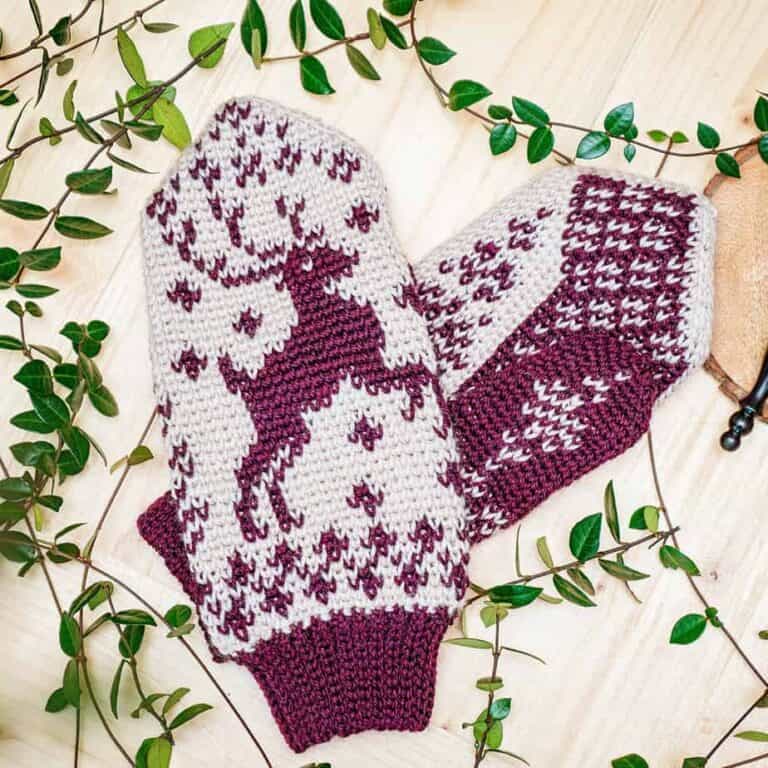
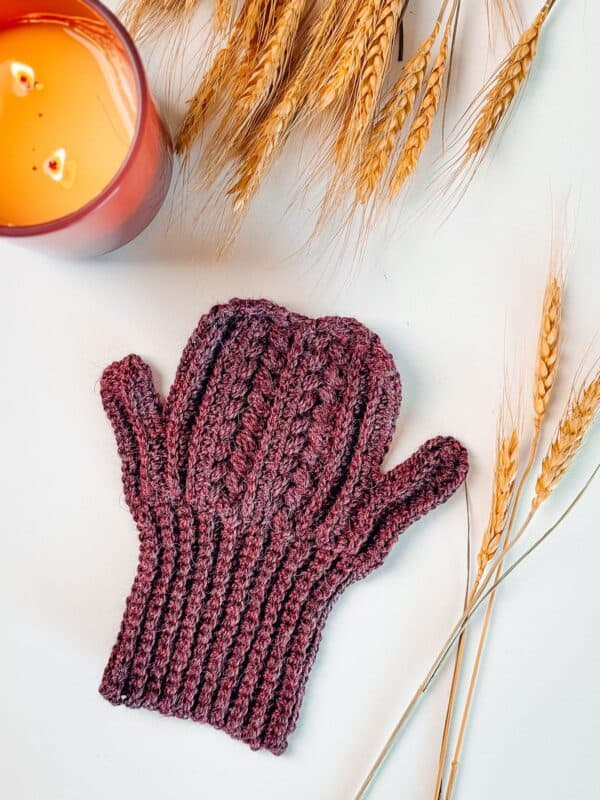
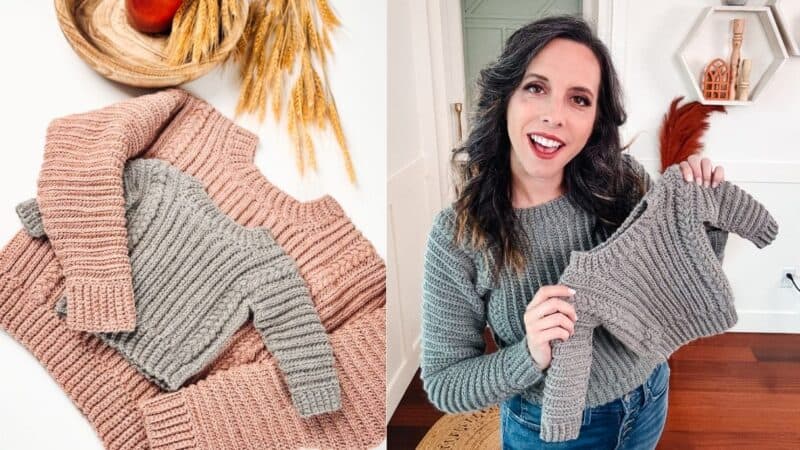
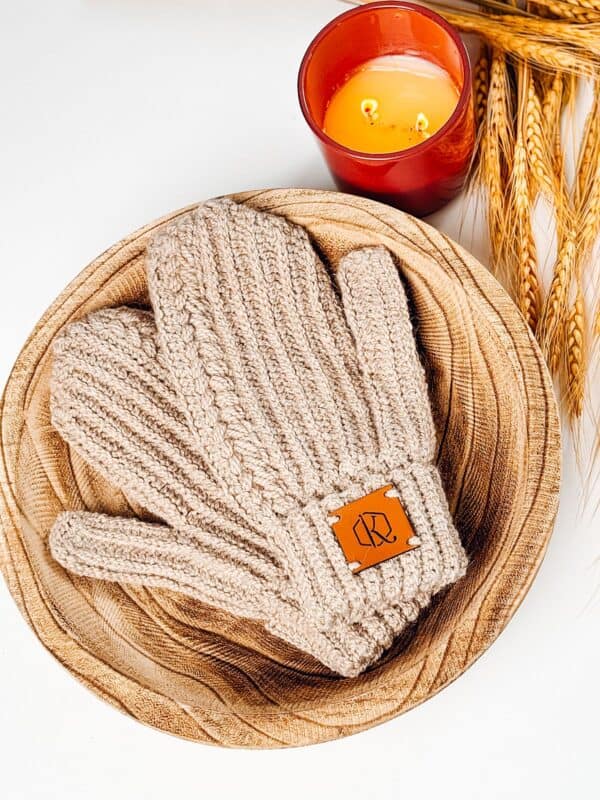
Get cozy and stylish with our Easy Crochet Mittens Pattern for Beginners! This pattern is perfect for those new to crochet, and we even have a helpful video tutorial to guide you every step of the way. These mittens are made in one piece and flat, making them a breeze to crochet. And with six sizes available, everyone can enjoy the warmth and comfort of these adorable mittens. Don’t miss out, start crocheting your own pair today! If you love the gorgeous texture of the puff stitches, then make sure to check out the Winter Wheat Flat Mittens – same flat style, more puffs!
How To Crochet Mittens Sideways
Believe it or not, these mittens are crocheted flat. These are certainly crochet mittens for beginners because we don’t have to work that tiny thumb hole in the round. It’s so much easy when you crochet the mittens from side to side and flat. These only have one quick seam which makes this easy mittens to crochet.

Disclosure: This post contains affiliate links. Please read my disclosure for more info.
What you’ll love about this easy crochet pattern for mittens.
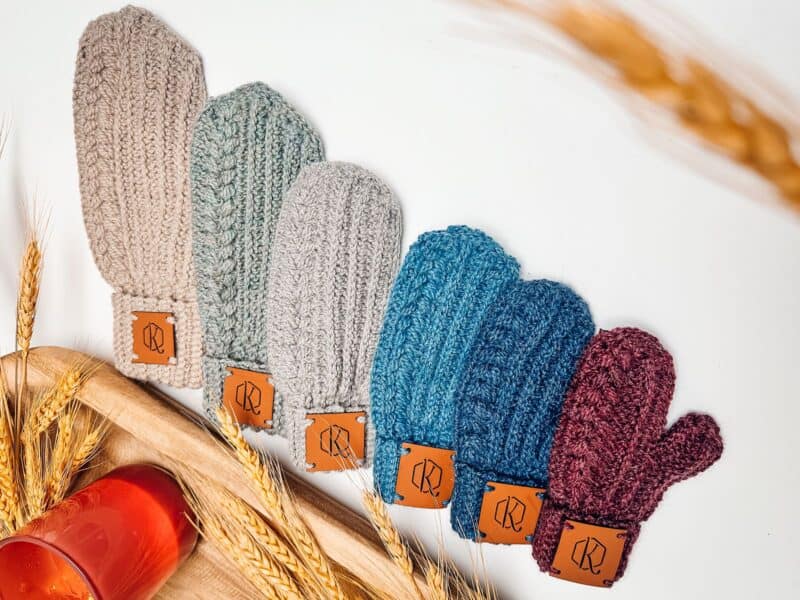
Autumn Wheat Mittens – Free Crochet Pattern
Save the Crochet Pattern on Ravelry
Pin this Free Crochet Mittens Pattern for Later.

How are the crocheted mittens constructed?
This is a thumb-to-thumb mitten crochet pattern made flat. This uses a unique construction from the sewing world, but we are going to create it from crochet. We will work sideways, starting with half the thumb, then work the body of the mitten, then the other half of the thumb. The piece will then be folded and seamed to create the final mitten.
Get the Autumn Wheat Pattern Collection
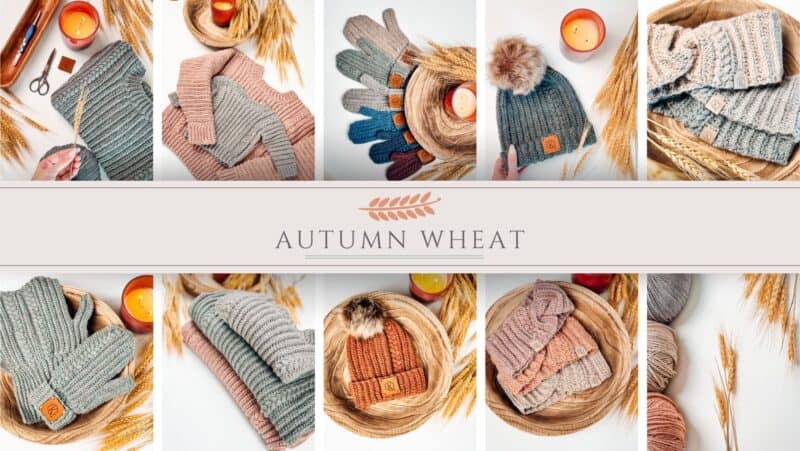
Join in on the crochet along happening now! Either view this pattern right here on the blog, or grab the individual pattern on Ravelry or Etsy. Or you can purchase the entire Autumn Wheat Collection.
What Crafty Crochet Supplies You Will Need For The Mittens
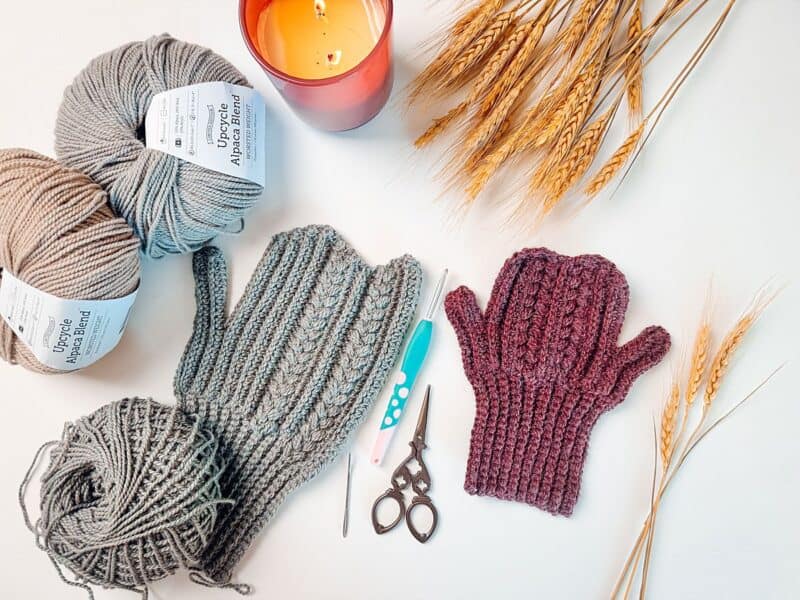
Yarn
WeCrochet Upcycle Worsted
Yarn Weight: Worsted Weight Yarn
33% Alpaca, 34% Wool, 33% Acrylic, 219yds/100g. Colorway Shown: Sage
Yarn Quantities
45 (55, 65) (80, 100, 140) yds
1 ball for all sizes
A Note On The Yarn & Substitutes
Please note, other weights can work as WeCrochet Upcycle varies per ball and tends to be on the thinner side, be sure to check gauge.
Yarn Substitutions
Heatherly Sport (shown in images) – 80% Acrylic, 20% Merino Wool, 328yds/100g
Brava Worsted – 100% Premium Acrylic, 218yds/100g
Mighty Stitch – 80% Acrylic/20% Superwash Wool, 208yds/100g
Swish DK – 100% Fine Superwash Merino Wool, 110yds/50g
Crochet Hook
Size G (4.0mm) Crochet Hook, or hook to obtain gauge.
Notions
Scissors
Yarn Needle
Removable Stitch Marker
Skill Level
Advanced Beginner
Sizing
Baby (Toddler, Preschool) (Child, Adult Small, Adult Large)
Actual measurements are in schematic in the paid version.
Height of mittens including the 3.25 (3.5, 3.5) (3.5, 4, 5) inch cuff is 7 (8, 9, 9.5) (10.5, 12.25) inches.
Abbreviations
ch – chain
blo – back loop only
flo – front loop only
hdc – half double crochet
hdc2tog -half double crochet two together
Puff sts – puff stitch
rem – remaining
RS – right side
sc – single crochet
sl st – slip stitch
st(s) – stitch(es)
WS – wrong side
Special Crochet Stitches
Half Double Crochet In The Third Loop: What’s really cool about half double crochet is that there’s a third loop on the back of your stitch. If you work hdc into the third loop, you get a totally different, knit-like fabric.
For this pattern, we are going to be working in rows, which means we will work on the row below in the third loop on the front of our work. Need a visual? Watch the video tutorial of this stitch.

Puff Stitch: Yarn over and insert your hook into the stitch/space. Yarn over again and pull up a long loop. (Yarn over and insert your hook into the same stitch/space. Yarn over again and pull up a long loop) two more times (7 loops on the hook). Yarn over and pull through the first 6 loops, yarn over and pull through remaining loops.
Gauge
17 sts and 11 rows = 4″ by 4″ in half double crochet worked in the third loop, blocked.
How to Crochet A Gauge Swatch
Working a gauge swatch will let you know if you will have the correct sizing for this pattern. A gauge swatch helps you practice the stitches used in this project and improve your stitch work for a flawless look.
Are you struggling to match gauge? Check out the blog post on What is Crochet Gauge and How To Fix It
Gauge Swatch Instructions:
Row 1: Ch 25, hdc in the 2nd ch from the hook and in the remaining across, turn.
Row 2: Ch 1 (does not count as a st), hdc in the third loop in each st across, turn. Repeat Row 2 until there are 16 rows. Measure your swatch and adjust as needed.
Notes for the Crochet Mittens Free Pattern
- The yarn suggested in this pattern can vary in thickness depending on the color. It’s very important to keep checking gauge to make sure the sizing is correct.
- A ch 1 at the beginning of a row is not counted as a stitch.
- Using a stitch marker at the beginning of each row is recommended.
- Work the first row of chains in the back humps.
- Hdc stitches at beginning and ends of rows are worked regularly.
- Foundation Half Double Crochet: Video Tutorial of the foundation half double crochet.
- Check out the Video Tutorial for the Easy Crochet Mittens.
- This Pattern Uses Standard US Terminology
Crochet Mittens Video Tutorial
Watch how how to crochet mittens with a tutorial.

Free Crochet Mittens Written Pattern
To Unlock Exclusive Subscriber Content click the Box below and join for free! Grow will pop up so you can subscribe to my Blog. Enter your email and create a password. Every time you see Exclusive Content on my Blog, log in to your account!

First Thumb Section of Crochet Mitten
Baby
Row 1: Ch 33, hdc in the 2nd ch from the hook and in the next 13 sts, sc 18, turn. | (32 sts)
Row 2: Ch 1 (turning ch does not count as a st throughout), blo sc 18, third loop hdc 13, 2 hdc in the last, turn. | (33 sts)
Rows 3: Ch 1, hdc2tog, third loop hdc 13, blo sc 18, turn. | (32 sts)
Toddler
Row 1: Ch 37, hdc in the 2nd ch from the hook and in the next 15 sts, sc 20, turn. | (36 sts)
Row 2: Ch 1 (turning ch does not count as a st throughout), blo sc 20, third loop hdc 15, 2 hdc in the last, turn. | (37 sts)
Row 3: Ch 1, hdc2tog, third loop hdc 15, blo sc 20, turn. | (36 sts)
Preschool
Row 1: Ch 41, hdc in the 2nd ch from the hook and in the next 19 sts, sc 20, turn. | (40 sts)
Row 2: Ch 1 (turning ch does not count as a st throughout), blo sc 20, third loop hdc 19, 2 hdc in the last, turn. | (41 sts)
Row 3: Ch 1, hdc2tog, third loop hdc 19, blo sc 20, turn. | (40 sts)
Child
Row 1: Ch 43, sc in the 2nd ch from the hook and in the next 19 sts, hdc 22, turn. | (42 sts)
Row 2: Ch 1 (turning ch does not count as a st throughout), 2 hdc in the first, third loop hdc 21, blo sc 20, turn. | (43 sts)
Row 3: Ch 1, blo sc 20, third loop hdc 23, turn. | (43 sts)
Row 4: Ch 1, hdc2tog, third loop hdc 21, blo sc 20, turn. | (42 sts)
Adult Small
Row 1: Ch 47, sc in the 2nd ch from the hook and in the next 21 sts, hdc 24, turn. | (46 sts)
Row 2: Ch 1 (turning ch does not count as a st throughout), 2 hdc in the first, third loop hdc 23, blo sc 22, turn. | (47 sts)
Row 3: Ch 1, blo sc 22, third loop hdc 25, turn. | (47 sts)
Row 4: Ch 1, hdc2tog, third loop hdc 23, blo sc 22, turn. | (46 sts)
Adult Large
Row 1: Ch 57, sc in the 2nd ch from the hook and in the next 27 sts, hdc 28, turn. | (56 sts)
Row 2: Ch 1 (turning ch does not count as a st throughout), 2 hdc in the first, third loop hdc 27, blo sc 28, turn. | (57 sts)
Row 3: Ch 1, blo sc 28, third loop hdc 29, turn. | (57 sts)
Row 4: Ch 1, hdc2tog, third loop hdc 27, blo sc 28, turn. | (56 sts)
Join The Kindest Community
Join our vibrant community of crafters on Facebook today. Whether you enjoy crafting with others or simply have burning questions, we’ve got you covered – join us now!

Quick Tip
Having a hard time keeping track of rows? A stitch marker will be your best friend for not missing any stitches.
Crochet Mitten Body Section
Row 1: Ch 1, blo sc 18, third loop hdc 7, leave the remaining sts unworked and foundation hdc 12, turn. | (37 sts)
Row 2: Ch 1, 2 hdc in the first, third loop hdc 18, blo sc 18, turn. | (38 sts)
Row 3: Ch 1, blo sc 18, third loop hdc 19, 2 hdc in the last, turn. | (39 sts)
Row 4: Ch 1, third loop hdc 21, blo sc 18, turn. | (39 sts)
Row 5: Ch 1, blo sc 18, [skip the next st, sc in next, work a puff st into the skipped st] work until the last 3 sts, hdc in next, hdc2tog, turn. | (38 sts)
Row 6: Ch 1, hdc2tog, [skip the next st, sc in next, work a puff st into the skipped st] work until the last 18 sts, blo sc 18, turn. | (37 sts)
Row 7: Ch 1, blo sc 18, hdc 17, hdc2tog, turn. | (36 sts)
Row 8: Ch 1, 2 hdc in the first, third loop hdc 18, blo sc 18, turn. | (37 sts)
Row 9: Ch 1, blo sc 18, [skip the next st, sc in next, work a puff st into the skipped st] work until the last st, 2 hdc in the last, turn. | (38 sts)
Row 10: Ch 1, 2 hdc in the first, hdc in next, [skip the next st, sc in next, work a puff st into the skipped st] work until the last 18 sts, blo sc 18, turn. | (39 sts)
Row 11: Ch 1, blo sc 18, hdc 21, turn. | (39 sts)
Row 12: Ch 1, hdc2tog, third loop hdc 19, blo sc 18, turn. | (38 sts)
Row 13: Ch 1, blo sc 18, third loop hdc 18, hdc2tog, turn. | (37 sts)
Row 14: Ch 1, hdc2tog, third loop hdc 17, blo sc 18, turn. | (36 sts)
Toddler
Row 1: Ch 1, blo sc 20, third loop hdc 8, leave the remaining sts unworked and foundation hdc 13, turn. | (41 sts)
Row 2: Ch 1, 2 hdc in the first, third loop hdc 20, blo sc 20, turn. | (42 sts)
Row 3: Ch 1, blo sc 20, third loop hdc 21, 2 hdc in the last, turn. | (43 sts)
Row 4: Ch 1, 2 hdc in the first, third loop hdc 22, blo sc 20, turn. | (44 sts)
Row 5: Ch 1, blo sc 20, third loop hdc 23, 2 hdc in the last, turn. | (45 sts)
Row 6: Ch 1, hdc2tog, third loop hdc 23, blo sc 20, turn. | (44 sts)
Row 7: Ch 1, blo sc 20, [skip the next st, sc in next, work a puff st into the skipped st] work until the last 3 sts, hdc in next, hdc2tog, turn. | (43 sts)
Row 8: Ch 1, hdc2tog, [skip the next st, sc in next, work a puff st into the skipped st] work until the last 20 sts, blo sc 20, turn. | (42 sts)
Row 9: Ch 1, blo sc 20, hdc 20, hdc2tog, turn. | (41 sts)
Row 10: Ch 1, third loop hdc 21, blo sc 20, turn. | (41 sts)
Row 11: Ch 1, blo sc 20, [skip the next st, sc in next, work a puff st into the skipped st] work until the last st, 2 hdc in the last, turn. | (42 sts)
Row 12: Ch 1, 2 hdc in the first, hdc in next, [skip the next st, sc in next, work a puff st into the skipped st] work until the last 20 sts, blo sc 20, turn. | (43 sts)
Row 13: Ch 1, blo sc 20, hdc 22, 2 hdc in the last, turn. | (44 sts)
Row 14: Ch 1, 2 hdc in the first, third loop hdc 23, blo sc 20, turn. | (45 sts)
Row 15: Ch 1, blo sc 20, third loop hdc 23, hdc2tog, turn. | (44 sts)
Row 16: Ch 1, hdc2tog, third loop hdc 22, blo sc 20, turn. | (43 sts)
Row 17: Ch 1, blo sc 20, third loop hdc 21, hdc2tog, turn. | (42 sts)
Row 18: Ch 1, hdc2tog, third loop hdc 20, blo sc 20, turn. | (41 sts)
Preschool
Row 1: Ch 1, blo sc 20, third loop hdc 10, leave the remaining sts unworked and foundation hdc 16, turn. | (46 sts)
Row 2: Ch 1, 2 hdc in the first, third loop hdc 25, blo sc 20, turn. | (47 sts)
Row 3: Ch 1, blo sc 20, third loop hdc 26, 2 hdc in the last, turn. | (48 sts)
Row 4: Ch 1, 2 hdc in the first, third loop hdc 27, blo sc 20, turn. | (49 sts)
Row 5: Ch 1, blo sc 20, third loop hdc 28, 2 hdc in the last, turn. | (50 sts)
Row 6: Ch 1, third loop hdc 30, blo sc 20, turn. | (50 sts)
Row 7: Ch 1, blo sc 20, [skip the next st, sc in next, work a puff st into the skipped st] work until the last 4 sts, hdc in next 2, hdc2tog, turn. | (49 sts)
Row 8: Ch 1, hdc2tog, hdc in next, [skip the next st, sc in next, work a puff st into the skipped st] work until the last 20 sts, blo sc 20, turn. | (48 sts)
Row 9: Ch 1, blo sc 20, hdc 26, hdc2tog, turn. | (47 sts)
Row 10: Ch 1, hdc2tog, third loop hdc 25, blo sc 20, turn. | (46 sts)
Row 11: Ch 1, blo sc 20, third loop hdc 26, turn. | (46 sts)
Row 12: Ch 1, 2 hdc in the first, third loop hdc 25, blo sc 20, turn. | (47 sts)
Row 13: Ch 1, blo sc 20, [skip the next st, sc in next, work a puff st into the skipped st] work until the last st, 2 hdc in the last, turn. | (48 sts)
Row 14: Ch 1, 2 hdc in first, hdc in next, [skip the next st, sc in next, work a puff st into the skipped st] work until the last 20 sts, blo sc 20, turn. | (49 sts)
Row 15: Ch 1, blo sc 20, hdc 28, 2 hdc in the last, turn. | (50 sts)
Row 16: Ch 1, third loop hdc 30, blo sc 20, turn. | (50 sts)
Row 17: Ch 1, blo sc 20, third loop hdc 28, hdc2tog, turn. | (49 sts)
Row 18: Ch 1, hdc2tog, third loop hdc 27, blo sc 20, turn. | (48 sts)
Row 19: Ch 1, blo sc 20, third loop hdc 26, hdc2tog, turn. | (47 sts)
Row 20: Ch 1, hdc2tog, third loop hdc 25, blo sc 20, turn. | (46 sts)
Child
Row 1: Ch 1, blo sc 20, third loop hdc 11, leave the remaining sts unworked and foundation hdc 17, turn. | (48 sts)
Row 2: Ch 1, 2 hdc in the first, third loop hdc 27, blo sc 20, turn. | (49 sts)
Row 3: Ch 1, blo sc 20, third loop hdc 28, 2 hdc in the last, turn. | (50 sts)
Row 4: Ch 1, 2 hdc in the first, third loop hdc 29, blo sc 20, turn. | (51 sts)
Row 5: Ch 1, blo sc 20, third loop hdc 30, 2 hdc in the last, turn. | (52 sts)
Row 6: Ch 1, 2 hdc in the first, third loop hdc 31, blo sc 20, turn. | (53 sts)
Row 7: Ch 1, blo sc 20, third loop hdc 31, hdc2tog, turn. | (52 sts)
Row 8: Ch 1, hdc2tog, [skip the next st, sc in next, work a puff st into the skipped st] work until the last 20 sts, blo sc 20, turn. | (51 sts)
Row 9: Ch 1, blo sc 20, [skip the next st, sc in next, work a puff st into the skipped st] work until the last 3 sts, hdc in next , hdc2tog, turn. | (50 sts)
Row 10: Ch 1, hdc2tog, hdc 28, blo sc 20, turn. | (49 sts)
Row 11: Ch 1, blo sc 20, third loop hdc 27, hdc2tog, turn. | (48 sts)
Row 12: Ch 1, third loop hdc 28, blo sc 20, turn. | (48 sts)
Row 13: Ch 1, blo sc 20, hdc 27, 2 hdc in the last, turn. | (49 sts)
Row 14: Ch 1, 2 hdc in the first, [skip the next st, sc in next, work a puff st into the skipped st] work until the last 20 sts, blo sc 20, turn. | (50 sts)
Row 15: Ch 1, blo sc 20, [skip the next st, sc in next, work a puff st into the skipped st] work until the last 2 sts, hdc in next, 2 hdc in the last, turn. | (51 sts)
Row 16: Ch 1, 2 hdc in the first, hdc 30, blo sc 20, turn. | (52 sts)
Row 17: Ch 1, blo sc 20, third loop hdc 31, 2 hdc in the last, turn. | (53 sts)
Row 18: Ch 1, hdc2tog, third loop hdc 31, blo sc 20, turn. | (52 sts)
Row 19: Ch 1, blo sc 20, third loop hdc 30, hdc2tog, turn. | (51 sts)
Row 20: Ch 1, hdc2tog, third loop hdc 29, blo sc 20, turn. | (50 sts)
Row 21: Ch 1, blo sc 20, third loop hdc 28, hdc2tog, turn. | (49 sts)
Row 22: Ch 1, hdc2tog, third loop hdc 27, blo sc 20, turn. | (48 sts)
Adult Small
Row 1: Ch 1, blo sc 22, third loop hdc 12, leave the remaining sts unworked and foundation hdc 18, turn. | (52 sts)
Row 2: Ch 1, 2 hdc in the first, third loop hdc 29, blo sc 22, turn. | (53 sts)
Row 3: Ch 1, blo sc 22, third loop hdc 30, 2 hdc in the last, turn. | (54 sts)
Row 4: Ch 1, 2 hdc in the first, third loop hdc 31, blo sc 22, turn. | (55 sts)
Row 5: Ch 1, blo sc 22, third loop hdc 32, 2 hdc in the last, turn. | (56 sts)
Row 6: Ch 1, 2 hdc in the first, third loop hdc 33, blo sc 22, turn. | (57 sts)
Row 7: Ch 1, blo sc 22, third loop hdc 34, 2 hdc in the last, turn. | (58 sts)
Row 8: Ch 1, hdc2tog, third loop hdc 34, blo sc 22, turn. | (57 sts)
Row 9: Ch 1, blo sc 22, third loop hdc 33, hdc2tog, turn. | (56 sts)
Row 10: Ch 1, hdc2tog, [skip the next st, sc in next, work a puff st into the skipped st] work until the last 22 sts, blo sc 22, turn. | (55 sts)
Row 11: Ch 1, blo sc 22, [skip the next st, sc in next, work a puff st into the skipped st] work until the last 3 sts, hdc in next, hdc2tog, turn. | (54 sts)
Row 12: Ch 1, hdc2tog, hdc 30, blo sc 22, turn. | (53 sts)
Row 13: Ch 1, blo sc 22, third loop hdc 29, hdc2tog, turn. | (52 sts)
Row 14: Ch 1, third loop hdc 30, blo sc 22, turn. | (52 sts)
Row 15: Ch 1, blo sc 22, third loop hdc 29, 2 hdc in the last, turn. | (53 sts)
Row 16: Ch 1, 2 hdc in the first, [skip the next st, sc in next, work a puff st into the skipped st] work until the last 22 sts, blo sc 22, turn. | (54 sts)
Row 17: Ch 1, blo sc 22, [skip the next st, sc in next, work a puff st into the skipped st] work until the last 2 sts, hdc in next, 2 hdc in the last, turn. | (55 sts)
Row 18: Ch 1, 2 hdc in the first, hdc 32, blo sc 22, turn. | (56 sts)
Row 19: Ch 1, blo sc 22, third loop hdc 33, 2 hdc in the last, turn. | (57 sts)
Row 20: Ch 1, 2 hdc in the first, third loop hdc 34, blo sc 22, turn. | (58 sts)
Row 21: Ch 1, blo sc 22, third loop hdc 34, hdc2tog, turn. | (57 sts)
Row 22: Ch 1, hdc2tog, third loop hdc 33, blo sc 22, turn. | (56 sts)
Row 23: Ch 1, blo sc 22, third loop hdc 32, hdc2tog, turn. | (55 sts)
Row 24: Ch 1, hdc2tog, third loop hdc 31, blo sc 22, turn. | (54 sts)
Row 25: Ch 1, blo sc 22, third loop hdc 30, hdc2tog, turn. | (53 sts)
Row 26: Ch 1, hdc2tog, third loop hdc 29, blo sc 22, turn. | (52 sts)
Adult Large
Row 1: Ch 1, blo sc 28, third loop hdc 14, leave the remaining sts unworked and foundation hdc 19, turn. | (61 sts)
Row 2: Ch 1, 2 hdc in the first, third loop hdc 32, blo sc 28, turn. | (62 sts)
Row 3: Ch 1, blo sc 28, third loop hdc 33, 2 hdc in the last, turn. | (63 sts)
Row 4: Ch 1, 2 hdc in the first, third loop hdc 34, blo sc 28, turn. | (64 sts)
Row 5: Ch 1, blo sc 28, third loop hdc 35, 2 hdc in the last, turn. | (65 sts)
Row 6: Ch 1, 2 hdc in the first, third loop hdc 36, blo sc 28, turn. | (66 sts)
Row 7: Ch 1, blo sc 28, third loop hdc 37, 2 hdc in the last, turn. | (67 sts)
Row 8: Ch 1, 2 hdc in the first, third loop hdc 38, blo sc 28, turn. | (68 sts)
Row 9: Ch 1, blo sc 28, third loop hdc 38, hdc2tog, turn. | (67 sts)
Row 10: Ch 1, hdc2tog, third loop hdc 37, blo sc 28 turn. | (66 sts)
Row 11: Ch 1, blo sc 28, [skip the next st, sc in next, work a puff st into the skipped st] work until the last 2 sts, hdc2tog, turn. | (65 sts)
Row 12: Ch 1, hdc2tog, hdc in next, [skip the next st, sc in next, work a puff st into the skipped st] work until the last 28 sts, blo sc 28, turn. | (64 sts)
Row 13: Ch 1, blo sc 28, hdc 34, hdc2tog, turn. | (63 sts)
Row 14: Ch 1, hdc2tog, third loop hdc 33, blo sc 28 turn. | (62 sts)
Row 15: Ch 1, blo sc 28, third loop hdc 34, turn. | (62 sts)
Row 16: Ch 1, 2 hdc in the first, third loop hdc 33, blo sc 28 turn. | (63 sts)
Rows 17: Ch 1, blo sc 28, [skip the next st, sc in next, work a puff st into the skipped st] work until the last st, 2 hdc in the last, turn. | (64 sts)
Row 18: Ch 1, 2 hdc in first, hdc in next, [skip the next st, sc in next, work a puff st into the skipped st] work until the last 28 sts, blo sc 28, turn. | (65 sts)
Row 19: Ch 1, blo sc 28, hdc 36, 2 hdc sts in the last, turn. | (66 sts)
Row 20: Ch 1, 2 hdc in the first, third loop hdc 37, blo sc 28 turn. | (67 sts)
Row 21: Ch 1, blo sc 28, third loop hdc 38, 2 hdc in the last, turn. | (68 sts)
Row 22: Ch 1, hdc2tog, third loop hdc 38, blo sc 28, turn. | (67 sts)
Row 23: Ch 1, blo sc 28, third loop hdc 37, hdc in the last, turn. | (66 sts)
Row 24: Ch 1, hdc2tog, third loop hdc 36, blo sc 28 turn. | (65 sts)
Row 25: Ch 1, blo sc 28, third loop hdc 35, hdc2tog, turn. | (64 sts)
Row 26: Ch 1, hdc2tog, third loop hdc 34, blo sc 28 turn. | (63 sts)
Row 27: Ch 1, blo sc 28, third loop hdc 33, hdc2tog, turn. | (62 sts)
Row 28: Ch 1, hdc2tog, hdc 32, blo sc 28 turn. | (61 sts)
Second Thumb Section
Baby
Row 1: Ch 1, blo sc 18, third loop hdc 7, leave the remaining sts unworked and foundation hdc 7, turn. | (32 sts)
Row 2: Ch 1, 2 hdc in the first, third loop hdc 13, blo sc 18, turn. | (33 sts)
Row 3: Ch 1, blo sc 18, third loop hdc 13, hdc2tog; fasten off and weave in end. | (32 sts)
Toddler
Row 1: Ch 1, blo sc 20, third loop hdc 8, leave the remaining sts unworked and foundation hdc 8, turn. | (36 sts)
Row 2: Ch 1, 2 hdc in the first, third loop hdc 15, blo sc 20, turn. | (37 sts)
Row 3: Ch 1, blo sc 20, third loop hdc 15, hdc2tog; fasten off and weave in end. | (36 sts)
Preschool
Row 1: Ch 1, blo sc 20, third loop hdc 10, leave the remaining sts unworked and foundation hdc 10, turn. | (40 sts)
Row 2: Ch 1, 2 hdc in the first, third loop hdc 19, blo sc 20, turn. | (41 sts)
Row 3: Ch 1, blo sc 20, third loop hdc 19, hdc2tog; fasten off and weave in end. | (40 sts)
Child
Row 1: Ch 1, blo sc 20, third loop hdc 11, leave the remaining sts unworked and foundation hdc 11, turn. | (42 sts)
Row 2: Ch 1, 2 hdc in the first, third loop hdc 21, blo sc 20, turn. | (43 sts)
Row 3: Ch 1, blo sc 20, third loop hdc 23, turn. | (43 sts)
Row 4: Ch 1, hdc2tog, third loop hdc 21, blo sc 20; do not fasten off, go to finishing. | (42 sts)
Adult Small
Row 1: Ch 1, blo sc 22, third loop hdc 12, leave the remaining sts unworked and foundation hdc 12, turn. | (46 sts)
Row 2: Ch 1, 2 hdc in the first, third loop hdc 23, blo sc 22, turn. | (47 sts)
Row 3: Ch 1, blo sc 22, third loop hdc 25, turn. | (47 sts)
Row 4: Ch 1, hdc2tog, third loop hdc 23, blo sc 22; do not fasten off, go to finishing. | (46 sts)
Adult Large
Row 1: Ch 1, blo sc 28, third loop hdc 14, leave the remaining sts unworked and foundation hdc 14, turn. | (56 sts)
Row 2: Ch 1, 2 hdc in first, third loop hdc 27, blo sc 28, turn. | (57 sts)
Row 3: Ch 1, blo sc 28, third loop hdc 29, turn. | (57 sts)
Row 4: Ch 1, hdc2tog, third loop hdc 27, blo sc 28; do not fasten off, go to finishing. | (56 sts)

Finishing the Easy Crochet Mitten Pattern
Fold the mitten in half to prepare for seaming. The desired side should be facing out, make sure
you have the same side facing out for the second mitten.
For the smaller sizes, attach yarn to the bottom cuff edge.
Insert your hook through the flo of the first stitch closest to you, and then in the blo of the side farthest from you. Yarn over and sl st to join. Work up the side of the mitten, around the thumb, then up the side of the fingers and across the top. Keep your sl sts as even as possible.
Fasten off and weave in all ends. Enjoy cozy hands all season long.
How To Care For Your Crochet Mittens
Caring for your handmade crochet wool mittens is easy. Here are a few tips to keep them looking and feeling great:
1. Hand wash only – Wool is an incredibly delicate material and should not be machine-washed or put in the dryer, as this can cause it to shrink or become misshapen. It’s best to hand wash your mittens with a mild wool wash and lukewarm water.
2. Dry flat – Lay your mittens flat on a clean towel, preferably in the sun or near an open window to help them dry faster without stretching out of shape.
3. Handle gently – When putting them on or taking them off, try not to stretch the fabric too much. This can cause the wool to lose its shape or become misshapen.
4. Store properly – When not in use, store your mittens in a cool, dry place away from direct sunlight. If possible, keep them flat so that they don’t get crumpled up.
Following these tips will help ensure that your handmade crochet wool mittens last for years to come. Enjoy your new mittens! 🙂
Well, That Was Fun! What’s Next?