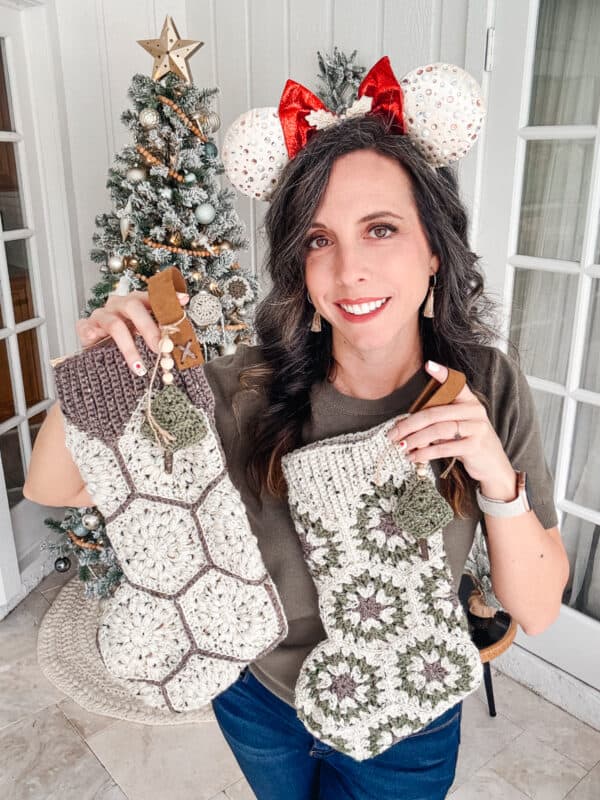
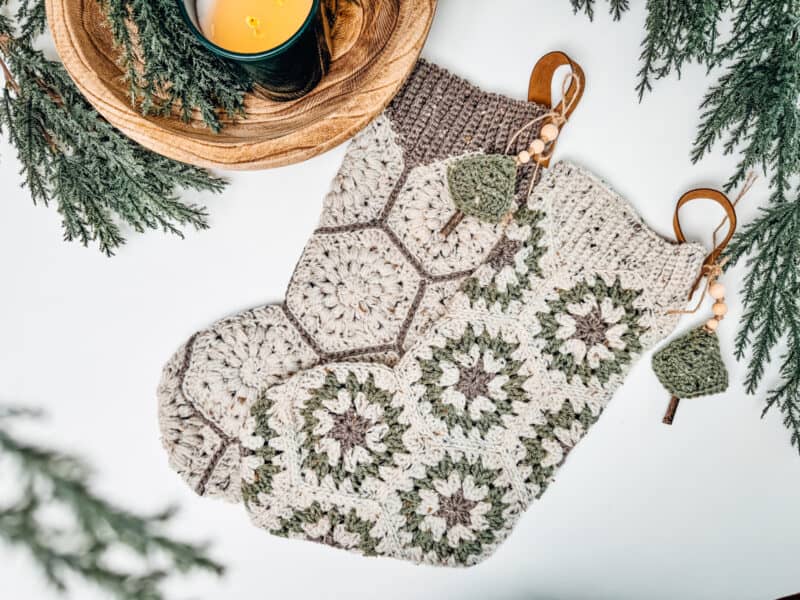
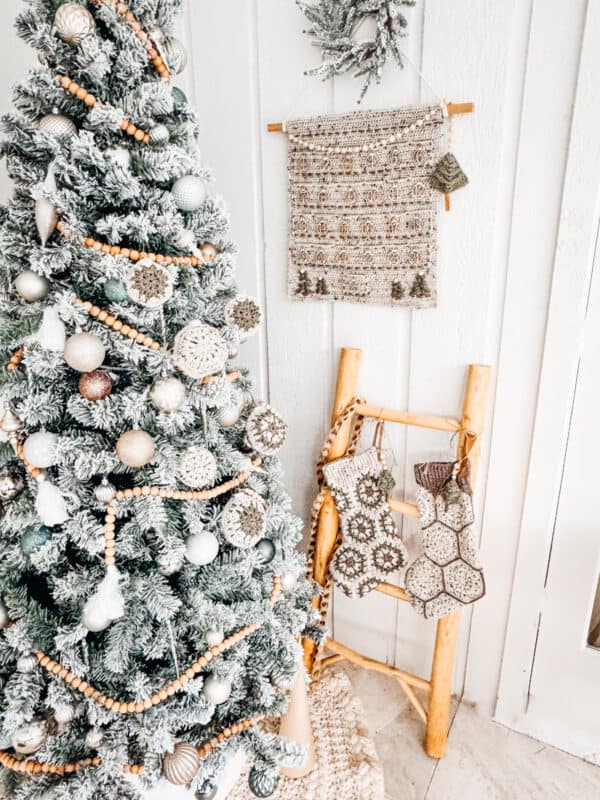
The holidays are around the corner, and it’s the perfect time to start decorating your home. One of the best ways to add cozy, warm vibes to your home is with some handmade crochet stockings. The Granny Hexagon Stockings not only look adorable but also make for a personal touch.
Disclosure: This post contains affiliate links. Please read my disclosure for more info.
So why not go the extra mile this year and create a unique stocking using our free crochet granny hexagon stocking pattern? This pattern is perfect for beginners and advanced crocheters. We have included two options for granny hexagons and a video tutorial to make it easy for you. Excited to get started? Let’s dive into how to make your stocking. And if you love granny squares, you might also like crocheting the Granny Square Snowflake Blanket or add the Macchiato Wreath Tree Skirt Free Crochet Pattern to your holiday decor.
Want to add some extra pizzazz? Try attaching bows, sequins, or tassels for a personal touch. Our step-by-step video tutorial will guide you along the way, and we hope our pattern sparks your imagination to create something truly special. Once you’ve finished, proudly hang your creation, fill it with treats, and bask in the cozy holiday vibes it brings to your home. Get ready to crochet your way to a festive and joyful season!
What you’ll love about the Christmas Crochet Pattern.

How many granny hexagons are used to make the crochet stocking?
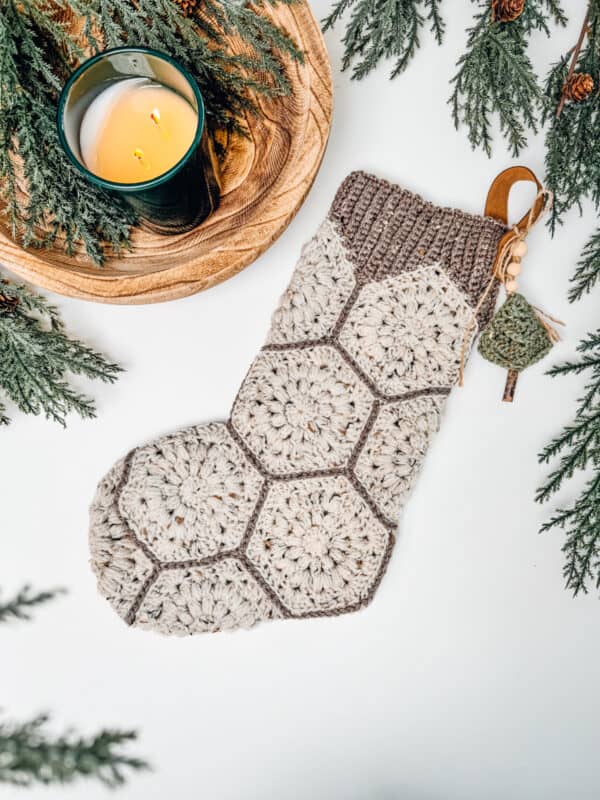
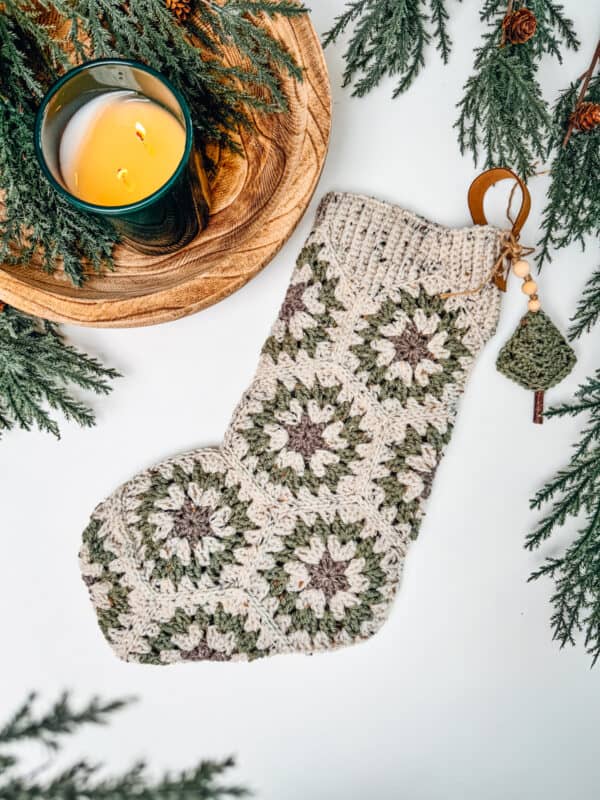
Only 12! This stocking has a unique construction that only uses 12 granny hexagons. And we don’t need to make any half hexagons either, this is super simple. By using a never-before-seen join as you go ribbing that zig-zags, we can create a nice finish for the top.
There are two choices of granny hexagons for this festive stocking. We’ll join 12 motifs with a flat slip stitch and add a special ribbing at the top. Then, we’ll top it off with a leather hanging strap and a Christmas tree ornament for extra charm.

Hexagon Granny Stocking – Free Crochet Pattern
Save the Crochet Pattern on Ravelry
Pin this Free Crochet Stocking Pattern for Later.
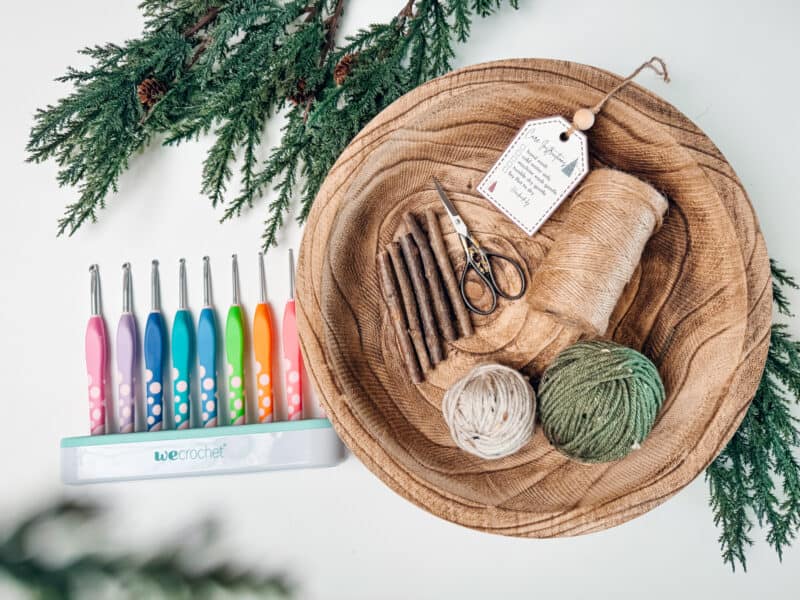
Supplies for the Granny Hexagon Stocking
Yarn
Brava Tweed Worsted
97% Premium Acrylic, 3% Viscose, 218yds/100g. Weight: 4 Worsted
Colorways Shown: Wren, Wasabi, & Mink
Yarn Quantities
Traditional Granny Stocking: 300 total yards (one skein each color)
Puff Granny Stocking: 325 total yards (2 skeins Wren, 1 skein Mink)
Get Creative With Yarn Colors
This pattern is fun to do with your own home decor color themes. Feel free to mix up the yarns to be from traditional to pinks and purples.
If you love these colors, you might love the Granny All The Way Stocking Collection. It uses the fun and easy granny stitches with 7 color pattern options.
Yarn Substitutions
Brava Worsted – 100% Premium Acrylic, 218yds/100g
Mary Maxim Maximum Value Yarn – 100% Acrylic, 474yds/8oz
Red Heart Super Saver – 100% Acrylic, 364yds/7oz
Crochet Hook
Size H (5.0mm) Crochet Hook, or hook to obtain gauge.
Notions
Scissors
Yarn Needle
Removable Stitch Marker
Wood Blocking Board
Cinnamon Stick (or regular stick)
Wooden Beads
Skill Level
Intermediate
Sizing
16” From the cuff to toe; 6.5 inches across.
Abbreviations
blo – back loop only
ch – chain
dc – double crochet
hdc – half double crochet
Ps – puff stitch
rnd- round
Stsc – stacked single crochet stitch
Gauge
After blocking, your granny hexagon should measure 5 inches across from the longest point. Where this is not a fitted item, gauge is not as critical.
How to Crochet A Gauge Swatch
I recommend creating one granny hexagon and then blocking to dimensions. See how you like it, make adjustments if needed, then continue to pattern.
Are you struggling to match gauge? Check out the blog post on What is Crochet Gauge and How To Fix It
Special Crochet Stitches
Puff Stitch: Yarn over and insert your hook into the stitch/space. Yarn over again and pull up a long loop. (Yarn over and insert your hook into the same stitch/space. Yarn over again and pull up a long loop) two more times (7 loops on the hook). Yarn over and pull through the first 6 loops, yarn over and pull through remaining loops.
Stacked Single Crochet (Stsc): Do NOT chain, insert hook into next stitch, yo, pull up a loop, yo and pull through both loops, insert hook in the vertical bar below, yo, pull up a loop, yo and pull through both loop on hook.
Stacked Single Puff (Stsc Ps): Insert the hook into the next stitch, yo, pull up a loop, yo and pull through both loops, insert hook in the vertical bar below, yo, pull up a loop (2 loops on the hook), Yo again, insert the hook into the same stitch and pull up a loop (4 loops on the hook), Yo again, insert the hook into the same stitch and pull up a loop (6 loops on the hook), Yarn over and pull through the first 5 loops, yarn over and pull through remaining loops.
Magic Circle (MC): Start by creating a loop with your yarn. The tail of the working yarn will be over the working end. Insert your hook into the loop from behind. Yarn over and pull through the loop. Work the stitches as instructed into the loop.
Notes for the Christmas Crochet Stocking
- Chains at the beginning of the rounds for the puff hexagon are substituted with a Stsc, use a stitch marker to keep track of the first stitch of the round is recommended.
- The Ch 1 at the beginning of the row for the Tree Ornament does not count as a stitch.
- Before you dive into your project, take a moment to identify the stitches and read through the pattern. Trust me, this small step will make a big difference in your crochet journey!
All the festive makes.
Check Out The Set
If you love the look, check out the matching free patterns!
Stocking Video Tutorial
Want to see this pattern in action? Visuals are always a great way to follow along with the pattern.

How To Crochet A Christmas Stocking

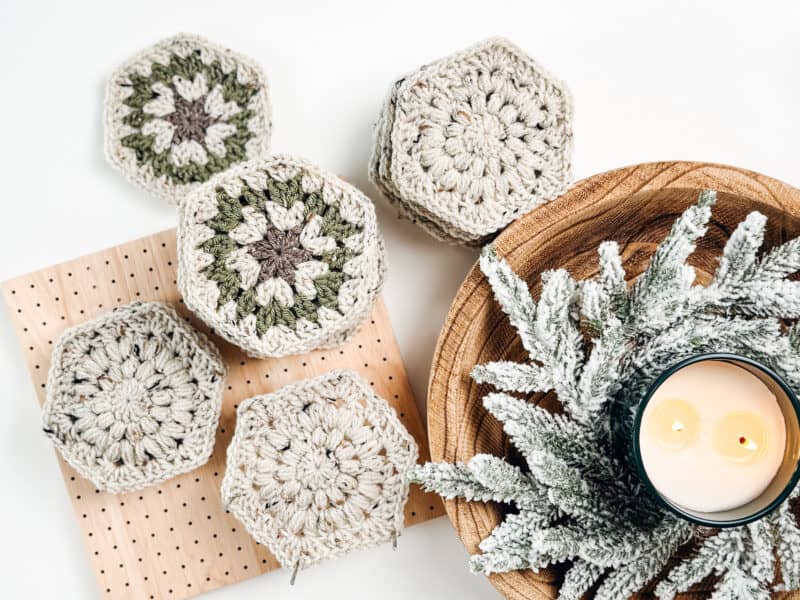
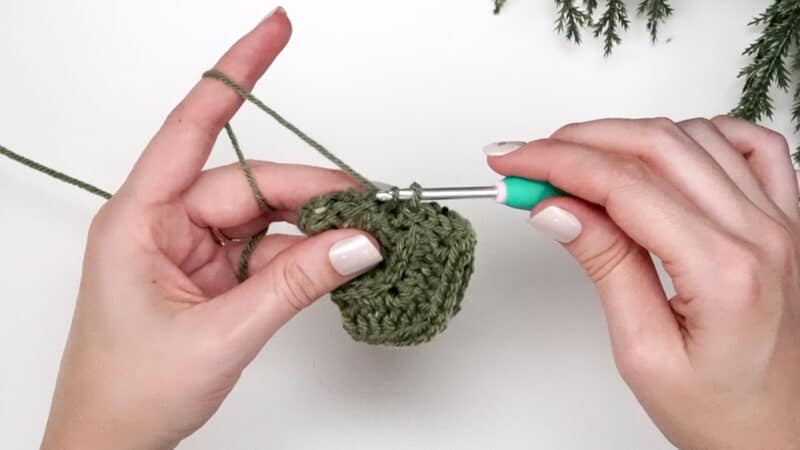
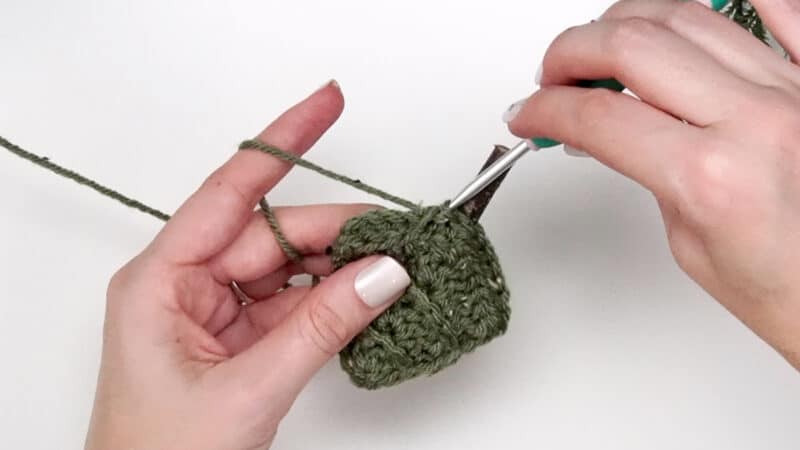
Puff Granny Crochet Hexagon
Rnd 1: Inside Magic Circle: Ch 1 (does not count as a stitch), Stsc, dc 11, do not join. | 12 sts
Rnd 2: Working into the first stitch without joining, Stsc Ps, ch 1, *Ps in next, ch 1; repeat from * around, sl st to the top of the Stsc Ps to join. | 12 Ps sts and 12 ch sts
Rnd 3: Sl st to the next ch 1-space, (Stsc Ps, ch 1, Ps) in same ch 1-space, *in the next ch 1-space (Ps, ch 1, Ps); repeat from * around, sl st to first Stsc Ps to join. | 24 Ps sts and 12 ch sts
Rnd 4: In the first ch 1-space (Stsc 1, 2 dc, ch 1, 3 dc), *in the next ch 1-space dc 3, in the next ch 1-space (dc 3, ch 1, dc 3); repeat from * until the last ch 1-space, dc 3 in last ch 1- space, either sl st to join and fasten off or fasten off yarn and create a sl st join. | 54 dc sts and 6 ch sts
Make 12 Hexagons. You can mix up the colors as you like.
Traditional Granny Crochet Hexagon
Color Inspiration
Want an easy way to plot your colors? I’ve created a printable color planner for you on the next page. Simply print, punch out the holes, and tie yarn to see how they go together. In the ad-free pattern on Etsy this includes a printable Color Inspiration Card where you can plan your yarn and plot the stocking color combinations.

Rnd 1: Inside Magic Circle: Ch 1 (does not count as a stitch), Stsc 1, dc 1, [ch 1, dc 2] 5 times, ch 1, sl st to top of the Stsc to join. | 12 sts and 6 chains
Rnd 2: Sl st to the next ch 1-space (change colors on the second sl st if desired), working into the ch 1-space from the previous rnd (Stsc 1, dc 1, ch 1, dc 2, ch 1), in the next ch space dc 2, ch 1, *in the next ch space (dc 2, ch 1, dc 2, ch 1), in the next ch space dc 2, ch
1; repeat from * around, sl st to the top of the Stsc to join. | 24 sts and 12 ch sts
Rnd 3: Sl st to the next ch 1-space, working into the ch 1-space from the previous rnd (Stsc 1, dc 1, ch 1, dc 2, ch 1), *in the next ch space (dc 2, ch 1, dc 2, ch 1), in the next ch space dc 2, ch 1; repeat from * around, sl st to the top of the Stsc to join. | 36 sts and 18 ch sts
Rnd 4: Sl st to the next ch 1-space, working into the ch 1-space from the previous rnd (Stsc 1, dc 1, ch 1, dc 2, ch 1), *in the next ch space (dc 2, ch 1, dc 2, ch 1), [in the next ch space dc 2, ch 1] twice; repeat from * around, sl st to the top of the Stsc to join. | 48 sts and 24 ch sts
Make 12 Hexagons. You can mix up the colors as you like.
Quick Tip
Blocking the hexagons by using either a blocking board or a mat and pins will make the process of joining easier. Plus, your project will look sharp and professional.
Click the box below to unlock this exclusive subscriber content for free. Add your email and create a password. If you are having trouble, reset your password or log in to the Grow Portal.
I’m thrilled to share this amazing crochet pattern with you! Please don’t copy, paste, or distribute this pattern. Prefer an ad-free experience? Purchase a digital PDF file for a small fee from one of my online stores. I appreciate your support and readership. You are why I can keep doing what I love and sharing it with others. Thank you from the bottom of my heart.
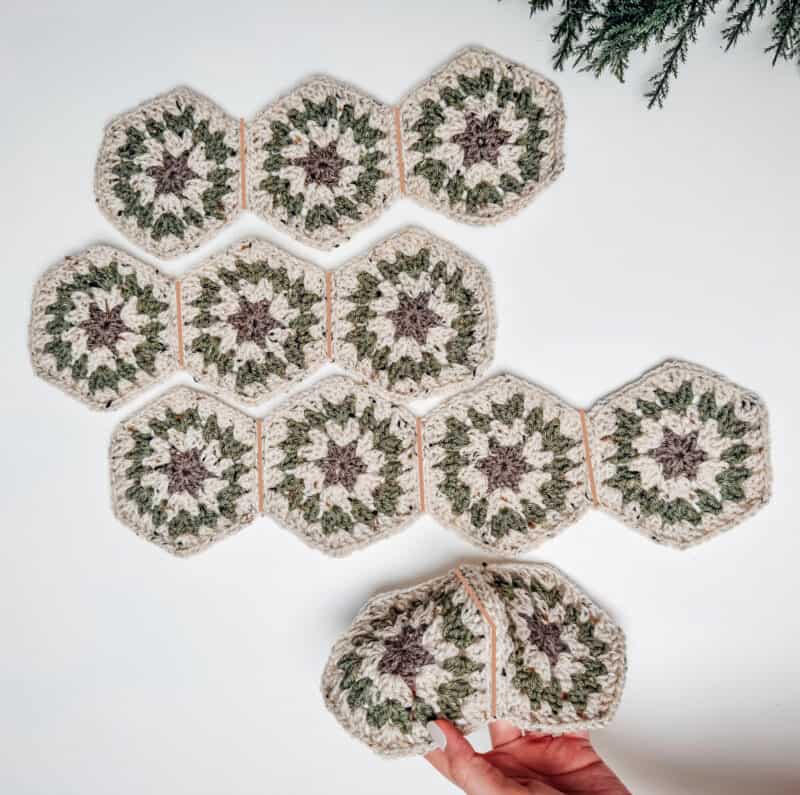
Joining the Hexagons
When it comes to joining the hexagons, you can use your preferred method. One of my favorites is the flat sl st, and I show this process in the video tutorial.
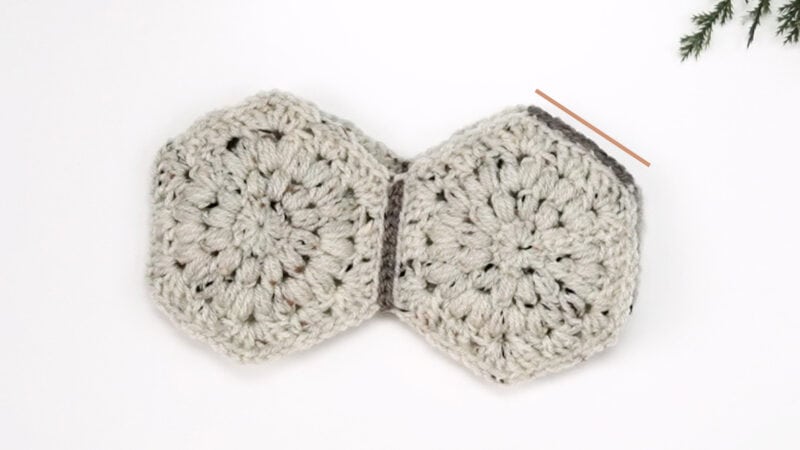
Lay out the hexagons and join together in rows, as seen in the photo below.
Seam the vertical sides of each hexagon together, as shown below by the orange lines.
The last two hexagons at the bottom of the image are seamed together on two sides.
Next we will take the two sets of 3 hexagons and join the vertical sides to make a tube.
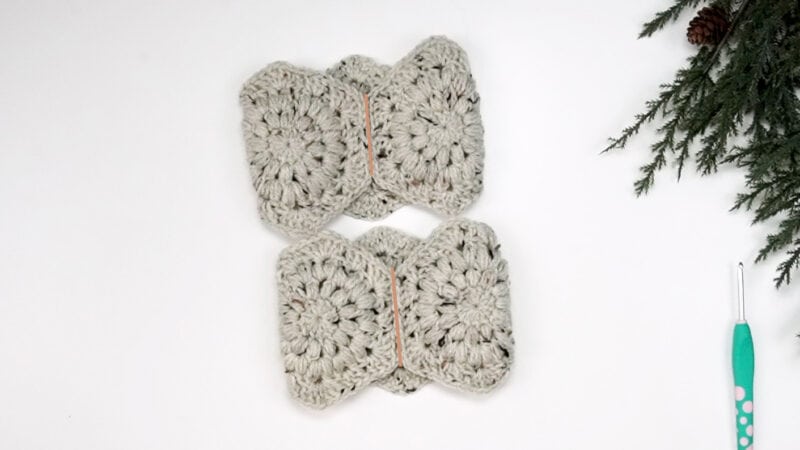
Then we will join these two tube pieces together. This will create the top leg of the stocking.
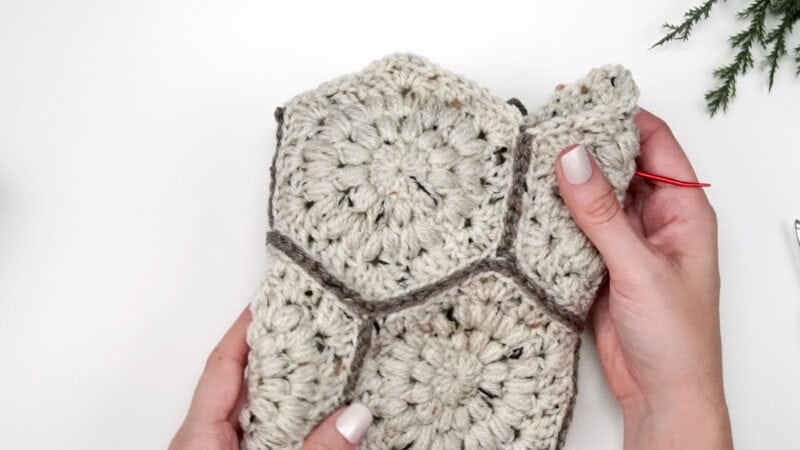
Now take the set of 4 hexagons and fold together to create a tube. Seam the sides together as indicated below:
Now seam the top tube to the narrower opening of the 4 hexagon tube.
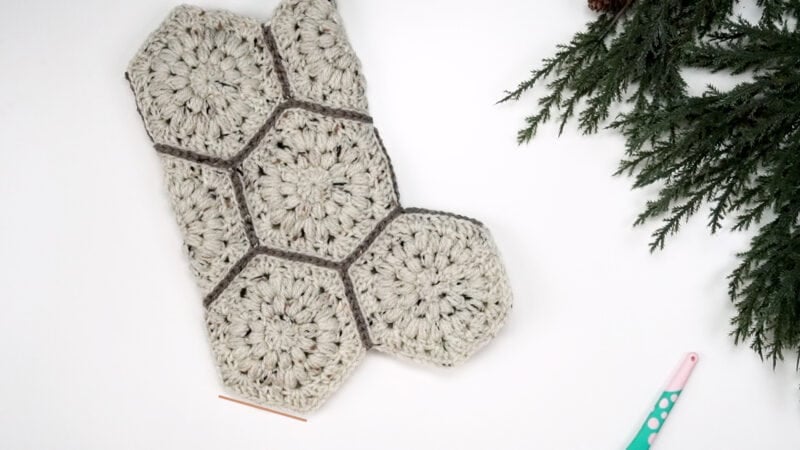
To create the heel, seam two edges together as shown above with the orange line.
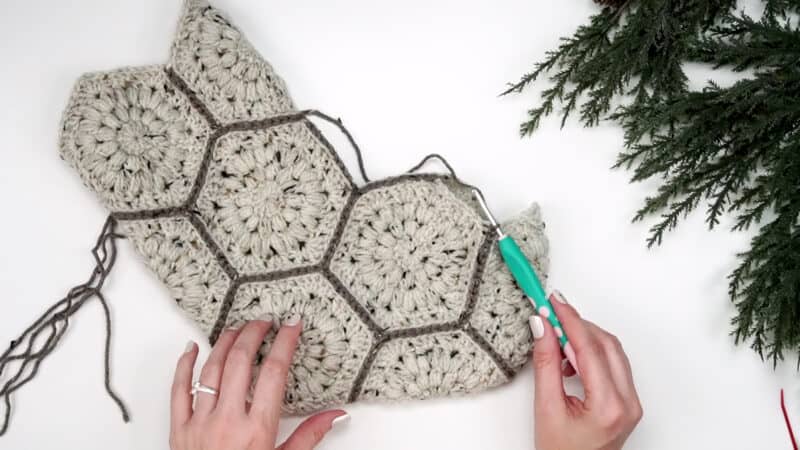
Last we will seam the set of 2 hexagons into the bottom opening, matching up each edge.

Ribbing for Puff Hexagon
Attach your preferred color of yarn at the lower point between two hexagons on the heel side and Ch 18.
Row 1: Sc in the 2nd ch from the hook and across, sl st the next 2 sts from the top edge of the stocking, turn. | 17 sts
Row 2: Skip the two sl sts and 2 sc sts, blo sc 15, turn. | 15 sts
Row 3: Ch 1 (does not count as a st here or throughout) blo sc 15, sl st the next 2 sts from the top edge of the stocking, turn. | 15 sts
Row 4: Skip the two sl sts and 2 sc sts, blo sc 13, turn. | 13 sts
Row 5: Ch 1, blo sc 13, sl st the next 2 sts from the top edge of the stocking, turn. | 13 sts
Row 6: Skip the two sl sts and 2 sc sts, blo sc 11, turn. | 11 sts
Row 7: Ch 1, blo sc 11, sl st the next 2 sts from the top edge of the stocking, turn. | 11 sts
Row 8: Skip the two sl sts and 2 sc sts, blo sc 9, turn. | 9 sts
Row 9: Ch 1, blo sc 9, sl st the next 2 sts from the top edge of the stocking, turn. | 9 sts
Row 10: Skip the two sl sts and 2 sc sts, blo sc 7, turn. | 7 sts
Row 11: Ch 1, blo sc 7, sl st the next 2 sts from the top edge of the stocking, turn. | 7 sts
Row 12: Ch 1, blo sc in the two sl sts and in the remaining sts across, turn. | 9 sts
Row 13: Ch 1, blo sc 9, sl st the next 2 sts from the top edge of the stocking, turn. | 9 sts
Row 14: Ch 1, blo sc in the two sl sts and in the remaining sts across, turn. | 11 sts
Row 15: Ch 1, blo sc 11, sl st the next 2 sts from the top edge of the stocking, turn. | 11 sts
Row 16: Ch 1, blo sc in the two sl sts and in the remaining sts across, turn. | 13 sts
Row 17: Ch 1, blo sc 13, sl st the next 2 sts from the top edge of the stocking, turn. | 13 sts
Row 18: Ch 1, blo sc in the two sl sts and in the remaining sts across, turn. | 15 sts
Row 19: Ch 1, blo sc 15, sl st the next 2 sts from the top edge of the stocking, turn. | 15 sts
Row 20: Ch 1, blo sc in the two sl sts and in the remaining sts across, turn. | 17 sts
Row 21: Ch 1, blo sc 17, sl st the next 2 sts from the top edge of the stocking, turn. | 17 sts
Repeat Rows 2-17, then repeat Rows 2-16.
Join last row to beginning row by slip stitching through blo of first and last row at the same time, or use a yarn needle and yarn to seam.
Join The Kindest Community
Join our vibrant community of crafters on Facebook today. Whether you enjoy crafting with others or simply have burning questions, we’ve got you covered – join us now!

Ribbing for Traditional Hexagon
Attach your preferred color of yarn at the lower point between two hexagons on the heel side and Ch 18.
Row 1: Sc in the 2nd ch from the hook and across, sl st the next 2 sts from the top edge of the stocking, turn. | 17 sts
Row 2: Skip the two sl sts and 2 sc sts, blo sc 15, turn. | 15 sts
Row 3: Ch 1 (does not count as a st here or throughout) blo sc 15, sl st the next 2 sts from the top edge of the stocking, turn. | 15 sts
Row 4: Skip the two sl sts and 2 sc sts, blo sc 13, turn. | 13 sts
Row 5: Ch 1, blo sc 13, sl st the next 2 sts from the top edge of the stocking, turn. | 13 sts
Row 6: Skip the two sl sts and 2 sc sts, blo sc 11, turn. | 11 sts
Row 7: Ch 1, blo sc 11, sl st the next 2 sts from the top edge of the stocking, turn. | 11 sts
Row 8: Skip the two sl sts and 2 sc sts, blo sc 9, turn. | 9 sts
Row 9: Ch 1, blo sc 9, sl st the next 2 sts from the top edge of the stocking, turn. | 9 sts
Row 10: Skip the two sl sts and 2 sc sts, blo sc 7, turn. | 7 sts
Row 11: Ch 1, blo sc 7, sl st the next 2 sts from the top edge of the stocking, turn. | 7 sts
Row 12: Skip the two sl sts and 2 sc sts, blo sc 5, turn. | 5 sts
Row 13: Ch 1, blo sc 5, sl st the next 2 sts from the top edge of the stocking, turn. | 5 sts
Row 14: Ch 1, blo sc in the two sl sts and in the remaining sts across, turn. | 7 sts
Row 15: Ch 1, blo sc 7, sl st the next 2 sts from the top edge of the stocking, turn. | 7 sts
Row 16: Ch 1, blo sc in the two sl sts and in the remaining sts across, turn. | 9 sts
Row 17: Ch 1, blo sc 9, sl st the next 2 sts from the top edge of the stocking, turn. | 9 sts
Row 18: Ch 1, blo sc in the two sl sts and in the remaining sts across, turn. | 11 sts
Row 19: Ch 1, blo sc 11, sl st the next 2 sts from the top edge of the stocking, turn. | 11 sts
Row 20: Ch 1, blo sc in the two sl sts and in the remaining sts across, turn. | 13 sts
Row 21: Ch 1, blo sc 13, sl st the next 2 sts from the top edge of the stocking, turn. | 13 sts
Row 22: Ch 1, blo sc in the two sl sts and in the remaining sts across, turn. | 15 sts
Row 23: Ch 1, blo sc 15, sl st the next 2 sts from the top edge of the stocking, turn. | 15 sts
Row 24: Ch 1, blo sc in the two sl sts and in the remaining sts across, turn. | 17 sts
Row 25: Ch 1, blo sc 17, sl st the next 2 sts from the top edge of the stocking, turn. | 17 sts
Repeat Rows 2-25, then repeat Rows 2-24.
Join last row to beginning row by slip stitching through blo of first and last row at the same time, or use a yarn needle and yarn to seam.
Tab to Hang the Stocking
Use a strip of leather and a leather punch to create a strap and stitch to the top of the stocking (see video). Or create a crochet i-cord: https://brianakdesigns.com/how-to-crochet-an-i-cord/
Tree Ornament (make 2)
Row 1: Inside MC ch 1, Stsc, hdc 2, pull ring closed, do not join, turn. | 3 sts
Row 2: Third loop Stsc 1, third loop hdc 3 in next st, hdc 1, turn. | 5 sts
Row 3: Third loop Stsc 1, third loop hdc 1, third loop hdc 3 in next st, third loop hdc 2, turn. | 7 sts
Row 4: Third loop Stsc 1, third loop hdc 2, third loop hdc 3 in next st, third loop hdc 3, turn. | 9 sts
Row 5: Third loop Stsc 1, third loop hdc 3, third loop hdc 3 in next st, third loop hdc 4, turn. | 11 sts
Row 6: Third loop Stsc 1, third loop hdc 4, third loop hdc 3 in next st, third loop hdc 5, turn. | 13 sts
Fasten off and weave in ends for the first tree.
Repeat all the steps again for a second tree, but do not fasten off.
Joining the Trees
Place one tree on top of the other with preferred sides facing out.
Sl st around the perimeter of the trees, working through the tree closest to you, then farthest away, to join them together. For a sharp look, ch 1 at each corner of the tree.
Note before the next steps: If you are nervous about the stick coming out, you can place a bit of hot glue or craft glue on the stick before inserting it between the trees.
Once you are at the center bottom of the tree, place the stick and crochet around it, skipping only one stitch, if possible, on the front and the back. Work this tightly so it holds the cinnamon stick in place.
Tie a string to the top of the tree and add beads if desired. Then, tie this crochet tree ornament around the tab of the stocking for extra holiday cheer.

Finishing the Crochet Stockings
Weave in any ends. Block if needed or cut out a piece of cardboard the shape of the stocking and insert to maintain a sharp look when displaying.
How To Store Handmade Crochet Stockings
Crochet stockings are a classic holiday decoration that can bring warmth and cheer to your home. Handmade crochet stockings are even more special, as each stocking is unique and handmade with care. To ensure your handmade crochet stockings last for many years to come, proper storage is essential.
Here are some tips on how to store handmade crochet stockings:
• Hang the stocking on a sturdy hook in an area that’s not subject to harsh temperatures or moisture.
• Avoid folding the stocking when storing it as this could cause stress fractures to form along the fold lines.
• If you need to store multiple crocheted stockings, place them in a box lined with acid-free paper and keep the box out of direct sunlight.
• Do not allow pets to interact with stockings as this could lead to fraying or unraveling. My kitten has been interested in playing with my stockings so we’ve had to move them this season.
• If you need to remove dirt or dust from your stocking, use a clean cloth lightly dampened with water and mild soap, then lay flat on a towel to dry.
By following these tips you can maintain the quality of your crocheted stockings and keep them looking beautiful for many years to come!
Well, That Was Fun! What’s Next?