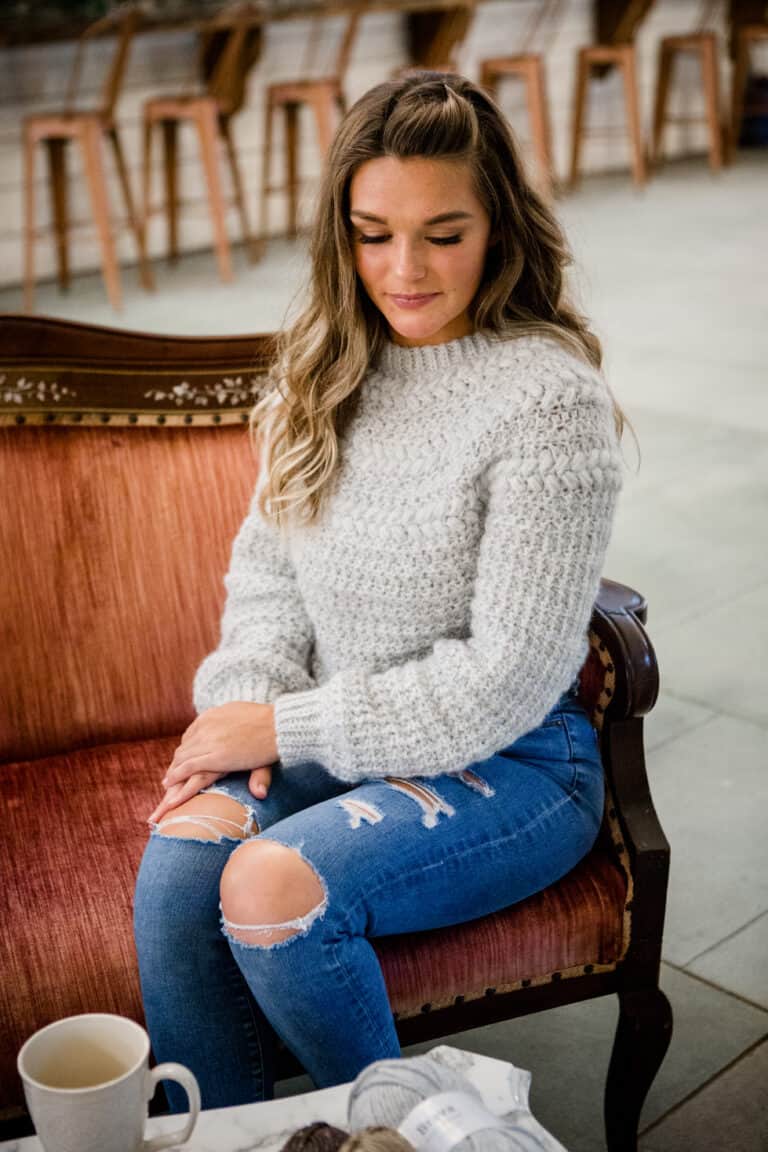
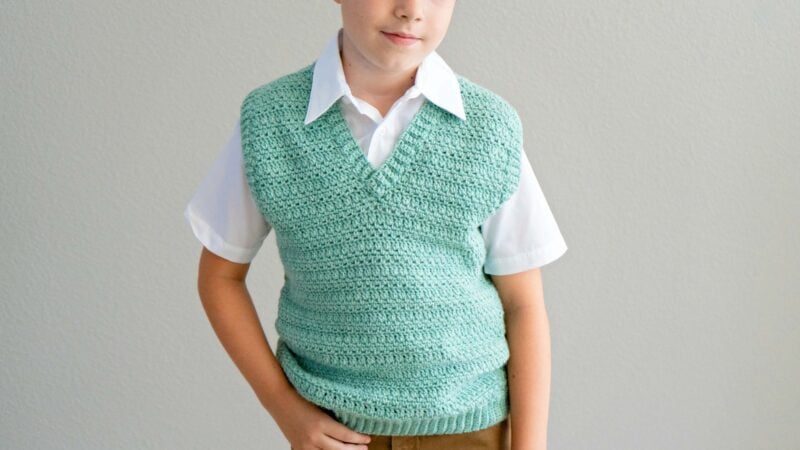
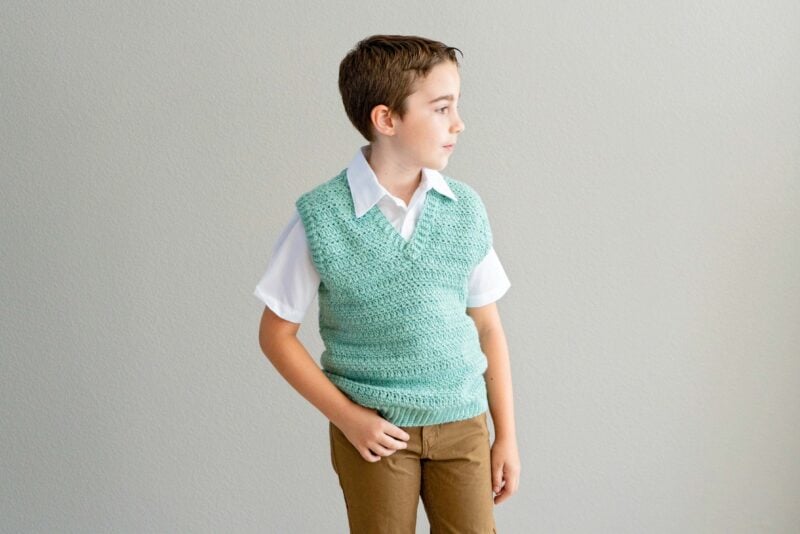
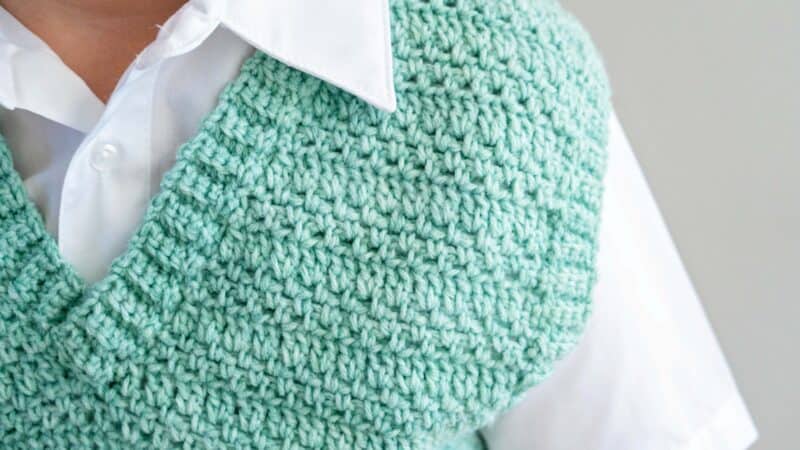
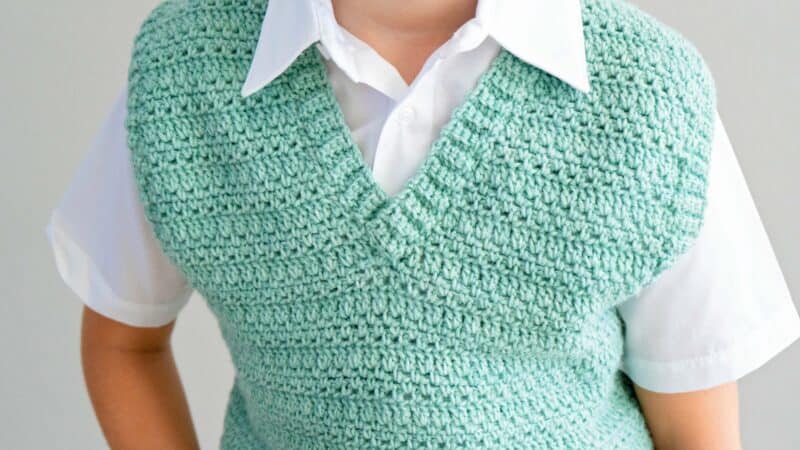
Want an Easy Crochet Vest Pattern with a video tutorial? Look no further with this simple stitch repeat that packs a punch of texture and drape. And is this just for the boys? NOPE! This crochet vest patterns comes in 9 child sizes, as well as 9 adult sizes.
Disclosure: This post contains affiliate links. Please read my disclosure for more info.
This vest is a unisex sweater that can be worn by anyone 0 to 99. Head on over to WeCrochet and get the Heatherly Crochet Vest Pattern now, or keep reading for the free version below. Do you love patterns for the whole family? I’ve also created the Everyday Crochet Knit-Look Sweater Pattern in sizes child to adult as well.
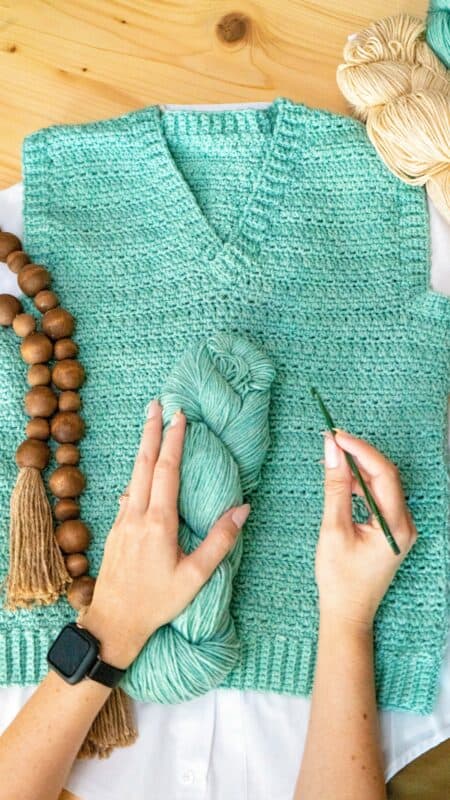
Review of WeCrochet Heatherly Yarn
When I previewed Heatherly Yarn I seriously thought the price point was going to be above ten dollars a hank. The yarn is released and priced at 5.99, I see once again the amazing value offered by WeCrochet. The Heatherly Worsted has 218 yards per hank, and the Heatherly Sport has 328 yards per hank.
If you’ve never purchased a hank of yarn before, a yarn swift and winder are great tools for getting the yarn into a cake, which is much easier to work with. Or you can wind it into a ball by hand and use a helping hand from a friend to hold the hank while you wind.
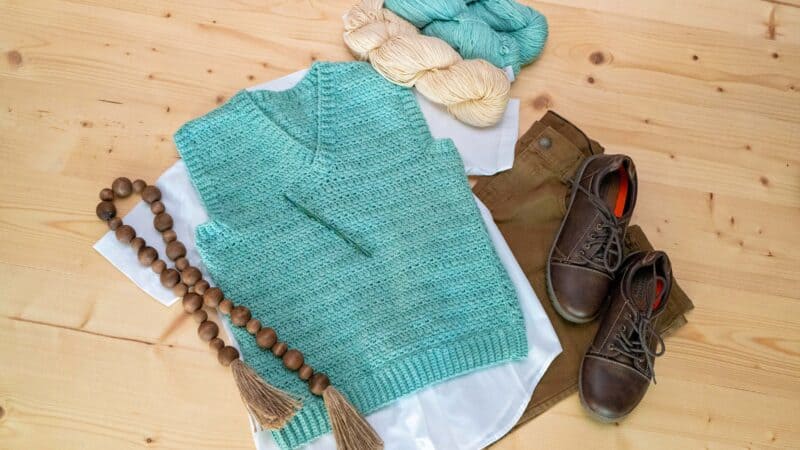
This yarn is a great blend of 80% acrylic and 20% merino wool, which adds some softness. Heatherly is in the baby yarn category and comes in 12 gentle colors, but in my humble opinion, this yarn is for the whole family. I love soft things myself and the colors are fantastic shades. I have enjoyed working with the yarn so much I also used it for the Lace Sleeve Crochet Sweater.
How The Vest Is Constructed
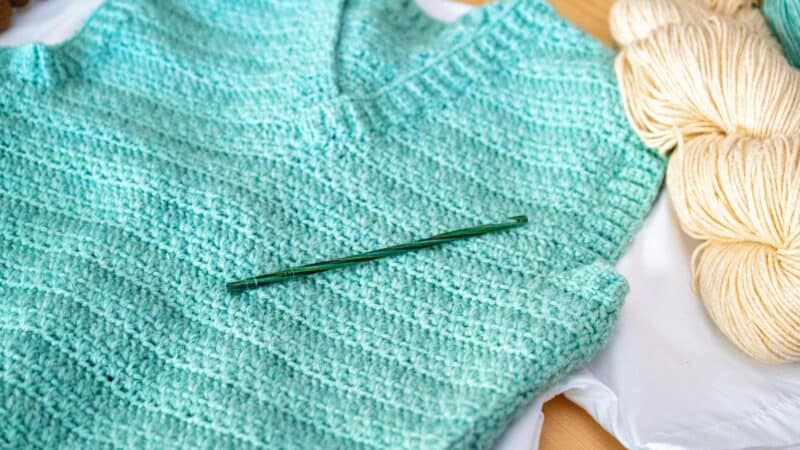
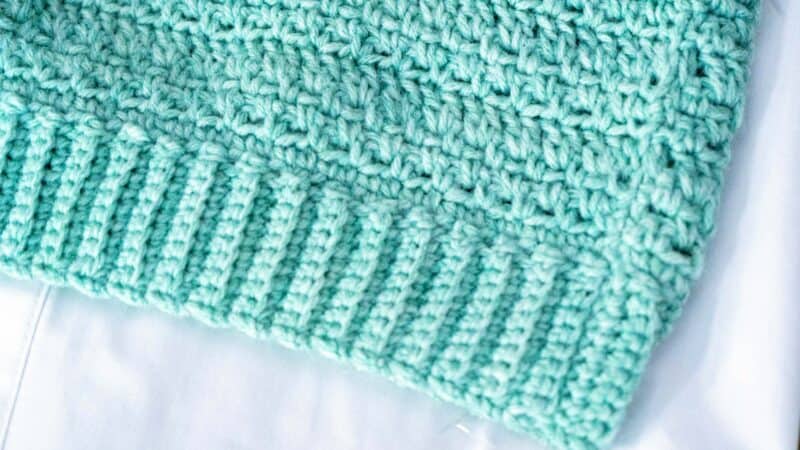
The Heatherly Crochet Vest is made in two pieces: the Back and the Front Panels. Then, the vest is seamed at the shoulders and down each side. Lastly, the ribbing is added around the neck, arms, and bottom.
If you love this style of construction, where we aren’t working in the round, check out the flat construction of the Gingersnap Crochet Pullover Sweater Pattern.

How To Determine The Best Crochet Vest Fit
Use the bust measurements when determining size. Due to the 2-3” of ease; for a more fitted garment consider going down a size. This vest is a size 10 shown on my son who is 8, so he has a little room to grow. But I can also wear this vest as a fitted top as it’s negative ease for me. Check out this Instagram video to see it on both of us.
About Ribbing Gauge
Ribbing can be fickle when it comes to matching the gauge. I find each crocheter can be very different in tension. Find the right tension for you by going up or down a crochet hook. The Ribbing will create a more fitted appearance and maintain consistent tension. If tension is too tight fabric might pucker; to avoid this, keep a loose tension or use a larger hook.

Supplies Needed For The Vest
Crochet Hook:
F (3.75 mm) Crochet Hook & D (3.25mm) Crochet Hook
Notions:
Removable stitch markers if needed
Yarn needle to weave in ends
Scissors
Blocking Mat and Pins (optional)
Yarn:
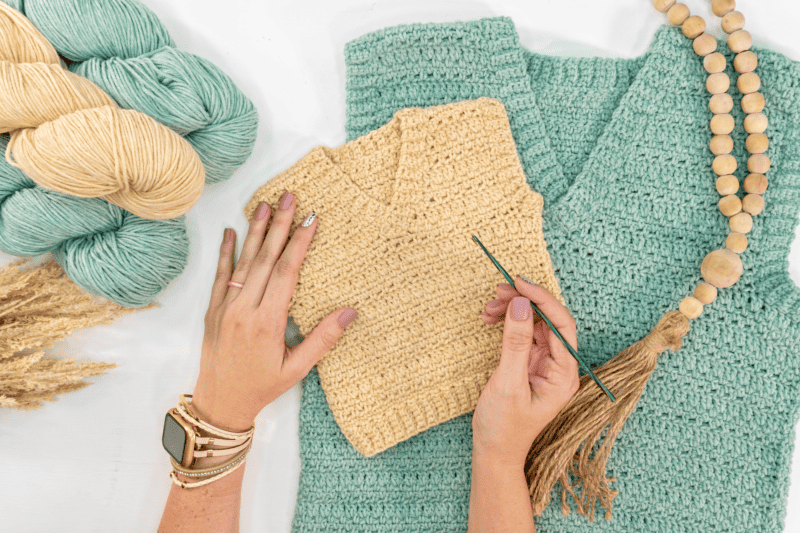
WeCrochet Heatherly Sport
80% Acrylic, 20% Merino Wool, 328yds/100g
Colorway: Agave or Butter in images
Yardage:
Child: 200 (250, 300, 350, 400) (550, 590, 615, 675)
Adult: 720 (800, 900, 1000, 1150) (1300, 1450, 1650, 1850)
Hanks:
Child: 1 (1, 2, 2, 2) (2, 2, 2, 3)
Adult: 3 (3, 3, 3, 3) (4, 4, 5, 5)
Abbreviations/Stitches:
blo- back loop only
ch – chain
dc – double crochet
dc2tog – double crochet two stitches together
RS – right side
sc – single crochet
sc2tog – single crochet two stitches together
Stsc – stacked single crochet
st(s) – stitch(es)
WS – wront side
Gauge:
19 sts x 15 rows = 4×4 inches in Row 1-4 in
Rows 1-4, the established row repeat.
Skill Level:
Advanced Beginner/Intermediate
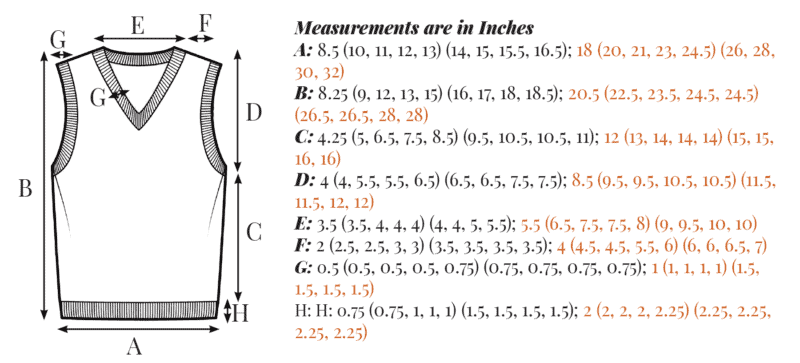
Size/Measurements:
This garment has a 2-3” ease.
Bust Sizes (does not include ease):
Child: 15 (18, 20, 22, 24) (26, 28, 29, 31)
Adult: 34 (38, 40, 44, 47) (50, 54, 58, 62)
See the schematic in the pattern for finished garment measurements.

Notes
This vest is made in two pieces; the Back and the Front panels. It is then seamed at the shoulders and then down each side. Lastly, ribbing is added around the neck, arms, and bottom.
The sizes are written as: 1-3 mo (6-9 mo, 12-18 mo, 2y, 4y) (6y, 8y, 10y, 12y); X-Small (Small, Medium, Large, 1X) (2X, 3X, 4X, 5x)
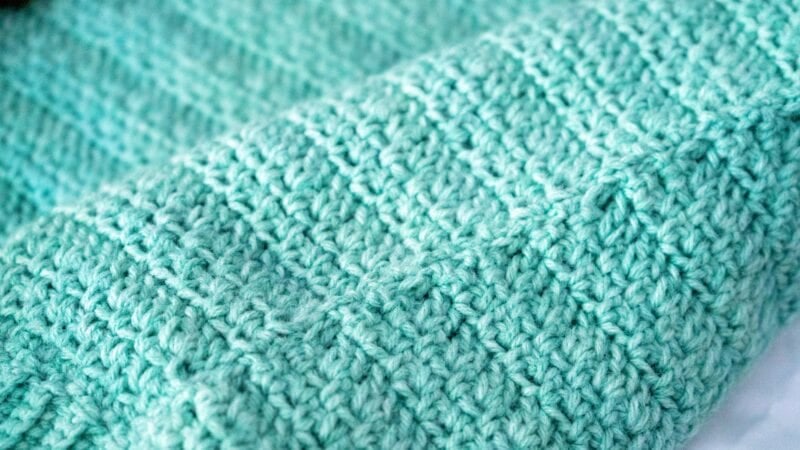
There is no need to use starting chains, instead, use the Stacked Single Crochet (see Special Stitches).
Special Stitches
Stacked Single Crochet (Stsc): Do NOT chain, insert hook into next stitch, yo, pull up a loop, yo and pull through both loops, insert hook in the vertical bar below, yo, pull up a loop, yo and pull through both loop on hook. https://brianakdesigns.com/stacked-single-crochet/
This is a free crochet pattern with a video tutorial, simply become a free blog subscriber to unlock this crochet pattern below.
Easy Crochet Vest Pattern Video:

Purchase the Ad-Free
Downloadable PDF
The free pattern on this blog is only available for viewing and is not to be printed off. If you would like an ad-free digitals PDF that is printable, please visit my shops. Whether you view on the blog, or purchase the downloadable pattern, your viewership is supporting an artist and greatly appreciated.
Click the box below to unlock this exclusive subscriber content for free. Add your email and create a password. If you are having trouble, reset your password or log in to the Grow Portal.
I’m thrilled to share this amazing crochet pattern with you! Please don’t copy, paste, or distribute this pattern. Prefer an ad-free experience? Purchase a digital PDF file for a small fee from one of my online stores. I appreciate your support and readership. You are why I can keep doing what I love and sharing it with others. Thank you from the bottom of my heart.
Crochet Vest Schematic
Written Instructions
Back of Crochet Vest Bottom
With F (3.75mm) hook ch 40 (48, 52, 56, 62) (66, 72, 74, 78); 82 (94, 100, 110, 116) (124, 132, 142, 152)
Set Up Row (RS):
In the first ch from the hook sc, sc in remaining across, turn. 40 (48, 52, 56, 62) (66, 72, 74, 78); 82 (94, 100, 110, 116) (124, 132, 142, 152) sts
Row 1:
Sc in first 2 sts, ch 1, skip 1, sc in next; repeat from * to * across, turn.
Rows 2-3:
Repeat Row 1.
Row 4:
Stsc in first, 2dc sts in next ch space, skip 1, 2dc sts in next ch space; repeat from * to until the last 2 sts, skip 1, dc in last, turn.
Repeats:
Repeat Rows 1-4 for 3 (4, 5, 6, 7) (8, 9, 9, 10); 11 (11, 12, 12, 12) (13, 13, 14, 14) more times, turn and fasten off.
Note on length:
To customize the length, add fewer or more rows in increments of the Row Repeat.
Back of Crochet Vest Arm Holes
Row 1 (WS):
Skip the first 3 (4, 4, 4, 7) ( 7, 10, 10, 10); 10 ( 10, 10, 11, 11) (13, 16, 17, 20) sts in row. Attach the yarn to the next stitch and Repeat Row 1 of established row pattern for 34 (40, 44, 48, 48) (52, 52, 56, 58); 62 (74, 80, 88, 94) (98, 100, 108, 112) sts and turn. The last 3 (4, 4, 4, 7) ( 7, 10, 10, 10); 10 ( 10, 10, 11, 11) (13, 16, 17, 20) sts will remain unworked. 34 (40, 44, 48, 48) (52, 52, 56, 58); 62 (74, 80, 88, 94) (98, 100, 108, 112) sts
Rows 2-3:
Sc in first 2 sts, ch 1, skip 1, sc in next; repeat from * to * across, turn.
Row 4:
Stsc in first, 2dc sts in next, skip 1, 2dc sts in next ch space; repeat from * to * until the last 2 sts, skip 1, dc in last, turn.
Repeats:
Continue to work the established row repeat for 2 (2, 3, 3, 4) (4, 4, 5, 5); 6 (7, 7, 8, 8) (9, 9, 10, 10) more times, turn and do not fasten off.
Back of Crochet Vest Neck – First Shoulder
Row 1 (WS):
Work Row 1 of established row pattern for the first 10 (12, 12, 14, 14) (16, 16, 16, 16); 18 (22, 22, 26, 28) (28, 28, 30, 32) sts, turn leaving remaining sts unworked. 10 (12, 12, 14, 14) (16, 16, 16, 16); 18 (22, 22, 26, 28) (28, 28, 30, 32) sts
Rows 2-3:
Sc in first 2 sts, ch 1, skip 1, sc in next; repeat from * to * across, turn. Stop here for 1-3mo size.
Row 4:
Stsc in first, 2dc sts in next, skip 1, 2dc sts in next ch space; repeat from * to * until
the last 2 sts, skip 1, dc in last, fasten off.
Back of Crochet Vest Neck – Second Shoulder
Row 1 (WS):
With the WS facing. skip 14 (16, 20, 20, 20) (20, 20, 24, 26); 26 (30, 36, 36, 38) (42, 44, 48, 48) sts from the left of the first shoulder, work Row 1 of established row pattern for the last 10 (12, 12, 14, 14) (16, 16, 16, 16); 18 (22, 22, 26, 28) (28, 28, 30, 32) sts, turn. 10 (12, 12, 14, 14) (16, 16, 16, 16); 18 (22, 22, 26, 28) (28, 28, 30, 32) sts
Rows 2-3:
Sc in first 2 sts, ch 1, skip 1, sc in next; repeat from * to * across, turn. Stop here for 1-3mo size.
Row 4:
Stsc in first, 2dc sts in next, skip 1, 2dc sts in next ch space; repeat from * to * until
the last 2 sts, skip 1, dc in last, fasten off. Set the back of the vest aside.
Front of Crochet Vest Bottom
Repeat the Back of Vest Bottom instructions.
Front of Vest Arm Holes
These steps will creat the v neck look.
Row 1 (WS):
Skip the first 3 (4, 4, 4, 7) ( 7, 10, 10, 10); 10 ( 10, 10, 11, 11) (13, 16, 17, 20) sts in row. Attach the yarn to the next stitch and Repeat Row 1 of established row pattern for 36 (40, 44, 48, 48) (52, 52, 56, 58); 62 (74, 80, 88, 94) (98, 100, 108, 112) sts and turn. The last 3 (4, 4, 4, 70 ( 7, 10, 10, 10); 10 ( 10, 10, 11, 11) (13, 16, 17, 20) sts will remain unworked. 34 (40, 44, 48, 48) (52, 52, 56, 58); 62 (74, 80, 88, 94) (98, 100, 108, 112) sts
Row 2:
sc in first 2 sts, ch 1, skip 1, sc in next; repeat from * to * across, turn. Front of Vest V -First Shoulder
Row 3:
Repeat Row 3 from the established row pattern over the next 16 (20, 22, 24, 24) (26, 26, 28, 28); 30 (36, 40, 44, 46) (48, 50, 54, 56) sts, turn and do not work the remaining sts in the row.
For sizes 1-3 mo (6-9 mo, 12-18 mo, 2y); (Medium, 3X, 4X, 5x) only:
Working in the established row pattern, decrease 1 st on the neck edge every row for 3 (3, 3, 3); (3, 3, 3, 3) rows.
Then continue to decrease 1 st every other row on the neck edge until stitch count is 10 (12,12, 14); (22, 28,30,32) sts.
For sizes 4y (6y, 8y, 10y, 12y); X-Small (Small,Large,1X, 2X) only:
Working in the established row pattern, decrease 1 st every other row on the neck edge until the stitch count is 14 (16, 16, 16, 16); 18 (22, 26, 28, 28) sts.
Decreasing Instructions (See Video for Decreasing Tips):
Decreasing Row 4 working towards the neckline across even sts:
Stsc in first, 2dc sts in next, skip 1, 2dc sts in next ch space; repeat from * to * until the last 3 sts, dc in next, skip 1, dc in last, turn. (decreased by 1 st)
Decreasing Row 4 working towards the neckline across odd sts:
Stsc in first, 2dc sts in next, skip 1, 2dc sts in next ch space; repeat from * to * until the last 3 sts, skip 1, d2tog, turn. (de-creased by 1 st)
Decreasing Rows 1-3 working towards the neckline:
Sc in first 2 sts, ch 1, skip 1, sc in next; repeat from * to * across until the last 2 sts, sc2tog, turn.
Odd number of sts for Rows 1-3 working towards the neckline:
At the end of the row work the last st as a sc st.
Continue in the established row pattern for 3 (0, 0 , 0, 1) (2, 1, 1, 1); 5 (5, 0, 1, 1) (1, 0, 0, 0) more rows. Fasten off.
Front of Vest V -Second Shoulder
This will continue to create the v neck.
Row 3:
With the WS facing, attatch yarn in the space next to the last st worked on Row 3 of the First Shoulder. Please note: for sizes 0-3 mo, Men Small, Medium, 2X, and 3X: skip 2 sts and then attatch yarn. Repeat Row 3 from the established row pattern over the next 16 (20, 22, 24, 24) (26, 26, 28, 28); 30 (36, 40, 44, 46) (48, 50, 54, 56) sts, turn.
For sizes 1-3 mo (6-9 mo, 12-18 mo, 2y); (Medium, 3X, 4X, 5x) only:
Working in the established row pattern, decrease 1 st on the neck edge every row for 3 (3, 3, 3); (3, 3, 3, 3) rows.
Then, continue to decrease 1 st every other row on the neck edge until stitch count is 10 (12,12, 14); (22, 28,30,32) sts.
For sizes 4y (6y, 8y, 10y, 12y); X-Small (Small,Large,1X, 2X) only:
Working in the established row pattern, decrease 1 st every other row on the neck edge until the stitch count is 14 (16, 16, 16, 16); 18 (22, 26, 28, 28) sts.
Decreasing Instructions (See Video for Decreasing Tips):
Decrease Row 4 working away from the neckline:
Stsc, dc2tog, 2dc sts in next, skip 1, 2dc sts in next ch space; repeat from * to * until the last 2 sts, skip 1, dc in last, turn. (decreased by 1 st)
Decreasing Rows 1-3 working away from the neckline:
sc2tog, sc in next, ch 1, skip 1, sc in next; repeat from * to * across, turn.
Decreasing Row 4 when the first 2 sts are sc:
Stsc, skip 1, 2dc sts in next ch space; repeat
from * to * until the last 2 sts, skip 1, dc in last, turn. (decreased by 1 st)
Odd number of sts for Rows 1-3 working away the neckline:
Sc in first st, ch 1, skip 1, sc in next; repeat from * to * across, turn.
Continue in the established row pattern for 3 (0, 0 , 0, 1) (1, 1, 1, 1); 5 (5, 0, 1, 1) (1, 0, 0, 0) more rows. Fasten off.
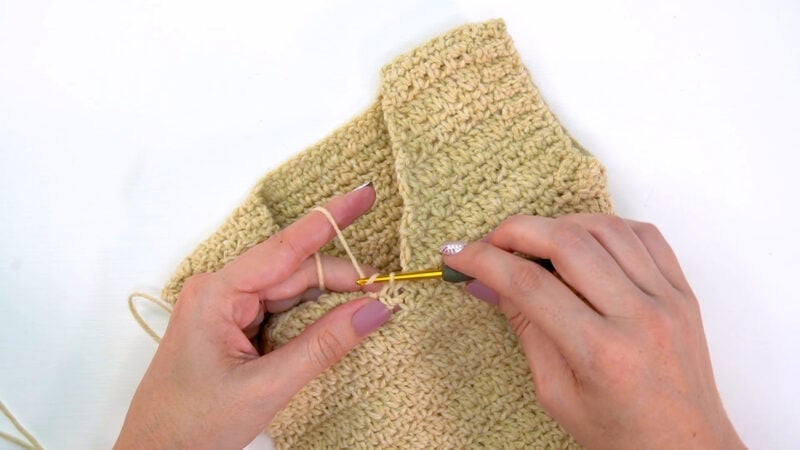
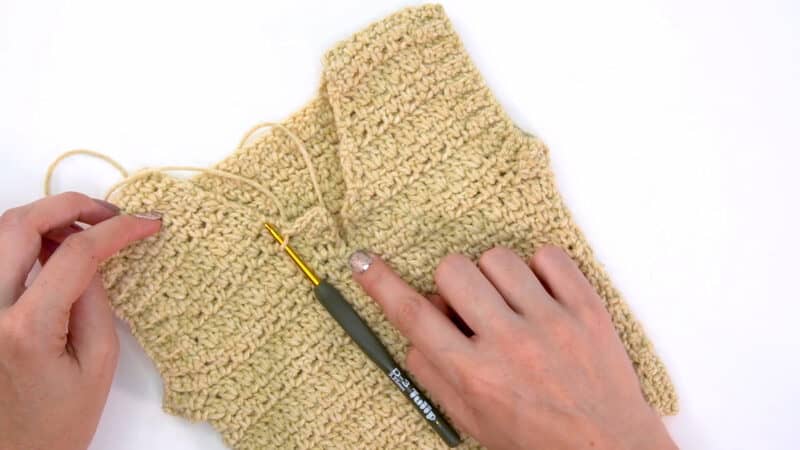
Seaming the Vest
Blocking is recommended before seaming due to the lean of this stitch.
With the RS facing out, use your yarn needle and yarn to seam the shoulders together. Then seam down each side of the vest. Weave in ends.
Bottom Vest Ribbing
With D (3.25mm), attach the yarn to the bottom edge of the vest on the side.
Row 1:
Ch 6 (6, 8, 8, 8) (10, 10, 10, 10); 14 (14, 14, 14, 16) (16, 16, 16, 16) sc in second chain from hook and across to body of vest, sl st the next 2 sts on the body edge (these do not count as sts), turn. 5 (5, 7, 7, 7) (9, 9, 9, 9); 13 (13, 13, 13, 15) (15, 15, 15, 15) sts
Row 2:
Skip the 2 sts from the body edge, in blo sc in each st across until the last st, sc in both loops of the last st, turn. 5 (5, 7, 7, 7) (9, 9, 9, 9); 13 (13, 13, 13, 15) (15, 15, 15, 15) sts
Row 3:
Ch 1 (does not count as a stitch), sc through both loops of the first st, blo sc in each st across, sl st the next 2 sts along the body edge, turn.
Repeats:
Repeat Rows 2-3 around the bottom of the vest body. Join last row to beginning row by slip stitching through blo of first and last row at the same time with the WS facing.

Armhole Ribbing for the Crochet Sweater Vest Pattern
With D (3.25mm), attach the yarn to the bottom edge of the armhole on the side.
Row 1:
Ch 4 for baby sizes, and 5 for all other sizes, sc in second chain from hook and across to body, sl st 2 sts along the body edge (these do not count as sts), turn. (3 sts for baby, 4 sts for all other sizes)
Row 2:
Skip the two sts from the body, in blo sc in each st across until the last st, sc in both
loops of the last st, turn. (3 sts for baby, 4 sts for all other sizes)
Row 3:
Ch 1 (does not count as a stitch), sc through both loops of the first st, blo sc in each st across, sl st 2 sts along the body edge, turn.
Repeats:
Repeat Rows 2-3 around the bottom of the vest body. Join last row to beginning row by slip stitching through blo of first and last row at the same time with the WS facing.

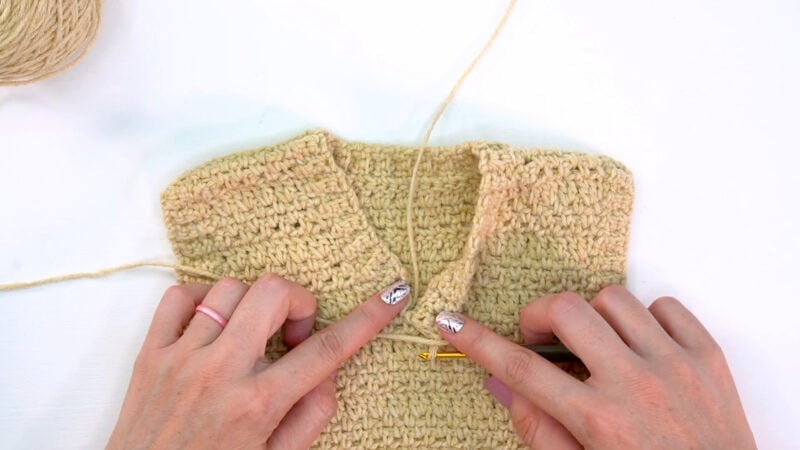
V-Neck Ribbing
With hook size D (3.25mm), attach the yarn to the center of the ‘V’ on the front of the vest.
Row 1:
Ch 4 for baby sizes, and 5 for all other sizes, sc in second chain from hook and across to body, sl st 2 sts on the vest body (these do not count as sts), turn. (3 sts for baby, 4 sts for all other sizes)
Row 2:
Skip the two sts from the vest body, in blo sc in each st across until the last st, sc in both loops of the last st, turn. (3 sts for baby, 4 sts for all other sizes)
Row 3:
Ch 1 (does not count as a stitch), sc through both loops of the first st, blo sc in each st across, sl st 2 sts on the body, turn.
Repeats:
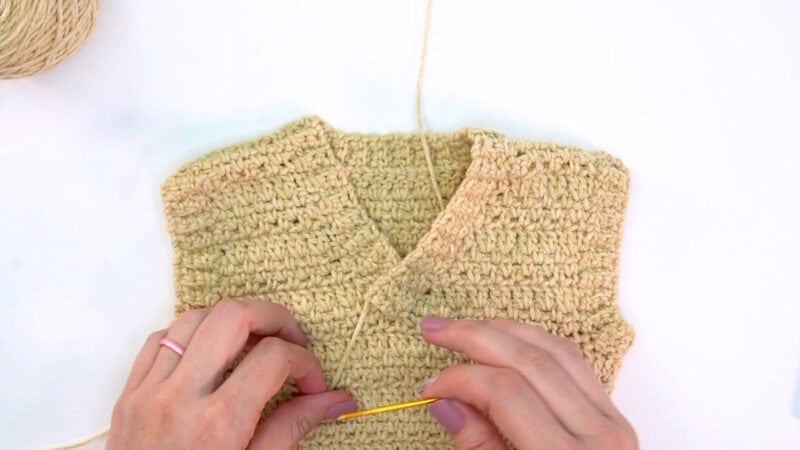
Repeat Rows 2-3 around the bottom of the vest body. Fasten off and use your tail end and yarn needle to tack down the overlapping center. Weave in all ends.
V-Neck Ribbing Images
Well, That Was Fun! What’s Next?