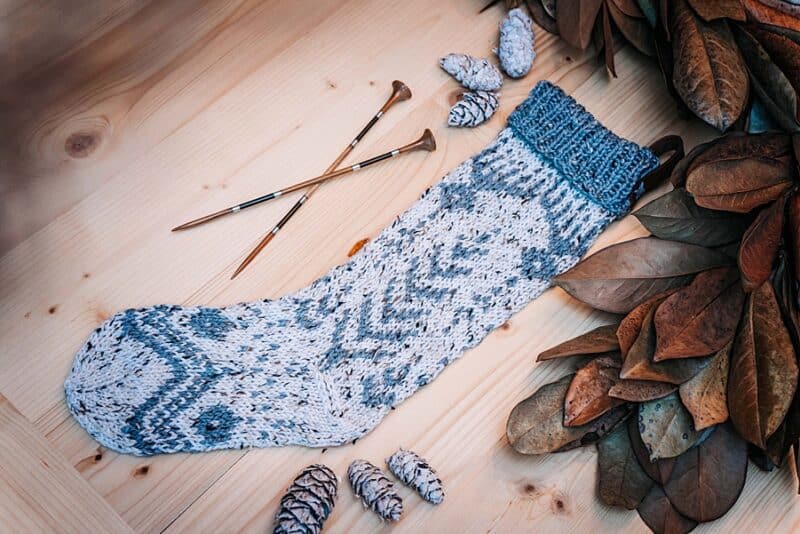
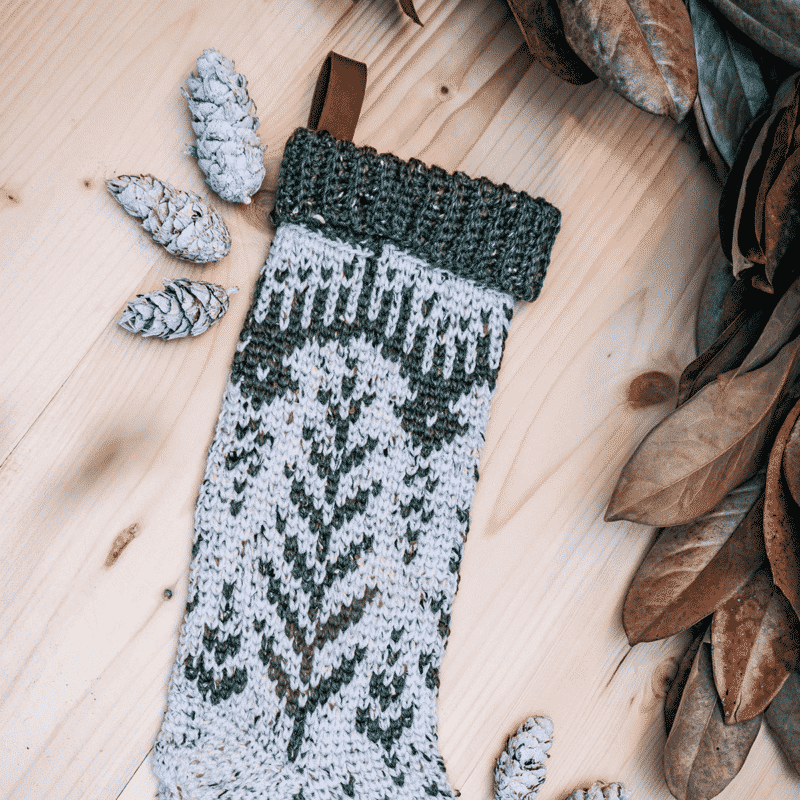
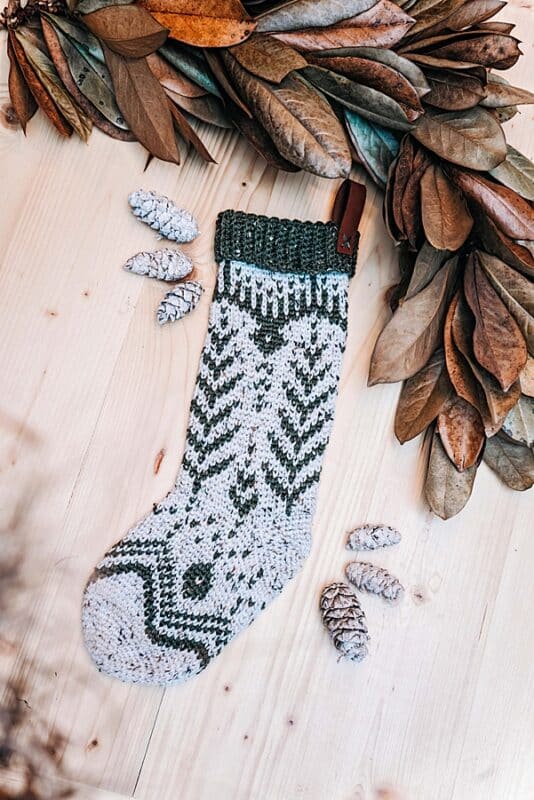
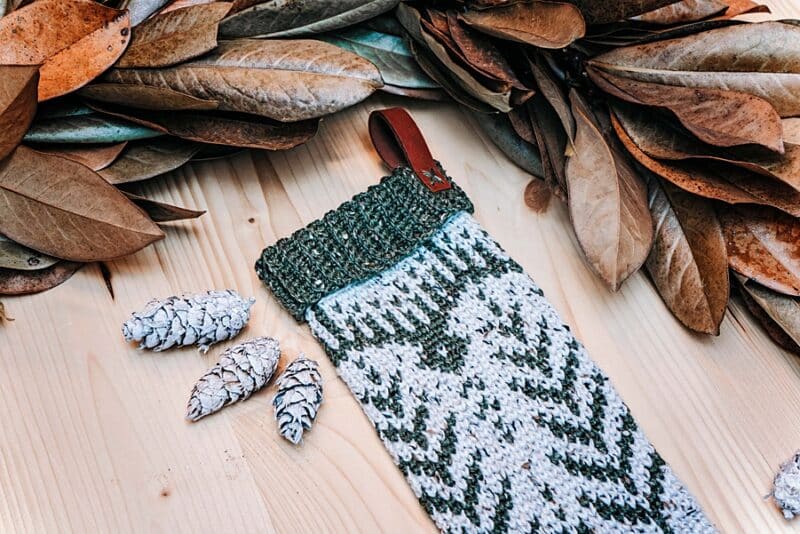
Have you ever seen such a pretty crochet stocking pattern? Come learn how to do the traditional fair isle crochet technique for a modern home decor stocking. This crochet stocking will add cozy vibes for the holidays. If you like colorwork stockings, you’ll love the Polar Bear Stroll Stocking!
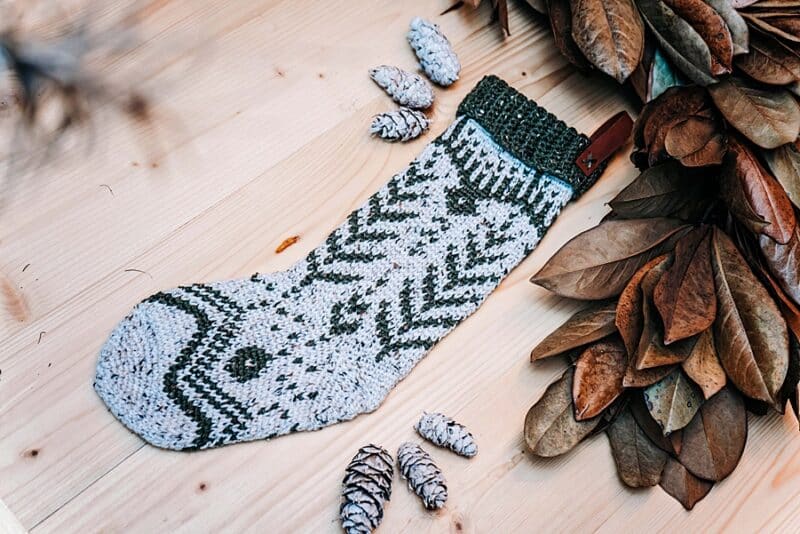
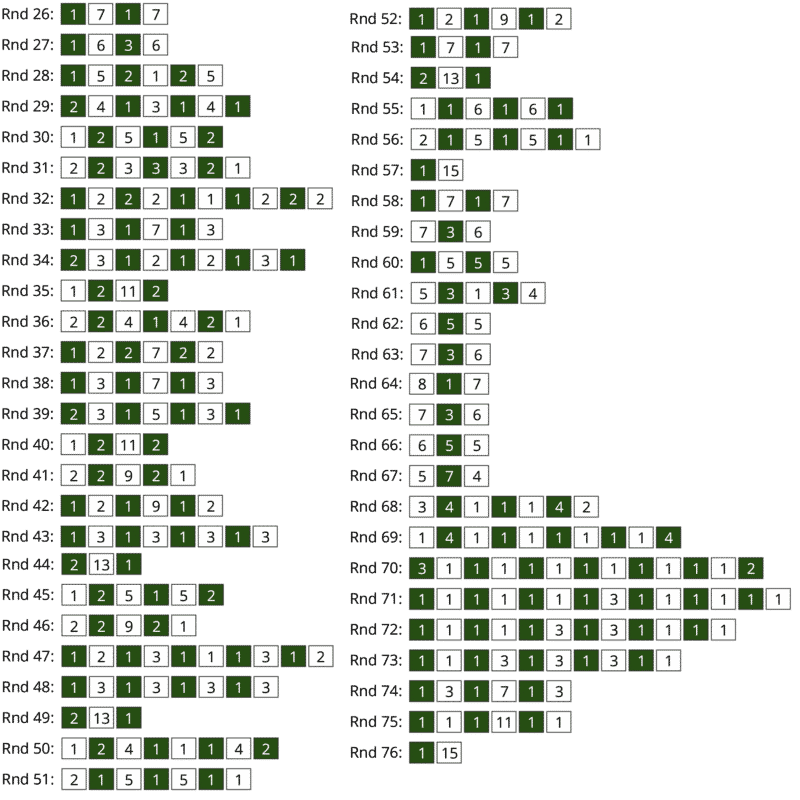
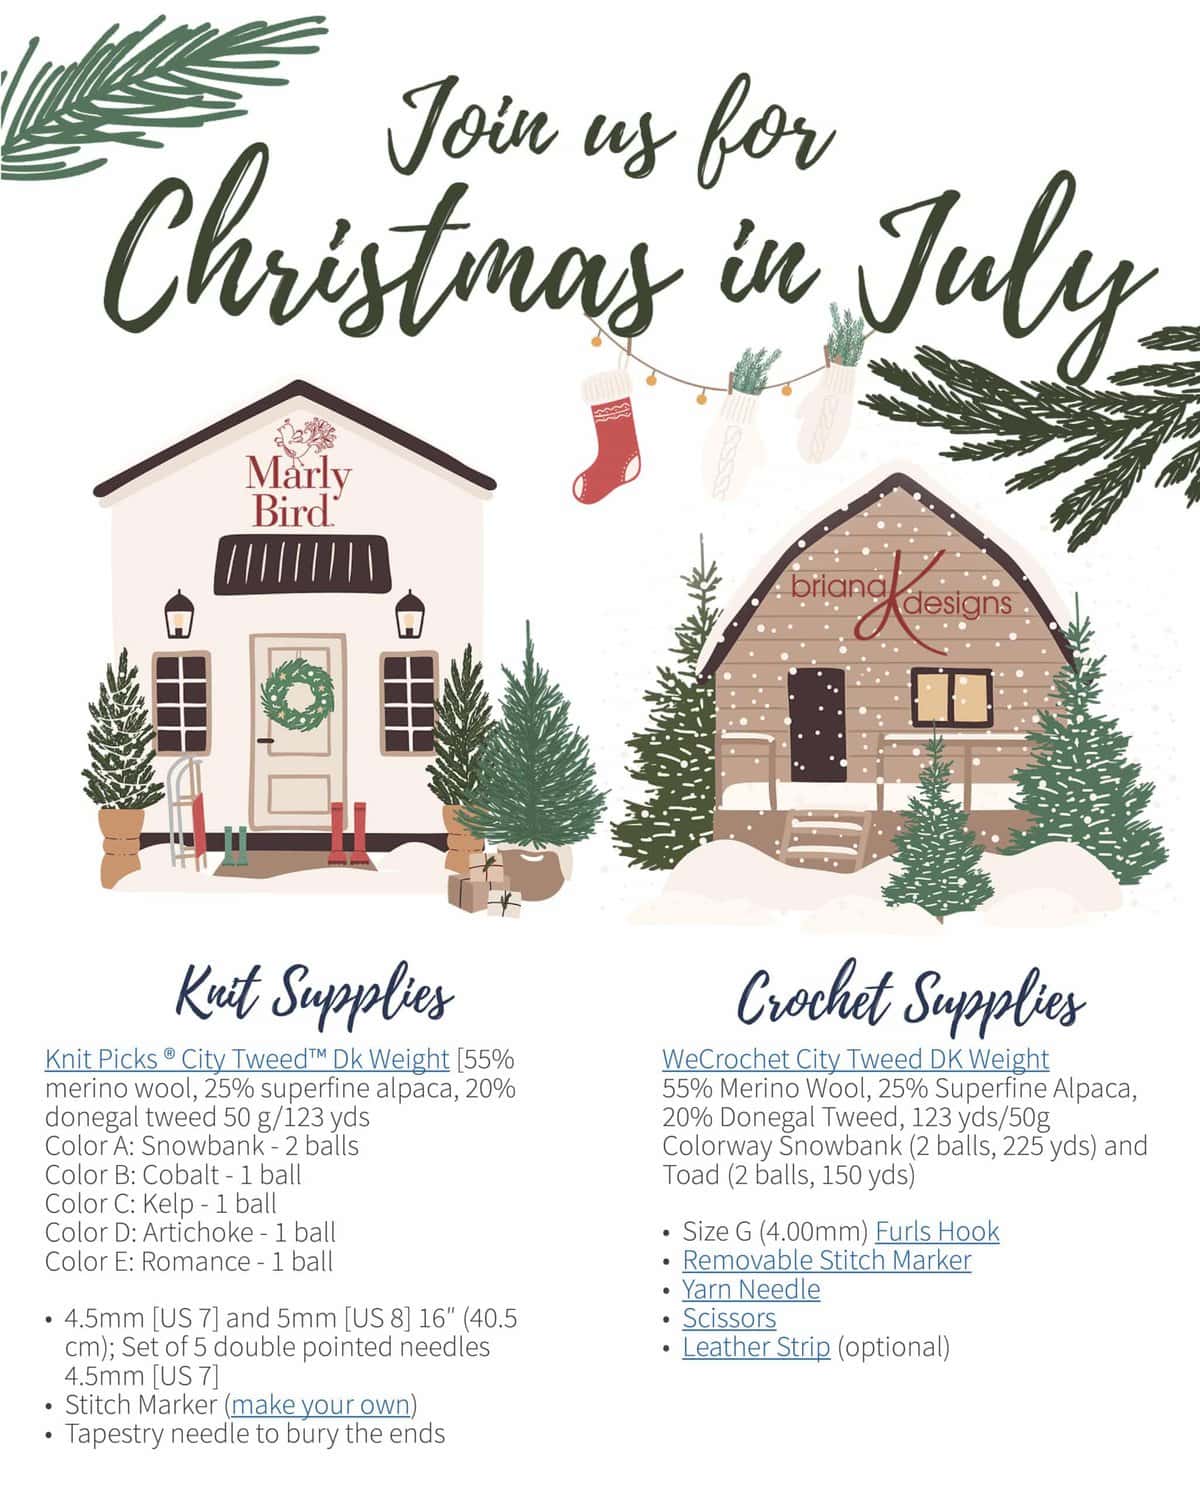
This year Marly Bird and I are bringing the holiday fun with an amazing Make-A-Long, and I’m introducing the White Spruce Crochet Stocking Pattern. Christmas in July is so much fun, especially when creating with friends. If you prefer to knit, check out my White Spruce Knit Stocking.
This pattern can be enjoyed for free right here on the blog. If you would like to purchase an ad-free pdf head on over to Ravelry or Etsy.
What to put in a crochet stocking?
Get The Crochet & Knit Supplies Now
Don’t wait, get those supplies ordered because you want in on this. Click on that button below for a downloadable supply list.


All About the Crochet Pattern Perks
When you see this year’s Christmas stocking patterns we hope to blow you away. We have worked hard to make colorwork easy. This is why we have included not only written instructions but also chart instructions and color block instructions as well! If you haven’t seen what a color block chart looks like, stay tuned!
Best of all, this year the Make A Long will also include video tutorials. If you have ever been afraid of crochet colorwork, don’t fear! With a step-by-step visual guide, you can crochet this stocking.
White Spruce Knit Stocking Mimic:
Of course, I couldn’t resist creating a knit mimic of the crochet version. This pattern can be found in the special ebook or by clicking on the image below.
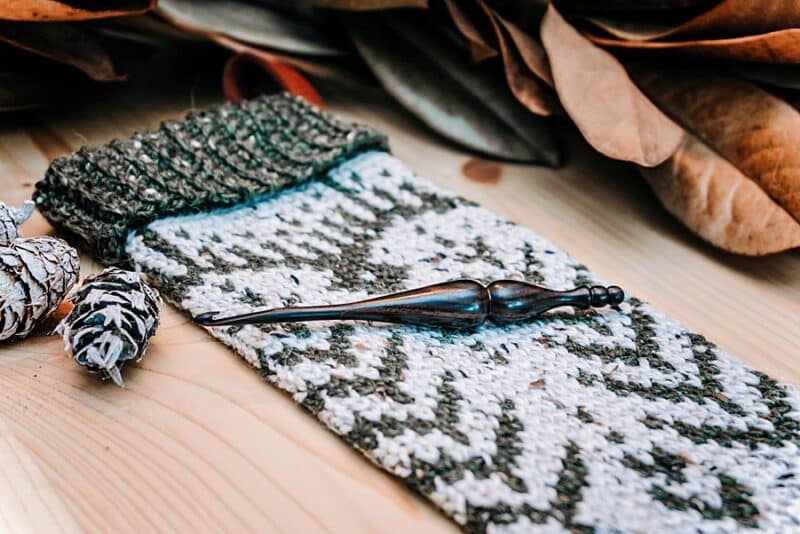
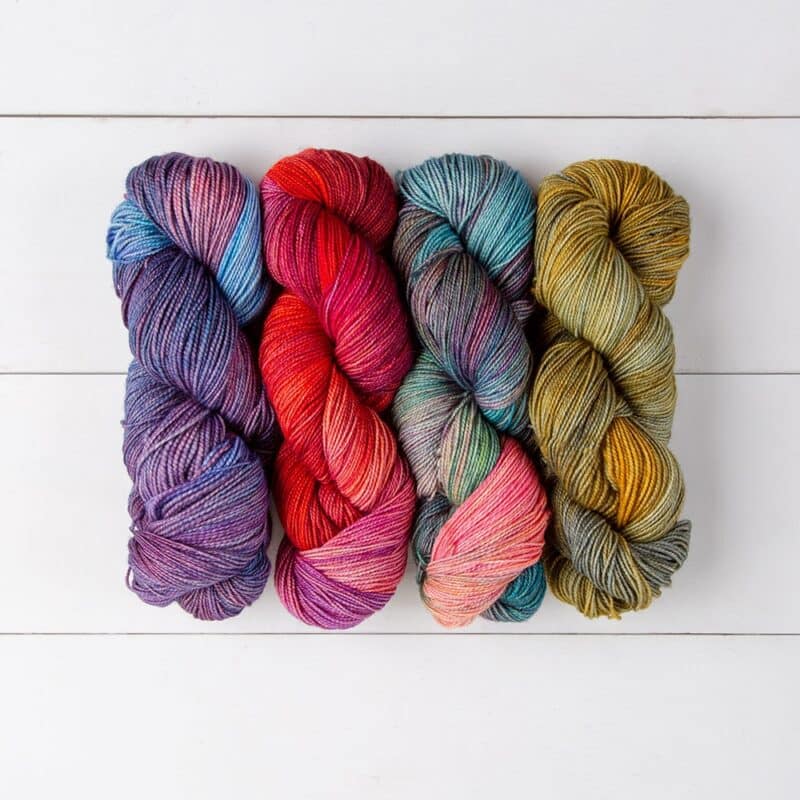
White Spruce Crochet Stocking Supplies
Crochet Hook:
4.0mm (G hook), or hook to obtain gauge


Notions:
Removable stitch markers
Yarn needle to weave in ends
Scissors
Leather Strip (optional)
Yarn:
WeCrochet City Tweed DK Weight
55% Merino Wool, 25% Superfine Alpaca, 20% Donegal Tweed, 123 yds/50g
Colorway Snowbank (2 balls, 225 yds) and Toad (2 balls, 150 yds)
Yardage:
375 yds (343 m) total.
Abbreviations/Stitches:
ch – chain
rnd- round
sc – single crochet
ssc – split single crochet
sl st – slip stitch
st(s) – stitch(es)
16 sts x 21 rows = 4×4 inches in ssc
Skill Level:
Intermediate
Size:
19” From folded cuff to toe; 11” circumference.
White Spruce Crochet Stocking Notes
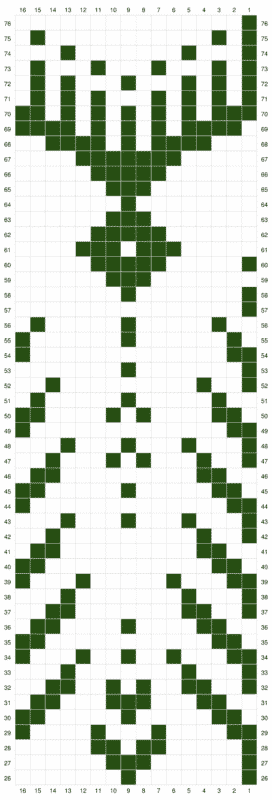
This crochet stocking pattern will be worked from toe-up, leaving space for the heel to be worked last.
The colorwork in this pattern will use the split single crochet (ssc).
For the colorwork section, Color B will be abbreviated as (B), and color A as (A).
Example: (B) x 9 = with Color B ssc the next 9 stitches
The traditional ch 1 at the beginning of the round has been omitted as it is not needed. It is helpful to place a stitch marker on the first stitch of each row.
White Spruce Stocking Crochet Pattern Video

Part 1 of the Stocking
Crochet Stocking Toe
Rnd 1:
With Color A, sc 8 into a Magic Circle, do not join, work continuously. | 8 sts
Rnd 2:
2sc in each stitch around. | 16 sts
Rnd 3:
Sc in each st around. | 16 sts
Rnd 4:
*2sc in the first, sc in the next*; repeat from * to * around. | 24 sts
Rnd 5:
Rep Rnd 3 | 24 sts
Rnd 6:
*2sc in the first, sc in the next 2*; repeat from * to * around. | 32 sts
Rnd 7:
Rep Rnd 3 | 32 sts
Rnd 8:
*2sc in the first, sc in the next 3*; repeat from * to * around. | 40 sts
Rnd 9:
Rep Rnd 3 | 40 sts
Rnd 10:
*2sc in the first, sc in the next 4*; repeat from * to * around. | 48 sts
Rnd 11:
Rep Rnd 3 | 48 sts
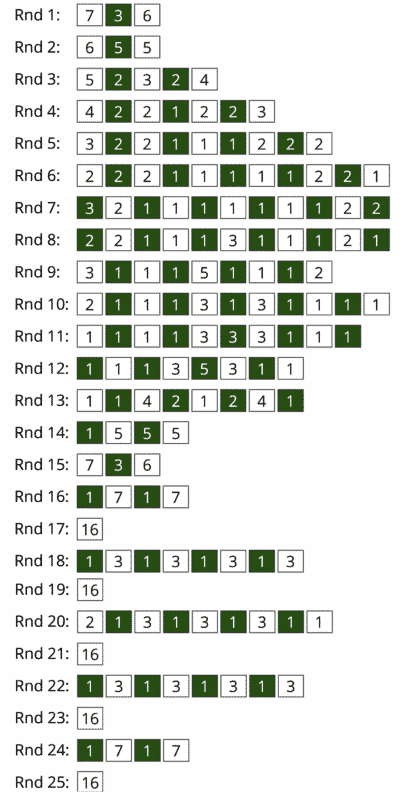
Crochet Stocking Foot – Written Instructions
All the stitches for the foot will be worked as ssc. Repeat each round instructions 3 times for one round. The stitch count will remain 48 sts.
Rnd 1: (A) x 7, (B) x 3, (A) x 6
Rnd 2: (A) x 6, (B) x 5, (A) x 5
Rnd 3: (A) x 4, [(A) x 1, (B) x 2, (A) x 2] x 2, (A) x 2
Rnd 4: (A) x 4, (B) x 1, [(B) x 1, (A) x 2] x 2, (B) x 2, (A) x 3
Rnd 5: (A) x 3, (B) x 2, (A) x 1, [(A) x 1, (B) x 1] x 2, (A) x 2, (B) x 2, (A) x 2
Rnd 6: (A) x 2, (B) x 2, (A) x 1, [(A) x 1, (B) x 1] x 3, (A) x 2, (B) x 2, (A) x 1
Rnd 7: (B) x 3, (A) x 1, [(A) x 1, (B) x 1] x 4, (A) x 2, (B) x 2
Rnd 8: (B) x 2, [(A) x 2, (B) x 1, (A) x 1, (B) x 1, (A) x 1] x 2, (A) x 1, (B) x 1
Rnd 9: [(A) x 3, (B) x 1, (A) x 1, (B) x 1, (A) x 2] x 2
Rnd 10: (A) x 1, [(A) x 1, (B) x 1] x 2, [(A) x 3, (B) x 1] x 2, (A) x 1, (B) x 1, (A) x 1
Rnd 11: [(A) x 1, (B) x 1] x 2, (A) x 3, (B) x 3, (A) x 2, [(A) x 1, (B) x 1] x 2
Rnd 12: [(B) x 1, (A) x 1] x 2, (A) x 2, (B) x 5, (A) x 3, (B) x 1, (A) x 1
Rnd 13: (A) x 1, (B) x 1, (A) x 4, [(B) x 2, (A) x 1] x 2, (A) x 3, (B) x 1
Rnd 14: (B) x 1, (A) x 5, (B) x 5, (A) x 5
Rnd 15: (A) x 7, (B) x 3, (A) x 6
Rnd 16: [(B) x 1, (A) x 7] x 2
Rnd 17: (A) x 16
Rnd 18: [(B) x 1, (A) x 3] x 4
Rnd 19: (A) x 16
Rnd 20: [(A) x 2, (B) x 1, (A) x 1] x 4
Rnd 21: (A) x 16
Rnd 22: [(B) x 1, (A) x 3] x 4
Rnd 23: (A) x 16
Rnd 24: [(B) x 1, (A) x 7] x 2
Rnd 25: With A ch 22, skip 22, ssc in remaining sts around. (This creates the heel.)
Crochet Stocking Foot – Chart Instructions
Repeat each round instructions 3 times for one round.
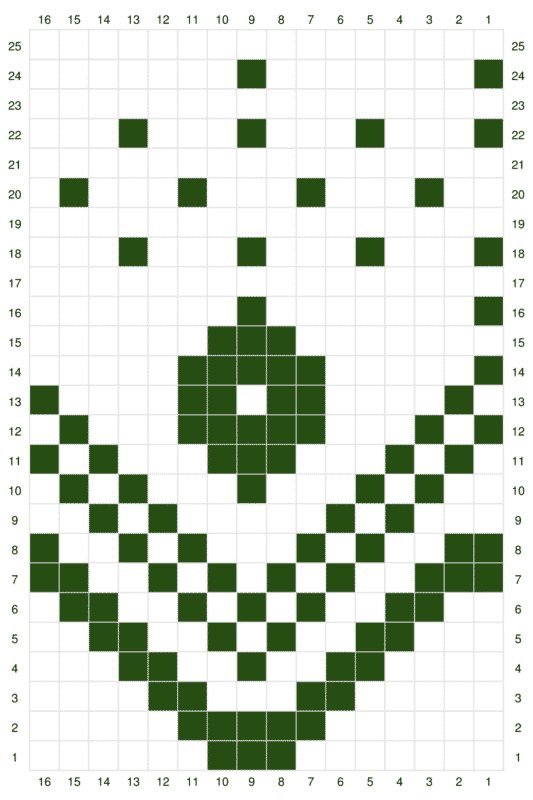
Crochet Stocking Foot – Color Block Instructions
Repeat each round instructions 3 times for one round.
Part 2 of the White Spruce Stocking
In part 2, we will be working on the leg portion of the White Spruce Crochet Stocking Pattern. Be sure to share your progress in the Briana K Community on Facebook.
Crochet Stocking Part 2 Video Tutorial

Crochet Stocking Leg – Written Instructions
Repeat each round instructions 3 times for one round.
Rnd 26: [(B) x 1, (A) x 7] x 2
Rnd 27: (B) x 1, (A) x 6, (B) x 3, (A) x 6
Rnd 28: [(B) x 1, (A) x 7] x 2
Rnd 29: (B) x 2, (A) x 4, [(B) x 1, (A) x 3] x 2, (A) x 1, (B) x 1
Rnd 30: (A) x 1, (B) x 1, [(B) x 1, (A) x 5] x 2, (B) x 2
Rnd 31: (A) x 2, [(B) x 2, (A) x 3, (B) x 1] x 2, (B) x 1, (A) x 1
Rnd 32: [(B) x 1, (A) x 2, (B) x 1] x 2, (A) x 1, (B) x 1, (A) x 2, (B) x 2, (A) x 2
Rnd 33: [(B) x 1, (A) x 3] x 2, (A) x 4, (B) x 1, (A) x 3
Rnd 34: (B) x 2, (A) x 1, [(A) x 2, (B) x 1] x 3, (A) x 3, (B) x 1
Rnd 35: (A) x 1, (B) x 2, (A) x 11, (B) x 2
Rnd 36: A x 2, (B) x 1, [(B) x 1, (A) x 4] x 2, B x 2, (A) x 1
Rnd 37: (B) x 1, (A) x 2, (B) x 2, (A) x 7, (B) x 2, (A) x 2
Rnd 38: [(B) x 1, (A) x 3] x 2, (A) x 4, (B) x 1, (A) x 3
Rnd 39: (B) x 1, [(B) x 1, (A) x 3] x 2, (A) x 2, (B) x 1, (A) x 3, (B) x 1
Rnd 40: (A) x 1, (B) x 2, (A) x 11, (B) x 2
Rnd 41: (A) x 2, (B) x 2, (A) x 9, (B) x 2, (A) x 1
Rnd 42: [(B) x 1, (A) x 2] x 2, (A) x 7, (B) x 1, (A) x 2
Rnd 43: [(B) x 1, (A) x 3] x 4
Rnd 44: (B) x 2, (A) x 13, (B) x 1
Rnd 45: A x 1, (B) x 1, [(B) x 1, (A) x 5] x 2, B x 2
Rnd 46: (A) x 2, (B) x 2, (A) x 9, (B) x 2, (A) x 1
Rnd 47: [(B) x 1, (A) x 2] x 2, [(A) x 1, (B) x 1] x 2, (A) x 3, (B) x 1, (A) x 2
Rnd 48: [(B) x 1, (A) x 3] x 4
Rnd 49: (B) x 2, (A) x 13, (B) x 1
Rnd 50: (A) x 1, (B) x 2, (A) x 4, [(B) x 1, (A) x 1] x 2, (A) x 3, (B) x 2
Rnd 51: [(A) x 2, (B) x 1, (A) x 3] x 2, (A) x 2, (B) x 1, (A) x 1
Rnd 52: [(B) x 1, (A) x 2] x 2, (A) x 7, (B) x 1, (A) x 2
Rnd 53: [(B) x 1, (A) x 7] x 2
Rnd 54: (B) x 2, (A) x 13, (B) x 1
Rnd 55: [(A) x 1, (B) x 1, (A) x 5] x 2, (A) x 1, (B) x 1
Rnd 56: [(A) x 2, (B) x 1, (A) x 3] x 2, (A) x 2, (B) x 1, (A) x 1
Rnd 57: (B) x 1, (A) x 15
Rnd 58: [(B) x 1, (A) x 7] x 2
Rnd 59: (A) x 7, (B) x 3, (A) x 6
Rnd 60: (B) x 1, (A) x 5, (B) x 5, (A) x 5
Rnd 61: (A) x 4, [(A) x 1, (B) x 3] x 2, (A) x 4
Rnd 62: (A) x 6, (B) x 5, (A) x 5
Rnd 63: (A) x 7, (B) x 3, (A) x 6
Rnd 64: (A) x 8, (B) x 1, (A) x 7
Rnd 65: (A) x 7, (B) x 3, (A) x 6
Rnd 66: (A) x 6, (B) x 5, (A) x 5
Rnd 67: (A) x 5, (B) x 7, (A) x 4
Rnd 68: (A) x 3, (B) x 4, [(A) x 1, (B) x 1] x 2, (B) x 3, (A) x 2
Rnd 69: (A) x 1, (B) x 4, [(A) x 1, (B) x 1] x 4, (B) x 3
Rnd 70: (B) x 2, [(B) x 1, (A) x 1] x 6, (B) x 2
Rnd 71: [(B) x 1, (A) x 1] x 4, (A) x 1, [(A) x 1, (B) x 1] x 3, (A) x 1
Rnd 72: [(B) x 1, (A) x 1] x 3, [(A) x 2, (B) x 1, (A) x 1] x 2, (B) x 1, (A) x 1
Rnd 73: [(B) x 1, (A) x 1] x 2, [(A) x 2, (B) x 1, (A) x 1] x 3
Rnd 74: [(B) x 1, (A) x 3] x 2, (A) x 4, (B) x 1, (A) x 3
Rnd 75: [(B) x 1, (A) x 1] x 2, (A) x 10, (B) x 1, (A) x 1
Rnd 76: (B) x 1, (A) x 15
Fasten off Color A and move to Cuff Instructions.
Crochet Stocking Leg – Chart Instructions
Repeat each round instructions 3 times for one round
Crochet Stocking Leg – Color Block Instructions
Repeat each round instructions 3 times for one round
Part 3 of the White Spruce Stocking
Here we are at Part 3 of the Stocking Make Along! How’s your White Spruce Crochet Stocking coming along? Be sure to share your progress in the Briana K Community on Facebook.
Crochet Stocking Part 3 Video Tutorial

White Spruce Crochet Stocking Cuff
Row 1: With Color B, ch 17, in blo sc in second chain from hook and across to body, sl st 2 sts on the body (these do not count as sts), turn. | 16 sts
Row 2: Skip the two sl sts from the body, in blo sc in each st across, turn. | 16 sts
Row 3: Ch 1, in blo sc in each st across, sl st 2 sts on the body, turn. | 16 sts
Repeats: Repeat Rows 2-3 around the top of the stocking body. Join the last row to the beginning row by slip stitching through the blo of the first and last row at the same time with the WS facing.
White Spruce Crochet Stocking Heel
Rnd 1: With Color A, join yarn at the corner of the heel opening. Sc around the heel opening, do not join.
*Optional Tip: To reduce holes, sc2 tog at the corners. | 44 sts
Rnd 2: *sc2tog, sc in the next 9*; repeat from * to * around | 40 sts
Rnd 3: *sc2tog, sc in the next 8*; repeat from * to * around | 36 sts
Rnd 4: *sc2tog, sc in the next 7*; repeat from * to * around | 32 sts
Rnd 5: *sc2tog, sc in the next 6*; repeat from * to * around | 28 sts
Rnd 6: *sc2tog, sc in the next 5*; repeat from * to * around | 24 sts
Rnd 7: *sc2tog, sc in the next 4*; repeat from * to * around | 20 sts
Rnd 8: sc2tog around | 10 sts
Fasten off leaving a tail, weave tail through the front loops of each stitch around then pull closed. Weave in ends.
Fasten off leaving a tail, weave tail through the front loops of each stitch around then pull closed. Weave in ends.
White Spruce Crochet Stocking Finishing
Use a strip of leather and a leather punch to create a strap and stitch to the top of the stocking. Or create an i-cord.
I really hope you enjoyed this event. You are my motivation to keep on creating and I can’t tell you how much joy it brings to see your beautiful creations. Cheers!
Well, That Was Fun! What’s Next?


