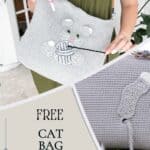


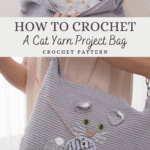
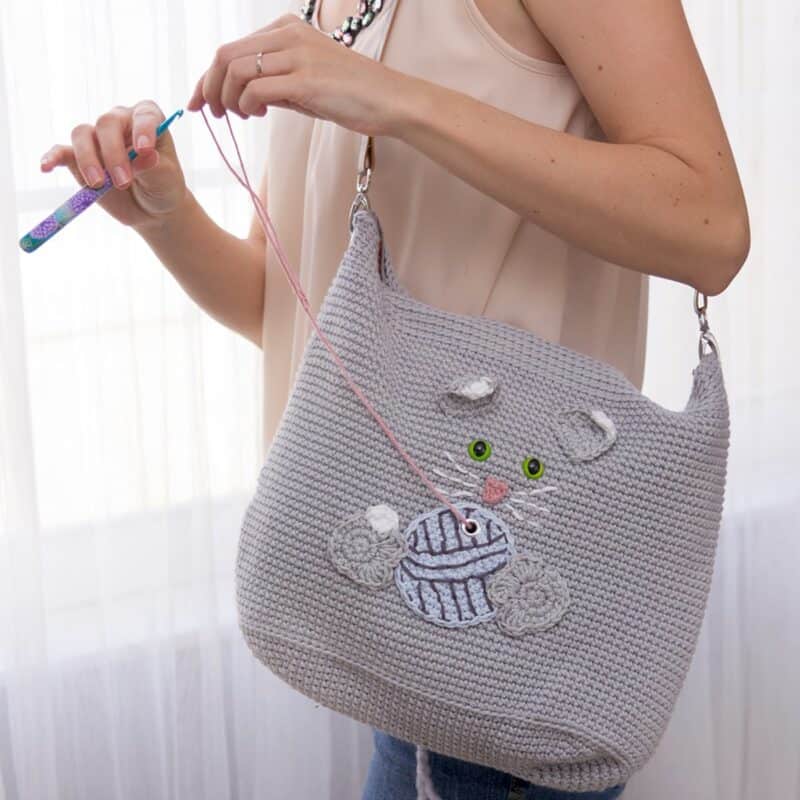
Say hello to your new favorite yarn companion — the free Cat Crochet Project Bag Pattern! Whether you’re a yarn enthusiast, cat lover, or both (let’s be honest, probably both ?), this project is about to make your crochet life a lot more fun and organized.
This adorable bag keeps your yarn tangle-free and your projects neatly tucked away, whether you’re crocheting on the couch or crafting on the go. With its cute kitty-inspired design, it’s as functional as it is fabulous — a true must-make for crochet lovers who enjoy a side of whimsy.
And if you can’t get enough of playful project bags, don’t miss the Fish Crochet Bag Free Pattern or the hilariously magical Unicorn Farts Crochet Project Bag — because handmade storage should always make you smile.
Crochet Cat Project Bag Supplies
Crochet Hook:
5.0mm (H hook), or hook to obtain gauge
Notions:
Tapestry (yarn) Needle
Scissors
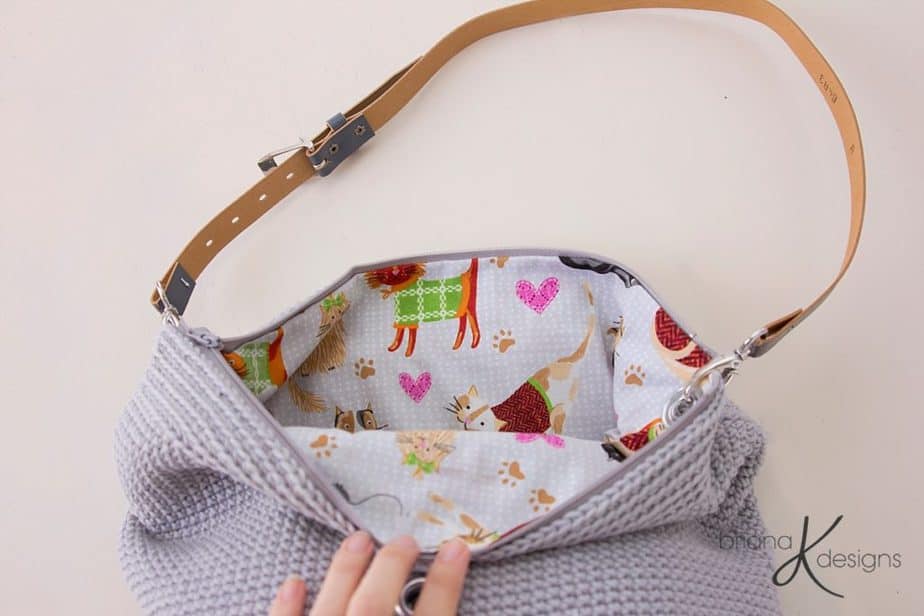
Leather strap for bag handle (I used an old belt)
2 cat safety eyes 18 mm
Large Eyelet Kit ¼ inch (6.35mm)- 2 grommets needed
Extra-Large Eyelet Kit 7/16 inch (1.1cm)- 3 grommets needed
-Or An Eyelets/Grommet Kit
Quick Dry Fabric Fusion (Liquid Stitch)
¾ yard cotton or non-stretchy fabric
12-inch grey zipper
Handbag Swivel Clasps– set of two, optional
Yarn:
The original bag was made with 100% cotton yarn:
Yarn Quantities
Total Yardage: approx. 460 yards
Color A: Grey (2 skeins)
Color B: White (under 20 yds)
Color C: Light Blue (under 25 yds)
Color D: Pink (under 10 yds)
Color E: Dark Grey (under 10 yds)
Abbreviations/Stitches:
ch- Chain
sl st- Slip Stitch
st(s) – stitch(es)
sc- Single Crochet
sc2tog- Single Crochet Two Together
sc3tog- Single Crochet Three Together
18 rows x 18 stitches = 4 x4 inches in sc
Skill Level:
Beginner/Intermediate
Bag Measurements in inches:
Laid flat: 12 ½ inches, Width: 14 inches
FAQs About the Cat Crochet Project Bag ?
Q: What skill level is this pattern?
A: This pattern is beginner-friendly, perfect for anyone who knows how to work in the round and crochet basic stitches.
Q: How big is the finished bag?
A: The finished project bag comfortably fits several skeins of yarn, a WIP (work-in-progress), and your favorite hook set.
Q: Can I use different yarn weights?
A: Yes! You can experiment with lighter yarn for a smaller pouch or chunky yarn for a bigger, sturdier tote.
Q: How do I clean the bag?
A: If you’re using acrylic yarn, it’s easy-care — just hand-wash gently and lay flat to dry.
Q: Can I sell finished items made from this pattern?
A: Absolutely! You’re welcome to sell your handmade cat project bags — just credit Briana K as the designer.
Pattern Notes:
- This bag works from the bottom up and is joined in the round.
- Chains do not count as stitches when joining.
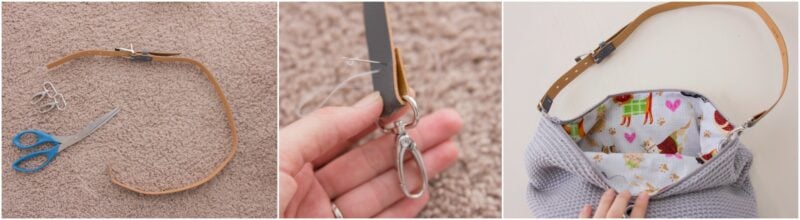
- For a handbag strap, consider using an old belt from your closet, visiting a consignment store, or checking the ribbon aisle at your local craft store. The swivel clasps are optional; the handle can be fastened through the extra-large grommet (just make sure to get a strap that fits the clasps or through the grommet).
Relax & Crochet
Upgrade to the Printable PDF
Beautifully formatted to print and relax while crocheting. The paid pattern includes:
This crochet pattern can be purchased on Etsy or Ravelry.
Click the box below to unlock this exclusive subscriber content for free. Add your email and create a password. If you are having trouble, reset your password or log in to the Grow Portal.
I’m thrilled to share this amazing crochet pattern with you! Please don’t copy, paste, or distribute this pattern. Prefer an ad-free experience? Purchase a digital PDF file for a small fee from one of my online stores. I appreciate your support and readership. You are why I can keep doing what I love and sharing it with others. Thank you from the bottom of my heart.

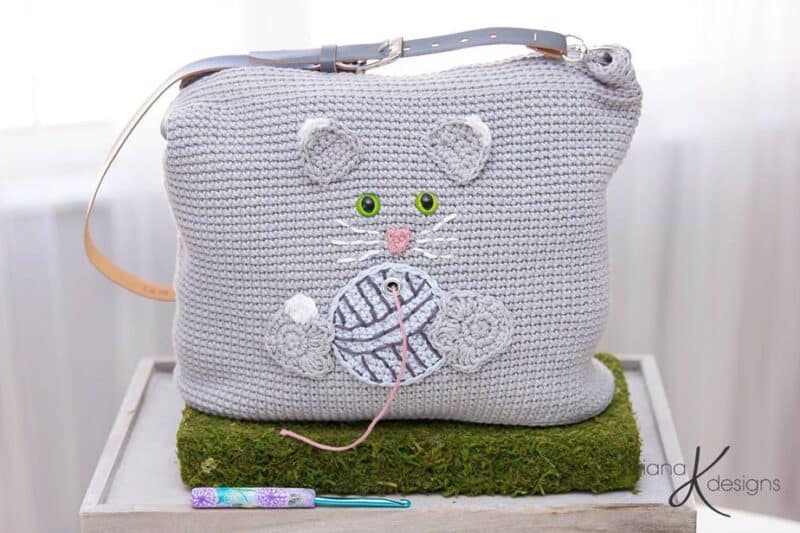
Free Crochet Cat Bag Pattern
Cat Bag Body
Rnd 7:
Sc in each stitch around, join, and ch 1.
Rnd 8:
(2sc in next stitch, sc in next 3) three times, sc 30, (2sc in next stitch, sc in next 3) six times, sc 30, (2sc in next stitch, sc in next 3) three times, join, and ch 1. | 120 sts
Rnds 9-10:
Sc in each stitch around, join, and ch 1.
Rnd 11:
In Back Loops Only, sc in each stitch around, join, and ch 1.
Rnds 12-23:
Sc in each stitch around, join, and ch 1.
Join The Kindest Community
Join our vibrant community of crafters on Facebook today. Whether you enjoy crafting with others or simply have burning questions, we’ve got you covered – join us now!
Rnd 24:
Sc 28, chain 2, skip 2, sc 90, join, and ch 1.
Rnds 25-29:
Sc in each stitch around (and in chain 1 from round 24), join, and ch 1.
Rnd 30:
Sc 90, chain 1, skip 1, sc 29, join, and ch 1.
Rnds 31-56:
Sc in each stitch around (and in chains from round 30), join, and ch 1.
Rnd 57:
Ch 1 (counts as stitch), skip 1, sc 59, ch 1, skip 1, sc 59, join, and ch 1.
Rnd 58:
Sc in each stitch around (and in chains from round 57), join, and ch 1.
Rnds 59-62:
In Back Loops Only, sc in each stitch around, join, and ch 1.
Rnd 63:
In Back Loops Only, sc in each stitch around, join, and fasten off. Weave in the ends.
Cat Nose
Row 1:
Using Color D yarn, chain 4, sc in second chain from hook and across, turn, and ch 1. | 3 sts
Row 2:
Sc3tog, fasten off, leaving a tail to sew onto the bag. | 1 st
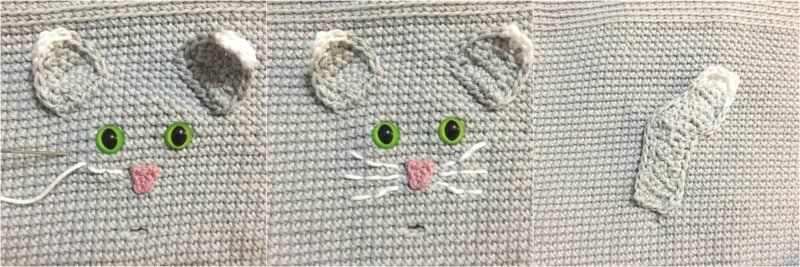
Cat Ears (Make 2)
Row 1:
With Color A yarn, chain 7, sc in 2nd chain from hook and across (the alternative method is to foundation single crochet 6), turn, and ch 1. | 6 sts
Row 2:
Sc2tog, sc in next 2, sc2tog, turn, and ch 1. | 4 sts
Row 3:
Sc in each across, turn, and ch 1. | 4 sts
Row 4:
Sc2tog twice, turn, and ch 1. | 2 sts
Row 5:
Sc2tog. | 1 st
Row 6:
Continue to sc around the outside edges of the ear, and change to white yarn for the top tip of the ear. Join, leaving a long tail for sewing to the bag, and fasten off.
Cat Tail
Row 1:
With Color A. Ch 5, sc in 2nd chain from hook and across (the alternative method is to foundation single crochet 4), turn, and ch 1. | 4 sts
Row 2:
Sc in each across, turn, and ch 1.
Row 3:
Sc2tog, sc in next, 2 sc in last, turn, and ch 1.
Row 4:
2sc in first, sc in next, sc2tog, turn, and ch 1.
Rows 5-8:
Repeat rows 3-4 two more times.
Row 9:
2sc in first, sc in next, sc2tog, turn, and ch 1.
Row 10:
Sc2tog, sc in next, 2 sc in last, turn, and ch 1.
Rows 11-14:
Repeat rows 9-10 two more times.
Rows 15-16:
Repeat rows 3-4.
Row 17:
With Color B, sc 4, turn, and ch 1.
Row 18:
Sc2tog, sc in next 2, turn, and ch 1. | 3 sts
Row 19:
Sc2tog, sc in last. | 2sts
Sc around tail using Color B on Color B sides and Color A on A sides.
Check out the ad-free pdf for the bag lining instructions.
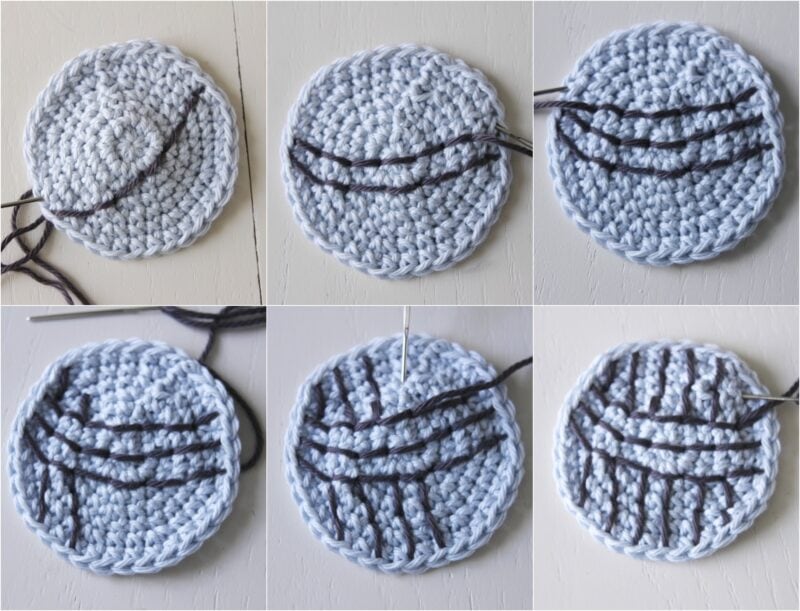
Yarn Ball
Row 1:
With Color D yarn, in Magic Circle (aka Magic Ring) sc 8, join, and ch 1. | 8 sts
Row 2:
2sc in each stitch around, join, and ch 1. | 16 sts
Row 3:
Sc in each st around, join, and ch 1.
Row 4:
2sc in first, sc in next; repeat * around, join, and ch 1. | 24 sts
Row 5:
Sc in 23, chain 1, skip 1, join, and ch 1.
Row 6:
*2sc in first, sc in next 2; repeat * around (be sure to sc in the chain 1 space from previous round), join, and ch 1. | 32 sts
Row 7:
Sc in each st around, join, and fasten off. Weave in ends.
Stitch on Yarn Ball
Using a tapestry needle and Color E yarn, stitch lines onto the yarn ball.
Paw 1
Rnd 1:
With Color A yarn, in Magic Circle sc 8, join, and ch 1. | 8 sts
Rnd 2:
2sc in each stitch around, join, and ch 1. | 16 sts
Rnd 3:
*sc first, 5dc in next; repeat * two more times, sc in last 10, join, and fasten off, leave a tail for sewing onto bag.
Paw 2
Rnd 1:
With Color A yarn, in Magic Circle sc 8, join, and ch 1. 8 sts
Rnd 2:
2sc in each stitch around, join, and ch 1. | 16 sts
Rnd 3:
*sc first, 5dc in next; repeat * one more time, change to Color B and repeat * one more time, change to Color A and sc in last 10, join, and fasten off, leave a tail for sewing onto bag.
Cat Face and Tail
Place cat eyes between rounds 33-34 (9-10 rows above chain 1 space) and fasten back; stitch ears and nose onto bag, and using a tapestry needle, stitch whiskers to the side of nose.
On the back of bag, stitch the tail into place, starting one row above the chain 2 space.
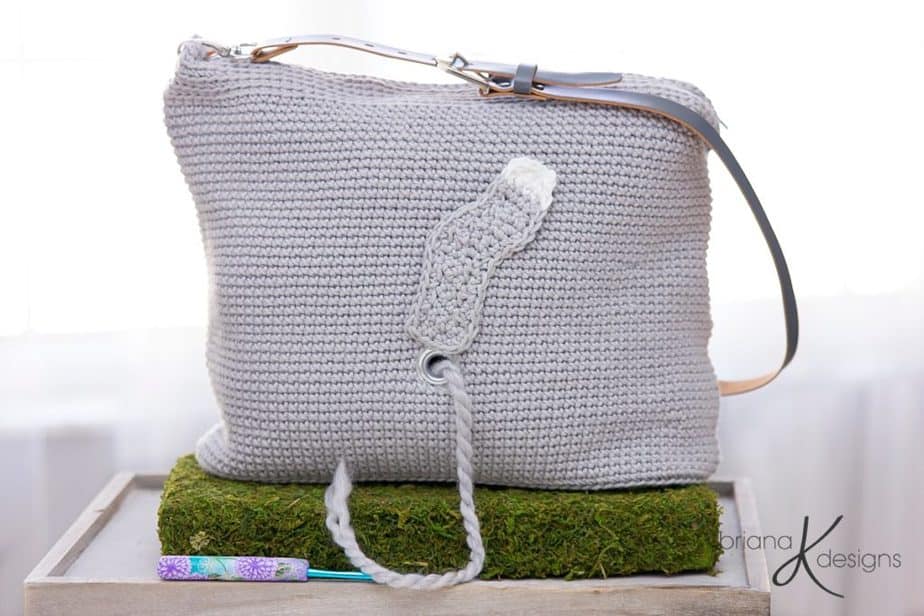
Zipper
On the second row down from the top, glue the sides of the zipper with the zipper facing.
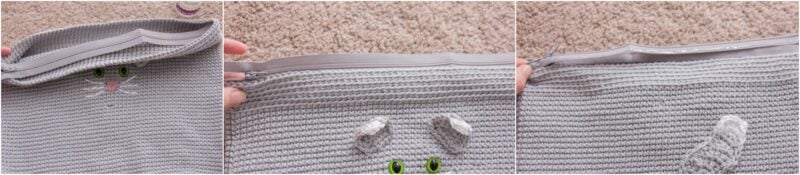
Grommets
Place grommets into holes on bag and yarn ball. Using as a guide, cut away fabric from bag (Large grommets in chain 1 spaces and extra-large grommets in chain 2 spaces at top of bag). With grommet kit, hammer grommets into place.
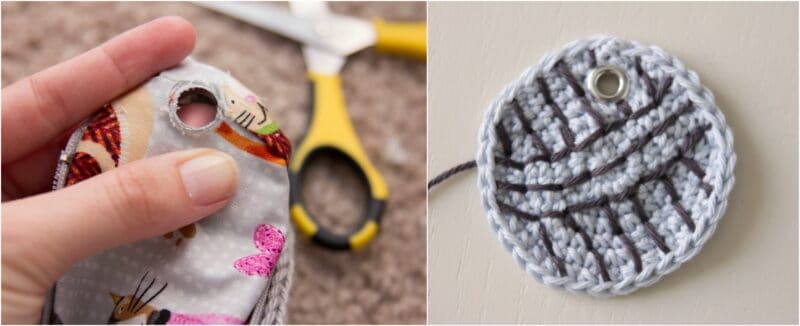
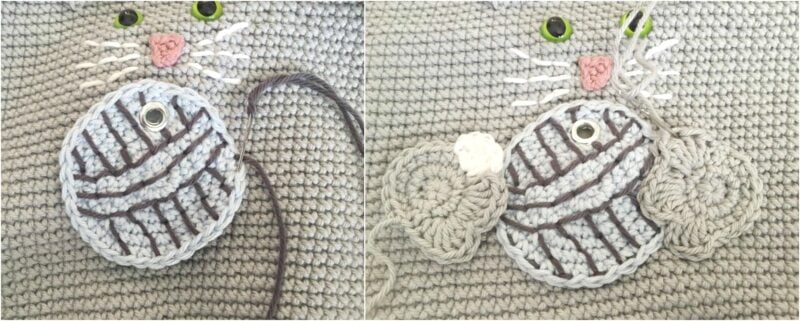
Stitch the yarn ball to the front of bag, making sure to match the grommet holes so yarn easily slides through both.
Stitch paws to each side of yarn ball.
Strap
Cut a belt and fasten ends around the swivel clasp with a sharp needle and thread. Attach to sides of bag.
Finishing
Weave in any remaining ends and keep your crochet project safe and protected!
With its playful design and practical purpose, the freeCat Crochet Project Bag Pattern is the purr-fect mix of form and function. Whether you’re storing your yarn stash, carrying your next WIP, or gifting it to a fellow cat-loving crocheter, this project is guaranteed to bring smiles and keep your crafting life organized.
So grab your yarn, cue up your favorite show, and crochet yourself a new feline friend — one that never tangles your yarn!
Looking for more fun crochet bags? Check out these beautiful projects!
Hexagon Granny Square Bag Pattern
Summer House One-Piece Cross-Body Bag
Cheers and happy crocheting!
Well, That Was Fun! What’s Next?