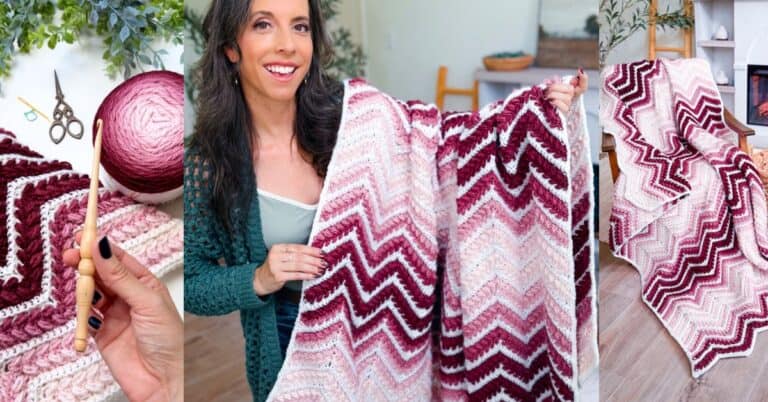
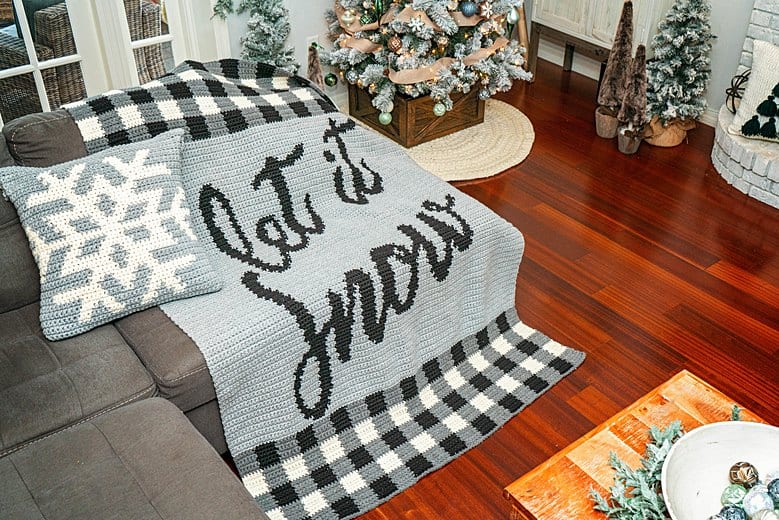
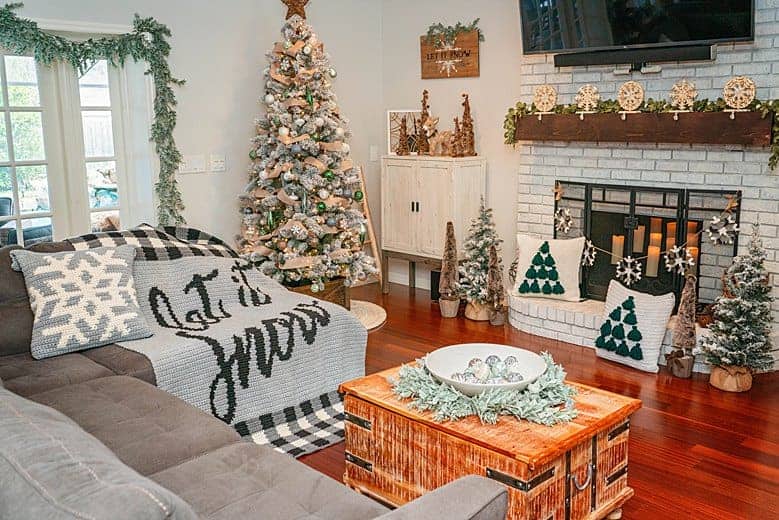
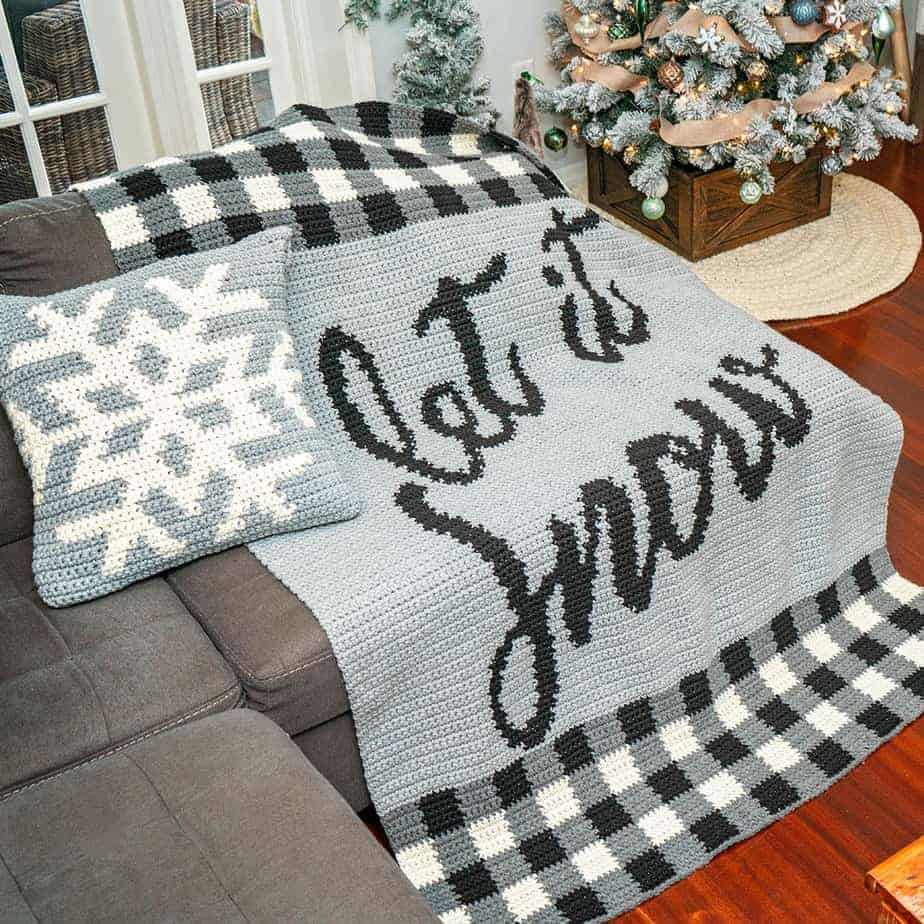
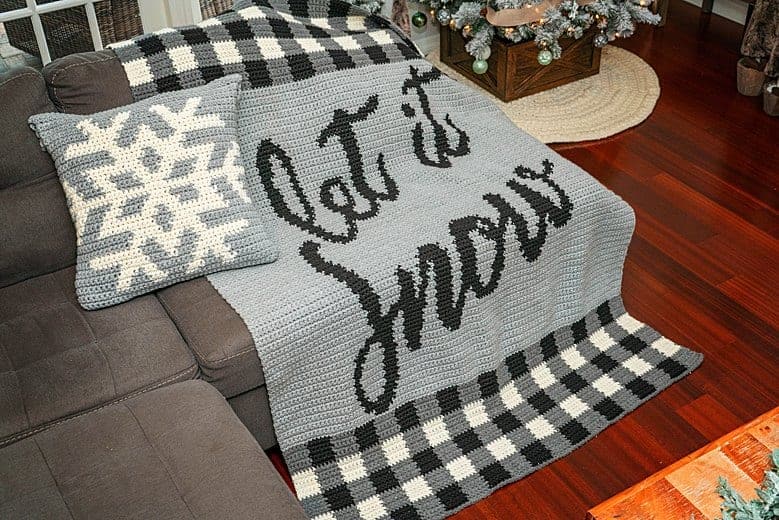
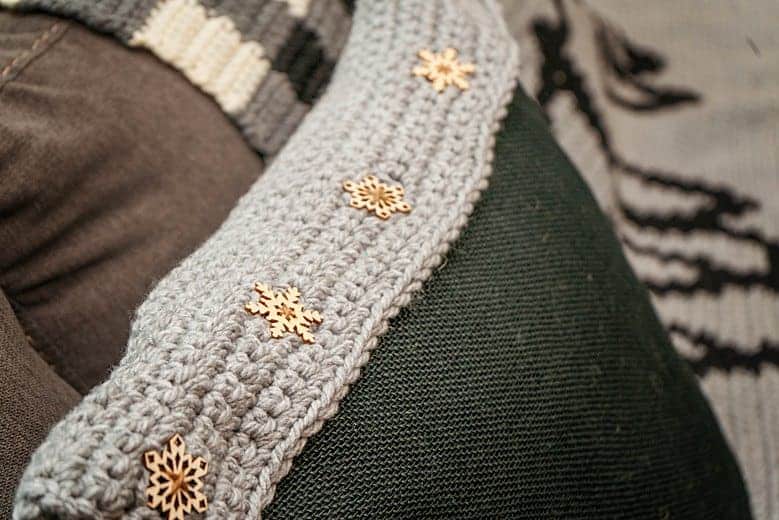
I grew up in the Rocky Mountains where winters were full of cold days and even colder nights. But I love the calm and silence of a gentle snowstorm, it’s so magical. If going out isn’t an option, then why not create a Let It Snow Crochet Blanket and Pillow.
And speaking of keeping cozy, also check out the Windowpane Cocoon Crochet Wrap, this pattern also uses bulky weight yarn with an easy crochet construction.
This is a fun colorwork pattern with a bulky weight yarn. It makes it warm enough for those really cold nights and adds a lot of warmth.
Are you ready to jump right in and crochet? Before you get started, take a moment to hop on over to learn Ways to Colorwork in Crochet. Learn about the different ways to do crochet color-work but also for a freebie!
The printable Sheep Yarn Bobbins are super helpful and also cute. You can even cut them out on a cutting machine!
Craft An Easy Granny Square Snowflake Blanket With This Free Pattern
Free Colorwork Holiday Stocking Pattern to Create Your Own Style
Let It Snow Crochet Supplies
Crochet Hook:
Size M/N/13/9mm crochet hook or size needed to obtain gauge,
Notions:
Yarn Needle
Scissors
1” (2.5 cm) Buttons, 5 needed
20×20 Inch Pillow Insert
3/4 yard burlap if desired
Yarn:
Bernat Softee Chunky super bulky (super chunky) weight acrylic yarn (3 ½ oz/108 yds/100g per ball):
Grey Heather #28046 (10 balls)
Black #28040 (5 balls)
True Grey #28044 (4 balls)
Neutral #28008 (3 balls)
Yardage:
Approx. 2,200 Yards [2,011 meters]
Abbreviations/Stitches:
ch- Chain
RS- Right Side
sc- Single Crochet
sl st- Slip Stitch
sts- Stitches
WS- Wrong Side
Gauge:
15 sc sts and 15 rows =
4” [10 cm] with H-hook
Measurements/Sizes:
Blanket: Approximately 62 ½ inches long x 48 inches wide
Pillow Cover is for a 20×20 inch pillow insert
Skill Level:
Easy/Advanced Beginner
Let It Snow Crochet Notes:
- Please note, matching gauge both horizontal and vertical can be difficult. Extra rows can be added at the top if needed so it is more important to match the stitch gauge versus the row gauge. This pattern also has some ease to fit over a pillow.
- The pillow pattern is worked from the bottom up in rows and in two pieces. The front panel will also work a buttonhole flap to secure the top of the crochet pillow. The front and the back panels will be slip stitched together once completed.
- After the end of each row turn and ch 1. The ch 1 does not count as a stitch.
- The right side of rows are read from right to left. Wrong side rows are read from left to right.
- To change color, work the last yarn over of the single crochet in the color of the next stitch.
- Since there is a wrong side and a right side to the pillow panels, I used a combination of intarsia and carrying yarn across the back for the colorwork. Experiment and see what works best for you.
- A burlap back can be used in a substitute for a crochet pillow back.
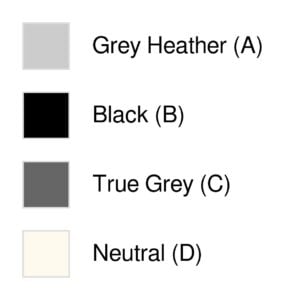
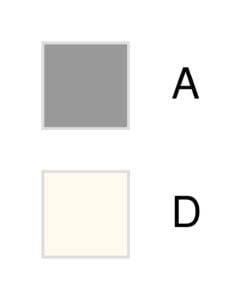
Colors are abbreviated as letters in the written instructions:
Grey Heather = A
Black = B
True Grey = C
Neutral = D
This pattern can also be purchased on Raverly: Let It Snow Crochet Blanket & Pillow on Ravelry. Or on LoveCrafts.
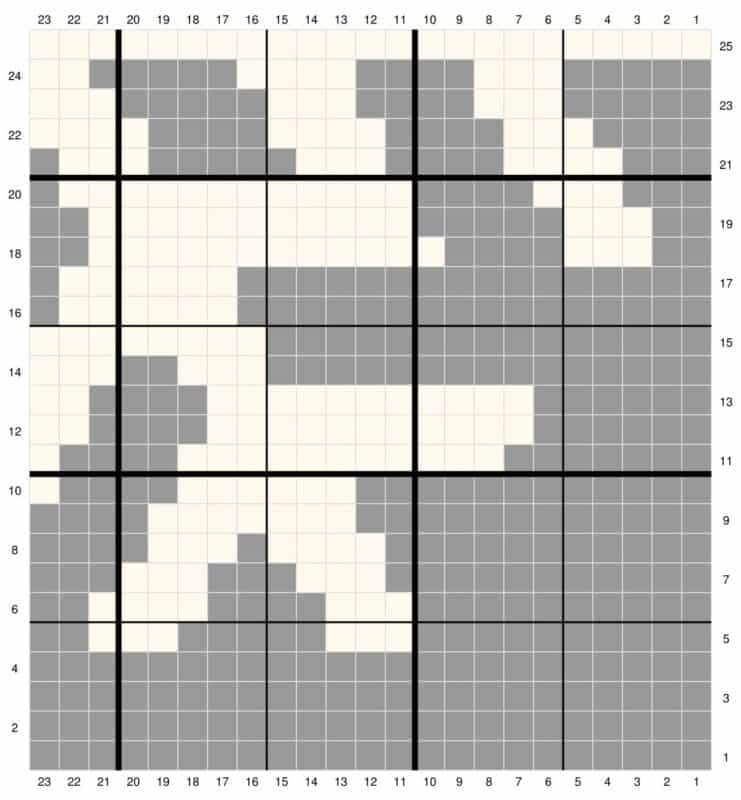
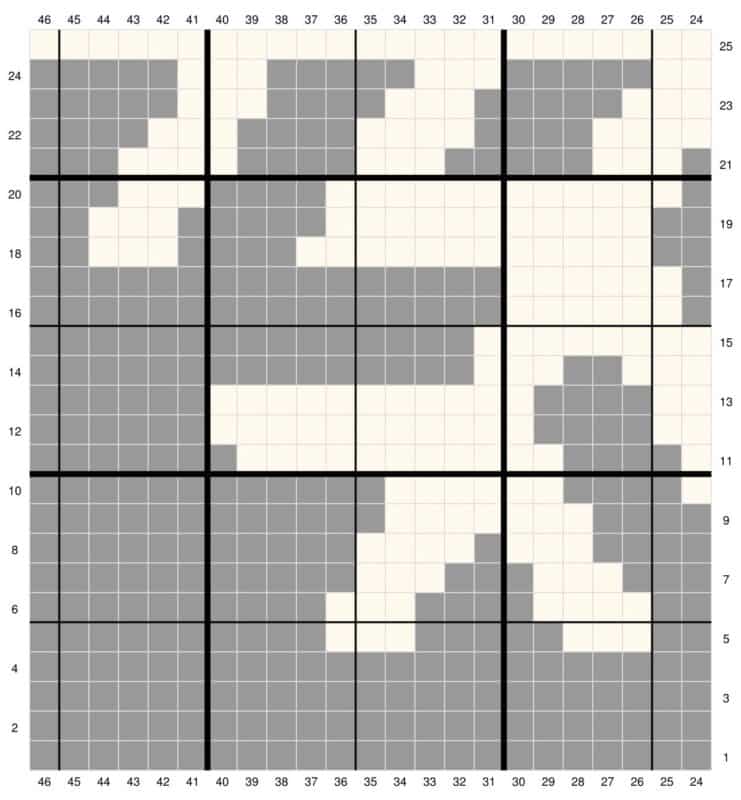
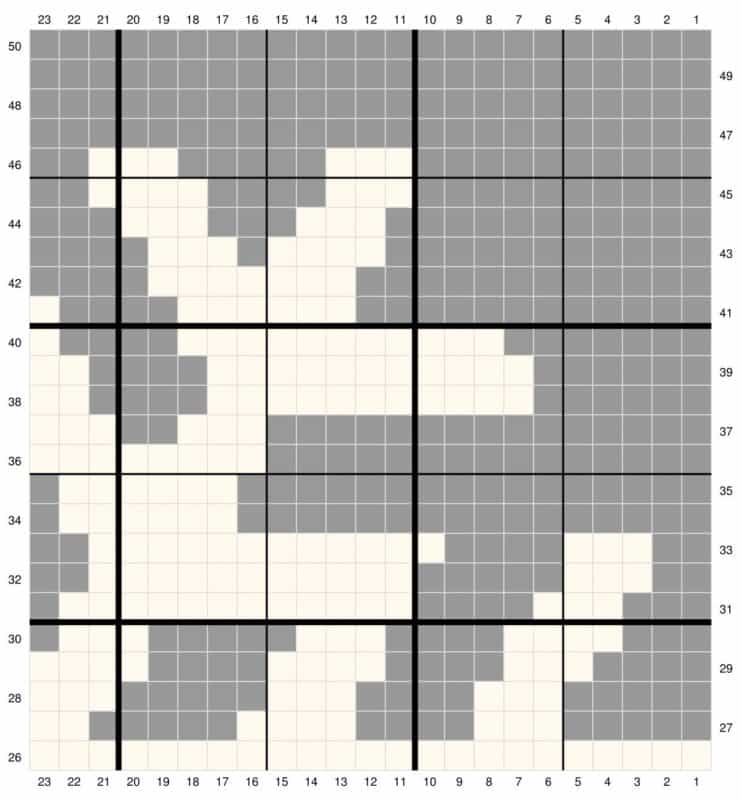
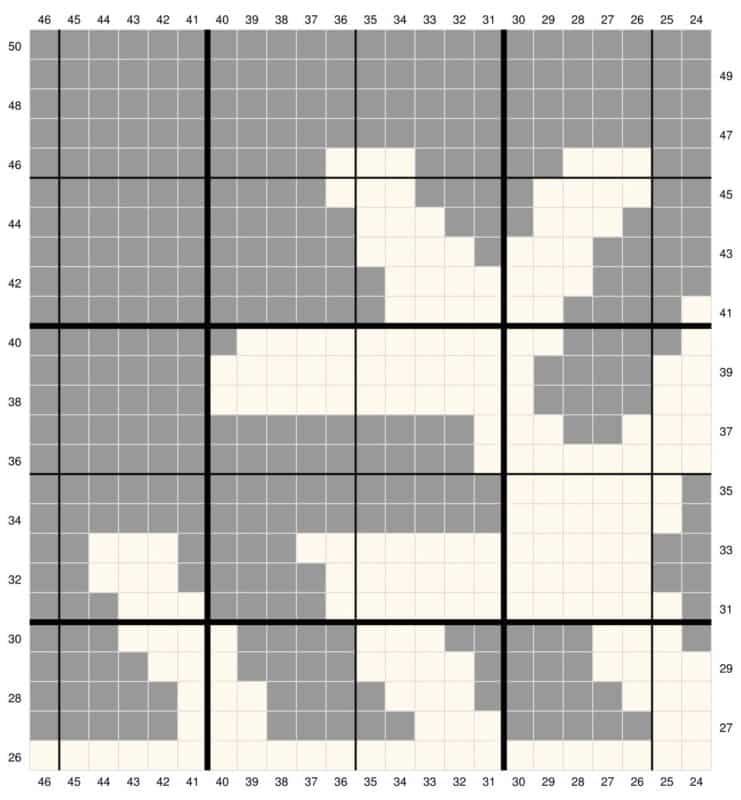
Let It Snow Crochet Blanket Charts
Click the box below to unlock this exclusive subscriber content for free. Add your email and create a password. If you are having trouble, reset your password or log in to the Grow Portal.
I’m thrilled to share this amazing crochet pattern with you! Please don’t copy, paste, or distribute this pattern. Prefer an ad-free experience? Purchase a digital PDF file for a small fee from one of my online stores. I appreciate your support and readership. You are why I can keep doing what I love and sharing it with others. Thank you from the bottom of my heart.
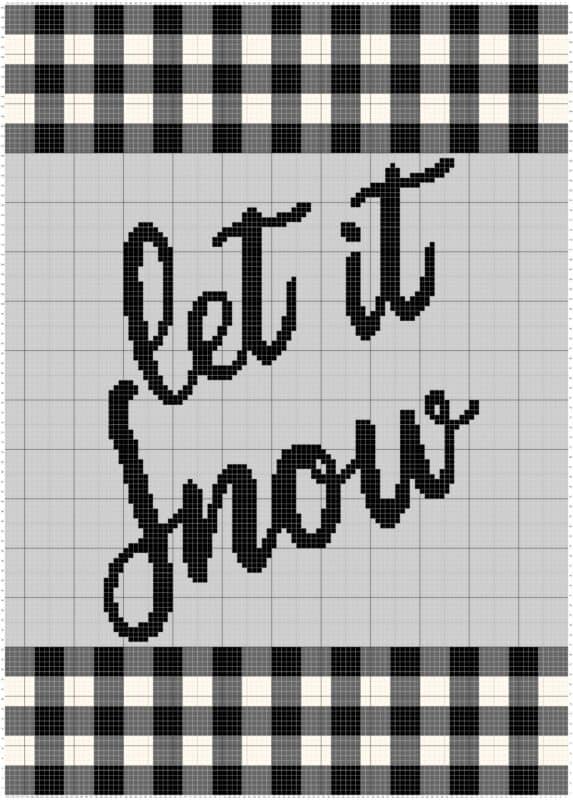
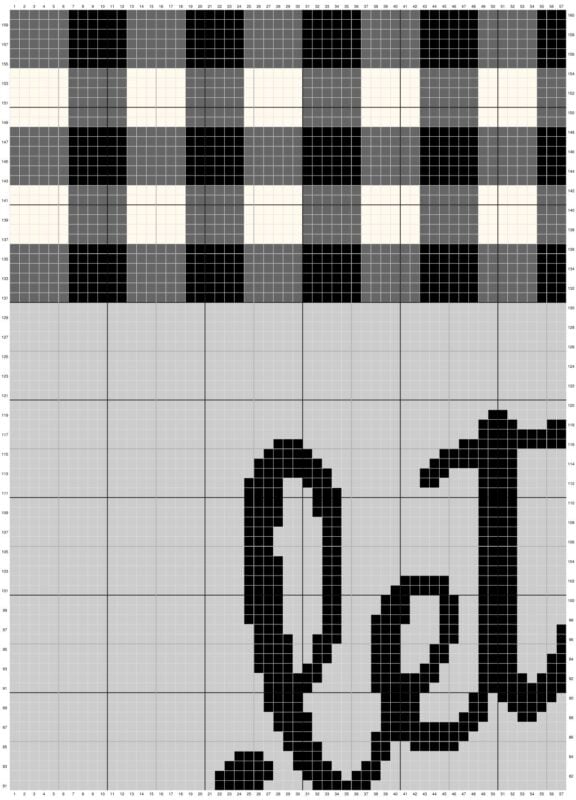
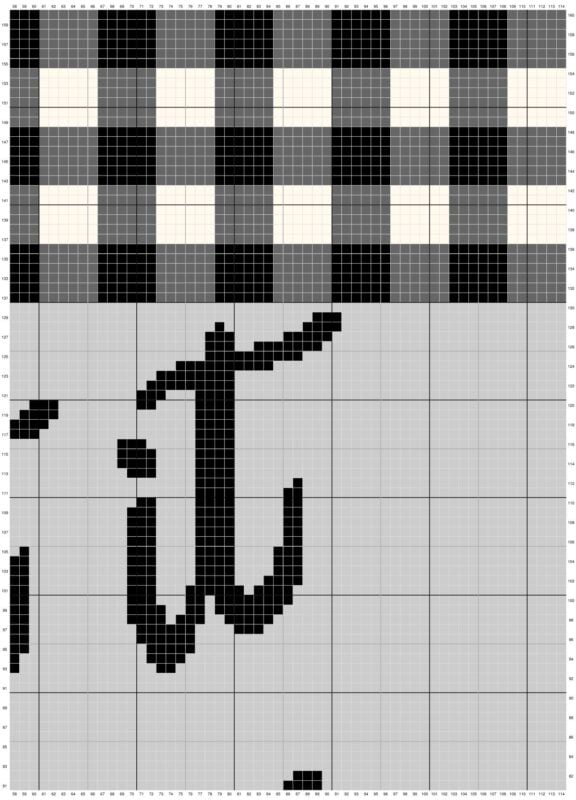
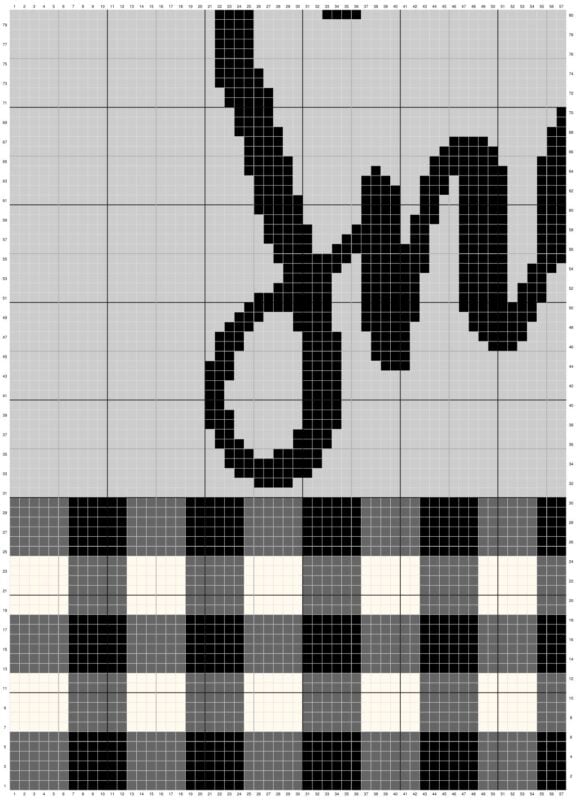
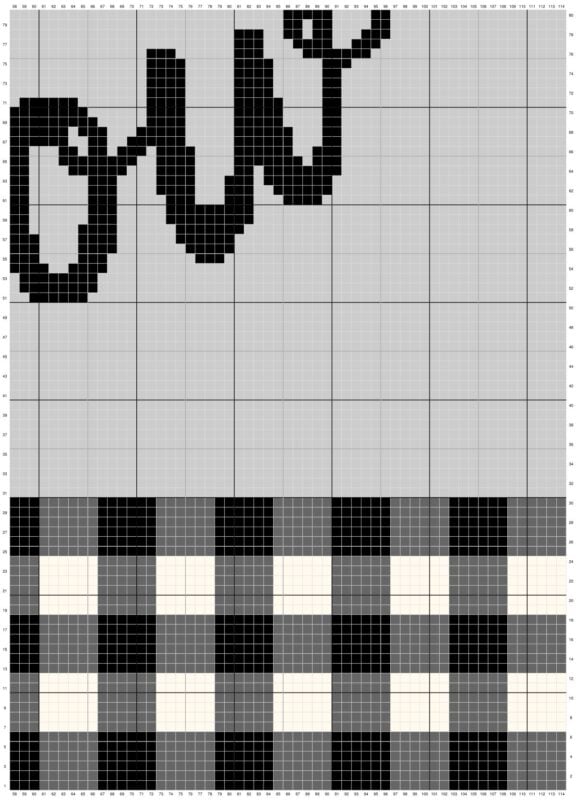
Let It Snow Crochet Instructions
To Begin: With True Grey (C), chain 115 and start the first row in the second chain from hook.
After the end of each row turn and ch 1. The ch 1 does not count as a stitch. (114 sts)
→ Row 1 [WS]: C6, B6, C6, B6, C6, B6, C6, B6, C6, B6, C6, B6, C6, B6, C6, B6, C6, B6, C6
← Row 2 [RS]: C6, B6, C6, B6, C6, B6, C6, B6, C6, B6, C6, B6, C6, B6, C6, B6, C6, B6, C6
→ Row 3 [WS]: C6, B6, C6, B6, C6, B6, C6, B6, C6, B6, C6, B6, C6, B6, C6, B6, C6, B6, C6
← Row 4 [RS]: C6, B6, C6, B6, C6, B6, C6, B6, C6, B6, C6, B6, C6, B6, C6, B6, C6, B6, C6
→ Row 5 [WS]: C6, B6, C6, B6, C6, B6, C6, B6, C6, B6, C6, B6, C6, B6, C6, B6, C6, B6, C6
← Row 6 [RS]: C6, B6, C6, B6, C6, B6, C6, B6, C6, B6, C6, B6, C6, B6, C6, B6, C6, B6, C6
→ Row 7 [WS]: D6, C6, D6, C6, D6, C6, D6, C6, D6, C6, D6, C6, D6, C6, D6, C6, D6, C6, D6
← Row 8 [RS]: D6, C6, D6, C6, D6, C6, D6, C6, D6, C6, D6, C6, D6, C6, D6, C6, D6, C6, D6
→ Row 9 [WS]: D6, C6, D6, C6, D6, C6, D6, C6, D6, C6, D6, C6, D6, C6, D6, C6, D6, C6, D6
← Row 10 [RS]: D6, C6, D6, C6, D6, C6, D6, C6, D6, C6, D6, C6, D6, C6, D6, C6, D6, C6, D6
→ Row 11 [WS]: D6, C6, D6, C6, D6, C6, D6, C6, D6, C6, D6, C6, D6, C6, D6, C6, D6, C6, D6
← Row 12 [RS]: D6, C6, D6, C6, D6, C6, D6, C6, D6, C6, D6, C6, D6, C6, D6, C6, D6, C6, D6
→ Row 13 [WS]: C6, B6, C6, B6, C6, B6, C6, B6, C6, B6, C6, B6, C6, B6, C6, B6, C6, B6, C6
← Row 14 [RS]: C6, B6, C6, B6, C6, B6, C6, B6, C6, B6, C6, B6, C6, B6, C6, B6, C6, B6, C6
→ Row 15 [WS]: C6, B6, C6, B6, C6, B6, C6, B6, C6, B6, C6, B6, C6, B6, C6, B6, C6, B6, C6
← Row 16 [RS]: C6, B6, C6, B6, C6, B6, C6, B6, C6, B6, C6, B6, C6, B6, C6, B6, C6, B6, C6
→ Row 17 [WS]: C6, B6, C6, B6, C6, B6, C6, B6, C6, B6, C6, B6, C6, B6, C6, B6, C6, B6, C6
← Row 18 [RS]: C6, B6, C6, B6, C6, B6, C6, B6, C6, B6, C6, B6, C6, B6, C6, B6, C6, B6, C6
→ Row 19 [WS]: D6, C6, D6, C6, D6, C6, D6, C6, D6, C6, D6, C6, D6, C6, D6, C6, D6, C6, D6
← Row 20 [RS]: D6, C6, D6, C6, D6, C6, D6, C6, D6, C6, D6, C6, D6, C6, D6, C6, D6, C6, D6
→ Row 21 [WS]: D6, C6, D6, C6, D6, C6, D6, C6, D6, C6, D6, C6, D6, C6, D6, C6, D6, C6, D6
← Row 22 [RS]: D6, C6, D6, C6, D6, C6, D6, C6, D6, C6, D6, C6, D6, C6, D6, C6, D6, C6, D6
→ Row 23 [WS]: D6, C6, D6, C6, D6, C6, D6, C6, D6, C6, D6, C6, D6, C6, D6, C6, D6, C6, D6
← Row 24 [RS]: D6, C6, D6, C6, D6, C6, D6, C6, D6, C6, D6, C6, D6, C6, D6, C6, D6, C6, D6
→ Row 25 [WS]: C6, B6, C6, B6, C6, B6, C6, B6, C6, B6, C6, B6, C6, B6, C6, B6, C6, B6, C6
← Row 26 [RS]: C6, B6, C6, B6, C6, B6, C6, B6, C6, B6, C6, B6, C6, B6, C6, B6, C6, B6, C6
→ Row 27 [WS]: C6, B6, C6, B6, C6, B6, C6, B6, C6, B6, C6, B6, C6, B6, C6, B6, C6, B6, C6
← Row 28 [RS]: C6, B6, C6, B6, C6, B6, C6, B6, C6, B6, C6, B6, C6, B6, C6, B6, C6, B6, C6
→ Row 29 [WS]: C6, B6, C6, B6, C6, B6, C6, B6, C6, B6, C6, B6, C6, B6, C6, B6, C6, B6, C6
← Row 30 [RS]: C6, B6, C6, B6, C6, B6, C6, B6, C6, B6, C6, B6, C6, B6, C6, B6, C6, B6, C6
→ Row 31 [WS]: A114
← Row 32 [RS]: A85, B4, A25
→ Row 33 [WS]: A23, B8, A83
← Row 34 [RS]: A82, B10, A22
→ Row 35 [WS]: A22, B3, A2, B5, A82
← Row 36 [RS]: A81, B4, A5, B3, A21
→ Row 37 [WS]: A21, B2, A6, B4, A81
← Row 38 [RS]: A80, B4, A7, B3, A20
→ Row 39 [WS]: A20, B3, A7, B4, A80
← Row 40 [RS]: A80, B4, A8, B2, A20
→ Row 41 [WS]: A20, B2, A8, B4, A80
← Row 42 [RS]: A80, B4, A8, B2, A20
→ Row 43 [WS]: A20, B3, A7, B4, A80
← Row 44 [RS]: A73, B3, A4, B4, A7, B3, A20
→ Row 45 [WS]: A21, B2, A7, B4, A3, B4, A73
← Row 46 [RS]: A62, B3, A8, B4, A3, B4, A6, B3, A21
→ Row 47 [WS]: A21, B3, A6, B4, A3, B4, A7, B5, A61
← Row 48 [RS]: A61, B6, A6, B5, A3, B4, A4, B3, A22
→ Row 49 [WS]: A23, B3, A3, B4, A3, B6, A5, B7, A60
← Row 50 [RS]: A60, B8, A4, B6, A3, B9, A24
→ Row 51 [WS]: A25, B8, A3, B6, A4, B5, A1, B3, A4, B6, A49
← Row 52 [RS]: A48, B8, A3, B3, A1, B5, A4, B6, A3, B6, A27
→ Row 53 [WS]: A28, B5, A3, B6, A4, B5, A2, B2, A3, B8, A48
← Row 54 [RS]: A47, B4, A2, B4, A1, B3, A2, B5, A3, B7, A2, B6, A28
→ Row 55 [WS]: A27, B8, A1, B7, A3, B5, A3, B6, A4, B3, A9, B3, A35
← Row 56 [RS]: A34, B5, A7, B4, A4, B6, A3, B5, A3, B10, A2, B4, A27
→ Row 57 [WS]: A26, B5, A3, B6, A1, B2, A3, B5, A3, B6, A4, B4, A6, B6, A34
← Row 58 [RS]: A33, B7, A6, B4, A5, B5, A3, B5, A3, B2, A1, B5, A4, B5, A26
→ Row 59 [WS]: A26, B4, A6, B4, A1, B3, A2, B5, A3, B5, A6, B3, A5, B9, A32
← Row 60 [RS]: A32, B9, A5, B3, A6, B5, A3, B5, A2, B2, A2, B4, A6, B5, A25
→ Row 61 [WS]: A25, B5, A6, B4, A2, B2, A2, B5, A3, B5, A6, B3, A5, B3, A3, B3, A3, B4, A25
← Row 62 [RS]: A24, B6, A2, B3, A3, B4, A4, B3, A6, B5, A3, B5, A1, B3, A2, B4, A7, B4, A25
→ Row 63 [WS]: A25, B4, A7, B3, A3, B3, A1, B5, A3, B5, A6, B3, A4, B4, A3, B3, A1, B7, A24
← Row 64 [RS]: A23, B8, A1, B2, A4, B4, A3, B6, A4, B5, A3, B8, A5, B1, A8, B5, A24
→ Row 65 [WS]: A24, B5, A14, B7, A4, B5, A3, B8, A2, B4, A4, B7, A1, B3, A23
← Row 66 [RS]: A23, B3, A2, B6, A4, B4, A1, B3, A1, B2, A1, B2, A3, B4, A5, B6, A16, B4, A24
→ Row 67 [WS]: A24, B4, A17, B4, A6, B8, A2, B2, A2, B6, A5, B6, A3, B2, A23
← Row 68 [RS]: A23, B2, A3, B6, A5, B5, A3, B3, A1, B8, A27, B5, A23
→ Row 69 [WS]: A23, B4, A29, B10, A5, B4, A5, B5, A4, B2, A23
← Row 70 [RS]: A23, B2, A4, B5, A5, B4, A6, B9, A29, B4, A23
→ Row 71 [WS]: A22, B5, A31, B6, A7, B4, A5, B5, A4, B2, A23
← Row 72 [RS]: A23, B2, A5, B4, A5, B4, A44, B5, A22
→ Row 73 [WS]: A21, B5, A45, B4, A5, B4, A5, B2, A23
← Row 74 [RS]: A23, B2, A5, B4, A5, B4, A45, B5, A21
→ Row 75 [WS]: A21, B4, A46, B4, A5, B4, A5, B3, A22
← Row 76 [RS]: A20, B7, A4, B3, A6, B3, A46, B4, A21
→ Row 77 [WS]: A21, B4, A55, B3, A3, B4, A2, B3, A19
← Row 78 [RS]: A18, B3, A3, B2, A1, B2, A2, B3, A55, B4, A21
→ Row 79 [WS]: A21, B4, A60, B2, A1, B2, A4, B2, A18
← Row 80 [RS]: A18, B2, A4, B5, A49, B4, A7, B4, A21
→ Row 81 [WS]: A21, B5, A5, B6, A48, B4, A25
← Row 82 [RS]: A25, B3, A48, B3, A1, B4, A3, B6, A21
→ Row 83 [WS]: A22, B5, A2, B4, A3, B2, A76
← Row 84 [RS]: A75, B2, A5, B3, A3, B3, A23
→ Row 85 [WS]: A28, B4, A5, B2, A2, B5, A68
← Row 86 [RS]: A67, B10, A6, B3, A28
→ Row 87 [WS]: A27, B4, A7, B10, A66
← Row 88 [RS]: A60, B2, A3, B3, A4, B4, A7, B4, A27
→ Row 89 [WS]: A26, B4, A8, B4, A5, B2, A2, B4, A59
← Row 90 [RS]: A58, B6, A1, B2, A5, B4, A8, B4, A26
→ Row 91 [WS]: A26, B5, A6, B6, A5, B9, A57
← Row 92 [RS]: A57, B3, A1, B5, A4, B7, A5, B6, A26
→ Row 93 [WS]: A25, B4, A1, B2, A5, B3, A2, B2, A4, B4, A3, B3, A14, B2, A40
← Row 94 [RS]: A39, B4, A13, B3, A3, B4, A3, B2, A3, B3, A4, B2, A2, B4, A25
→ Row 95 [WS]: A25, B4, A2, B2, A4, B3, A3, B2, A3, B4, A4, B3, A12, B5, A38
← Row 96 [RS]: A38, B6, A11, B3, A4, B4, A2, B2, A4, B3, A3, B3, A2, B4, A25
→ Row 97 [WS]: A25, B3, A4, B2, A3, B3, A4, B2, A2, B4, A4, B3, A11, B6, A4, B3, A31
← Row 98 [RS]: A30, B5, A2, B3, A1, B4, A10, B2, A5, B4, A2, B2, A3, B4, A3, B2, A4, B4, A24
→ Row 99 [WS]: A24, B4, A4, B2, A4, B3, A3, B2, A2, B4, A5, B2, A10, B4, A2, B2, A1, B7, A29
← Row 100 [RS]: A28, B8, A1, B2, A3, B3, A10, B2, A5, B4, A2, B2, A3, B3, A4, B2, A4, B4, A24
→ Row 101 [WS]: A24, B4, A4, B2, A5, B6, A3, B4, A5, B2, A10, B3, A3, B6, A1, B4, A28
← Row 102 [RS]: A27, B4, A3, B4, A4, B3, A10, B2, A5, B4, A3, B5, A6, B2, A4, B4, A24
→ Row 103 [WS]: A24, B4, A4, B2, A14, B4, A5, B2, A10, B3, A4, B4, A4, B3, A27
← Row 104 [RS]: A27, B3, A4, B4, A4, B3, A10, B2, A5, B4, A14, B2, A4, B4, A24
→ Row 105 [WS]: A24, B3, A5, B2, A14, B4, A6, B1, A10, B3, A4, B4, A4, B3, A27
← Row 106 [RS]: A27, B2, A5, B4, A4, B3, A17, B4, A14, B2, A5, B3, A24
→ Row 107 [WS]: A24, B3, A5, B2, A14, B4, A17, B3, A4, B4, A5, B2, A27
← Row 108 [RS]: A27, B2, A5, B4, A4, B3, A17, B4, A14, B2, A4, B4, A24
→ Row 109 [WS]: A24, B4, A3, B3, A14, B4, A17, B3, A4, B4, A5, B2, A27
← Row 110 [RS]: A27, B2, A5, B4, A4, B2, A18, B4, A14, B3, A3, B4, A24
→ Row 111 [WS]: A24, B4, A3, B3, A14, B4, A24, B4, A5, B2, A27
← Row 112 [RS]: A27, B1, A6, B4, A24, B4, A4, B2, A9, B3, A2, B4, A24
→ Row 113 [WS]: A25, B8, A9, B3, A3, B4, A17, B3, A4, B4, A34
← Row 114 [RS]: A34, B4, A4, B4, A16, B9, A11, B7, A25
→ Row 115 [WS]: A26, B5, A13, B8, A16, B4, A4, B4, A34
← Row 116 [RS]: A34, B4, A5, B3, A11, B11, A16, B3, A27
→ Row 117 [WS]: A48, B12, A16, B4, A34
← Row 118 [RS]: A34, B4, A15, B6, A3, B4, A48
→ Row 119 [WS]: A49, B2, A7, B4, A14, B4, A34
← Row 120 [RS]: A34, B4, A4, B2, A8, B3, A59
→ Row 121 [WS]: A70, B3, A3, B4, A34
← Row 122 [RS]: A34, B9, A71
→ Row 123 [WS]: A72, B8, A34
← Row 124 [RS]: A30, B10, A74
Join The Kindest Community
Join our vibrant community of crafters on Facebook today. Whether you enjoy crafting with others or simply have burning questions, we’ve got you covered – join us now!
→ Row 125 [WS]: A77, B10, A27
← Row 126 [RS]: A25, B7, A2, B3, A77
→ Row 127 [WS]: A77, B3, A5, B5, A24
← Row 128 [RS]: A23, B4, A8, B1, A78
→ Row 129 [WS]: A88, B3, A23
← Row 130 [RS]: A114
→ Row 131 [WS]: C6, B6, C6, B6, C6, B6, C6, B6, C6, B6, C6, B6, C6, B6, C6, B6, C6, B6, C6
← Row 132 [RS]: C6, B6, C6, B6, C6, B6, C6, B6, C6, B6, C6, B6, C6, B6, C6, B6, C6, B6, C6
→ Row 133 [WS]: C6, B6, C6, B6, C6, B6, C6, B6, C6, B6, C6, B6, C6, B6, C6, B6, C6, B6, C6
← Row 134 [RS]: C6, B6, C6, B6, C6, B6, C6, B6, C6, B6, C6, B6, C6, B6, C6, B6, C6, B6, C6
→ Row 135 [WS]: C6, B6, C6, B6, C6, B6, C6, B6, C6, B6, C6, B6, C6, B6, C6, B6, C6, B6, C6
← Row 136 [RS]: C6, B6, C6, B6, C6, B6, C6, B6, C6, B6, C6, B6, C6, B6, C6, B6, C6, B6, C6
→ Row 137 [WS]: D6, C6, D6, C6, D6, C6, D6, C6, D6, C6, D6, C6, D6, C6, D6, C6, D6, C6, D6
← Row 138 [RS]: D6, C6, D6, C6, D6, C6, D6, C6, D6, C6, D6, C6, D6, C6, D6, C6, D6, C6, D6
→ Row 139 [WS]: D6, C6, D6, C6, D6, C6, D6, C6, D6, C6, D6, C6, D6, C6, D6, C6, D6, C6, D6
← Row 140 [RS]: D6, C6, D6, C6, D6, C6, D6, C6, D6, C6, D6, C6, D6, C6, D6, C6, D6, C6, D6
→ Row 141 [WS]: D6, C6, D6, C6, D6, C6, D6, C6, D6, C6, D6, C6, D6, C6, D6, C6, D6, C6, D6
← Row 142 [RS]: D6, C6, D6, C6, D6, C6, D6, C6, D6, C6, D6, C6, D6, C6, D6, C6, D6, C6, D6
→ Row 143 [WS]: C6, B6, C6, B6, C6, B6, C6, B6, C6, B6, C6, B6, C6, B6, C6, B6, C6, B6, C6
← Row 144 [RS]: C6, B6, C6, B6, C6, B6, C6, B6, C6, B6, C6, B6, C6, B6, C6, B6, C6, B6, C6
→ Row 145 [WS]: C6, B6, C6, B6, C6, B6, C6, B6, C6, B6, C6, B6, C6, B6, C6, B6, C6, B6, C6
← Row 146 [RS]: C6, B6, C6, B6, C6, B6, C6, B6, C6, B6, C6, B6, C6, B6, C6, B6, C6, B6, C6
→ Row 147 [WS]: C6, B6, C6, B6, C6, B6, C6, B6, C6, B6, C6, B6, C6, B6, C6, B6, C6, B6, C6

← Row 148 [RS]: C6, B6, C6, B6, C6, B6, C6, B6, C6, B6, C6, B6, C6, B6, C6, B6, C6, B6, C6
→ Row 149 [WS]: D6, C6, D6, C6, D6, C6, D6, C6, D6, C6, D6, C6, D6, C6, D6, C6, D6, C6, D6
← Row 150 [RS]: D6, C6, D6, C6, D6, C6, D6, C6, D6, C6, D6, C6, D6, C6, D6, C6, D6, C6, D6
→ Row 151 [WS]: D6, C6, D6, C6, D6, C6, D6, C6, D6, C6, D6, C6, D6, C6, D6, C6, D6, C6, D6
← Row 152 [RS]: D6, C6, D6, C6, D6, C6, D6, C6, D6, C6, D6, C6, D6, C6, D6, C6, D6, C6, D6
→ Row 153 [WS]: D6, C6, D6, C6, D6, C6, D6, C6, D6, C6, D6, C6, D6, C6, D6, C6, D6, C6, D6
← Row 154 [RS]: D6, C6, D6, C6, D6, C6, D6, C6, D6, C6, D6, C6, D6, C6, D6, C6, D6, C6, D6
→ Row 155 [WS]: C6, B6, C6, B6, C6, B6, C6, B6, C6, B6, C6, B6, C6, B6, C6, B6, C6, B6, C6
← Row 156 [RS]: C6, B6, C6, B6, C6, B6, C6, B6, C6, B6, C6, B6, C6, B6, C6, B6, C6, B6, C6
→ Row 157 [WS]: C6, B6, C6, B6, C6, B6, C6, B6, C6, B6, C6, B6, C6, B6, C6, B6, C6, B6, C6
← Row 158 [RS]: C6, B6, C6, B6, C6, B6, C6, B6, C6, B6, C6, B6, C6, B6, C6, B6, C6, B6, C6
→ Row 159 [WS]: C6, B6, C6, B6, C6, B6, C6, B6, C6, B6, C6, B6, C6, B6, C6, B6, C6, B6, C6
← Row 160 [RS]: C6, B6, C6, B6, C6, B6, C6, B6, C6, B6, C6, B6, C6, B6, C6, B6, C6, B6, C6
Fasten Off and Weave in Ends.
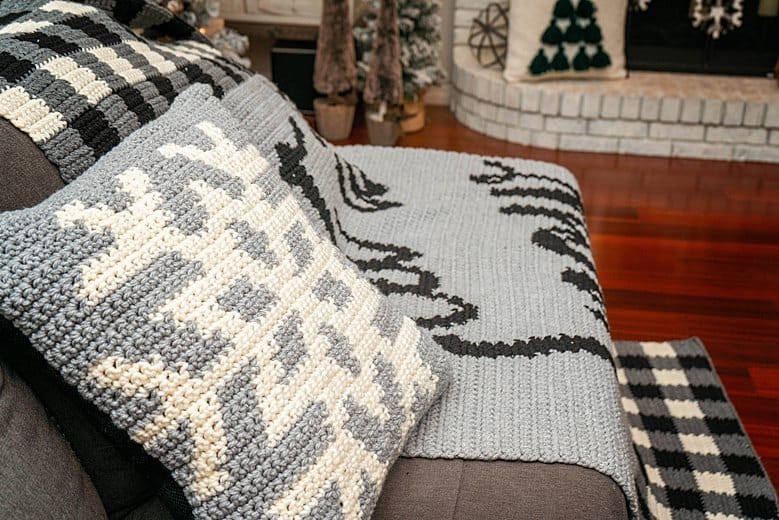
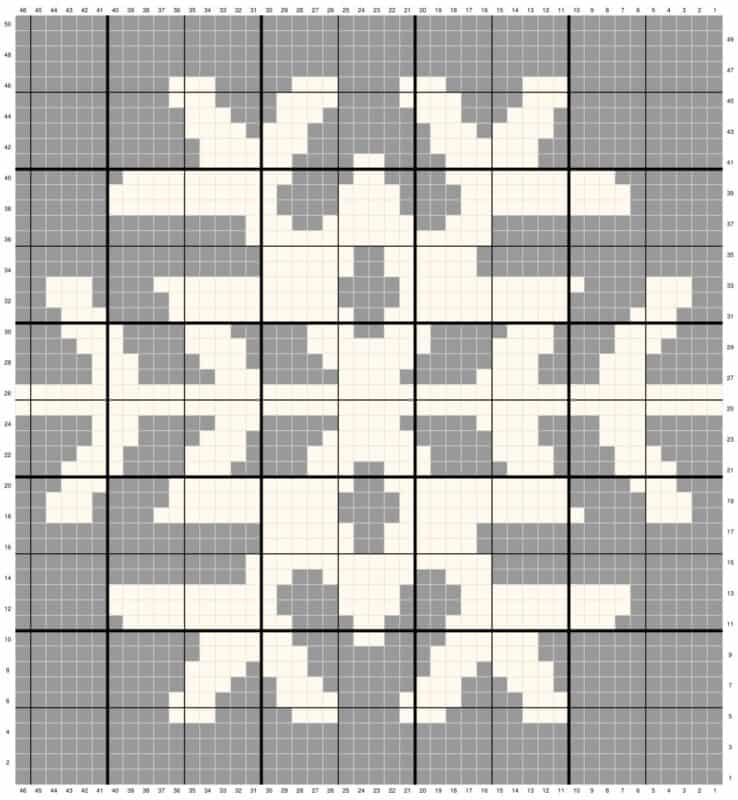
Snowflake Crochet Pillow:
Snowflake Pillow
To Begin: With Heather Grey (C), chain 47 and start the first row in the second chain from hook.
After the end of each row turn and ch 1. The ch 1 does not count as a stitch. (46 sts)
← Row 1 [RS]: A46
→ Row 2 [WS]: A46
← Row 3 [RS]: A46
→ Row 4 [WS]: A46
← Row 5 [RS]: A10, D3, A5, D3, A4, D3, A5, D3, A10
→ Row 6 [WS]: A10, D3, A4, D4, A4, D4, A4, D3, A10
← Row 7 [RS]: A11, D3, A3, D3, A6, D3, A3, D3, A11
→ Row 8 [WS]: A11, D4, A, D3, A8, D3, A, D4, A11
← Row 9 [RS]: A12, D7, A8, D7, A12
→ Row 10 [WS]: A12, D6, A4, D2, A4, D6, A12
← Row 11 [RS]: A7, D11, A4, D2, A4, D11, A7
→ Row 12 [WS]: A6, D11, A4, D4, A4, D11, A6
← Row 13 [RS]: A6, D11, A4, D4, A4, D11, A6
→ Row 14 [WS]: A15, D3, A2, D6, A2, D3, A15
← Row 15 [RS]: A15, D16, A15
→ Row 16 [WS]: A16, D6, A2, D6, A16
← Row 17 [RS]: A16, D6, A2, D6, A16
→ Row 18 [WS]: A2, D3, A4, D12, A4, D12, A4, D3, A2
← Row 19 [RS]: A2, D3, A5, D11, A4, D11, A5, D3, A2
→ Row 20 [WS]: A3, D3, A4, D12, A2, D12, A4, D3, A3
← Row 21 [RS]: A3, D4, A4, D3, A5, D3, A2, D3, A5, D3, A4, D4, A3
→ Row 22 [WS]: A4, D3, A4, D4, A4, D8, A4, D4, A4, D3, A4
← Row 23 [RS]: A5, D3, A4, D3, A5, D6, A5, D3, A4, D3, A5
→ Row 24 [WS]: A5, D3, A5, D3, A5, D4, A5, D4, A4, D3, A5
← Row 25 [RS]: D46
→ Row 26 [WS]: D46
← Row 27 [RS]: A5, D3, A4, D4, A5, D4, A5, D3, A5, D3, A5
→ Row 28 [WS]: A5, D3, A4, D3, A5, D6, A5, D3, A4, D3, A5
← Row 29 [RS]: A4, D3, A4, D4, A4, D8, A4, D4, A4, D3, A4
→ Row 30 [WS]: A3, D4, A4, D3, A5, D3, A2, D3, A5, D3, A4, D4, A3
← Row 31 [RS]: A3, D3, A4, D12, A2, D12, A4, D3, A3
→ Row 32 [WS]: A2, D3, A5, D11, A4, D11, A5, D3, A2
← Row 33 [RS]: A2, D3, A4, D12, A4, D12, A4, D3, A2
→ Row 34 [WS]: A16, D6, A2, D6, A16
← Row 35 [RS]: A16, D6, A2, D6, A16
→ Row 36 [WS]: A15, D16, A15
← Row 37 [RS]: A15, D3, A2, D6, A2, D3, A15
→ Row 38 [WS]: A6, D11, A4, D4, A4, D11, A6
← Row 39 [RS]: A6, D11, A4, D4, A4, D11, A6
→ Row 40 [WS]: A7, D11, A4, D2, A4, D11, A7
← Row 41 [RS]: A12, D6, A4, D2, A4, D6, A12
→ Row 42 [WS]: A12, D7, A8, D7, A12
← Row 43 [RS]: A11, D4, A, D3, A8, D3, A, D4, A11
→ Row 44 [WS]: A11, D3, A3, D3, A6, D3, A3, D3, A11
← Row 45 [RS]: A10, D3, A4, D4, A4, D4, A4, D3, A10
→ Row 46 [WS]: A10, D3, A5, D3, A4, D3, A5, D3, A10
← Row 47 [RS]: A46
→ Row 48 [WS]: A46
← Row 49 [RS]: A46
Rows 50-54: A46
-Button Row 55: ch 1, sc 2, *ch 2, skip 2, sc 8: repeat from * until last 4 stitches, ch 2, skip 2, sc in last 2, turn
-Continue to sc Rows 56-59 in C.
-Fasten off and weave in ends.
Back Panel:
-With Black or Grey, chain 47 and start the first row in the second chain from hook.
After the end of each row turn and ch 1. The ch 1 does not count as a stitch. (46 sts)
-Single crochet a total of 49 rows to create the back panel.
-Fasten off and weave in ends.
OR Continue to below and substitute the back panel for burlap.
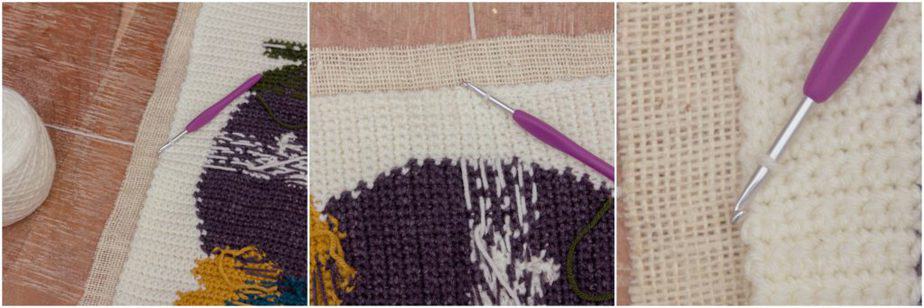
Attaching Panels Together:
Place the front and back panels together with wrong sides facing. If using burlap cut two pieces approximately one in longer on each side of pillow. Your crochet hook will be able to work through the holes in the burlap.
Using white yarn, slip stitch from top of one side of pillow (where the panels meet, not over the flap), around the bottom, and up the other side. I found by slip stitching with a tight tension really makes some crisp edges, but you do not want puckering. Fasten off and weave in ends. Flip pillow so the right side is facing out and the seams are on the inside.
Attaching Buttons:
With the back panel facing, fold front panel down over the top of the back panel and with stitch markers mark the row where each button will be placed. Using a yarn needle and green yarn, sew each button in place.
Place a 20×20 pillow inside the cover and enjoy!
Well, That Was Fun! What’s Next?