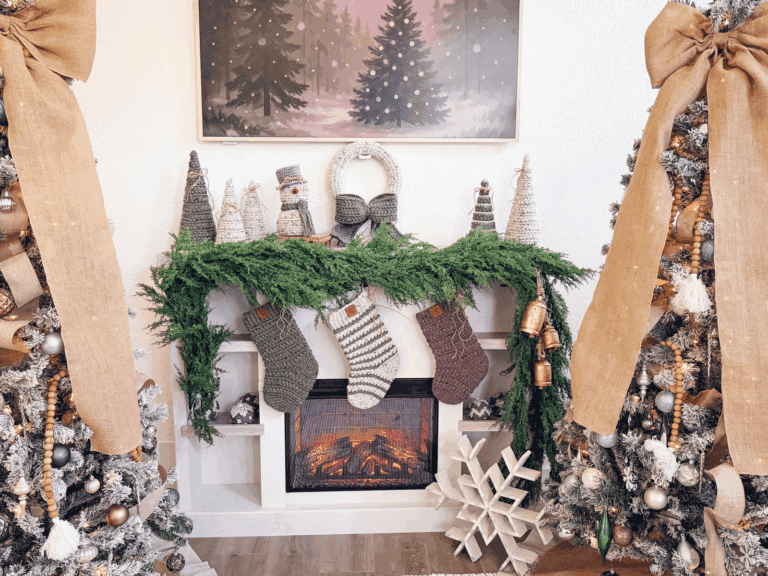
Get ready to stuff your stockings in style this holiday season! Perfect for those who love to play with colors, choose from our wide selection of yarn colors to create your unique and merry masterpiece. You’ll be delighted as you stitch along and watch the beautiful colorwork come to life. If you love colorful stockings, you might love the Granny All The Way Stocking Collection. It uses the easy granny stitches with 7 color pattern options.
Disclosure: This post contains affiliate links. Please read my disclosure for more info.
Plus, with endless customization options, your stockings will be the highlight of your holiday decor for years to come. So grab your hook and let’s get started on your one-of-a-kind holiday must-have!
Use the charts at the end of this pattern to design your own stocking. Cut out the stocking base and then each individual chart to mix and match sections to create your own stocking. Watch the video for tips!
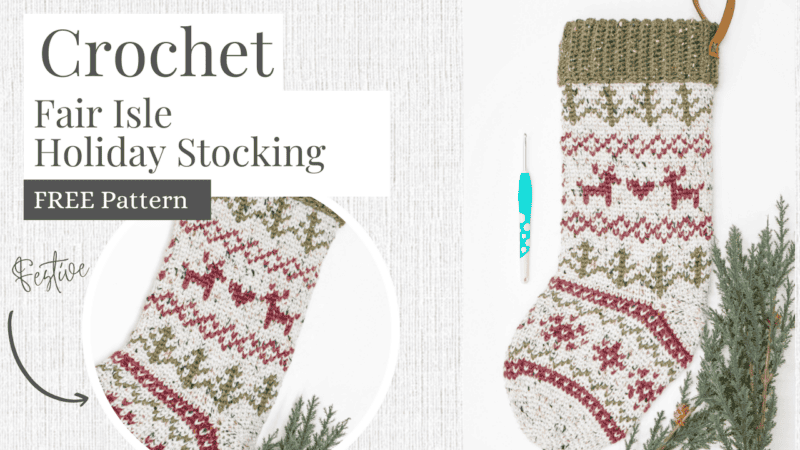
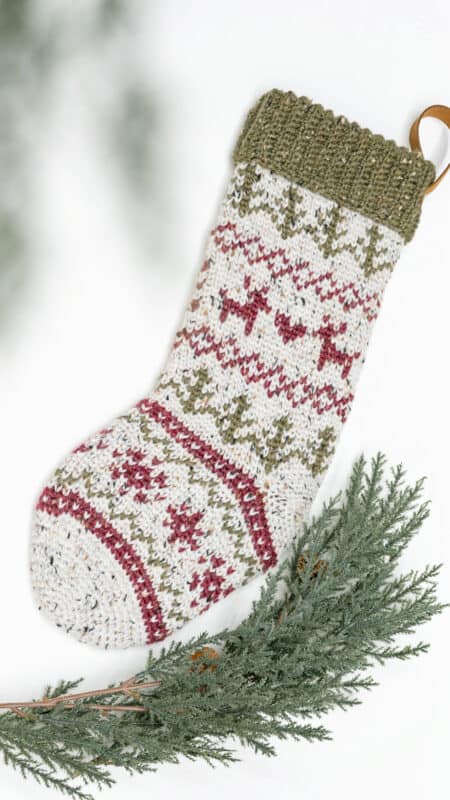
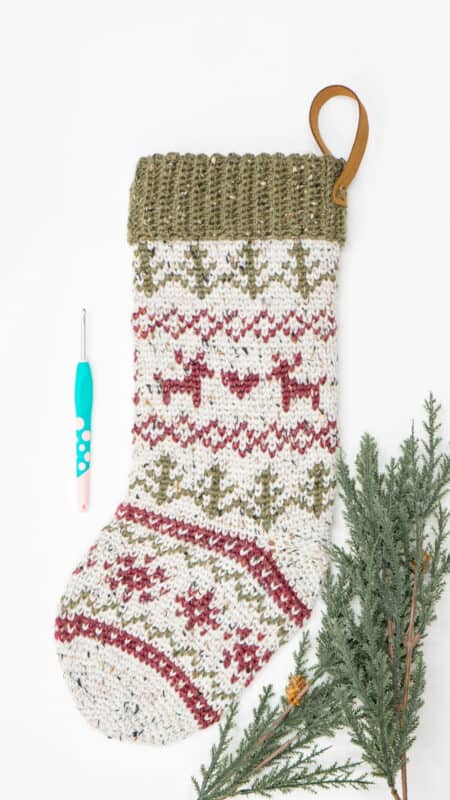
This festive crochet & knit stocking will be worked toe-up, leaving space for the heel to be worked last. The colorwork in the crochet pattern will use the split single crochet (ssc) also known as the waistcoat stitch. For more colorwork stockings, check out the Polar Bear Stroll Stocking and the Prancing Deer Stocking!
These stockings are inside the Create Your Style Course!
With this fun holiday course, you will get to create-your-own stocking kit to customize your holiday decor and loads more! Including the Snowflake Crochet Blanket.

About The Free Christmas In July Crochet Along
I’m so excited for you to join me with a fun Crochet Along Event. This year we have two projects to choose from that will be released in segments on the blog. So if you are on this post, the pattern will be updated each day a segment is released.
Want all the information and extra freebies for the crochet along? Be sure to sign up and you will get instant access to:
Crochet Along Schedule & Materials List – get planning!
Need to Know Details – all the information is organized in one place with links to blog posts.
Color Theory & Inspiration Module will help you plot yarn choices.
Video Tutorial for the Fair Isle Crochet Stocking

Supplies You Will Need To Crochet This Stocking:
Crochet Hook:
size G (4mm), or hook to obtain gauge
Knitting Needle:
size 8 (5.0mm), or hook to obtain gauge
Notions:
Removable stitch markers if needed
Yarn needle to weave in ends
Scissors
Leather Strip (optional)
Leather Hole Punch (optional)
Yarn for crochet version:
WeCrochet City Tweed DK Weight
55% Merino Wool, 25% Superfine Alpaca,
20% Donegal Tweed, 123 yds/50g
Yardage for crochet version:
Colorways:
Snowbank (2 balls, 180 yds)
Blue Blood (1 ball, 90 yds)
Toad (2 balls, 180 yds)
Total Yardage is approx. 450yds
Yarn for knit version:
Knit Picks City Tweed Aran/HW Weight
55% Merino Wool, 25% Superfine Alpaca,
20% Donegal Tweed, 164 yds/100g
Yardage for knit version:
Colorways:
Snowshoe (1 ball, 150 yds)
Romance (1 ball, 100 yds)
Toad (1 ball, 150 yds)
Total Yardage is approx. 400 yds

Abbreviations/Stitches for crochet:
ch – chain
RS – right side
sc – single crochet
sc2tog – single crochet two together
sl st – slip stitch
st(s) – stitch(es)
ssc – split single crochet
WS – wrong side
yo- yarn over
Abbreviations/Stitches for knit:
k – knit
k2tog – knit two sts together
kfb – knit in the front and the back of the stitch
p – purl
ssk – slip slip knit
st(s) – stitch(es)
Gauge:
Crochet: 17 sts x 21 rows = 4×4 inches in ssc
Knit: 16 sts x 21 rows = 4×4 inches in stockinette
Measurements/Sizes:
Crochet: 19” From folded cuff to toe; 11” circumference.
Knit: 21” From folded cuff to toe; 11” circumference.
Skill Level:
Intermediate
Special Stitches for Crochet:
Split Single Crochet (ssc): Insert hook between the legs of the stitch (on the back of work the hook should be under the horizontal bar and between the upside-down ‘V’ shape as well), yarn over, pull up a loop to the height of a single crochet, yarn over, pull through both loops on hook.
Tip: Keep a loose tension so the stitches are easily worked. https://brianakdesigns.com/split-single-crochet-round-flat/
Magic Circle: Start by creating a loop with your yarn. The tail of the working yarn will be over the working end. Insert your hook into the loop from behind. Yarn over and pull through the loop. Work the stitches as instructed into the loop. https://brianakdesigns.com/magic-crochet-circle-ring/
Notes for the Crochet Stocking
How to read the colorwork instructions:
In the colorwork section Color A will be abbreviated as (A), and Color B as (B).
Example: (B) x 9 = with Color B ssc the next 9 stitches
The chart will be worked from right to left for each round and repeated until the end of the
round.
If you would like to only use two colors, that’s perfectly fine! If you would like to rotate your
color B to change in some sections like the example, that can be done as well.
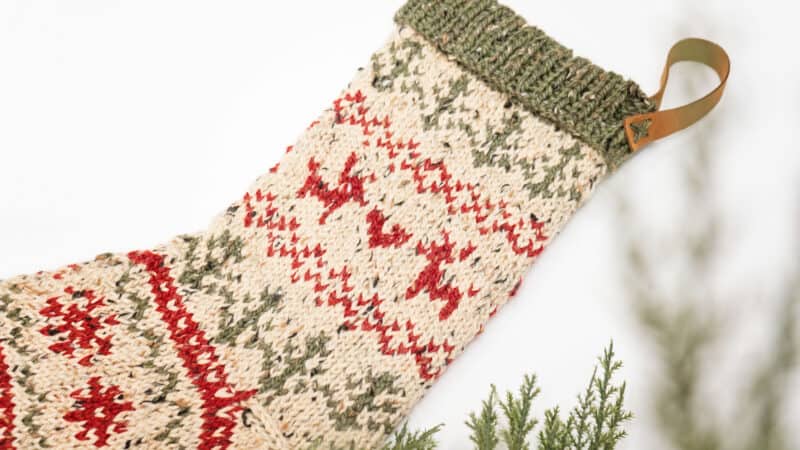
Color A: Snowbank (white)
Color B: Blue Blood (red)
Color B: Toad (green)
Want an Ad-Free PDF Download of this pattern?
This pattern is available in my shops:
Written Instructions for the Crochet Stocking
The Toe of the Crochet Stocking
Rnd 1:
With Color A, sc 8 into a Magic Circle, do not join, work continuously. (8)sts
Rnd 2:
2sc in each stitch around. (16)sts
Rnd 3:
Sc in each st around. (16)sts
Rnd 4:
2sc in the first, sc in the next; repeat from * to * around. (24)sts
Rnd 5:
Rep Rnd 3. (24)sts
Rnd 6:
2sc in the first, sc in the next 2; repeat from * to * around. (32)sts
Rnd 7:
Rep Rnd 3. (32)sts
Rnd 8:
2sc in the first, sc in the next 3; repeat from * to * around. (40)sts
Rnd 9:
Rep Rnd 3. (40)sts
Rnd 10:
2sc in the first, sc in the next 4; repeat from * to * around. (48)sts
Rnd 11:
Rep Rnd 3. (48)sts
Rnd 12:
2sc in the first, sc in the next 5; repeat from * to * around. (56)sts
Rnd 13:
Rep Rnd 3. (56)sts
The Foot of the Crochet Stocking
All the stitches for the foot will be worked as ssc. Repeat each round instructions 2 times for one round. The stitch count will remain 56 sts.
If you’ve purchased the VIP Experience with the Create Your Holiday Style, this is where you get to be the designer! Use your colorwork swatches from the course to fill the 25 rounds of crochet for the foot. It is okay if you go a little over or under the 25 rounds for this section.
Click the box below to unlock this exclusive subscriber content for free. Add your email and create a password. If you are having trouble, reset your password or log in to the Grow Portal.
I’m thrilled to share this amazing crochet pattern with you! Please don’t copy, paste, or distribute this pattern. Prefer an ad-free experience? Purchase a digital PDF file for a small fee from one of my online stores. I appreciate your support and readership. You are why I can keep doing what I love and sharing it with others. Thank you from the bottom of my heart.


Rnd 1:
(B) x 28
Rnd 2:
[(A) x 1, (B) x 1] x 14
Rnd 3:
(B) x 28
Rnd 4:
(A) x 28
Rnd 5:
[(A) x 1, (B) x 1, (A) x 2] x 7
Rnd 6:
[(B) x 1, (A) x 1] x 14
Rnd 7:
[(A) x 3, (B) x 1] x 7
Rnd 8:
(A) x 28
Rnd 9:
(A) x 4, (B) x 1, (A) x 17, (B) x 1, (A) x 5
Rnd 10:
[(A) x 2, (B) x 1, (A) x 1] x 2, (A) x 5, (B) x 1, (A) x 6, [(B) x 1, (A) x 3] x 2
Rnd 11:
(A) x 1, (B) x 1, [(B) x 1, (A) x 1] x 2, (B) x 2, (A) x 2, [(A) x 1, (B) x 1] x 3, (A) x 3, (B) x 1, [(B) x 1, (A) x 1] x 2, (B) x 2, (A) x 2
Rnd 12:
[(A) x 3, (B) x 3, (A) x 3] x 3, (A) x 1
Rnd 13:
[(B) x 1, (A) x 1, (B) x 1] x 3, [(A) x 1, (B) x 3] x 2, [(A) x 1, (B) x 1] x 2, [(B) x 1, (A) x 1, (B)x 1] x 2, (A) x 1
Rnd 14:
[(A) x 3, (B) x 3, (A) x 3] x 3, (A) x 1
Rnd 15:
(A) x 1, (B) x 1, [(B) x 1, (A) x 1] x 2, (B) x 2, (A) x 2, [(A) x 1, (B) x 1] x 3, (A) x 3, (B) x 1, [(B) x 1, (A) x 1] x 2, (B) x 2, (A) x 2
Rnd 16:
[(A) x 2, (B) x 1, (A) x 1] x 2, (A) x 5, (B) x 1, (A) x 6, [(B) x 1, (A) x 3] x 2
Rnd 17:
(A) x 4, (B) x 1, (A) x 17, (B) x 1, (A) x 5
Rnd 18:
(A) x 28
Rnd 19:
[(A) x 1, (B) x 1, (A) x 2] x 7
Rnd 20:
[(B) x 1, (A) x 1] x 14
Rnd 21:
[(A) x 3, (B) x 1] x 7
Rnd 22:
(A) x 28
Rnd 23:
(B) x 28
Rnd 24:
[(A) x 1, (B) x 1] x 14
Rnd 25:
(B) x 28
Creating The Heel Space for the Crochet Stocking
Rnd 26:
With A ssc 17, ch 22, skip 22, ssc 17. (This creates the heel opening.)
This is where your custom chart for the foot will end, and next the leg custom chart will begin. If needed, work another round in your main color so that you work across the chain stitches before beginning the leg of the stocking.
Crochet Stocking Colorwork Leg
All the stitches for the leg will be worked as ssc. Repeat each round instructions 2 times for one round. The stitch count will remain 56 sts.
This is where you can once again be the designer! Use your colorwork swatches on the following pages to fill the 25 crochet rounds for the foot. It is okay to go a little over or under the recommended 47 rounds for this section.
Crochet Stocking Colorwork Leg Chart


Crochet Stocking Colorwork Leg Written Instructions
Rnd 27:
(A) x 28
Rnd 28:
[(A) x 3, (B) x 1, (A) x 3] x 4
Rnd 29:
[(A) x 2, (B) x 3, (A) x 2] x 4
Rnd 30:
[(A) x 1, (B) x 1] x 3, [(A) x 2, (B) x 1, (A) x 1, (B) x 1, (A) x 1, (B) x 1] x 3, (A) x 1
Rnd 31:
[(B) x 1, (A) x 2] x 2, [(B) x 2, (A) x 2, (B) x 1, (A) x 2] x 3, (B) x 1
Rnd 32:
[(A) x 2, (B) x 3, (A) x 2] x 4
Rnd 33:
[(A) x 1, (B) x 1] x 3, [(A) x 2, (B) x 1, (A) x 1, (B) x 1, (A) x 1, (B) x 1] x 3, (A) x 1
Rnd 34:
[(A) x 3, (B) x 1, (A) x 3] x 4
Rnd 35:
[(A) x 2, (B) x 3, (A) x 2] x 4
Rnd 36:
[(A) x 3, (B) x 1, (A) x 3] x 4
Rnd 37:
(A) x 28
Rnd 38:
(A) x 28
Rnd 39:
[(A) x 1, (B) x 1, (A) x 2] x 7
Rnd 40:
[(B) x 1, (A) x 1] x 14
Rnd 41:
[(A) x 3, (B) x 1] x 7
Rnd 42:
[(B) x 1, (A) x 1] x 14
Rnd 43:
[(A) x 1, (B) x 1, (A) x 2] x 7
Rnd 44:
(A) x 28
Rnd 45:
(A) x 28
Rnd 46:
[(A) x 3, (B) x 1] x 2, (A) x 10, [(A) x 1, (B) x 1, (A) x 2] x 2, (A) x 1, (B) x 1
Rnd 47:
[(A) x 3, (B) x 1] x 2, (A) x 10, [(A) x 1, (B) x 1, (A) x 2] x 2, (A) x 1, (B) x 1
Rnd 48:
(A) x 3, (B) x 4, [(B) x 1, (A) x 5] x 2, (B) x 5, (A) x 4
Rnd 49:
(A) x 3, (B) x 4, [(B) x 1, (A) x 4, (B) x 2] x 2, (B) x 3, (A) x 4
Rnd 50:
(A) x 2, [(B) x 1, (A) x 3, (B) x 1] x 2, (B) x 4, (A) x 3, (B) x 2, (A) x 1, [(A) x 2, (B) x 1] x 2
Rnd 51:
(A) x 7, (B) x 1, [(B) x 2, (A) x 1] x 3, (B) x 3, (A) x 8
Rnd 52:
(A) x 6, (B) x 3, (A) x 9, (B) x 3, (A) x 7
Rnd 53:
(A) x 4, [(A) x 1, (B) x 1] x 2, (A) x 10, [(A) x 1, (B) x 1] x 2, (A) x 5, (B) x 1
Rnd 54:
(A) x 4, [(A) x 1, (B) x 1, (A) x 1] x 2, (A) x 8, [(B) x 1, (A) x 2] x 2, (A) x 3, (B) x 1
Rnd 55:
(A) x 28
Rnd 56:
(A) x 28
Rnd 57:
[(A) x 1, (B) x 1, (A) x 2] x 7
Rnd 58:
[(B) x 1, (A) x 1] x 14
Rnd 59:
[(A) x 3, (B) x 1] x 7
Rnd 60:
[(B) x 1, (A) x 1] x 14
Rnd 61:
[(A) x 1, (B) x 1, (A) x 2] x 7
Rnd 62:
(A) x 28
Rnd 63:
(A) x 28
Rnd 64:
[(A) x 3, (B) x 1, (A) x 3] x 4
Rnd 65:
[(A) x 2, (B) x 3, (A) x 2] x 4
Rnd 66:
[(A) x 1, (B) x 1] x 3, [(A) x 2, (B) x 1, (A) x 1, (B) x 1, (A) x 1, (B) x 1] x 3, (A) x 1
Rnd 67:
[(B) x 1, (A) x 2] x 2, [(B) x 2, (A) x 2, (B) x 1, (A) x 2] x 3, (B) x 1
Rnd 68:
[(A) x 2, (B) x 3, (A) x 2] x 4
Rnd 69:
[(A) x 1, (B) x 1] x 3, [(A) x 2, (B) x 1, (A) x 1, (B) x 1, (A) x 1, (B) x 1] x 3, (A) x 1
Rnd 70:
[(A) x 3, (B) x 1, (A) x 3] x 4
Rnd 71:
[(A) x 2, (B) x 3, (A) x 2] x 4
Rnd 72:
[(A) x 3, (B) x 1, (A) x 3] x 4
Rnd 73:
(A) x 28, fasten off A.
Crochet Stocking Cuff
Row 1:
With Color B, ch 17 (or 25 for a taller cuff), blo sc in second chain from hook and across to body, sl st 2 sts on the body (these do not count as sts), turn. (16 or 24)sts
Row 2:
Skip the two sl sts from the body, blo sc in each st across, turn. (16 or 24)sts
Row 3:
Ch 1, blo sc in each st across, sl st 2 sts on the body, turn.
Repeats:
Repeat Rows 2-3 around the top of the stocking body. Join the last row to the beginning row by slip stitching through blo of first and last row at the same time with the WS of the cuff facing. Fasten off and weave in ends.
Crochet Stocking Heel
Rnd 1:
With Color A, join the yarn at the corner of the heel opening. Sc around the heel opening, do not join.
*Optional Tip: To reduce holes, sc2tog at the corners. (44)sts
Rnd 2:
*sc2tog, sc in the next 9*; repeat from * to * around. (40)sts
Rnd 3:
*sc2tog, sc in the next 8*; repeat from * to * around. (36)sts
Rnd 4:
*sc2tog, sc in the next 7*; repeat from * to * around. (32)sts
Rnd 5:
*sc2tog, sc in the next 6*; repeat from * to * around. (28)sts
Rnd 6:
*sc2tog, sc in the next 5*; repeat from * to * around. (24)sts
Rnd 7:
*sc2tog, sc in the next 4*; repeat from * to * around. (20)sts
Rnd 8:
Sc2tog around. (10)sts
Fasten off, leaving a tail, weave the tail through the front loops of each stitch around, then pull closed. Weave in ends.
Finishing the Stocking and Tab
Use a strip of leather and a leather punch to create a strap and stitch to the top of the stocking.
Or create an i-cord: https://brianakdesigns.com/how-to-crochet-an-i-cord/
The Knit Fair Isle Stocking Instructions
Locate the knit stocking on Etsy & Ravelry!
Video Tutorial for the Knit Stocking

Special Stitches:
k2tog: The k2tog is a right-leaning decrease and one of the most commonly used decreases. With the working yarn in back, insert the right needle into the second, then the first stitches on the left needle (from left to right). Wrap the yarn under and then over the right needle. Pull a loop through the 2 stitches. Drop the 2 stitches from the left needle.
ssk: The slip slip knit is a smaller decrease twisted stitch which to the right. Slip 1 stitch knitwise from the left to the right needle. Slip another stitch knitwise from the left to the right needle. Return the slipped stitches in their twisted position back to the left hand needle. Knit the 2 stitches together in their twisted position. Video Link: https://brianakdesigns.com/how-to-decrease-knitting/#ssk
How to read the colorwork instructions:
In the colorwork section Color A will be abbreviated as (A), and Color B as (B).
Example: (B) x 9 = with Color B knit the next 9 stitches
The chart will be worked from right to left for each round and repeated until the end of the
round.
Color A: Snowshoe (Cream)
Color B: Romance (Red)
Color B: Toad (Green)
Toe of the Knit Stocking
Rnd 1:
With Color A, CO 8 sts, leaving at least an 8-in tail. Divide as desired, without twisting
sts, join. (8)sts
Rnd 2:
k1, m1r; repeat from * to * around. (16)sts
Rnd 3: Knit. (16)sts
Rnd 4: kfb, k1; repeat from * to * around. (24)sts
Rnd 5: Rep Rnd 3. (24)sts
Rnd 6: kfb, k2; repeat from * to * around. (32)sts
Rnd 7: Rep Rnd 3. (32)sts
Rnd 8: kfb, k3; repeat from * to * around. (40)sts
Rnd 9: Rep Rnd 3. (40)sts
Rnd 10: kfb, k4; repeat from * to * around. (48)sts
Rnd 11: Rep Rnd 3. (48)sts
Rnd 12: kfb, k5; repeat from * to * around. (56)sts
Rnd 13-15: Rep Rnd 3. (56)sts
Foot of the Knit Stocking
Repeat each round instructions 2 times for one round. The stitch count will remain 56 sts.
This is where you get to be the designer! Use your colorwork swatches on the following pages to fill the 25 rounds of crochet for the foot. It is okay if you go a little over or under the 25 rounds for this section.

Rnd 1: (B) x 28
Rnd 2: [(A) x 1, (B) x 1] x 14
Rnd 3: (B) x 28
Rnd 4: (A) x 28
Rnd 5: [(A) x 1, (B) x 1, (A) x 2] x 7
Rnd 6: [(B) x 1, (A) x 1] x 14
Rnd 7: [(A) x 3, (B) x 1] x 7
Rnd 8: (A) x 28
Rnd 9: (A) x 4, (B) x 1, (A) x 17, (B) x 1, (A) x 5
Rnd 10: [(A) x 2, (B) x 1, (A) x 1] x 2, (A) x 5, (B) x 1, (A) x 6, [(B) x 1, (A) x 3] x 2
Rnd 11: (A) x 1, (B) x 1, [(B) x 1, (A) x 1] x 2, (B) x 2, (A) x 2, [(A) x 1, (B) x 1] x 3, (A) x 3, (B) x 1, [(B) x 1, (A) x 1] x 2, (B) x 2, (A) x 2
Rnd 12: [(A) x 3, (B) x 3, (A) x 3] x 3, (A) x 1
Rnd 13: [(B) x 1, (A) x 1, (B) x 1] x 3, [(A) x 1, (B) x 3] x 2, [(A) x 1, (B) x 1] x 2, [(B) x 1, (A) x 1, (B) x 1] x 2, (A) x 1
Rnd 14: [(A) x 3, (B) x 3, (A) x 3] x 3, (A) x 1
Rnd 15: (A) x 1, (B) x 1, [(B) x 1, (A) x 1] x 2, (B) x 2, (A) x 2, [(A) x 1, (B) x 1] x 3, (A) x 3, (B) x 1, [(B) x 1, (A) x 1] x 2, (B) x 2, (A) x 2
Rnd 16: [(A) x 2, (B) x 1, (A) x 1] x 2, (A) x 5, (B) x 1, (A) x 6, [(B) x 1, (A) x 3] x 2
Rnd 17: (A) x 4, (B) x 1, (A) x 17, (B) x 1, (A) x 5
Rnd 18: (A) x 28
Rnd 19: [(A) x 1, (B) x 1, (A) x 2] x 7
Rnd 20: [(B) x 1, (A) x 1] x 14
Rnd 21: [(A) x 3, (B) x 1] x 7
Rnd 22: (A) x 28
Rnd 23: (B) x 28
Rnd 24: [(A) x 1, (B) x 1] x 14
Rnd 25: (B) x 28
Rnd 26: With A k 17, place the next 22 sts on a holder, thumb cast on 22 sts OR create a provisional cast on as in the video tutorial, k 17. (This creates the heel.)

Leg of the Knit Stocking
Repeat each round instructions 2 times for one round. The stitch count will remain 56 sts.
This is where you can once again be the designer! Use your colorwork swatches on the following pages to fill the 25 rounds of crochet for the foot. It is okay if you go a little over or under the recommended 47 rounds for this section.
Rnd 27: (A) x 28
Rnd 28: [(A) x 3, (B) x 1, (A) x 3] x 4
Rnd 29: [(A) x 2, (B) x 3, (A) x 2] x 4
Rnd 30: [(A) x 1, (B) x 1] x 3, [(A) x 2, (B) x 1, (A) x 1, (B) x 1, (A) x 1, (B) x 1] x 3, (A) x 1
Rnd 31: [(B) x 1, (A) x 2] x 2, [(B) x 2, (A) x 2, (B) x 1, (A) x 2] x 3, (B) x 1
Rnd 32: [(A) x 2, (B) x 3, (A) x 2] x 4
Rnd 33: [(A) x 1, (B) x 1] x 3, [(A) x 2, (B) x 1, (A) x 1, (B) x 1, (A) x 1, (B) x 1] x 3, (A) x 1
Rnd 34: [(A) x 3, (B) x 1, (A) x 3] x 4
Rnd 35: [(A) x 2, (B) x 3, (A) x 2] x 4
Rnd 36: [(A) x 3, (B) x 1, (A) x 3] x 4
Rnd 37: (A) x 28
Rnd 38: (A) x 28
Rnd 39: [(A) x 1, (B) x 1, (A) x 2] x 7
Rnd 40: [(B) x 1, (A) x 1] x 14
Rnd 41: [(A) x 3, (B) x 1] x 7
Rnd 42: [(B) x 1, (A) x 1] x 14
Rnd 43: [(A) x 1, (B) x 1, (A) x 2] x 7
Rnd 44: (A) x 28
Rnd 45: (A) x 28
Rnd 46: [(A) x 3, (B) x 1] x 2, (A) x 10, [(A) x 1, (B) x 1, (A) x 2] x 2, (A) x 1, (B) x 1
Rnd 47: [(A) x 3, (B) x 1] x 2, (A) x 10, [(A) x 1, (B) x 1, (A) x 2] x 2, (A) x 1, (B) x 1
Rnd 48: (A) x 3, (B) x 4, [(B) x 1, (A) x 5] x 2, (B) x 5, (A) x 4
Rnd 49: (A) x 3, (B) x 4, [(B) x 1, (A) x 4, (B) x 2] x 2, (B) x 3, (A) x 4
Rnd 50: (A) x 2, [(B) x 1, (A) x 3, (B) x 1] x 2, (B) x 4, (A) x 3, (B) x 2, (A) x 1, [(A) x 2, (B) x 1] x 2
Rnd 51: (A) x 7, (B) x 1, [(B) x 2, (A) x 1] x 3, (B) x 3, (A) x 8
Rnd 52: (A) x 6, (B) x 3, (A) x 9, (B) x 3, (A) x 7
Rnd 53: (A) x 4, [(A) x 1, (B) x 1] x 2, (A) x 10, [(A) x 1, (B) x 1] x 2, (A) x 5, (B) x 1
Rnd 54: (A) x 4, [(A) x 1, (B) x 1, (A) x 1] x 2, (A) x 8, [(B) x 1, (A) x 2] x 2, (A) x 3, (B) x 1
Rnd 55: (A) x 28
Rnd 56: (A) x 28
Rnd 57: [(A) x 1, (B) x 1, (A) x 2] x 7
Rnd 58: [(B) x 1, (A) x 1] x 14
Rnd 59: [(A) x 3, (B) x 1] x 7
Rnd 60: [(B) x 1, (A) x 1] x 14
Rnd 61: [(A) x 1, (B) x 1, (A) x 2] x 7
Rnd 62: (A) x 28
Rnd 63: (A) x 28
Rnd 64: [(A) x 3, (B) x 1, (A) x 3] x 4
Rnd 65: [(A) x 2, (B) x 3, (A) x 2] x 4
Rnd 66: [(A) x 1, (B) x 1] x 3, [(A) x 2, (B) x 1, (A) x 1, (B) x 1, (A) x 1, (B) x 1] x 3, (A) x 1
Rnd 67: [(B) x 1, (A) x 2] x 2, [(B) x 2, (A) x 2, (B) x 1, (A) x 2] x 3, (B) x 1
Rnd 68: [(A) x 2, (B) x 3, (A) x 2] x 4
Rnd 69: [(A) x 1, (B) x 1] x 3, [(A) x 2, (B) x 1, (A) x 1, (B) x 1, (A) x 1, (B) x 1] x 3, (A) x 1
Rnd 70: [(A) x 3, (B) x 1, (A) x 3] x 4
Rnd 71: [(A) x 2, (B) x 3, (A) x 2] x 4
Rnd 72: [(A) x 3, (B) x 1, (A) x 3] x 4
Rnd 73: (A) x 28
Chart for the Knit Stocking Leg
Ribbing Cuff of the Knit Stocking
Rnd 1: With Color B (or your color of choice), k1, p1; repeat from * to * around.
Repeats: Work ribbing until the cuff measures 4 inches or 6 inches, depending on the desired
height of the cuff.
Heel of the Knit Stocking
Rnd 1: Place held stitches back on needles, (22 sts along the top of the heel and 22 sts along the
bottom of the heel). If there is a gap on each side of the heel we can use our tail end to close those up later. 44 sts
Rnd 2: (ssk, k18, k2tog) two times. 40 sts
Rnd 3: (ssk, k16, k2tog) two times. 36 sts
Rnd 4: (ssk, k14, k2tog) two times. 32 sts
Rnd 5: (ssk, k12, k2tog) two times. 28 sts
Rnd 6: (ssk, k10, k2tog) two times. 24 sts
Rnd 7: (ssk, k8, k2tog) two times. 20 sts
Rnd 8: (ssk, k6, k2tog) two times. 16 sts
Rnd 9: Knit. 16 sts
Fasten off, leaving enough tail length for closing the opening. Place your tapestry needle
on the tail end and slip the remaining stitches to the tapestry needle. Pull to close the
opening and weave in the end. Fasten off the remaining tail.
Finishing the Knit Stocking
Use a strip of leather and a leather punch to create a strap and stitch to the top of the stocking. (see video)
Or create an i-cord.
Check out more of my patterns for inspiration.
Crochet Christmas Stockings for Holiday Joy!
Infinity Crochet Christmas Stocking Pattern
Joy! Infinity Crochet Stocking Pattern
White Spruce Crochet Stocking Pattern
Well, That Was Fun! What’s Next?