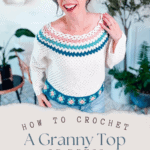


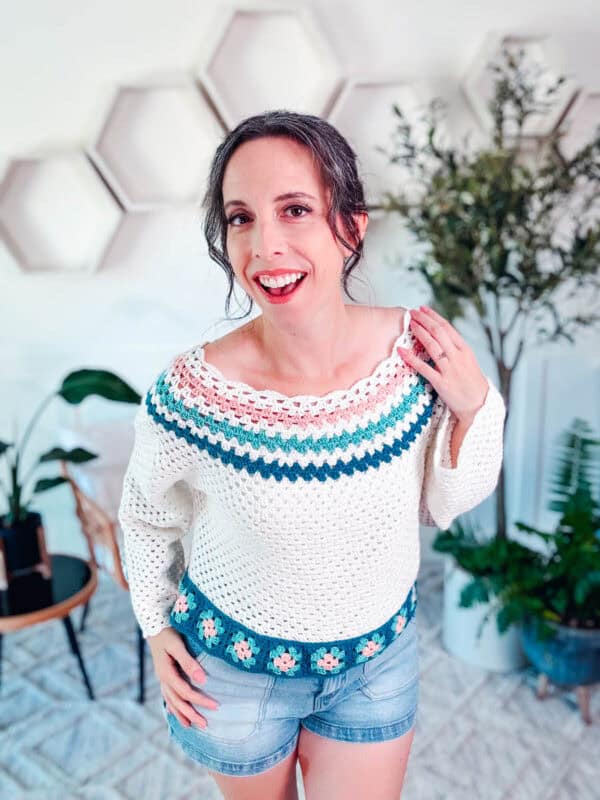
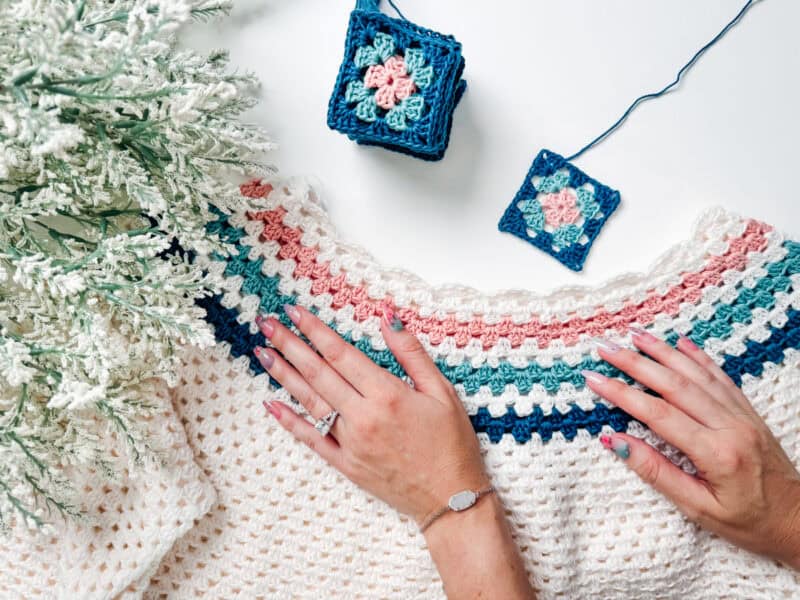
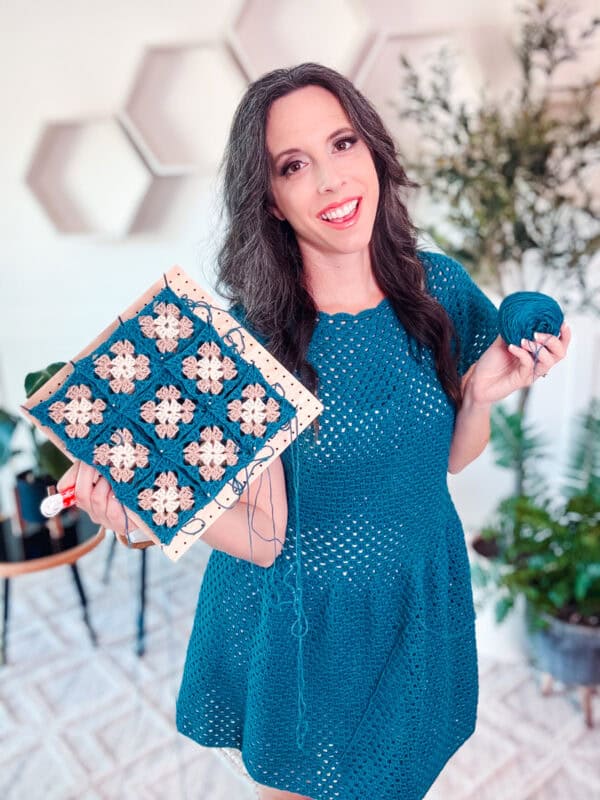
Looking for a fun and flirty crochet top you can wear all summer long? The Summer Granny Crochet Top is a modern twist on a classic stitch! Crocheted from the top down with a customizable fit, this airy garment can be worn as a cute tank top or easily extended into a flattering granny stitch dress.

Disclosure: This post contains affiliate links. Please read my disclosure for more info.
Whether you’re headed to a festival, brunch, or just love wearing handmade crochet clothing, this project is beginner-friendly, endlessly adaptable, and full of vintage charm. Bonus: it’s the perfect stash-busting design to play with color. And if you’re hooked on granny stitch like I am, you’ll definitely want to check out the Colorful Hues Granny Blanket, Granny Rectangle Bag, and the Gemstone Granny Cardigan.
Crochet Supplies for the Granny Summer Top
Yarn
WeCrochet Comfy Fingering
75% Pima Cotton, 25% Acrylic, 218yds/50g
Colorways: White, Marlin, Flamingo, Sea Foam
Or
Hobbii Twister Solid
55% Cotton, 45% Acrylic, 437yds/100g
Colorways: Light Rose, Dusty Rose, Cream, Glacier
Yarn Quantities
White Top With Square Trim Total:
1400 (1450, 1525, 1600, 1700) (1850, 2000, 2200, 2400) yds; 7 (7, 8, 8, 9) (9, 10, 11, 12) skeins
Accent colors use 1 ball each color.
For sizes L-5X, use 2 balls of the most commonly used accent color.
See notes on modification yardages.
Yarn Substitutions
75% Fine Superwash Merino Wool, 25% Nylon, 231yds/50g
Scheepjes Whirlette – 60% Cottom, 40% Acrylic, 498yds/100g
Remember always to check the gauge and drape when substituting yarns.
Crochet Hook
Size US G (4.0mm) Crochet Hook or hook to obtain gauge.
Notions
Scissors
Yarn Needle
Removable Stitch Marker
Blocking Board
Skill Level
Intermediate

What you’ll love about this pattern.
? Simple Stitch Repeat – This versatile piece combines the timeless charm of the granny stitch paired with classic granny squares.
? Top-down construction means you can try it on as you go for the perfect fit.
? Customizable – You can make this top with long or short sleeves, or in a cropped or hip-length style. Or, add some simple decreases to make a fitted waistline to a flouncy dress! The choice is yours!
Sizes
XS (S, M, L, 1X) (2X, 3X, 4X, 5X)
To fit chest: 32 (34, 38, 42, 46) (50, 54, 58, 62)
Actual measurements: 38 (39.5, 42, 46, 50) (54, 56.75, 59.5, 63.5)
This garment features an oversized, relaxed fit and is designed to be worn with 1.5-6 inches of ease. For a more fitted look, go down a size.
Abbreviations
blo – back loop only
ch – chain
dc – double crochet
sc – single crochet
sl st – slip stitch
sp – space
sps – spaces
st(s) – stitch(es)
Stsc – Stacked Single Crochet
Gauge
18 sts and 11 rows + 4″ by 4″ worked in the granny stitch.
How to Crochet A Gauge Swatch
Working a gauge swatch will let you know if you will have the correct sizing for this pattern. It will also help you practice the stitches used in this project and improve your stitch work for a flawless look.
Are you struggling to match the gauge? Check out the blog post on What is Crochet Gauge and How To Fix It
Gauge Swatch Instructions
Since this pattern is worked in the round, it’s best to create the gauge swatch in the round.
Ch 45, without twisting the chain, join.
Rnd 1:
Stsc, 2 dc in the same ch, skip 2 chs, *3 in next ch, skip 2 chs; repeat from * around, join to the top of the Stsc. | 45 sts, 15 granny groups
Rnd 2:
Sl st in the next 2 sts, Stsc into next sp, 2 dc in same sp, 3 dc in all sp around, join.
Repeat Row 2 for 13 total rounds, measure, and make any adjustments.
Construction
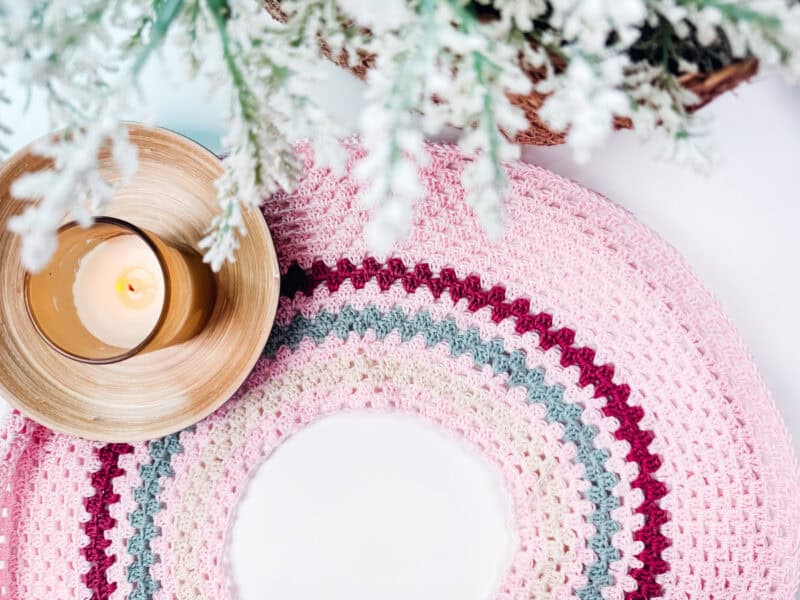
The Summer Granny Top is crocheted from the top down in one piece, making it easy to adjust as you go. You’ll begin by working an evenly increasing yoke in the round, which creates the neckline and shoulder shaping. Once the yoke is complete, you’ll split the stitches to create the sleeves and body.
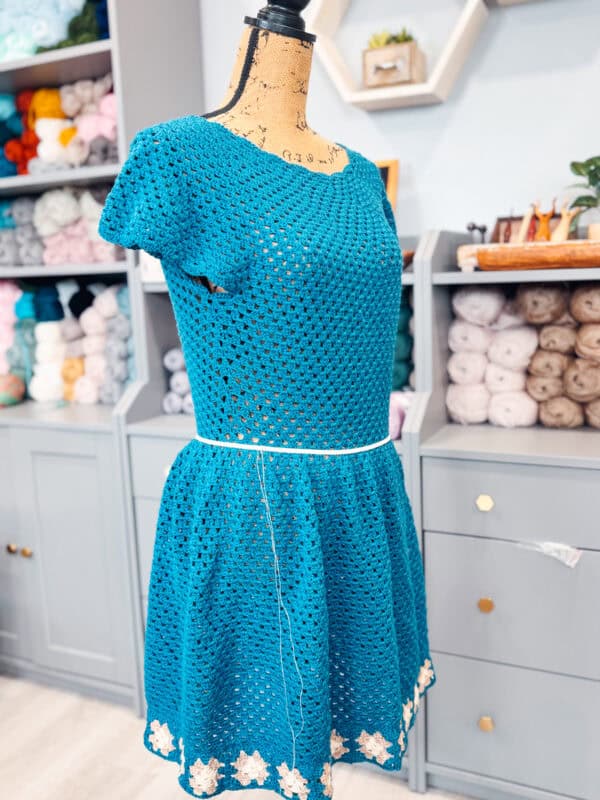
From there, the fun begins: you can keep it simple as a cropped or hip-length top, or transition into a breezy tea-length granny stitch dress. Want a skater-style silhouette? Decrease slightly toward the waist, then increase to flare out for a flattering A-line shape.
Granny squares are worked separately and can be seamed along the bottom edge of the top or dress for extra flair (or skip them for a cleaner look). You can also customize sleeve length, body length, and even neckline depth.
Need help adjusting for a better fit? Don’t forget to try it on as you go — one of the perks of a top-down crochet garment!
Love crochet dresses? Take a peek at the Taylor Swift Granny Dress and the Hexagon Swim Cover (don’t let the name fool you – this garment can be worn over tights or leggings)!

Special Stitches
Stacked Single Crochet (Stsc): Do NOT chain, insert hook into next stitch, yo, pull up a loop, yo and pull through both loops, insert hook in the vertical bar below, yo, pull up a loop, yo and pull through both
loops on the hook.
Pattern Notes
- The chain 1 at the beginning of the row does not count as a stitch.
- Hate weaving in ends? When working the Granny Squares, try this knot trick:
https://brianakdesigns.com/crochet-knot-join/
- The instructions and stitch counts are given for the smallest size, with the larger sizes in brackets ( ).
- Before you dive into your project, take a moment to identify the stitch and row counts that match the size you’re making. By highlighting or marking them, you’ll save time and effort later on. Trust us, this small step will make a big difference in your knitting or crochet journey!
- Modifying the top to a dress with short sleeves, decreases at the waist, and increases for a skirt flare, increased the yarn quantity by 25%.
❓ FAQ: Summer Granny Crochet Top or Dress
How do I turn the top into a dress?
To make the Summer Granny Top into a dress, continue crocheting in the granny stitch pattern after completing the top section. You can shape the dress by slightly decreasing at the waist and increasing to create an A-line flare. Additional yarn will be needed depending on the length you want.
What kind of yarn works best for this crochet top?
Lightweight, breathable yarns like cotton, bamboo, or cotton-acrylic blends are ideal. These yarns help the top keep its shape while offering great stitch definition.
Can I adjust the sizing?
Yes! This is a top-down pattern, so it’s easy to adjust as you go. Try it on after completing the yoke and make changes to the body or sleeves based on your preferences. You can also add rows to increase armhole depth before splitting for the sleeves.
Is this pattern beginner-friendly?
Absolutely. The granny stitch and simple shaping techniques make this an approachable project for adventurous beginners and beyond. If you’re comfortable with basic stitches like double crochet, you’re good to go!
Video Tutorial for the Summer Granny Crochet Top or Dress

Relax & Crochet
Upgrade to the Printable PDF
Beautifully formatted to print and relax while crocheting. The paid pattern includes:
The Ad-Free PDF can be purchased on Etsy or Ravelry.
Click the box below to unlock this exclusive subscriber content for free. Add your email and create a password. If you are having trouble, reset your password or log in to the Grow Portal.
I’m thrilled to share this amazing crochet pattern with you! Please don’t copy, paste, or distribute this pattern. Prefer an ad-free experience? Purchase a digital PDF file for a small fee from one of my online stores. I appreciate your support and readership. You are why I can keep doing what I love and sharing it with others. Thank you from the bottom of my heart.
Written Crochet Instructions for the Granny Summer Top
Tip Before Starting Yoke
If you are making the yoke in a solid color, you can work each round continuously without the need to join. Place a st marker at the beginning of each round. See video for a visual.
Here are the modified rounds for this pattern to work without joining:
Rnd 1:
Working in the rnd, sc 3 in first ch, skip 2 chs, *3 in next ch, skip 2 chs; repeat from * around, do not join. | 120 sts, 40 granny groups
Rnd 2:
[3 dc in next 3 sps, 4 dc in next sp] around, join. | 130 sts, 40 granny groups
For the remaining Rnds, start each rnd at the […] and do not join.
Yoke
With Color A, Ch 120 (keeping it loose, as this will determine the neck width), without twisting the chain, join.
Rnd 1:
Stsc, 2 dc in the same ch, skip 2 chs, *3 in next ch, skip 2 chs; repeat from * around, join to the top of the Stsc. | 120 sts, 40 granny groups
Rnd 2:
Sl st in the next 2 sts, Stsc in the space between the granny clusters, 2 dc in same sp, 3 dc in next 2 sps, 4 dc in next sp, [3 dc in next 3 sps, 4 dc in next sp] around, join. | 130 sts, 40 granny groups
Rnd 3:
Sl st in the next 2 sts, with Color B Stsc in next sp, 2 dc in same sp, 3 dc in next 2 sps, 3 dc in sp between 2nd & 3rd dc of 4 dc group, [3 dc in all sps and 3 dc in sp between 2nd & 3rd dc of 4 dc group] around,
join. | 150 sts, 50 granny groups
Rnd 4:
Sl st in the next 2 sts, Stsc in next sp, 2 dc in same sp, 3 dc in each sp around, join.
Rnd 5:
Sl st in the next 2 sts, fasten off Color B. With Color A, Stsc in next sp, 2 dc in same sp, 3 dc in each sp around, join.
Rnd 6:
Sl st in the next 2 sts, Stsc in the space between the granny clusters, 2 dc in same sp, 3 dc in next 3 sps, 4 dc in next sp, [3 dc in next 4 sps, 4 dc in next sp] around, join. | 160 sts, 50 granny groups
Rnd 7:
Sl st in the next 2 sts, with Color C, Stsc in next sp, 2 dc in same sp, [3 dc in each sp and 3 dc in sp between 2nd & 3rd dc of 4 dc group], join. | 180 sts, 60 granny groups
Rnd 8:
Sl st in the next 2 sts, Stsc in next sp, 2 dc in same sp, 3 dc in each sp around, join.
Rnd 9:
Sl st in the next 2 sts, fasten off Color C. With Color A, Stsc in next sp, 2 dc in same sp, 3 dc in each sp around, join.
Rnd 10:
Sl st in the next 2 sts, Stsc in the space between the granny clusters, 2 dc in same sp, 3 dc in next 4 sps, 4 dc in next sp, [3 dc in next 5 sps, 4 dc in next sp] around, join. | 190 sts, 60 granny groups
Rnd 11:
Sl st in the next 2 sts, with Color D, Stsc in next sp, 2 dc in same sp, [3 dc in each sp and 3 dc in sp between 2nd & 3rd dc of 4 dc group] , join. | 210 sts, 70 granny groups
Rnd 12:
Sl st in the next 2 sts, Stsc in next sp, 2 dc in same sp, 3 dc in each sp around, join.
Rnd 13:
Sl st in the next 2 sts, fasten off Color D. With Color A, Stsc in next sp, 2 dc in same sp, 3 dc in each sp around, join.
Rnd 14:
Sl st in the next 2 sts, Stsc in the space between the granny clusters, 2 dc in same sp, 3 dc in next 5 sps, 4 dc in next sp, [3 dc in next 6 sps, 4 dc in next sp] around, join. | 220 sts, 70 granny groups
Rnd 15:
Sl st in the next 2 sts, Stsc in next sp, 2 dc in same sp, [3 dc in each sp and 3 dc in sp between 2nd & 3rd dc of 4 dc group] around, join. | 240 sts, 80 granny groups
Rnd 16:
Sl st in the next 2 sts, Stsc in the space between the granny clusters, 2 dc in same sp, 3 dc in next 6 sps, 4 dc in next sp, [3 dc in next 7 sps, 4 dc in next sp] around, join. | 250 sts, 80 granny groups
Rnd 17:
Sl st in the next 2 sts, Stsc in next sp, 2 dc in same sp, [3 dc in each sp and 3 dc in sp between 2nd & 3rd dc of 4 dc group] around, join. | 270 sts, 90 granny groups
For Size X-Small Go to Arm Depth
Size Small Only:
Rnd 18:
Sl st in the next 2 sts, Stsc in the space between the granny clusters, 2 dc in same sp, 3 dc in next 20 sps, 4 dc in next sp, 3 dc in next 22 sps, 4 dc in next sp, 3 dc in next 21 sps, 4 dc in next sp, 3 dc in next 22 sps, 4 dc in next sp join. | 274 sts, 90 granny groups
Rnd 19:
Sl st in the next 2 sts, Stsc in next sp, 2 dc in same sp, [3 dc in each sp and 3 dc in sp between 2nd & 3rd dc of 4 dc group] around, join. | 282 sts, 94 granny groups
For Size Small Go to Arm Depth
All other sizes:
Rnd 18:
Sl st in the next 2 sts, Stsc in the space between the granny clusters, 2 dc in same sp, 3 dc in next 7 sps, 4 dc in next sp, [3 dc in next 8 sps, 4 dc in next sp] around, join. | 280 sts, 90 granny groups
Rnd 19:
Sl st in the next 2 sts, Stsc in next sp, 2 dc in same sp, [3 dc in each sp and 3 dc in sp between 2nd & 3rd dc of 4 dc group] around, join. | 300 sts, 100 granny groups
For size Medium Go to Arm Depth
All other sizes:
Rnd 20:
Sl st in the next 2 sts, Stsc in the space between the granny clusters, 2 dc in same sp, 3 dc in next 8 sps, 4 dc in next sp, [3 dc in next 9 sps, 4 dc in next sp] around, join. | 310 sts, 100 granny groups
Rnd 21:
Sl st in the next 2 sts, Stsc in next sp, 2 dc in same sp, [3 dc in each sp and 3 dc in sp between 2nd & 3rd dc of 4 dc group] around, join. | 330 sts, 110 granny groups
For Size Large Go to Arm Depth
All other sizes:
Rnd 22:
Sl st in the next 2 sts, Stsc in the space between the granny clusters, 2 dc in same sp, 3 dc in next 9 sps, 4 dc in next sp, [3 dc in next 10 sps, 4 dc in next sp] around, join. | 340 sts, 110 granny groups
Rnd 23:
Sl st in the next 2 sts, Stsc in next sp, 2 dc in same sp, [3 dc in each sp and 3 dc in sp between 2nd & 3rd dc of 4 dc group] around, join. | 360 sts, 120 granny groups
For Size 1X Go to Arm Depth
Size 2X Only:
Rnd 24:
Sl st in the next 2 sts, Stsc in the space between the granny clusters, 2 dc in same sp, 3 dc in next 29 sps, 4 dc in next sp, [3 dc in next 30 sps, 4 dc in next sp] around, join. | 364 sts, 120 granny groups
Rnd 25:
Sl st in the next 2 sts, Stsc in next sp, 2 dc in same sp, [3 dc in each sp and 3 dc in sp between 2nd & 3rd dc of 4 dc group] around, join. | 372 sts, 124 granny groups
All other sizes:
Rnd 24:
Sl st in the next 2 sts, Stsc in the space between the granny clusters, 2 dc in same sp, 3 dc in next 10 sps, 4 dc in next sp, [3 dc in next 11 sps, 4 dc in next sp] around, join. | 370 sts, 120 granny groups
Rnd 25:
Sl st in the next 2 sts, Stsc in next sp, 2 dc in same sp, [3 dc each sp and 3 dc in sp between 2nd & 3rd dc of 4 dc group] around, join. | 390 sts, 130 granny groups
For Size 3X Go to Arm Depth
Size 4X Only:
Rnd 26:
Sl st in the next 2 sts, Stsc in the space between the granny clusters, 2 dc in same sp, 3 dc in next 20 sps, 4 dc in next sp, 3 dc in next 22 sps, 4 dc in next sp, *3 dc in next 21 sps, 4 dc in next sp, 4 dc in next sp, 3 dc in next 22 sps, 4 dc in next sp; repeat from * one more time, join. | 396 sts, 130 granny groups
Rnd 27:
Sl st in the next 2 sts, Stsc in next sp, 2 dc in same sp, [3 dc in each sp and 3 dc in sp between 2nd & 3rd dc of 4 dc group] around, join. | 408 sts, 136 granny groups
Size 5X Only:
Rnd 26:
Sl st in the next 2 sts, Stsc in the space between the granny clusters, 2 dc in same sp, 3 dc in next 11 sps, 4 dc in next sp, 3 dc in next 12 sps, 4 dc in next sp] around,join. | 400 sts, 130 granny groups
Rnd 27:
Sl st in the next 2 sts, Stsc in next sp, 2 dc in same sp, [3 dc in each sp and 3 dc in sp between 2nd & 3rd dc of 4 dc group] around, join. | 420 sts, 140 granny groups
Join The Kindest Community
Join our vibrant community of crafters on Facebook today. Whether you enjoy crafting with others or simply have burning questions, we’ve got you covered – join us now!
Arm Depth
Work as follows:
Sl st in the next 2 sts, Stsc in next sp, 2 dc in same sp, 3 dc in each sp around, join. Until there are a total of 21 (22, 23, 24, 25) (26, 27, 28, 29) rnds.
The arm depth should be approx. 7 (7.5, 8, 8.5, 9) (9.5, 10, 10.5, 11) inches. See Fitting Tip.

Adjusting For Fit
Since this is a top-down construction, we get the added benefit of trying it on as we go. When splitting for the Body & Sleeves, try on and check for fit.
Do you need more rows for arm depth and comfort? Add more before continuing.
Splitting Body & Sleeves
Sl st in the next 2 sts, Stsc in the space between the granny clusters, 2 dc in same sp, 3 dc in next 25 (26, 28, 31, 34) (36, 38, 40, 42) sps, ch 7 (7, 7, 7, 7) (10, 10, 10, 13), skip 19 (20, 21, 23, 25) (25, 26, 27, 27) sps, 3 dc in the next 26 (27, 29, 32, 35) (37, 39, 41, 43) sps, ch 7 (7, 7, 7, 7) (10, 10, 10, 13), skip 19 (20, 21, 23, 25) (25, 26, 27, 27) sps, join.
Styling Tips
- Jeans or Denim Shorts: Pair the top with high-waisted jeans or denim shorts for a relaxed, everyday look.
- Maxi Skirt: Combine the top with a flowy, bohemian maxi skirt.
- High-Waisted Shorts: Pair the top with high-waisted shorts, and complete the look with a chic clutch bag.
- Cardigan or Jacket: Layer the top with a lightweight cardigan or denim jacket.
Body Length
The below is written for joining, but working this continuously is an option and removes any noticeable seam.
Rnd 1:
Sl st in the next 2 sts, Stsc in the space between the granny clusters, 2 dc in same sp, *3 dc in each sp until the ch sts, 3 dc in the first ch, [skip 2 ch, 3 dc in next] across all ch sts; repeat from * around, join
| 174 (180, 192, 210, 228) (246, 258, 270, 288) sts, (58 (60, 64, 70, 76) (82, 86, 90, 96) granny groups
Rnd 2:
Sl st in the next 2 sts, Stsc in next sp, 2 dc in same sp, 3 dc in each sp around, join.
Repeat until there are a total of 18 rnds, or until the desired length before the bottom granny square trim.
Customizing Fit
You may want a fitted look if you are crocheting the top or the dress. This can be done by adding decreases or increases that work for your body shape and size.
An example of this is on the dress, which is decreased on each side under the arm until the waist area. Then, it is increased on each side for the hip area.
This can be done in the desired amount of increases and decreases. It helps to try on the top or dress as you go.
How to Decrease:
Decrease Rnd 1:
Work in the granny stitch pattern until you reach the underarm, work 2 dc in the next space, continue in the granny stitch pattern until the other underarm, and repeat.
Decrease Rnd 2:
Work in the granny stitch until you reach the 2 dc group, skip the space before the 2 dc group, 3 dc in between the 2 dc sts, skip the space after the 2 dc group, continue in the granny stitch pattern until the other underarm, and repeat.
How to Increase:
Increase Rnd 1:
Work in the granny stitch pattern until you reach the underarm, work 4 dc in the next space, and continue in the granny stitch pattern until the other underarm, and repeat.
Increase Rnd 2:
Work in the granny stitch until you reach the 4 dc group, 3 dc in the center space between the 4 dc sts, continue in the granny stitch pattern until the other underarm, and repeat.

Make it a dress!
Length is the most significant difference between a crochet sweater and a dress.
There are several options of styles when it comes to making a dress. Here are some suggested options:
Option 1: Keep crocheting rounds until the desired length without increasing, and use a tie around the center to shape.
Option 2: For a shaped dress, increase and decrease only as needed around your body shape. Stop at the desired length.
Option 3: For a tea-style dress, increase at the waistline as follows: Increase every other space as shown in the increase instructions. Then, do a second set of increases and increase every third space. This will allow a gathered/flared look. It can also be styled with a tie or some fabric elastic on the inside to shape.
Sleeves
Attach the yarn with a sl st to the base of a dc 3 group under the arm. I prefer to work my sleeves continuously without joining since we are not changing colors.
Rnd 1:
Sc 3 in the first st. 3 dc in each sp around, join. Please note, add a 3 dc group in the ‘corners’ of the underarm to reduce a hole. | 24 (25, 26, 28, 30) (31, 32, 33, 34) granny groups
Please Note: For sizes with an odd number of granny groups, decrease by one granny group to have an even number by the end of the sleeve for the trim.
Repeats:
3 dc in each sp around until there are a total of 44 rnds, or until the desired length of sleeve before trim. In the very last space, substitute the 3 dc for 3 sc to help even out the bottom edge. Do not fasten off.
Sleeve Trim
*Sc in next sp, 5 dc into the next sp; repeat from * around. Either sl st and fasten off, or fasten off and use your tapestry needle for an invisible join.
Neck Trim
Attach the yarn to a space on the side of the neck.
*Sc in next sp, 5 dc into the next space; repeat from * around. Either sl st and fasten off, or fasten off and use your tapestry needle for an invisible join.
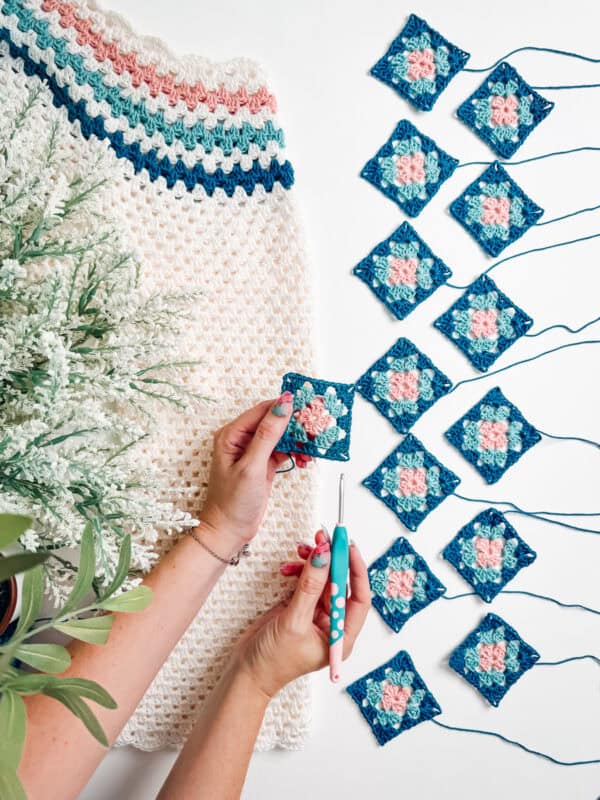
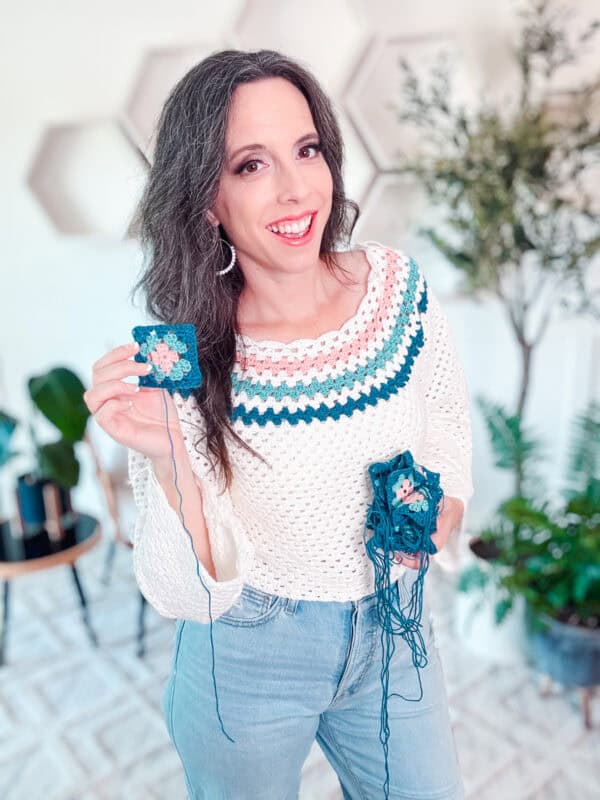
Granny Squares
See video for a knot join when changing colors for fewer ends to weave in.
Rnd 1:
With first color, and working in a Magic Ring, sl st, Stsc, ch 2, [3 dc, ch 2] three times, 2 dc, sl st to the top of the Stsc st to join. | 4 granny groups and 8 chs
Rnd 2:
With second color and working in the ch 2-space, Stsc, ch 2, 3 dc, [ch 1, in next ch 2-space (3dc, ch 2, 3dc)] three times, ch 1, 2 dc in first sp, sl st to the top of the Stsc st to join. 8 granny groups and 12 chs
Rnd 3:
With third color and working in the ch 2-space, Stsc, ch 2, 3 dc, [ch 1, 3 dc in the next ch space, ch 1, in next ch 2-space (3dc, ch 2, 3dc)] three times, ch 1, 3 dc in the next ch space, ch 1, 2 dc in first sp, sl st to the top of the Stsc st to join, leaving a long tail for joining, fasten off, block square. | 12 granny groups and 16 chs
Each granny square is approx 2 1/2 inches.
Make 16 (16, 17, 19, 20) (22, 23, 24, 26) granny squares for the bottom trim.
If you’ve adjusted your top or dress, this will change the number of granny squares needed. To determine the number of granny squares needed, measure the circumference of the bottom of the garment and divide it by 2 1/2 inches (or the measurement of one side of your granny square). This will give you an idea of the number of granny squares needed.
Attaching Granny Squares
Using your yarn needle and the tail end of a granny square, seam the edges of each granny square together, creating a tube to attach to the bottom of the sweater.
Pin the granny squares evenly to the bottom edge of the top. Using your crochet hook, surface sl st the bottom edge of the sweater to the granny squares.
Optional Dress Elastic
If you would like a more fitted look at the waistline, then adding elastic on the inside of the dress will pull in the fabric.
To do this, first determine the length of elastic needed by placing it around your body where it will sit. Make sure it will stretch enough to be able to lift over your head to get the garment off and on. Stitch the ends of the elastic together.
Next, turn your dress inside out and pin the elastic in place. Using a needle and thread, stitch the elastic around the inside of the dress. Flip the dress back to the right side and wear.
Finishing
Weave in any ends, block the garment if needed, and enjoy!
The beauty of the Summer Granny Crochet Top (or Dress) lies in its versatility and charm. Whether you’re a fan of granny squares or new to the stitch, this free pattern allows you to create a wearable piece that truly reflects your style. Plus, the modular top-down construction makes it easy to modify for fit, comfort, and length.
Take the time to block your finished garment and hand wash it with mild detergent to keep those stitches looking sharp. Store it folded or flat — especially if you added granny squares — to avoid stretching.
Want more granny stitch inspiration? Try the cozy Granny Square Cardigan or Pullover, or add some seasonal flair with my Granny Square Snowflake Quilt Blanket!
Cheers, and happy crocheting!
Well, That Was Fun! What’s Next?