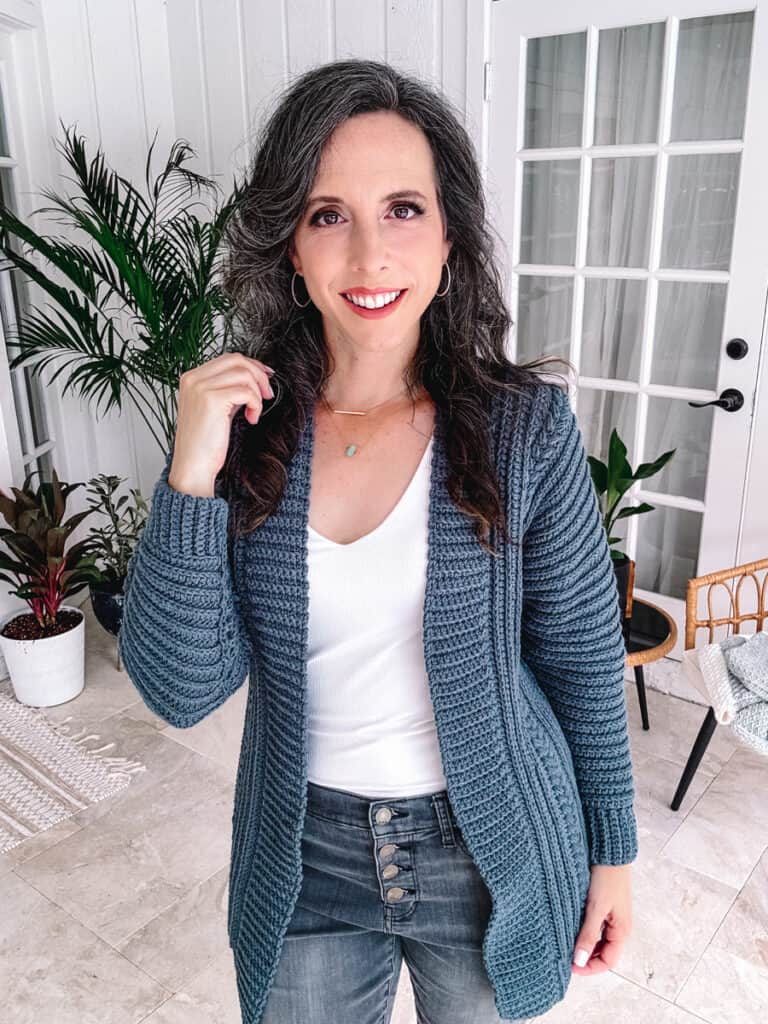
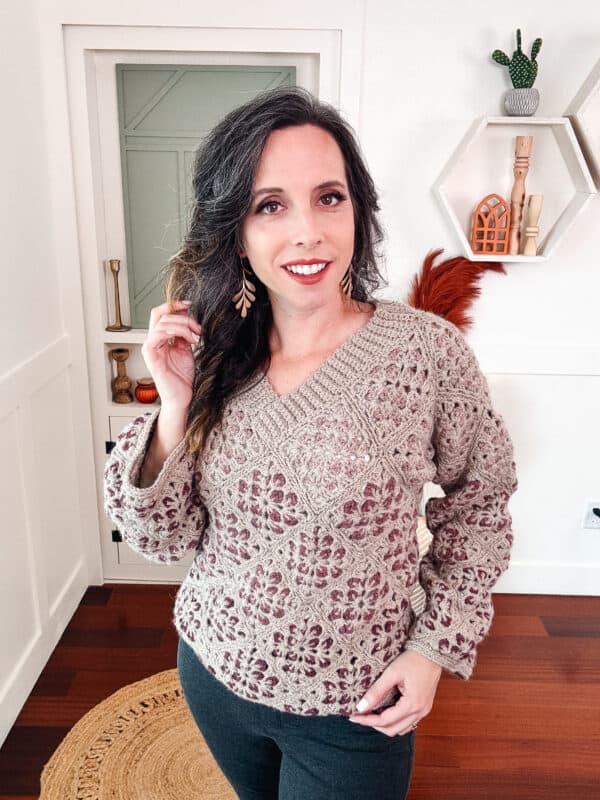
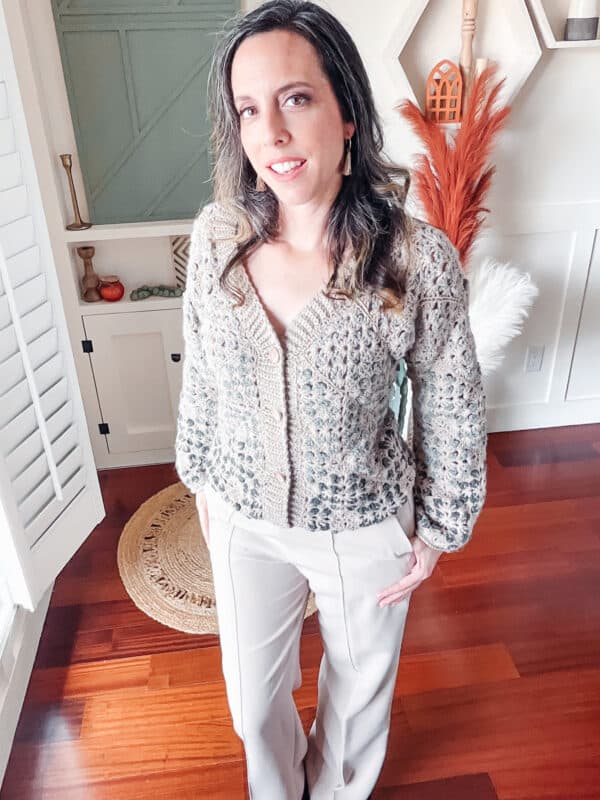
This crochet pattern changes a traditional granny square cardigan by arranging the unique granny square in a diamond shape. Not only is it warm and comfortable, it also comes in 9 sizes from extra small to 5x. And if you love granny stitches you may also enjoy the Rainbow Hues Granny Stitch Cardigan Pattern or the Shades of Diamonds Crochet Pullover Pattern.
Disclosure: This post contains affiliate links. Please read my disclosure for more info.
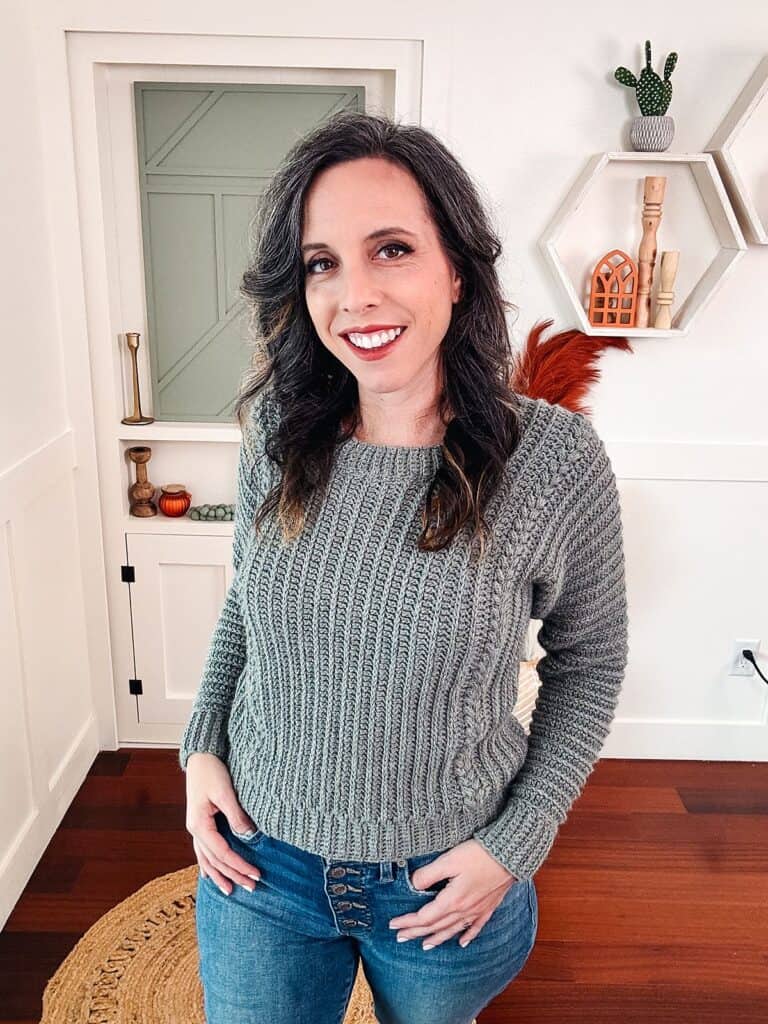
But want to modify this from a granny square cardigan to a granny sweater? Easily done! Keep on reading for the perfect adjustments to create your next stable garment. This is a must-have crochet garment you won’t be able to resist! Keep on reading for a crochet granny square cardigan pattern. Love granny squares? Also check out the Easy Granny Square Swim Cover and the Granny Square Snowflake Blanket.
I love collaborating with yarn friends! Check out the other designs used in the Not Your Average Granny Crochet Along, such as the Franny Granny Cardigan Pattern from HanJan Crochet and the River Stone Coatigan Pattern from MJ’s Off The Hook Designs.
What you’ll love about this free granny square cardigan pattern.
What tool will make granny squares easy?
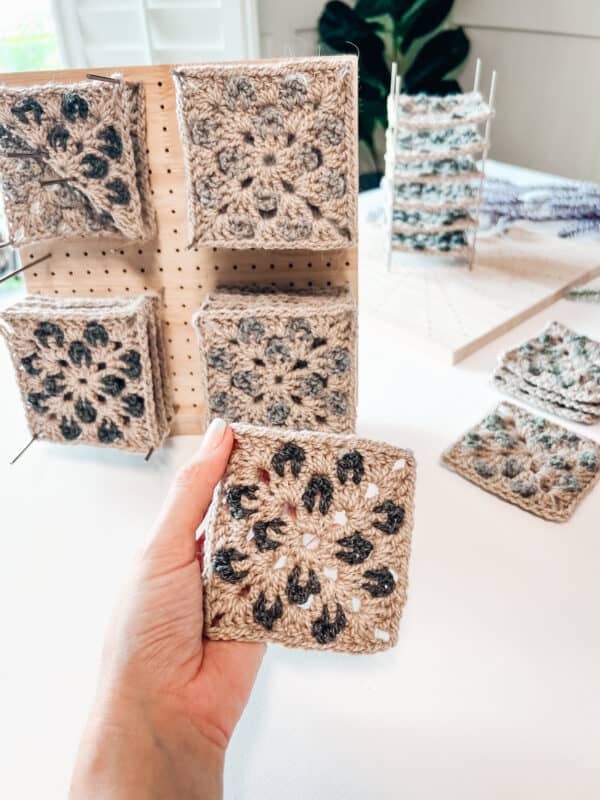
Having the right tools can make the biggest difference in success when working with crochet granny squares. Of course the yarn and hook matterns, but what might be critical is blocking. I’ve found a tool I can no longer live without, and that’s a wooden blocking board. This thing is just genius.
Simply block on these cool pegs to speed up the process of saying goodbye to pinning lots of squares. I first found this tool when creating the Granny Square Crochet Blanket, also a free pattern.
What Crafty Supplies You Will Need
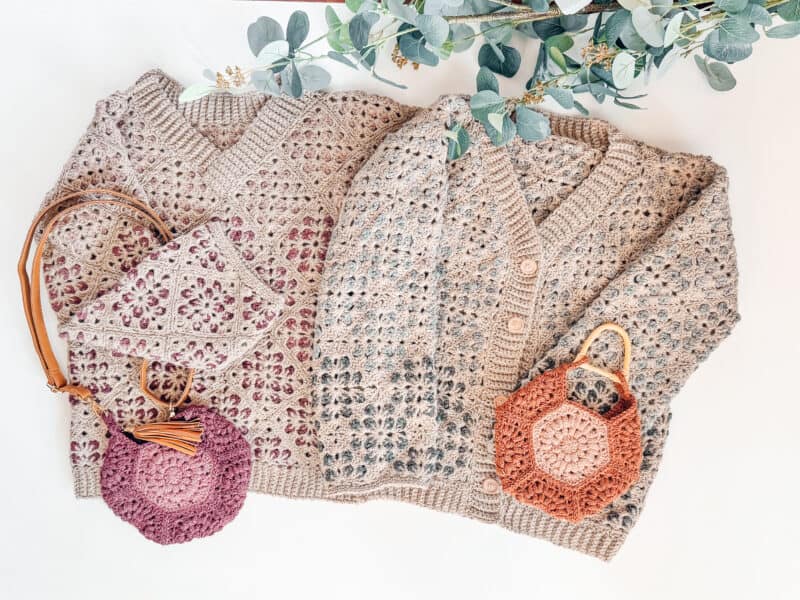
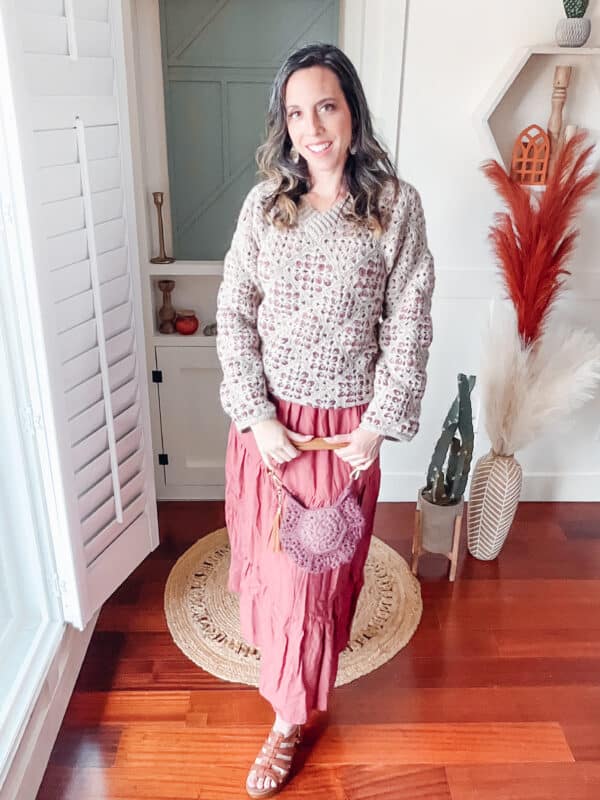
If you haven’t noticed, I love hexagons. And if you are looking at the image above and wondering where to find that bag, it’s only a click away. The best part is the Hexagon Granny Square Bag only uses seven granny hexagons to create.
Yarn
Upcycle Alpaca Blend Worsted Weight Yarn
33% Alpaca, 34% Wool, 33% Acrylic,
219yds/100g
Yarn Weight: Worsted (4)
Color Inspiration For Your Cardigan or Sweater
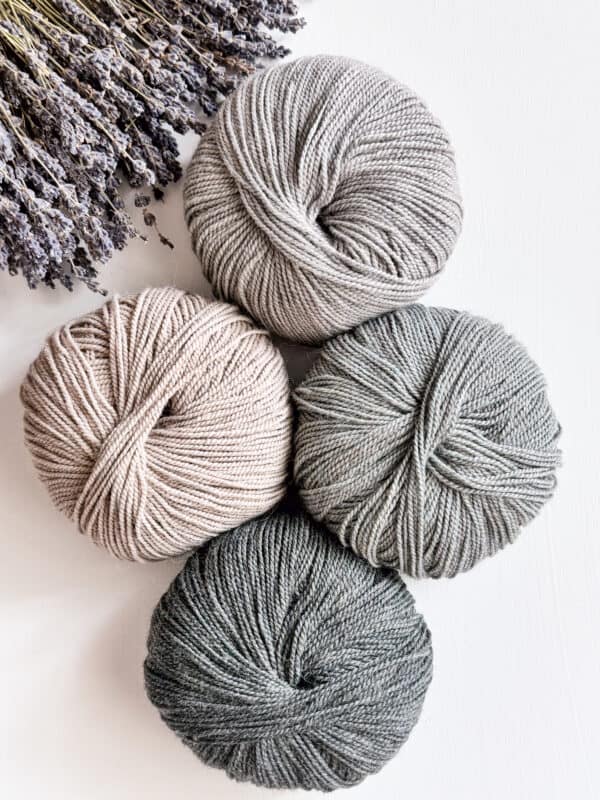
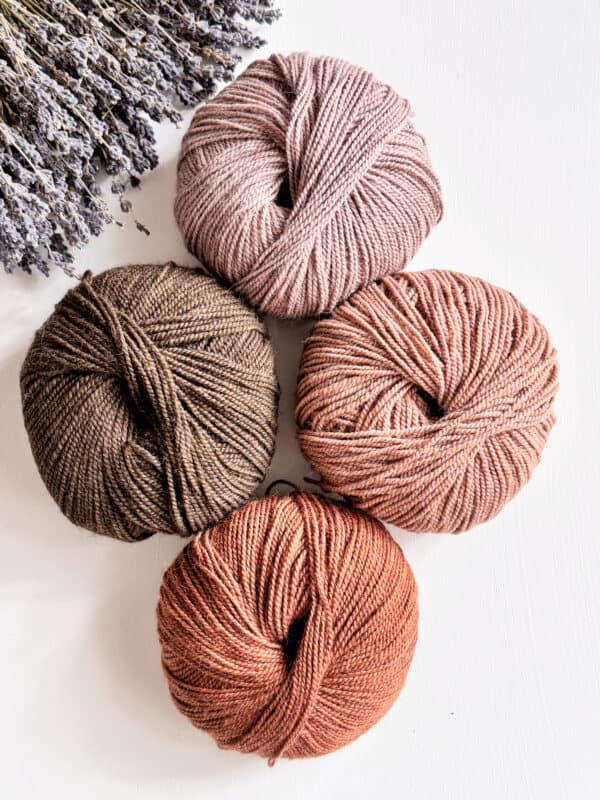

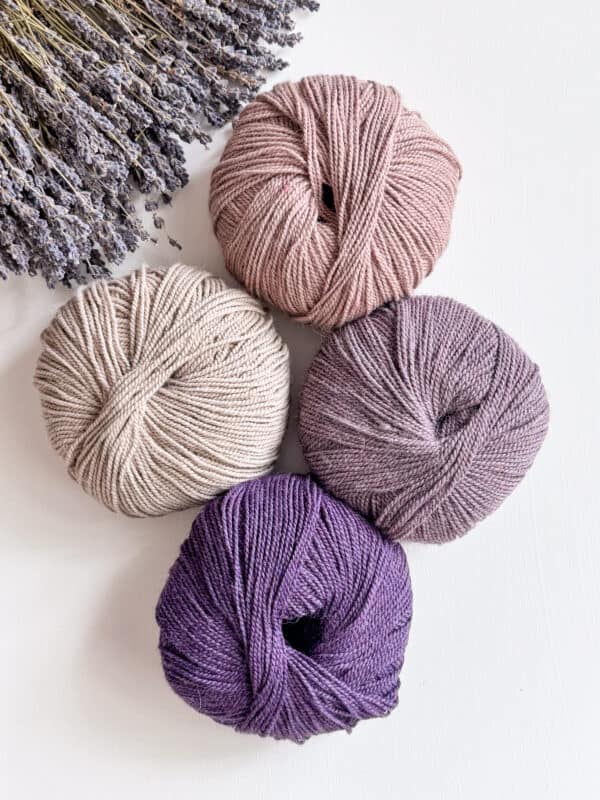

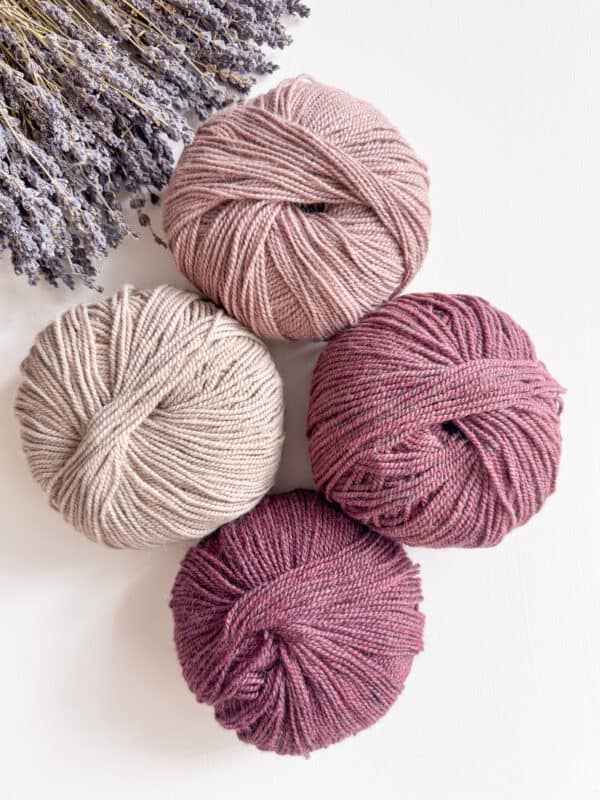
When you purchase the ad-free pdf pattern, it comes with yarn inspiration palettes in the Upcycle Alpaca Worsted Yarn. Build the perfect color combination to compliment your style.
Yarn Quantities
1450 (1720, 1850, 2000, 2300) (2550, 2700, 2850, 3000) total yardage
Main Color Balls of Yarn: 7 (7, 8, 8, 9) (10, 11, 12, 12)
Each Contrast Color Balls of Yarn: 1 (1, 1, 1, 1) (1, 1, 2, 2)
Yarn Substitutions
Heatherly Worsted
80% Acrylic, 20% Merino Wool, 218yds/100g
Check gauge, the sport weight is also an option.
Mighty Stitch
80% Acrylic 20% Superwash Wool, 208yds/100g
Paintbox Yarns Wool Blend Worsted
75% Acrylic 25% Wool, 219yds/3.5oz
Crochet Hook
Size G (4.0mm) Crochet Hook, or hook to obtain correctly sized granny square.
Notions
Scissors
Yarn Needle
Removable Stitch Marker
Wood Blocking Board
Skill Level
Intermediate
Garment Sizing
XS (S, M, L, 1X) (2X, 3X, 4X, 5X)
To fit chest:
30 (34, 38, 42, 46) (50, 54, 58, 62) Actual measurements are in schematic.
Ease: This garment has a lot of stretch without being restricting, but is a fitted garment.
1-3 inches of ease. Go up a bust size for a more casual fit.
Abbreviations
blo – back loop only
CC – contrast
ch – chain
dc – double crochet stitch
lp(s) – loop(s)
MC – main color
rnd- round
RS – right side
sc – single crochet
sl st – slip stitch
st(s) – stitch(es)
Stsc – stacked single crochet
YO – yarn over
Gauge
There are two sizes of granny squares for this pattern, use the one for your size and work up one granny square. After blocking, your granny square should measure 3.5 inches on all sides for s, l, 2X, & 4x. And measures 3.75 inches on all sides for sizes xs, m, 1X, 3X, 5X.
Make sure your granny square has a decent drape and you like the feel and look of it. If it appears favorable, start crocheting! If it’s too stiff or loose consider adjusting hook size or yarn.
Gauge Swatch for a Granny Square
Working a gauge swatch will let you know if you will have the correct sizing for this pattern. A gauge swatch helps you practice the stitches used in this project and improve your stitch work for a flawless look.
Are you struggling to match gauge? Check out the blog post on What is Crochet Gauge and How To Fix It
Gauge Swatch Instructions:
The key to nailing the sizing is to start by making one granny square and blocking it. This will ensure that you get the perfect gauge for each granny square and the overall cardigan.
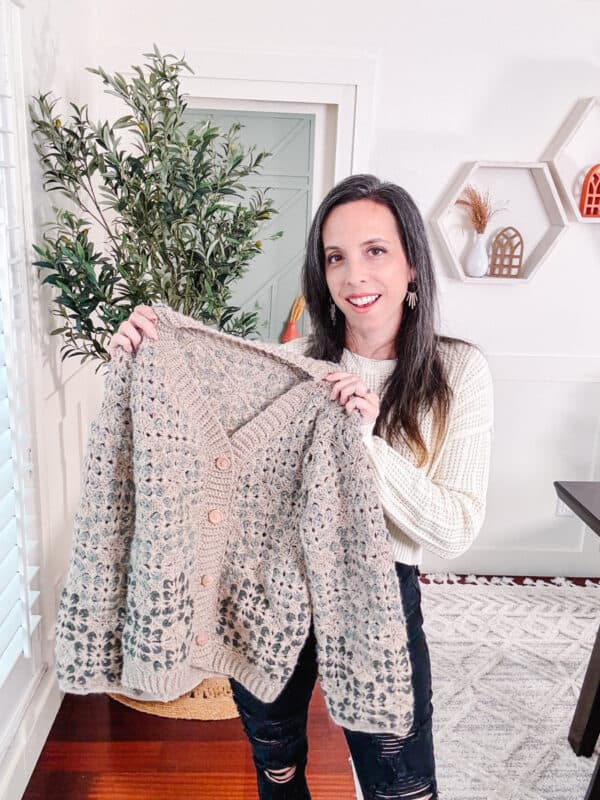
Construction
The Fancy Granny Cardigan features granny squares that we sew together to create a v-neck cardigan. We will then add ribbing at the bottom and front opening. You can also easily modify this design to make it a v-neck sweater.
Notes
- Using a stitch marker at the beginning of each round of the granny square is recommended.
- Substitute the chains at the beginning of the rounds with a Stsc. Use a stitch marker to keep track of the first stitch of the round.
- The instructions and stitch counts are given for the smallest size, with the larger sizes in brackets ( ).
Colors for the Green Crochet Granny Cardigan are written as:
C1: Parchment (Main Color)
C2: Pistachio (Contrast Color)
C3: Sage (Contrast Color)
C4: Thyme (Contrast Color)
This Pattern Uses Standard US Terminology.
Are granny stitches your thing? If so also check out the Gemstone Granny Crochet Cardigan and the Granny Stitch Crochet Clutch Pattern.
Hate Weaving in Ends? Try This Crochet Trick
Each Granny square can result in a lot of ends needing to be woven in. Since we have a wrong and right side, you can use a special knot for changing colors to reduce the number of ends to weave in and keep the knot to the back of your work.
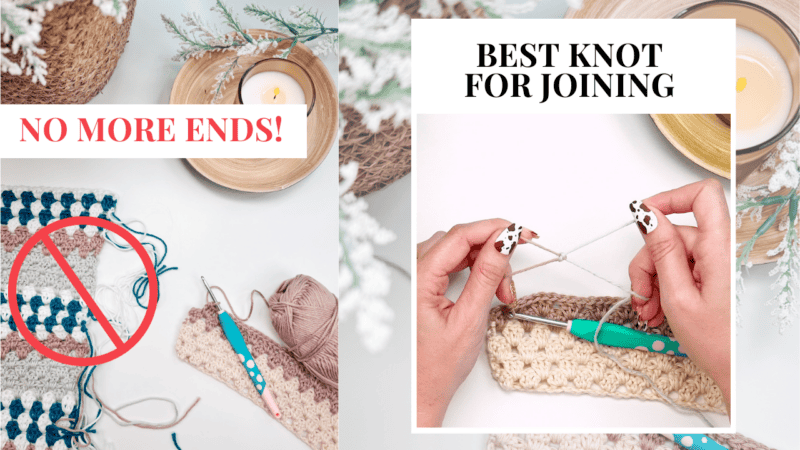
Video Tutorial:
Watch how easy and beginner friendly it is to work up a granny square with this crochet cardigan tutorial.

How to Make a Granny Square Cardigan
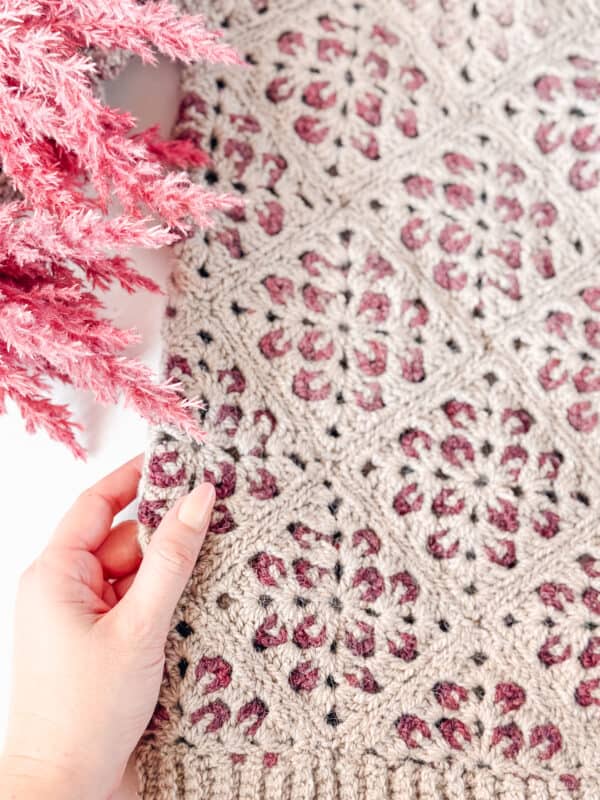
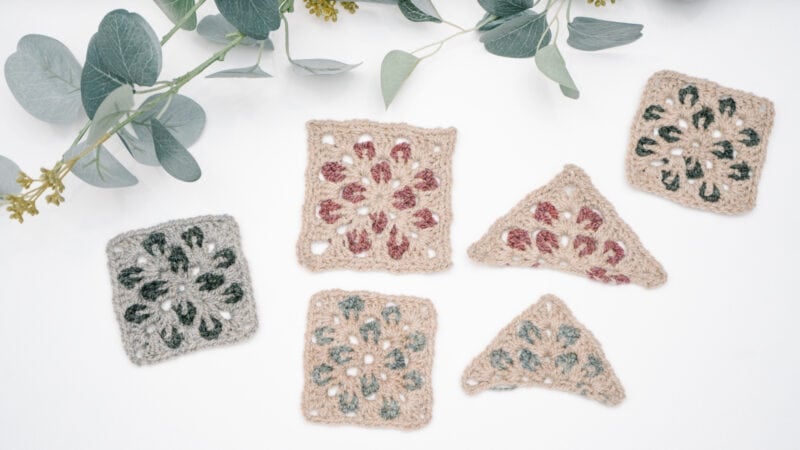
Full Modern Granny Square
Rnd 1 (RS):
With Main Color (MC) make Magic Circle, Stsc, dc 2, ch 3, [dc 3, ch 3] 3 times in Magic Circle, sl st to join with Contrasting Color (CC), turn.
Rnd 2 (WS):
Ch 4, sc in the space between the next dc sts, ch 3, sc in the space between the next dc sts; repeat from * to * around, on the very last yarn over of the sc st change to MC, turn.
Rnd 3:
Working in the last ch 3-space from Rnd 1 and around the Rnd 2 ch-4 space, Stsc, dc 2 in the same space, [ch 1, in the next ch 3-space from tRnd 1 (dc 3, ch 2, dc 3)] 3 times. Ch 1, working in the starting space at the beginning of the rnd dc 3, ch 2, join with a sl st with CC, turn.
Rnd 4:
Ch 4, [sc in the space between the next dc sts, ch 3] 3 times, sc in the space between the next dc sts; repeat from * to * around, on the very last yarn over of the sc st change to MC, turn. Fasten off CC.
Rnd 5:
Working in the last ch 2-space from the previous MC round (this will work around the CC of Rnd 4), Stsc, dc 2 in the same space, [ch 1, working around the CC of the previous round and in the next ch 1-space from the last MC rnd dc 3, ch 1, in the next ch 2-space from the last MC rnd (3 dc, ch 2, 3 dc)] 3 times. Ch 1, in the next ch 1-space from last MC rnd dc 3, ch 1, in the ch 2-space from the beginning of the rnd dc 3, ch 2 , do not turn.
Stop here for the S, L, 2X, & 4X, create an invisible join to finish and fasten off ends.
All other sizes continue with Rnd 6 below.
Granny Square for Sizes XS, M, 1X, 3X, & 5X
Rnd 6 (RS):
Sl st to join to the first st of rnd 5, do not turn, working in the last ch 2-space from the previous rnd, sc 3, *(ch 1, sc 3 into the next ch 1-space) twice, ch 1, in the next ch 2-space from the last MC rnd [3 sc, ch 2, 3 sc] 3 times. (ch 1, sc 3 into the next ch 1-space) twice, ch 1, in the ch 2-space from the beginning of the rnd sc 3, ch 2, create an invisible join to finish and fasten off ends.
Join The Kindest Community
Join our vibrant community of crafters on Facebook today. Whether you enjoy crafting with others or simply have burning questions, we’ve got you covered – join us now!
How Many Granny Squares To Make A Cardigan
To Unlock Exclusive Subscriber Content click the Box below and join for free! Grow will pop up so you can subscribe to my Blog. Enter your email and create a password. Every time you see Exclusive Content on my Blog, log in to your account!
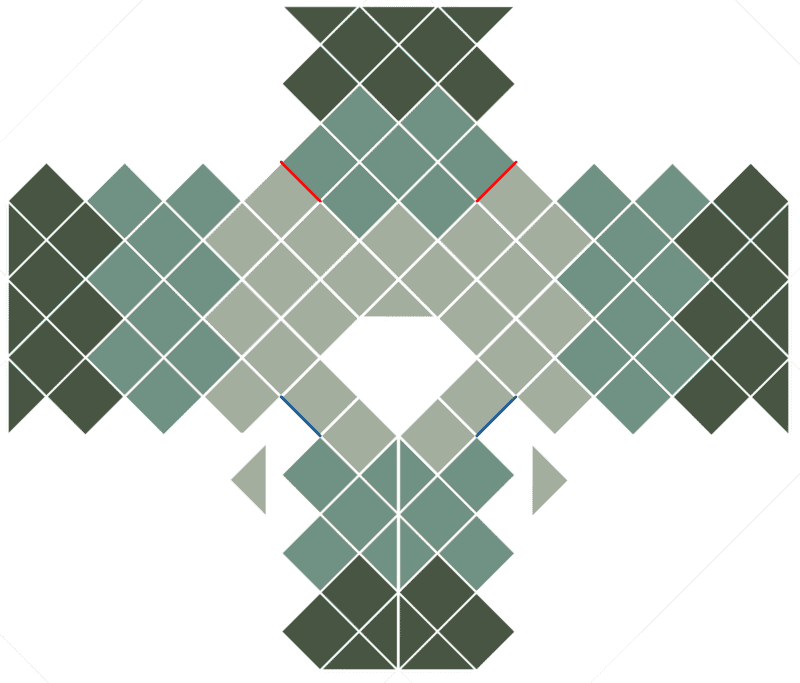
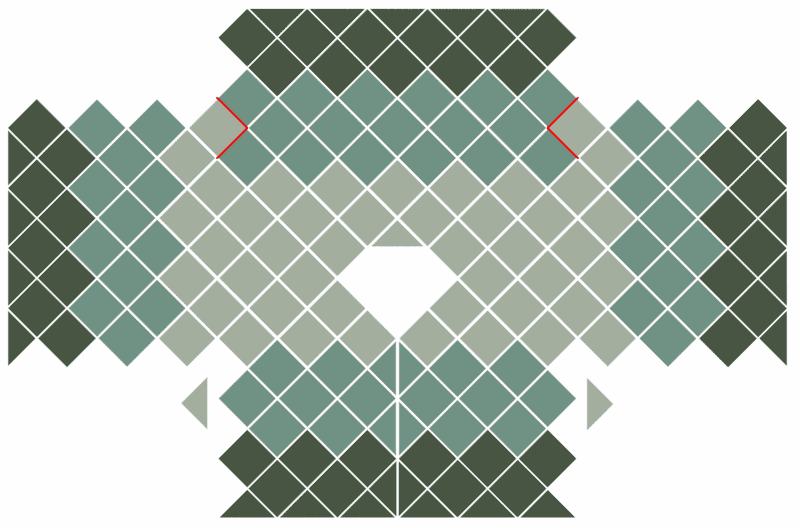
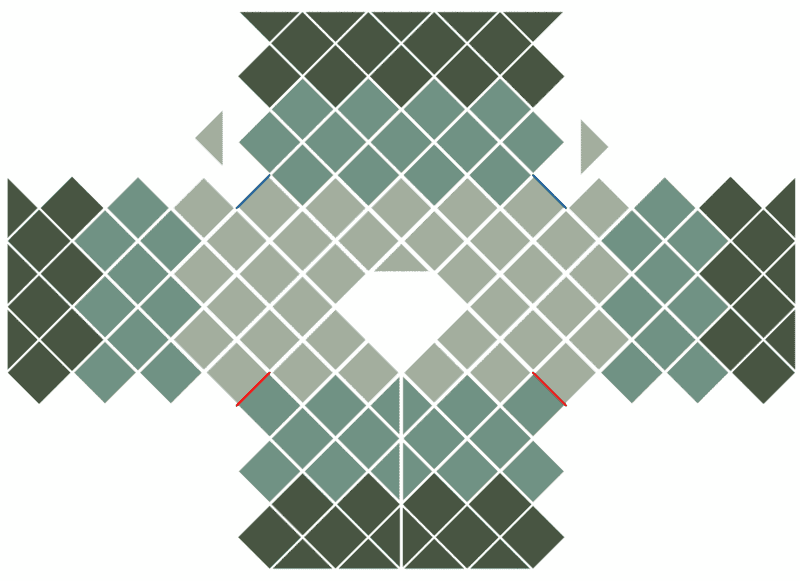
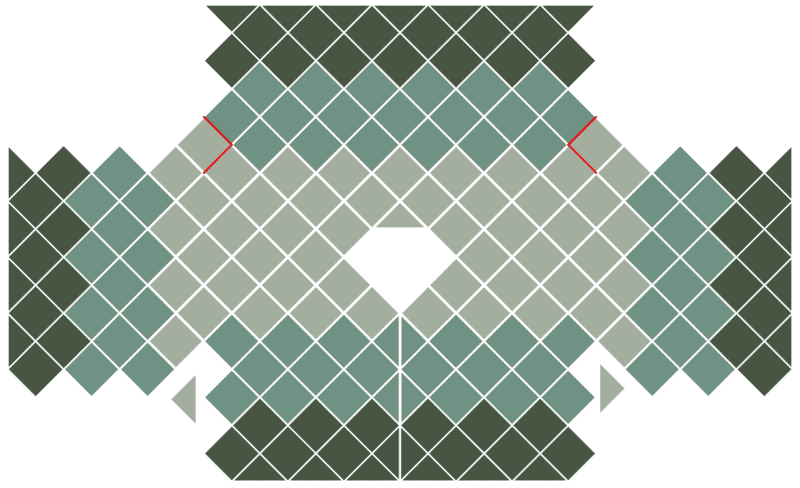
Granny Square Cardigan Pattern Layout

Granny Square Cardigan Layout
 XS Granny Square Cardigan
- Size Small & Medium Granny Square Cardigan
- 2x & 3x Granny Square Cardigan
- Large & 1x Granny Square Cardigan
- 4x & 5x Granny Square Cardigan

Here are the number of squares to create for each size of cardigan. But feel free to make it with more or less colors for your style.
Each square will use the MC with each CC:
CC Pistachio: 23 (29, 29, 35, 35) (45, 45, 51, 51)
CC Sage: 31 (37, 37, 43, 43) (55, 55, 61, 61)
CC Thyme: 21 (25, 25, 29, 29) (37, 37, 41, 41)
Handy Customization Tip
If you want to create a granny square sweater instead of a cardigan, substitute 4 of the Parchment/Sage half squares for 2 full squares, and 2 Parchment/Thyme half squares for 1 full square.
Half Modern Granny Squares
Row 1 (RS):
Inside Magic Circle with Main Color (MC): Stsc, ch 1, dc 3, ch 3, dc 3, ch 1, dc 1, on your last st change to the Contrasting Color (CC), turn. (see video for tip)
Row 2 (WS):
[Ch 3, sc in the space between the next dc sts] 2 times, ch 4, [sc in the space between the next dc sts, ch 3] 2 times, sc 1 into the last st, on the very last yarn over of the sc st change to MC (this can be loosely pulled up from the last row it was worked), fasten off the CC, turn.
Row 3:
Working in the ch-1 space from the first rnd – this row will work around the CC of Rnd 2, (Stsc, ch 1, dc 3) in the first ch 1-space, ch 1, skip the next ch 3-space, (dc 3, ch 2, dc 3) into the next ch space, ch 1, skip the next ch-3 space, (dc 3, ch 1, dc 1) in the last ch space, on the very last yarn over of the dc st change to CC, fasten off MC, turn.
Row 4:
Ch 3, [sc in the space between the next dc sts, ch 3] 3 times, sc in the space between the next dc sts, ch 4, [sc in the space between the next dc sts, ch 3] 4 times, sc in last st, on the very last yarn over of the sc st change to MC, fasten off CC, turn.
Row 5:
Working in the last ch space from the previous MC round – this row will work around the CC of Row 4, (Stsc, ch 1, dc 3) in the first ch-1 space, ch 1, skip the next ch-3 space, dc 3 into the next ch 3-space, ch 1, skip the next ch 3-space, (3 dc, ch 2, 3 dc) into the next ch space, ch 1, skip the next ch 3-space, dc 3 in the next ch space, ch 1, skip the next ch 3-space, (dc 3, ch 1, dc 1) in the last ch space.
For the S, L, 2X, & 4X stop here, create an invisible join to finish, fasten off and weave in ends.
All other sizes – either fasten off or sl st along the longest edge to the other corner, continue with Rnd 6 below.
Granny Square for Sizes XS, M, 1X, 3X, & 5X
Row 6:
Working in the last ch 2-space from the previous rnd, sc 1, ch 1, sc 3, *(ch 1, sc 3 into the next ch 1-space) twice, ch 1, in the next ch 2-space from the last MC rnd (3 sc, ch 2, 3 sc); repeat from * to * 3 times. (ch 1, sc 3 into the next ch 1-space) twice, ch 1, in the ch 2-space from the beginning of the rnd sc 3, ch 2, create an invisible join to finish, fasten off and weave in ends.
How Many Half Granny Squares for the Cardigan
Here are the amount of half squares to create for each size of cardigan. But feel free to make it with more or less colors for your style.
Each square will use the MC with each CC:
CC: Pistachio: 3 for all sizes
CC: Sage: 4 for all sizes
CC: Thyme: 13 (15, 15, 17, 17) (21, 21, 23, 23)
How to Block Granny Squares
Before seaming the sweater, it is very important to block each granny square.
Not only will this make seaming easier, but it will also be critical for fit. The blocking really opens the stitches and evens out the granny square.
My favorite way (and easiest method) to block granny squares is to use a crochet blocking board.
Blocking is a process of using water or heat to carefully relax yarn fibers and set the final shape and size. Notice the difference in blocked versus unblocked in the image below?

If you don’t have a special blocking board, don’t worry! For both methods we are going to spray our crochet granny square, or soak it in a lukewarm water for wet blocking, and lay it on blocking mats and pin into place. One the piece is dry, you are finishing blocking.
Another method is to first pin the granny square and then use a steamer to go over the piece and this will also open the stitches.
Seaming the Granny Squares
Lay the granny squares out RS facing as shown in the images for your chosen size below. Using the MC of yarn and a yarn needle, seam the granny squares together using the instructions from the video or preferred method (such as a flat sl st join). Do NOT seam along the red lines on the lay out charts (shown above in the exclusive content on this blog).
Then fold the cardigan in half, matching up the sides and sleeves. Sew from the arm opening to the underarm and from the bottom side of the cardigan up to the underarm. This will leave an opening under the arm in the shape of a triangle.
Use the half granny square to fill this opening and seam it into place.
Want an easier blocking experience? Get a wooden blocking board for getting the perfect crochet cardigan layout.
Bottom Ribbing
Row 1:
With the RS facing ch 8, SC in 2nd ch from hook and each ch across back towards the bottom body edge, sl st in next 2 sts along the bottom Body edge (these do not count as sts), turn. | 7 sts.
Row 2:
Sk the 2 sl sts from the bottom Body edge, Sc blp in each st across until the last st, SC in both lps of the last st, turn.
Row 3:
Ch 1 (does not count as a st here and throughout), SC through both lps of the first st, Sc blp in each st across, sl st in next 2 sts along the bottom Body edge, turn.
Reps: Rep Rows 2-3 around the bottom Body edge of the cardigan, fasten off.

Front & Neck Ribbing
Setup: With the right side facing, join yarn at the side of the bottom front. Slip stitch loosely around the neckline opening, keeping the slip stitches spaced evenly. Turn.
Place St Markers: Use 3-5 st markers depending on how many buttonholes you would like. Place the markers along the side of the front opening where you want the buttons evenly spaced. Trying this on is helpful in determining placement.
Working A Buttonhole Row:
When you get to a st marker, work that row as follows to create the buttonhole. Sk the 2 edge sl sts, sc blp 1, ch 2, sk 2, sc blp 1, sc the last st through both lps, turn.
Row 1:
Ch 8, sc in the 2nd ch from hook and each ch across back towards body opening edge, sl st in next 2 sts along the body edge, turn. | 7 sts.
Row 2:
Sk the 2 edge sl sts, Sc blp 4, sc the last st through both lps, turn.
Row 3:
Ch 1, sc the first st through both lps, Sc blp 4, sl st in next 2 sts along the body edge, turn.
Rep Rows 2-3 ribbing around the front opening and neck edge, creating buttonholes where st markers are placed. Fasten off and weave in ends.
Please Note:
If you are creating a sweater, use the same ribbing instructions that are on the Heatherly Crochet Vest Pattern.
Finishing the Sleeves
Setup:
Join yarn at the underarm of the sleeve with the right side facing. Slip stitch loosely around the sleeve opening, spacing the slip stitches evenly. Do not join.
Rnd 1:
Sc in first (place st marker), sc in remaining sts around, do not join.
Rnd 2:
Sc blo in each st around, fasten off and create an invisible join. Weave in ends.
Finishing the Granny Cardigan
Sew Buttons on opposite side of ribbing from the button holes. Weave in any ends, block again if needed.
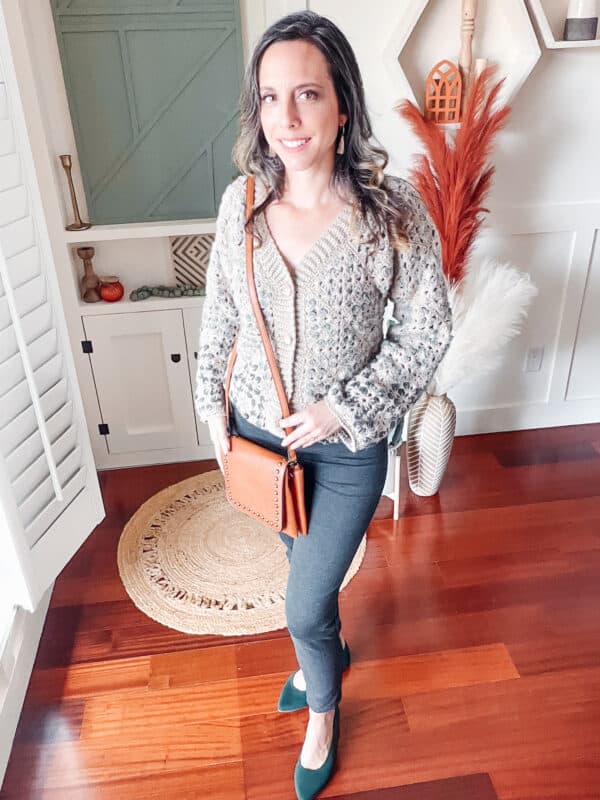
And Congrats! You have finished you amazing Fancy Granny Cardigan. Wear it often and proudly. Cheers!
How To Care For Your Crochet Cardigan
First, always hand wash your garment with a mild detergent. Avoid using a washing machine or dryer, as this can cause damage to the delicate fibers.
Second, block your crochet cardigan after washing to ensure its shape stays intact. You can do this by laying it flat on a clean towel, gently reshaping it, and letting it air dry.
Lastly, store your crochet cardigan folded neatly in a cool, dry place to avoid any unwanted stretching or damage. Follow these simple steps, and your handmade piece will remain beautiful for years to come.
Want more crochet inspiration? Try out the Regency Crochet Cardigan or the Diamond Crochet Cardigan.
Well, That Was Fun! What’s Next?