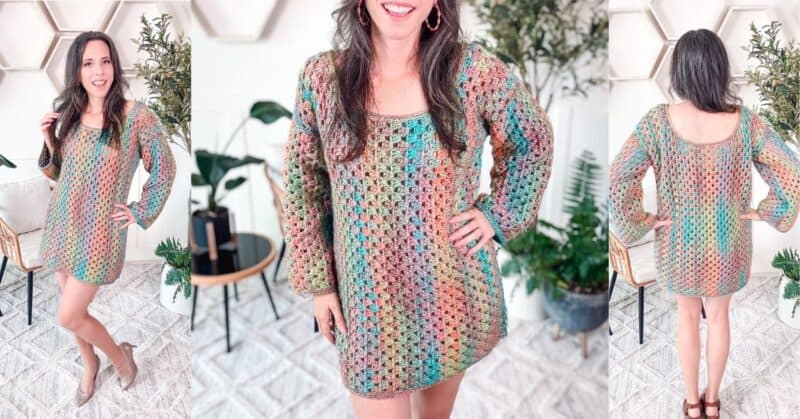
Classic Granny Stitch Dress
A stunning crochet granny dress inspired by the iconic style of Taylor Swift! This pattern is perfect for both beginners and advanced crocheters. Featuring the timeless granny stitch that is visually appealing, fun, and relaxing to work with. Love this look? Check out the Summer Granny Crochet Top or Dress for another chic top.
Disclosure: This post contains affiliate links. Please read my disclosure for more info.
The easy construction of this dress allows you to create a chic and stylish garment with minimal effort, making it an enjoyable and rewarding from start to finish.
And if you are hooked on the granny stitch, the Gemstone Granny Crochet Cardigan or the Rainbow Hues Granny Stitch Cardigan are granny stitch colorwork you will fall in love with.
Whether you’re a Swiftie looking to replicate her fabulous look or simply searching for a delightful crochet project, this dress will become a favorite in your handmade wardrobe. And some other favorites to check out are the Autumn Wheat Beginner Crochet Cardigan or the The Bias Suzette Shawl.
What to Wear Under The Dress
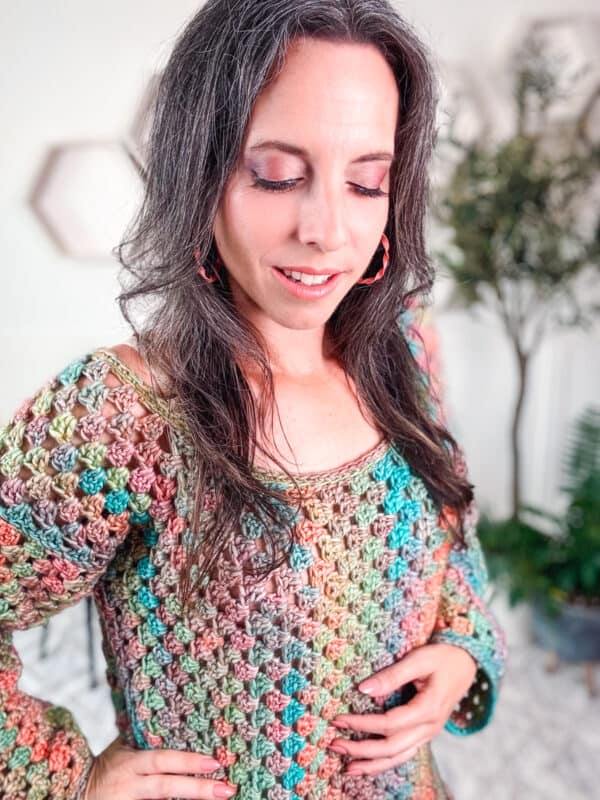
I’ve been asked what I wear under this dress since it’s an open stitch. I purchase this beige slip from Amazon. And I also grabbed a slip in white for when I want that pop under the dress.
Granny Dress Crochet Supplies
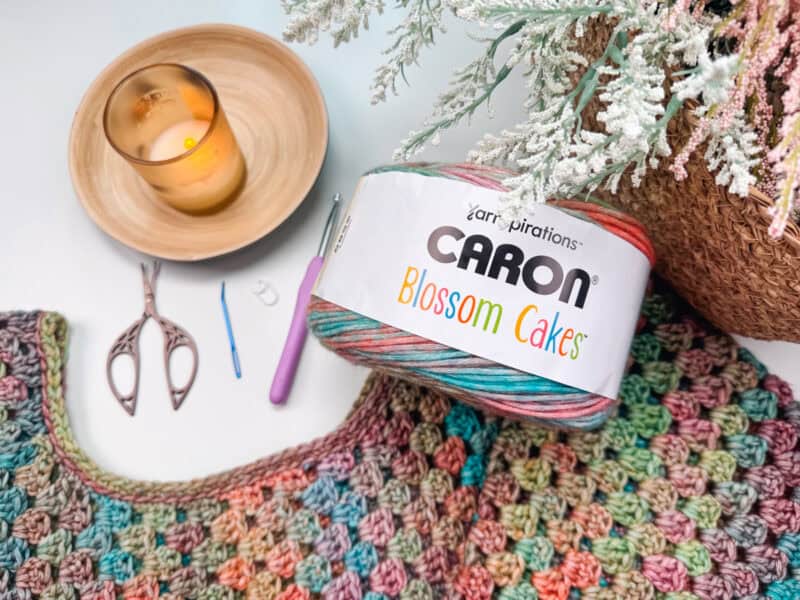
Yarn
Caron Blossom Cakes
61% Cotton, 39% Acrylic, 481 yds/8 oz.
Colorway Shown: Radiant Rainbow
Weight: 4 Heavy Worsted
Yarn Quantities
1050 (1200, 1300, 1400, 1500) 1650, 1800, 1950, 2100) yds
3 (3, 3, 3, 4) (4, 4, 4, 5) cakes
Yarn Substitutions To Use With Guide
WeCrochet Comfy Worsted
75% Pima Cotton, 25% Acrylic, 109yds/50g
WeCrochet Wonderfluff
70% Baby Alpaca, 7% Merino Wool, 23% Nylon, 142 yds/50 g
Hobbii Cascata
61% Cotton, 39% Premium Acrylic, 437 yds/200 g
Hobbii Portobello
60% Cotton, 28% Acrylic, 12% Wool, 131 yds/ 50 g
Lion Brand Color Theory
100% Acrylic, 246yds/100g
Crochet Hook
Size US K (6.5mm) Crochet Hook or hook to obtain gauge.
Notions
Scissors
Yarn Needle
Removable Stitch Marker
Skill Level
Beginner
One Size
XS (S, M, L, 1X) (2X, 3X, 4X, 5X)
To fit chest: 30 (34, 38, 42, 46) (50, 54, 58, 62)
Finished Bust Measurement: 34 (38, 42, 46, 50) (54, 58, 62, 64)
Ease: This garment is meant to be worn with a 3-5 inch ease.
Abbreviations
blo – back loop only
ch – chain
dc – double crochet
Stsc – stacked single crochet
sl st – slip stitch
st(s) – stitch(es)
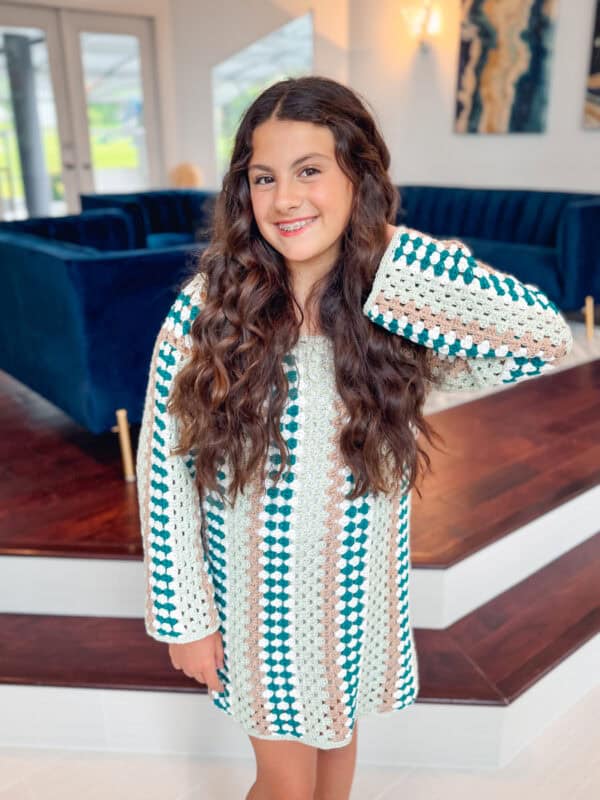
What you’ll love about this crochet dress pattern.
Less Seaming – The center body is crocheted as one piece, less seaming!
Any Weight Yarn – With the ad-free pdf you get a bonus guide to use any yarn.
5 Length options – I’ve got you covered to get the dress length for your personal style.
Size Inclusive – The adult size crochet pattern is available in size x-small to plus size 5x.
Gauge
11 sts and 6.5 rows + 4″ by 4″ Worked in the granny stitch, unblocked.
If you aggressively block, be aware it will change the size and ease of the garment.
Not sure what gauge is? Check out this blog post: What Is Crochet Gauge and How To Fix It
How to Crochet A Gauge Swatch
Chain 17
Row 1:
Working in the first ch from the hook Stsc first ch, 2 dc in next ch. *skip 2 chs, 3 dc in next ch; repeat from * until the last 3 chs, skip 2 chs, dc 1 in last, turn. | 17 sts
Row 2:
Stsc in first, 2 dc in the first space, *3 dc in the next space between the granny st groups; repeat until the last 3 sts of the row, skip 2 sts, dc in the last, turn.
Repeats: Repeat Row 2 until the swatch is at least 5 inches to measure.
Construction
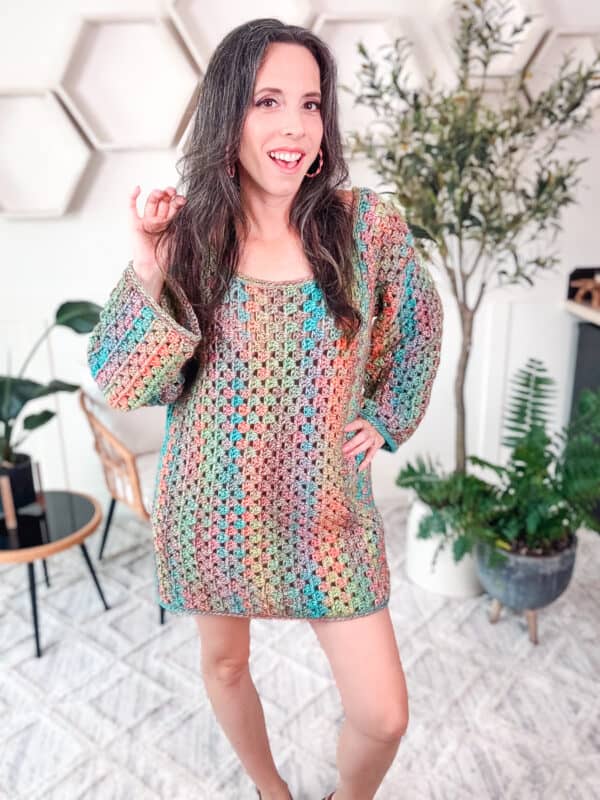
This is constructed in three easy pieces. First, we will work the body side-to-side and make space for the neck. Then, we will create two wide-style sleeves. Last, we will seam down the arms and sides. There are only two seams to finish this dress!
Love easy construction? Try making an accessory with the Danbury Crochet Bag or the Regency Crochet Cardigan. And if you enjoy granny stitches, check out the Colorful Hues Granny Stitch Blanket Pattern.
Special Stitches
Stacked Single Crochet (Stsc): Do NOT chain, insert hook into next stitch, yo, pull up a loop, yo and pull through both loops, insert hook in the vertical bar below, yo, pull up a loop, yo and pull through both loops on the hook.
Pattern Notes
- The instructions and stitch counts are given for the smallest size, with the larger sizes in
brackets ( ).
- Before you dive into your project, take a moment to identify the stitch and row counts that
match the size you’re making. By highlighting or marking them, you’ll save time and effort
later on. Trust us; this small step will make a big difference in your knitting or crochet journey!
- When there are 5 st counts at the end of the row, that indicates each length of the dress as 27
(29, 31, 33, 35) inches.
- When there are 9 st counts at the end of a row, that indicates each circumference size of
the dress as xs (s, m, l, 1x) (2x, 3x, 4x, 5x).
Hate Weaving in Ends? Try This Crochet Trick
If you are creating this crochet dress with lots of colors, like the original Taylor Swift one, then there will be a ton of ends to weave in. Since we are crocheting a border along the edges, you can use a special knot for changing colors to reduce the amount of ends to weave in.
Video Tutorial for the Classic Granny Dress
Relax & Crochet
Upgrade to the Printable PDF
Beautifully formatted to print and relax while crocheting. The paid pattern includes:
The Ad-Free PDF can be purchased on Etsy or Ravelry.

Click the box below to unlock this exclusive subscriber content for free. Add your email and create a password. If you are having trouble, reset your password or login to the Grow Portal.
I’m thrilled to share this amazing crochet pattern with you! Please don’t copy, paste, or distribute this pattern. Prefer an ad-free experience? Purchase a digital PDF file for a small fee from one of my online stores. I appreciate your support and readership. You are why I can keep doing what I love and sharing it with others. Thank you from the bottom of my heart.
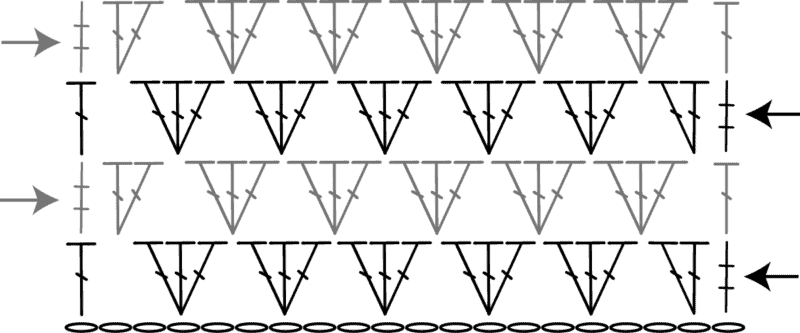
Crochet Stitch Chart
Please note, if you want to change the ease of the dress to be more fitted or oversized, this is where you crochet more or fewer rows. Write down how many rows you did so you can do the same on the other side.
Join The Kindest Community
Join our vibrant community of crafters on Facebook today. Whether you enjoy crafting with others or simply have burning questions, we’ve got you covered – join us now!
Style Adjustment
What about a neck that isn’t so wide? Adjusting this can be done by reducing the center front neckline by a couple of rows, and then adding a row on the First and Last Body Sections. This will keep the bust size the same but make the neck less wide.
To decrease the neck drop in front or back, work one more space towards the neck area until starting the Front Neckline Decreasing or Back Decreasing.
Front Neckline Decreasing
Row 1:
Stsc in first, 2 dc in the first space, *3 dc in the next space between the granny st groups; repeat until 21 (23, 24, 26, 28) spaces have been worked, dc in the next space, turn. | 64 (70, 73, 79, 85) sts
Row 2:
Stsc in the third st in the row, 2 dc in the first space, *3 dc in the next space between the granny st groups; repeat until the last 3 sts of the row, skip 2 sts, dc in the last, turn. | 62 (67, 71, 77, 82) sts
Row 3:
Stsc in first, 2 dc in the first space, *3 dc in the next space between the granny st groups; repeat until the last 3 sts in the row, dc in the last, turn. | 62 (67, 71, 77, 82) sts
Row 4:
Stsc in the third st in the row, 2 dc in the first space, *3 dc in the next space between the granny st groups; repeat until the last 3 sts of the row, skip 2 sts, dc in the last, turn. | 59 (64, 68, 74, 79) sts
Please see video or guide for more details on shaping.
Front Neckline
Row 1:
Stsc in first, 2 dc in the first space, *3 dc in the next space between the granny st groups; repeat until the last 3 sts of the row, skip 2 sts, dc in the last, turn.
Repeats:
Work Row 1 for 12 rows.
Front Neckline Increasing
Row 1:
Stsc in first, 2 dc in the first space, *3 dc in the next space between the granny st groups; repeat until the last 3 sts of the row, skip 1 st, 3 dc in next, dc in the last, turn. | 62 (67, 71, 77, 82) sts
Row 2:
Work Row Stsc in first, 2 dc in the first space, *3 dc in the next space between the granny st groups; repeat until the last 3 sts of the row, skip 2 sts, dc in the last, turn. | 62 (67, 71, 77, 82) sts
Rows 3-4:
Repeat Rows 1-2. | Fasten off.
Back Neckline Decreasing
Setup:
Skip 5 (5, 6, 6, 6) spaces to the left of the Front Neckline Decreasing Row and join yarn in the next space. Please note, we will be working more sts on the back so it will have a higher neckline than the front.
Row 1:
Stsc in space, *3 dc in the next space between the granny st groups; repeat until the last 3 sts of the row, skip 2 st, dc in the last, turn. | 65 (71, 74, 80, 86) sts
Row 2:
Stsc in first, 2 dc in the first space, *3 dc in the next space between the granny st groups; repeat until the last 4 sts of the row, skip 3 sts, dc in the last, turn. | 64 (70, 73, 79, 85) sts
Row 3:
Stsc in first, skip the next 3 sts and 3 dc in the next space, *3 dc in the next space between the granny st groups; repeat until the last 3 sts of the row, skip 2 st, dc 1 in the last, turn. | 62 (68, 71, 77, 83) sts
Row 4:
Stsc in first, 2 dc in the first space, *3 dc in the next space between the granny st groups; repeat until the last 4 sts of the row, skip 3 sts, dc in the last, turn. | 62 (67, 71, 77, 82) sts
Back Neckline
Row 1:
Stsc in first, 2 dc in the first space, *3 dc in the next space between the granny st groups; repeat until the last 3 sts of the row, skip 2 sts, dc in the last, turn.
Repeats:
Work Row 1 for 12 rows.
Back Neckline Increasing
Row 1:
Stsc in first, 3 dc in the first space, *3 dc in the next space between the granny st groups; repeat until the last 3 sts of the row, skip 1 st, 3 dc in next, dc in the last, turn. | 63 (68, 72, 78, 83) sts
Row 2:
Stsc in first, 2 dc in the first space, *3 dc in the next space between the granny st groups; repeat until the last 4 sts of the row, 3 dc in the space in the center of the last 4 sts, dc in the last, turn. | 64 (70, 73, 79, 85) sts
Row 3:
Stsc in first, 2 dc in the first space, *3 dc in the next space between the granny st groups; repeat until the last 3 sts of the row, skip 2 sts, dc in the last, turn. | 64 (70, 73, 79, 85) sts
Row 4:
Stsc in first, 2 dc in the first space, *3 dc in the next space between the granny st groups; repeat until the last 3 sts of the row, skip 2 sts, 2 dc in the last, turn. | 65 (71, 74, 80, 86) sts
Do not fasten off.
Ch 17 (17, 20, 20, 20), leaving a long tail fasten off. Leave the chain as is to work across in the next section, or use your yarn needle for an invisible join (see video).
Last Body Section
Row 1:
Attach yarn to the right side of your work, Stsc first st, 2 dc in the first space, 3 dc in the next space between the granny st groups until the chains across the neck area, [3 dc in the first ch, skip 2 chs] across chs until one ch remains, skip the last ch and work 3 dc into the next space, *3 dc in the next space between the granny st groups; repeat * across until the last 3 sts of the row, skip 2 sts, dc in the last, turn. | 148 (160, 169, 181, 193) sts
Row 2:
Stsc in first, 2 dc in the first space, *3 dc in the next space between the granny st groups; repeat until the last 3 sts of the row, skip 2 sts, dc in the last, turn.
Repeats:
Repeat Row 2 until there are a total of 5 (7, 9, 10, 12) (14, 15, 17, 18) rows.
Fasten off, block the body piece to measurements before seaming.
Sleeve Tip
To get the right sleeve length for you, try on the body portion once completed. Measure from the edge of the garment that sits off the shoulder to your wrist (or whatever length is desired). Then, chain the number of chains to that measurement in multiples of 3+2 and follow the remaining of the sleeve instructions.
Sleeves (Make 2)
To adjust the length of the sleeve, ch more or fewer stitches in multiples of 3+2.
Setup:
Ch 47.
Row 1:
Working in the first ch from the hook Stsc first ch, 2 dc in next ch. *skip 2 chs, 3 dc in next ch; repeat from * until the last 3 chs, skip 2 chs, dc in last, turn. | 46 sts
Row 2:
Stsc in first, 2 dc in the first space, *3 dc in the next space between the granny st groups; repeat until the last 3 sts of the row, skip 2 sts, dc in the last, turn.
Repeats:
Repeat Row 2 until there are a total of 24 (26, 28, 30, 32) (34, 36, 36, 38) rows.
Fasten off, block the sleeves to measurements before seaming.
Neckline Trim
To adjust the length of the sleeve, ch more or fewer stitches in multiples of 3+2.
Rnd 1:
Attach the yarn to the side edge of the neck. Sl st around, placing one sl st per st, and 3 sl sts per every 2 double crochet edge.
Rnd 2:
Sc in the blo in each st around. Either sl st to join or fasten off and create an invisible join with your yarn needle.
Attaching Sleeves
With st markers, mark the center edge of the sleeve. Then mark the center edge of the dress. With your yarn needle seam the sleeves to each side of the body piece.
Seaming
Fold the dress in half with RS facing out and WS together. Using your preferred seaming method, sew the front and back of the dress together at the side seam, beginning at the bottom hem, working to the underarm, and then seaming across the sleeve in one continuous seam. Repeat for the other side.
Sleeve Trim
Rnd 1:
Attach the yarn near the seam of the sleeve. Sl st around, placing one sl st per st, and 2 sl sts per every 1 double crochet edge. Keep the spacing as even as possible.
Rnd 2:
Sc in the blo in each st around. Either sl st to join or fasten off and create an invisible join with your yarn needle. Repeat for the other sleeve.
Bottom Trim
Rnd 1:
Sc in the blo in each st around. Either sl st to join or fasten off and create an invisible join with your yarn needle.
Rnd 2:
Sc in the blo in each st around. Either sl st to join or fasten off and create an invisible join with your yarn needle. Repeat for the other sleeve.
Want an easier blocking experience? Get a block combs for getting a clean sharp look.
Finishing
Weave in any ends. Style and enjoy wearing!
Congratulations on completing your Taylor Swift-inspired crochet dress! We hope you enjoyed creating this beautiful garment and feel proud of your handmade accomplishment.
As a final touch, here are a few tips on caring for your crocheted dress to ensure it stays in perfect condition. Always hand wash your dress in cold water with a gentle detergent, and avoid wringing or twisting it to prevent stretching. Lay it flat to dry on a clean towel, reshaping it as needed.
Store your dress folded, rather than hanging, to maintain its shape. With proper care, your crochet dress will remain a stylish and cherished piece in your wardrobe for years to come.
Ready for your next project? The Key Largo Crochet Top and the Sparrow Crochet Sweater Pattern are great additions to your wardrobe. And if you want a quick project, check out the Summer House Crochet Tank.
Cheers, and happy crocheting!

Well That Was Fun! What’s Next?
📌 PIN THIS POST – Don’t lose this project; save it to your Pinterest crochet board so you can quickly come back to it again.
💌 SHARE – Share your yarn choice, in-progress, or finished projects on Facebook or Instagram and use the hashtag #brianakdesigns
🥂 JOIN – Join the kindest crafters in the Briana K Designs Community Group on Facebook. We love yarny friends!
🔗 RAVELRY LINK -Link and share your project on Ravelry. Having inspirational photos can help crafters.


