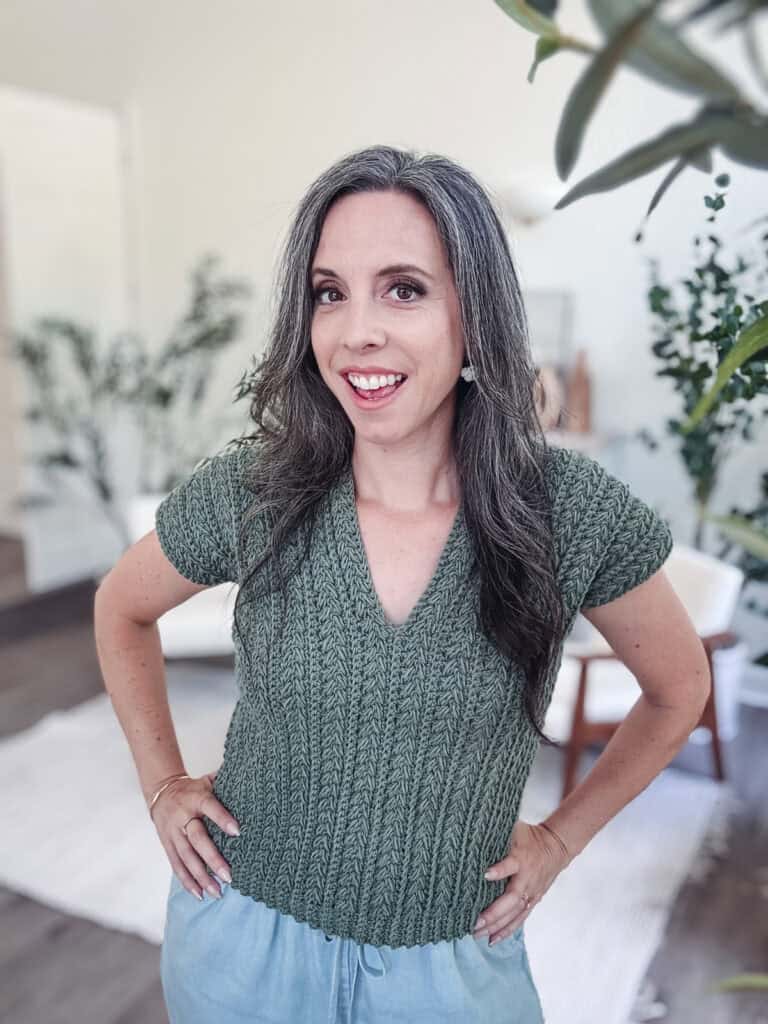
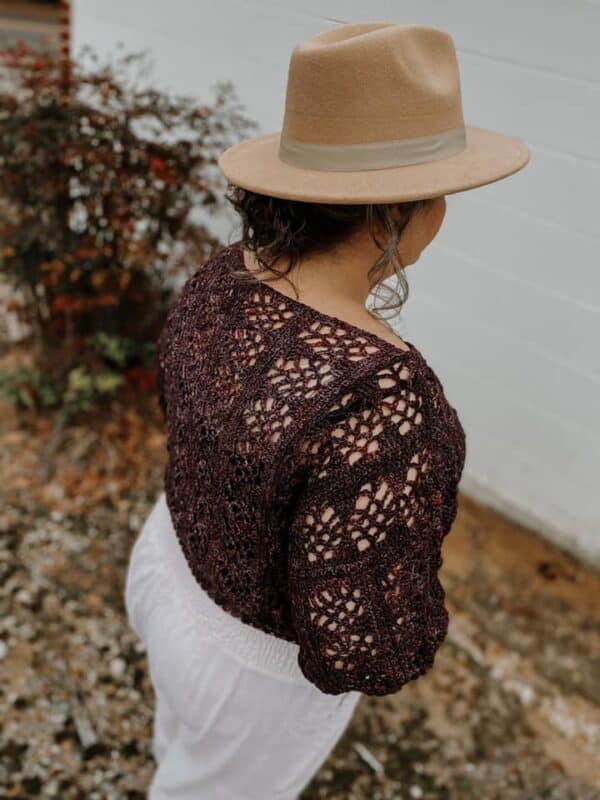
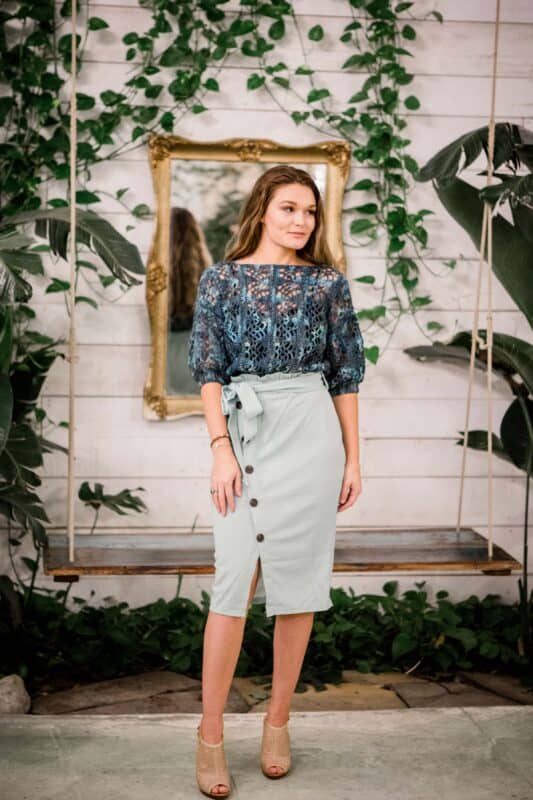
The tropical greenery backdrop at every view inspires the Key Largo Top Crochet Pattern. It’s easy to grow a variety of beautiful plants in humid climates and the Key Largo Top fabric reflects the luscious greenery.
So if you are wondering what to crochet for summer, this summer top crochet pattern is perfect for your wardrobe. And if you want more inspiration, check out the Long Summer Crochet Duster or the Easy Beginner Summer Crochet Tank Top.
Disclosure: This post contains affiliate links. Please read my disclosure for more info.
Want to Customize Your Crochet Top?
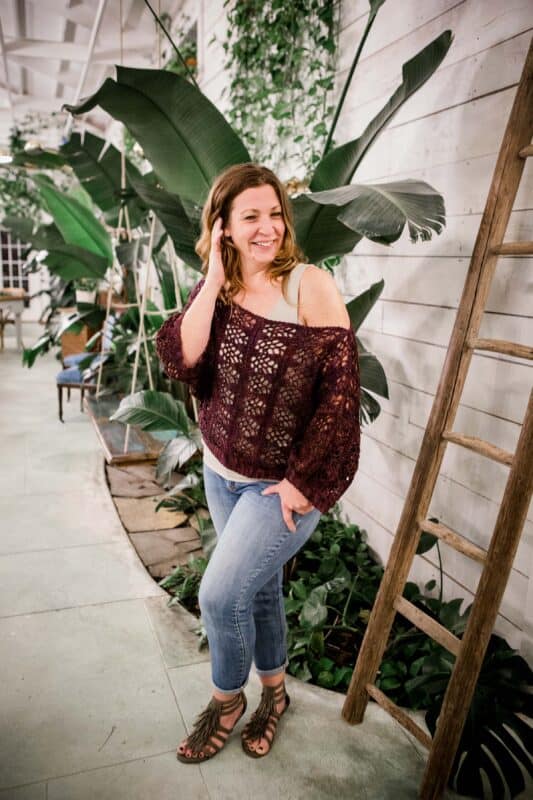
The Key Largo Top is meant to be a loose-fitting garment with the waistline and sleeves fitted to create a flowy puff in the fabric. To customize the fit to your body, here are some tips.
Ease of Fit
If you don’t want as much ease in the garment, go down one size when creating the body rectangle pieces, but leave the arms and ribbing instructions in your original sizing.
To check size as you create the rectangle pieces, hold them up to your body, matching the sides where the seams would go, and see if you like the room. Add or decrease the repeats, in multiples of 10, to adjust.
Top Length
This garment will be worn higher than the initial length of the rectangle due to creating the puff. To adjust the length, measure from the top center of your shoulder down to where you want the bottom of the garment to sit.
Then add three inches and create your beginning chain that length increasing in multiples of 10 beyond the starting chain of your size. Follow the same instructions.
Sleeve Length
If additional sleeve length is wanted, create your beginning chain length by increasing in multiples of 10 until the chain is the length of the desired sleeve. Follow the same instructions.
And yes it could be made with a full sleeve! It would be a puff sleeve at the wrist and very cute.
About the Fingering Weight Yarn for This Crochet Top
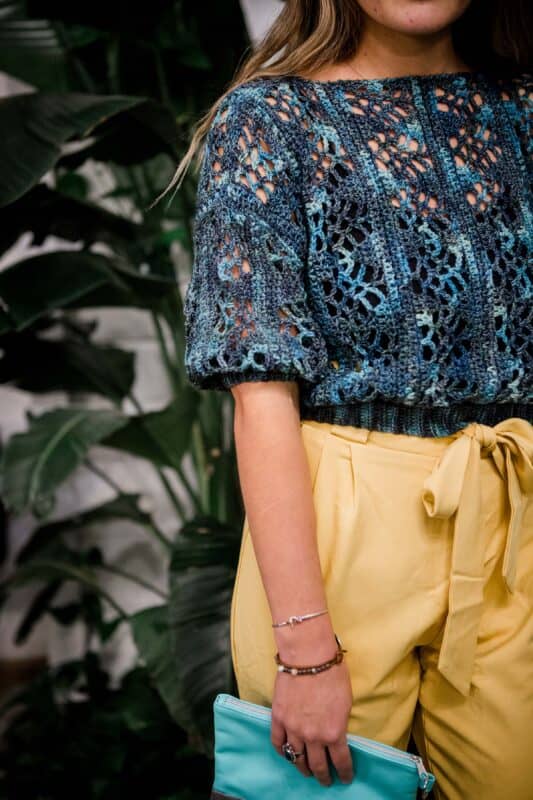
Hand-dyed yarns have become extremely popular and sought after. Who doesn’t want that pretty color variation for summer crochet tops? Hand-dyed takes more work to create, so of course, we see a higher price tag, but with WeCrochet we still see the same great value prices, even with the Hawthrone lines.
Each colorway has stunning variation and a great twist to prevent yarn splitting. And the lightweight fiber is a perfect summer yarn for crochet.
Hawthorne Fingering Multi Yarn was the choice for the Key Largo Top, but any of the Hawthorne Fingering Yarns would look amazing, and each has its unique tone. When ordering, be sure to order all the skeins at once to get the same dye lots.
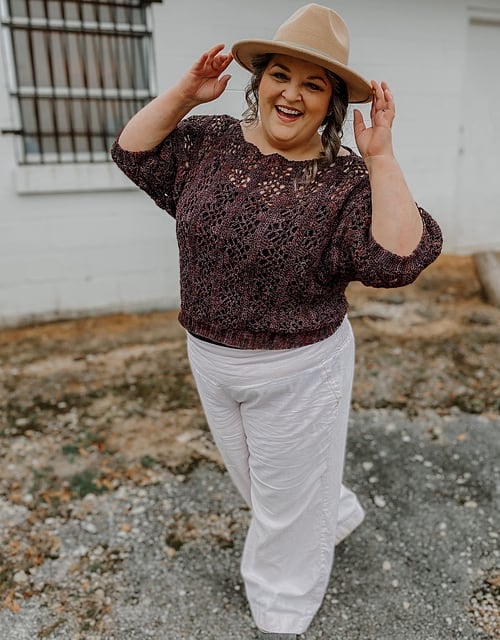
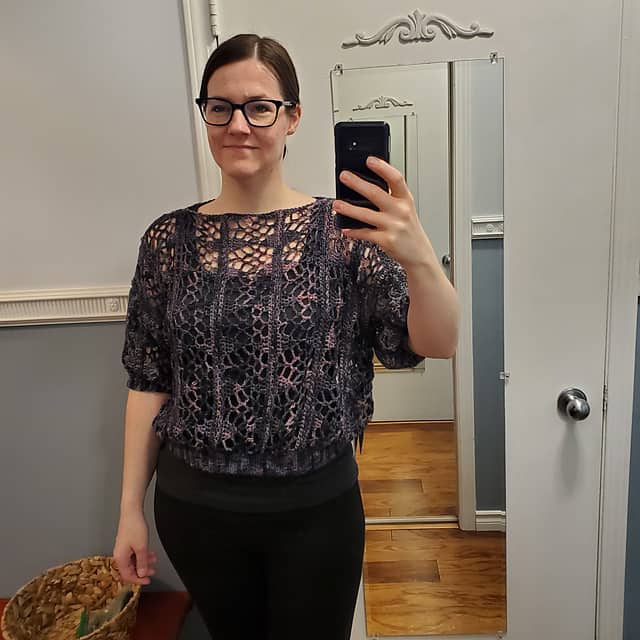
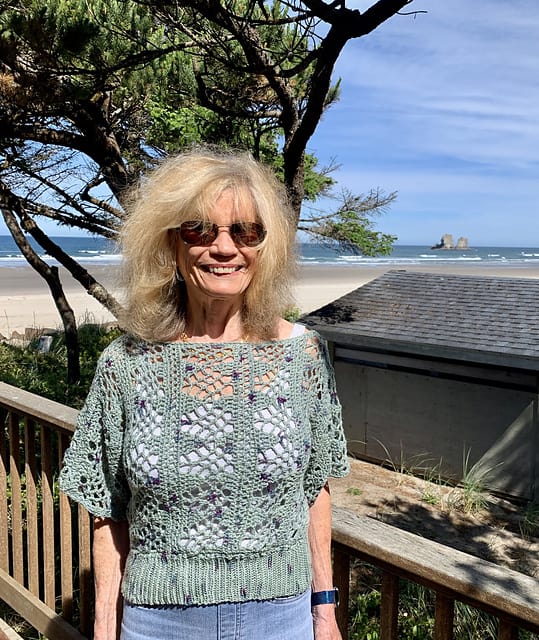
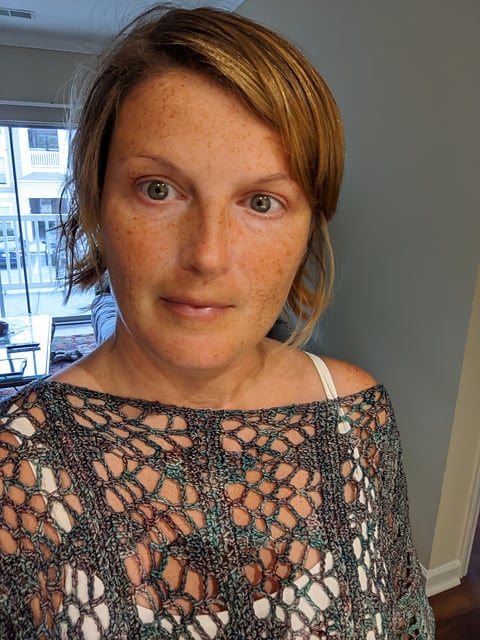
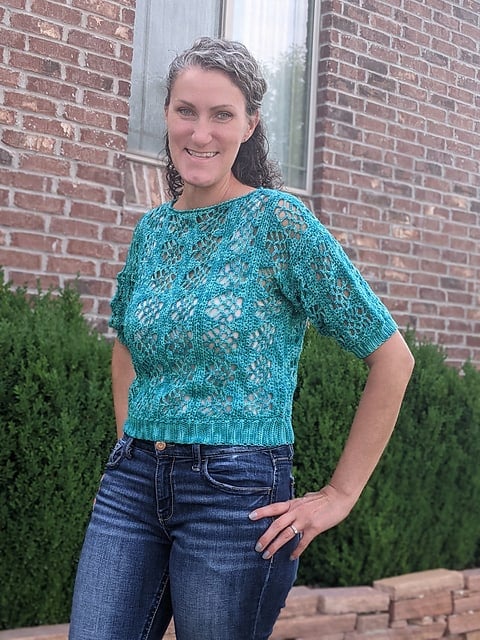
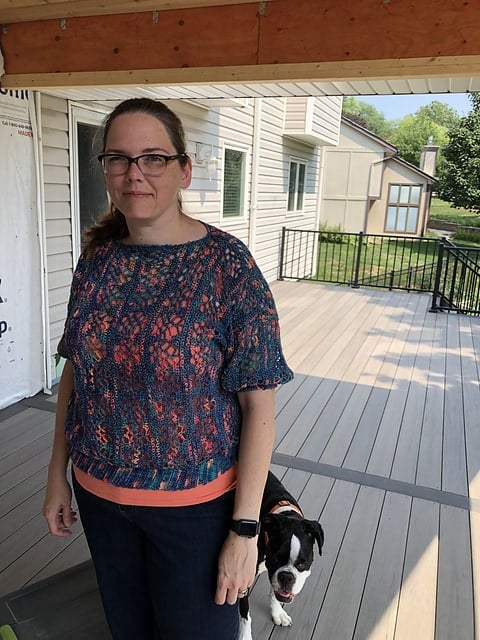
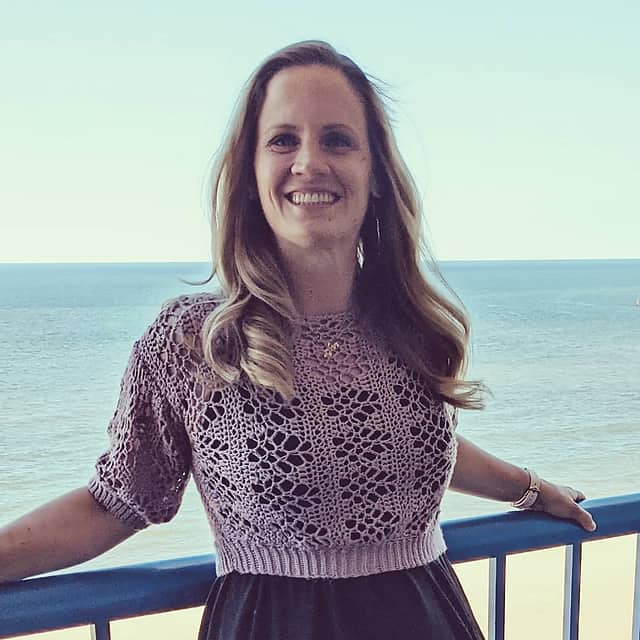
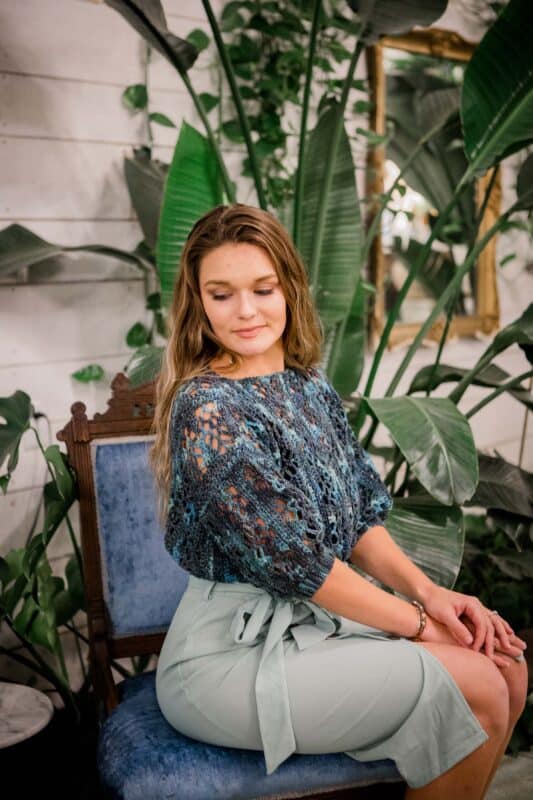
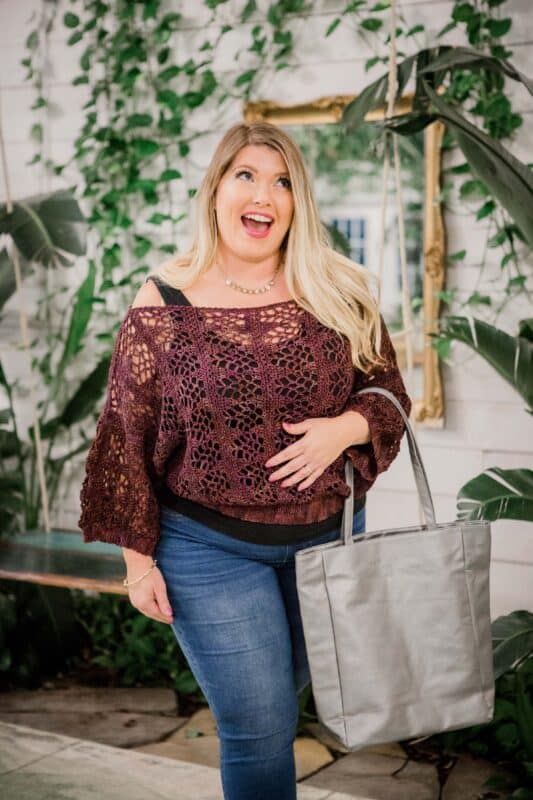
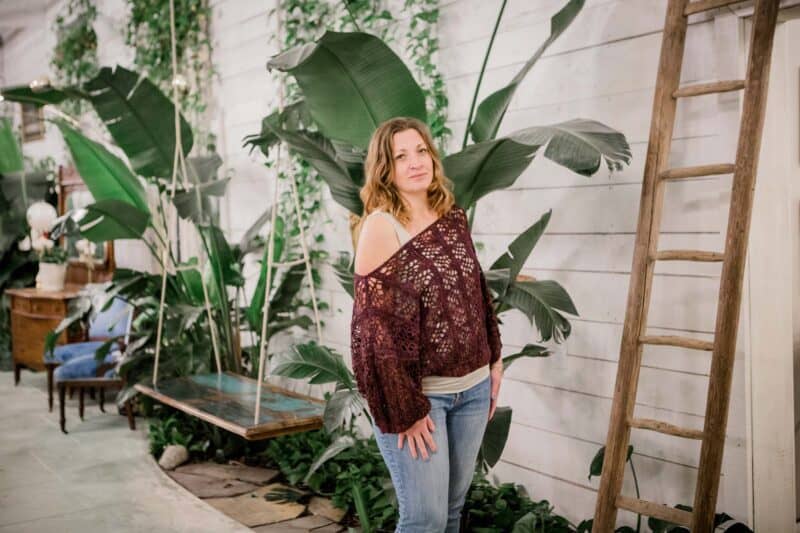
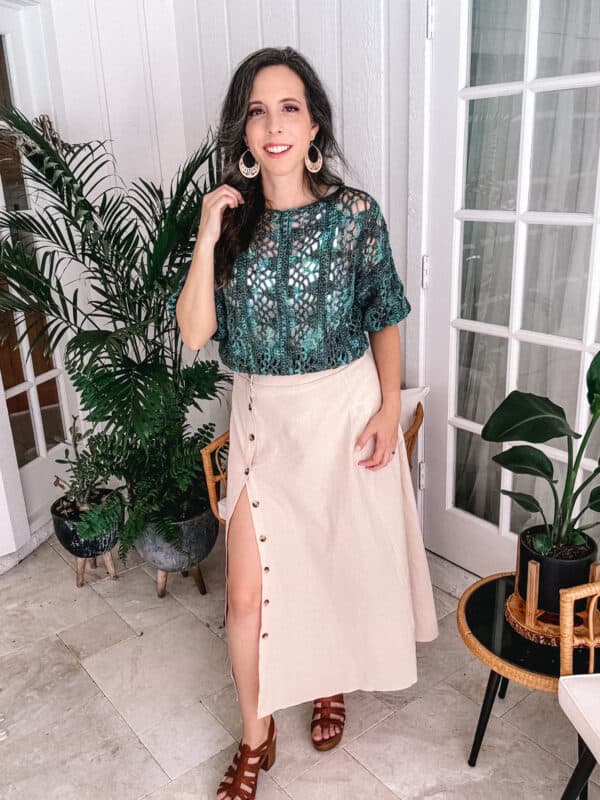
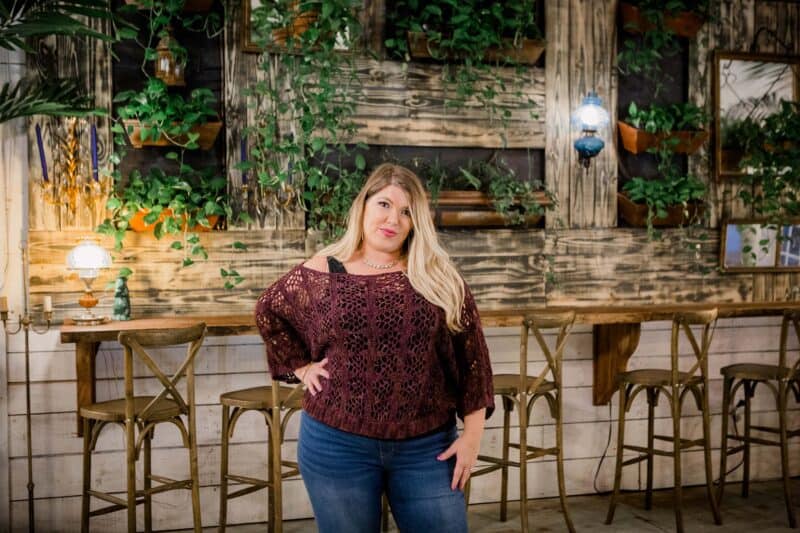
Check Out Crocheters Wearing the Key Largo Crochet Top
Suggested Supplies for the Key Largo Crochet Top
Crochet Hook:
5.0mm (H hook), or hook to obtain gauge


Notions:
Removable stitch markers if needed
Yarn needle to weave in ends
Scissors
Carry essentials in one of these Everyday Tote Bags.
Suggested Fingering Weight Yarn:
WeCrochet Hawthorne Fingering Multi Yarn (Fingering, 80% Fine Superwash Highland Wool, 20% Polyamide (Nylon), 357yds/326 m, 100 g)
Shown in Mt. Tabor. 3 (3, 3, 3, 4) (4, 5, 5, 5) hanks or 800 (840, 950, 1050, 1300) (1400, 1500, 1600, 1700) yards
Gauge:
7 x 7” = 30 sts x 22 rows in pattern repeat below.
Crochet Skill Level:
Skilled Beginner to Intermediate
Crochet Top Size:
Finished Bust Measurements: 35 (38, 38, 47, 54) (54, 60.5, 67, 67)
XS (S, M L, 1X) (2X, 3X, 4X, 5X)
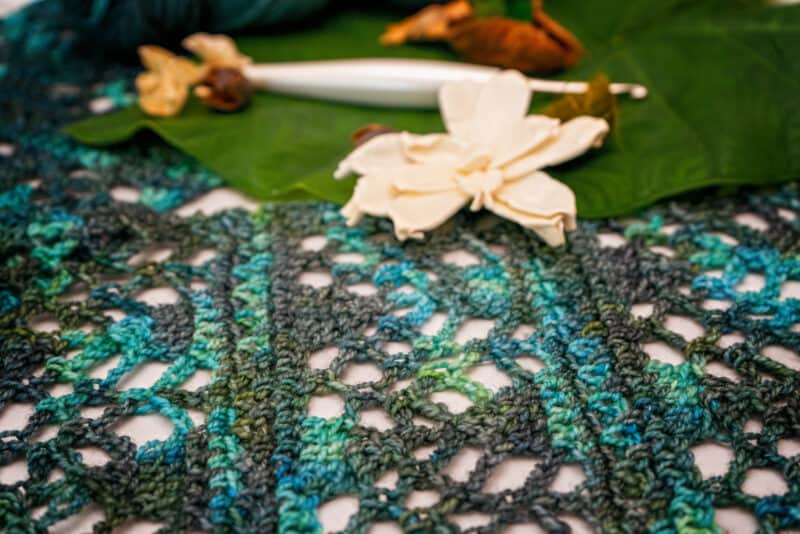
Notes for the Lacy Crochet Top
The Key Largo Top is created from four rectangles worked flat, two for the
body and two for the arms. Blocking the pieces to measurements will be key in opening up the stitch and drape.
The body rectangles are seamed together at the shoulders and on the sides. The sleeves will each be seamed for the underarm and then attached to the sleeve hole on the body pieces.
Ribbing will then be worked at the bottom of the garment and on the sleeves to shape the piece.
Lastly, a reverse single crochet stitch will be used around the neckline for a finishing touch.
Special Stitches:
Stacked Single Crochet Video Instructions. This can also be substituted with a chain 3 if desired.
Reverse Single Crochet Video Instructions
Key Largo Crochet Top Video Tutorial
Watch the video tutorial below for step-by-step instructions on how to crochet a summer top.

How to Style Your Lacy Crochet Top
When the sun starts to shine it’s time to pack up the bulky winter wear and start bringing out the lighter garments. Styling summer wear and layering will be key for comfort and fashion.
For the office –
High waist pants with a wide long leg will be sharp for an office look. A nice wedge or heel shoe will top off the professional look. But wear a neutral shoe that is in your comfort level; the Key Largo top will be where the focus of the outfit should be.
Wear a solid bright-colored undershirt, tucked into the pants, to really pop the stitches on the design. Grab a faux leather bag or jacket with a simple earring, and you are ready for an office meeting.
Casual – on the move –
Being casual does not mean giving up style. For this look, a pop of color in a high waist pencil pants will make the outfit fun.
Choose a neutral shirt under the Key Largo top to not overwhelm the outfit. Slip on a flat sandal or a little wedge and feel confident running all of your errands in style. With this outfit, the compliments are sure to come.
Casual – at home –
On a warmer spring day, throw on a pair of shorts. If you don’t mind showing a little mid-drift, these don’t need to be high-waisted and could even be jean shorts. For something cozier, choose a high waist fabric pants with a front tie.
Throw your hair up in a bun to let the outfit and comfort take center stage. Go shoeless, really let yourself unwind, but still stylish if a neighbor pops in.
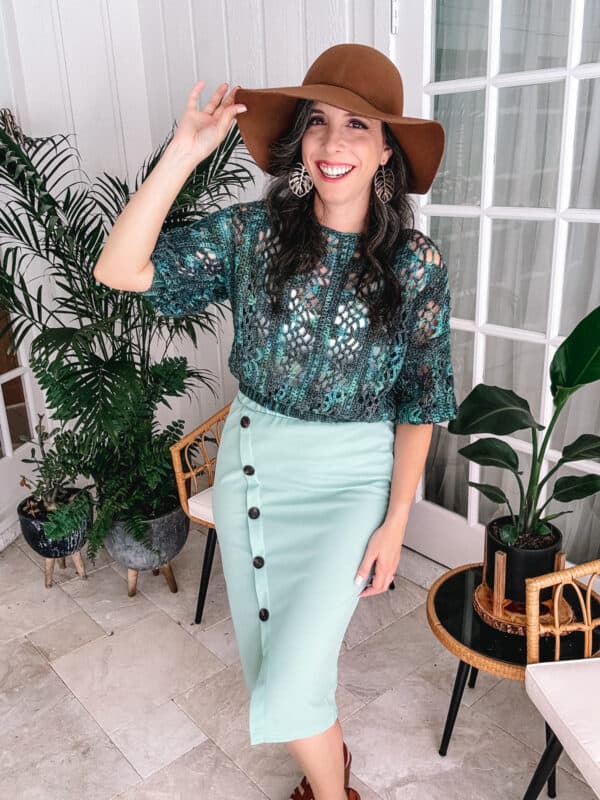
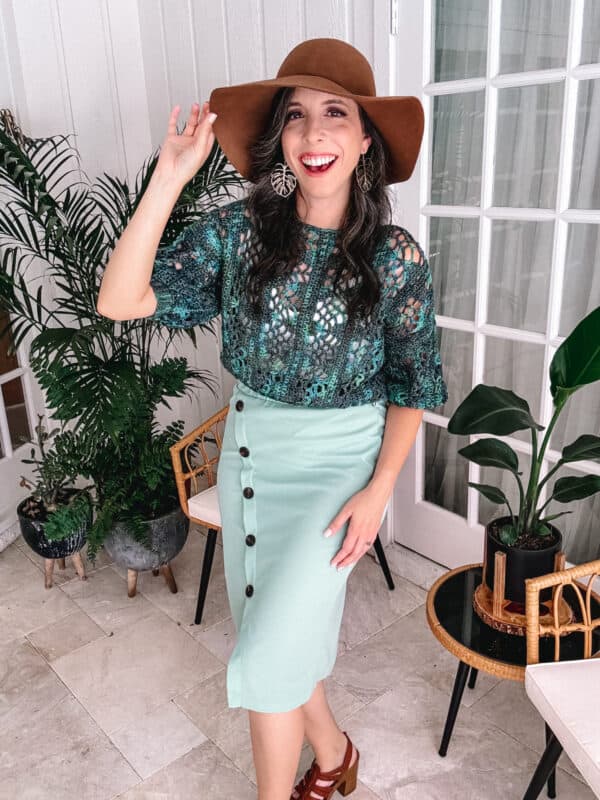
Date Night –
Summer evenings can still have a chill, pull out a cozy overcoat in a lighter color and feel free to throw on some dangle earrings.
A high-waist pencil skirt with cute heeled shoes will top off the evening for a nice restaurant. Grab your favorite clutch and go out for a good time knowing you look amazing.
Relax & Crochet
Upgrade to the Printable PDF
Beautifully formatted to print and relax while crocheting. The paid pattern includes:
Get the Ad-Free PDF on Ravelry or Etsy.
Crochet Stitch Chart
Click the box below to unlock this exclusive subscriber content for free. Add your email and create a password. If you are having trouble, reset your password or log in to the Grow Portal.
I’m thrilled to share this amazing crochet pattern with you! Please don’t copy, paste, or distribute this pattern. Prefer an ad-free experience? Purchase a digital PDF file for a small fee from one of my online stores. I appreciate your support and readership. You are why I can keep doing what I love and sharing it with others. Thank you from the bottom of my heart.
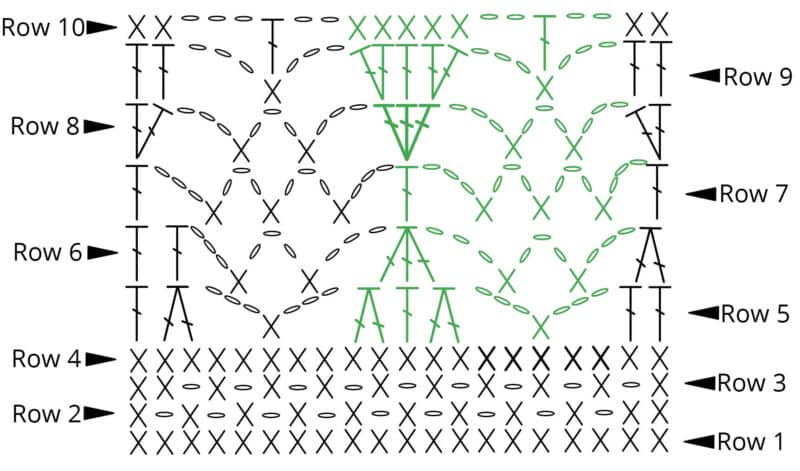
Established Stitch Pattern for the Summer Crochet Top
Row 1:
Sc in each sts across, turn.
Row 2:
(Sc, ch 1, skip 1) until the last 2 sts, sc in the last two, turn.
Row 3:
Rep row 2.
Row 4:
Sc in each across including chain sts, turn.
Row 5:
STsc, dc 1, *ch 3, skip 2, sc, ch 3, skip 2, dc2tog, dc, dc2tog*; repeat from * to * until last 8 sts, ch 3, skip 2, sc, ch 3, skip 2, dc2tog, dc in last, turn.
Row 6:
STsc, dc 1, (ch 3, sc in previous ch-3 space) twice, ch 3, *dc3tog, (ch 3, sc in previous ch 3 space) twice, ch 3*; rep from * to * until the last 2 sts, dc2tog, turn.
Row 7:
STsc, *(ch 3, sc in previous ch 3 space) three times, ch 3, dc 1*; rep from * to *, turn.
Row 8:
STsc, dc in same, ch 3, skip the first ch 3 space and sc in the next ch 3 space, ch 3, sc
in next ch 3 space, ch 3, *3 dc in the next dc, ch 3, skip the first ch 3 space and sc in the next ch 3 space, ch 3, sc in next ch 3 space, ch 3*; repeat from * to * until the last st, 2 dc in the last, turn.
Row 9:
STsc, dc 1, *ch 3, skip the first ch 3 space and sc in the next ch 3 space, ch 3, 2dc, dc 1, 2dc*; repeat from * to * until the last set of chain spaces, ch 3, skip the first ch 3 space and sc in the next ch 3 space, ch 3, dc in last 2, turn.
Row 10:
sc 2, ch 3, dc in next sc st, ch 2, *sc 5, ch 2, dc in the next sc st, ch 2*; rep from * to * until the last 2 sts, sc in last 2, turn.
How to Crochet the Summer Top Written Instructions
Crochet Sleeves (make 2)
Row 1 (rs):
Ch 30 for all sizes, sc in the first ch from the hook and across, turn. | 30 sts
Rows 2-10:
Same as rows 2-10 of Established Stitch Pattern.
Stitch counts per Row are as follows:
Row 1: 30 sc
Row 2: 16 sc, 14 ch
Row 3: 16 sc, 14 ch
Row 4: 30 sc
Row 5: 4 dc, 5 dc2tog, 3 sc, 6 ch-3 sps
Row 6: 2 dc, 6 sc, 2 dc3tog, 9 ch-3 sps
Row 7: 4 dc, 9 sc, 12 ch-3 sps
Row 8: 10 dc, 6 sc, 9 ch-3 sps
Row 9: 14 dc, 3 sc, 6 ch-3 sps
Row 10: 14 sc, 3 dc, 5 ch-2 sps, 1 ch-3 sp
At the end of Row 10, you will have 30 sts to work into.
Repeats:
Repeat rows 1-10 of Established Stitch Pattern for 4 (4, 5, 5, 5) (6, 6, 6, 6) more times for a total of 5 (5, 6, 6, 6) (7, 7, 7, 7) repeats per sleeve. Fasten off and block.
Crochet Body (make 2)
Row 1 (ws):
Ch 60 (60, 60, 70, 70) (80, 80, 90, 90), sc in the first ch from the hook and across, turn. 60 (60, 60, 70, 70) (80, 80, 90, 90) sts
Rows 2-10:
Same as rows 2-10 of Established Stitch Pattern.
Repeat Established Stitch Rows 1-10 for 4 (5, 5, 6, 7) (7, 8, 9, 9) more times for a total of 5 (6, 6, 7, 8) (8, 9, 10, 10) repeats per body piece. Repeat Established Stitch Rows 1-4 for one more time on all sizes. Fasten off yarn and block.
Seaming the Crochet Body
With the right side facing, place the body pieces together (one on top of the other) with the lines going vertical. Starting from the outer top edges of the garment, seam 5 to 6 inches inward.
This will create shoulder seams and leave an opening for the neck. Try on the garment and determine how wide you prefer the boat neck; it’s a personal preference.
From the top right and left corners of the body, measure down 8.75 (8.75, 21, 21, 21) (24.5, 24.5, 24.5) inches on each side and place a marker. Seam the garment from the marker down for the side seams.
Seaming the Crochet Sleeves
Place the arm wrong side facing with the lines going vertically. Fold in each side to meet and seam the sides together. Now place one of the open sides of the sleeve to the opening on the body, and stitch the sleeve to the body.
Crocheting the Bottom Body Ribbing
Set-Up:
Attach yarn to the bottom of the garment at a side seam, slip stitch around the bottom of the body, placing one stitch per row.
Row 1:
Ch 14, slip stitch in the second chain from hook and across, slip stitch two stitches in the blo along the body bottom edge, turn. 13 sts for all sizes
Row 2:
Skip the 2 bottom edge slip sts, in blo sl st 13, turn.
Row 3:
Ch 1, in blo sl st 13, sl st into the next two stitches from the bottom edge, turn.
Repeat rows 2-3 ribbing around the body’s bottom edge. Please note, if ribbing seems too tight, substitute every other row with blo single crochet instead of the slip stitches.
To join the two edges together, either fasten off and seam the beginning edge to the end-
ing edge with a tapestry needle. Or slip stitch through the blo from the ending edge and the stitch from the beginning edge at the same time.
Join The Kindest Community
Join our vibrant community of crafters on Facebook today. Whether you enjoy crafting with others or simply have burning questions, we’ve got you covered – join us now!
Crocheting the Sleeve Ribbing
Set-Up:
Attach yarn to the bottom of the sleeve at the seam, slip stitch around the arm
opening edge placing one stitch per row.
Row 1:
Ch 8, slip stitch in the second chain from hook and across, slip stitch two stitches
on the sleeve edge, turn. 7 sts for all sizes
Row 2:
Skip the 2 bottom edge slip sts, in blo sl st 7, turn.
Row 3:
Ch 1, in blo sl st 7, sl st into the next two stitches from the sleeve edge, turn.
Repeat rows 2-3 ribbing around the sleeve edge. Please note, if ribbing seems too tight, substitute every 4th row with blo single crochet instead of the slip stitches.
To join the two edges together either fasten off and seam the beginning edge to the end-
ing edge with a tapestry needle. Or slip stitch through the blo from the ending edge and the stitch from the beginning edge at the same time.
Finishing the Neck Trim
Join yarn at the shoulder seam in the neck opening. Rsc around the opening, join and fasten off. An alternative is to sc or sl st around if preferred.
Finishing the Lacy Crochet Top
Weave in any ends, block again if necessary, wear and enjoy!
This delicate creation deserves gentle attention, so handwashing in cold water with a mild detergent is recommended. Lay the top flat on a clean, dry towel, shaping it to preserve the intricate lace details, and allow it to air dry. Avoid hanging, as this can cause stretching.
Additionally, store it folded to prevent snagging. These thoughtful care tips will not only maintain the beauty and integrity of your Key Largo Top but also ensure it remains a timeless and elegant piece in your wardrobe.
Love the look of lace and have the confidence that comes from proper care, allowing your crochet creation to grace your wardrobe for many stylish moments to come.
If you are wanting even more crochet tops to add to your wardrobe, I have several to recommend in various styles.
Here are my top crochet style recommendations for summer: the It’s A Wrap Crochet Shawl Pattern Easy Free Pattern, the Shine Like A Diamond Crochet Tank Top Pattern, the Lollipop Summer Cardigan, or the Beginner Lace Crochet Poncho Pattern.
Well, That Was Fun! What’s Next?