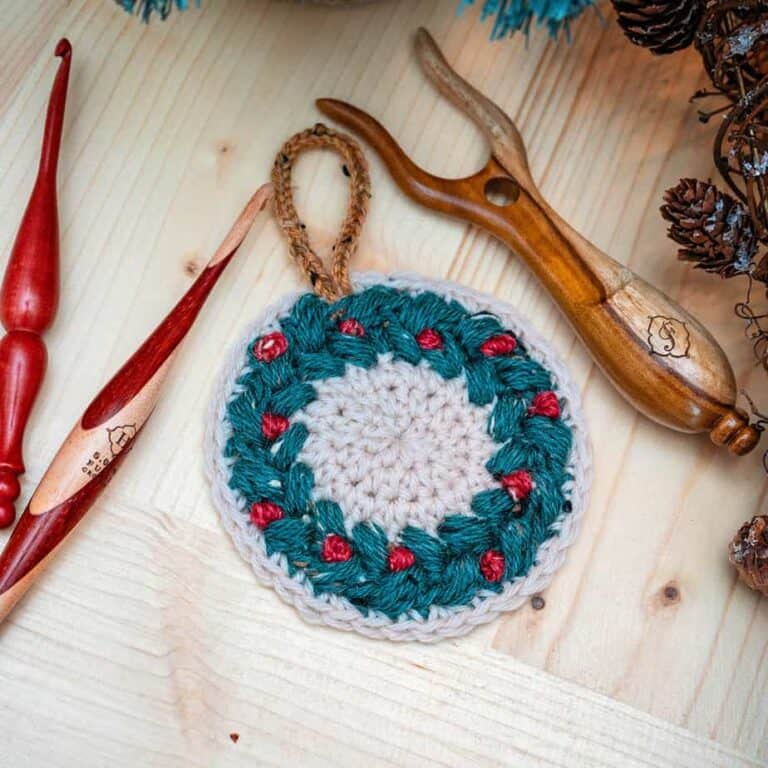
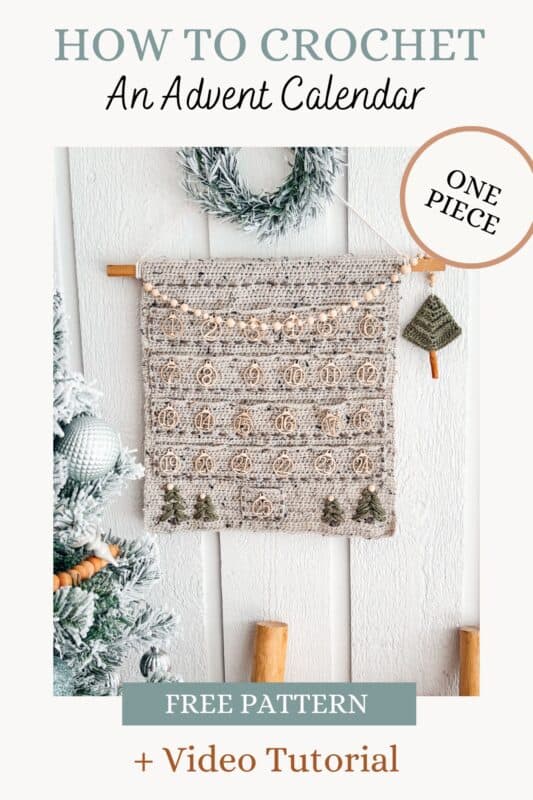
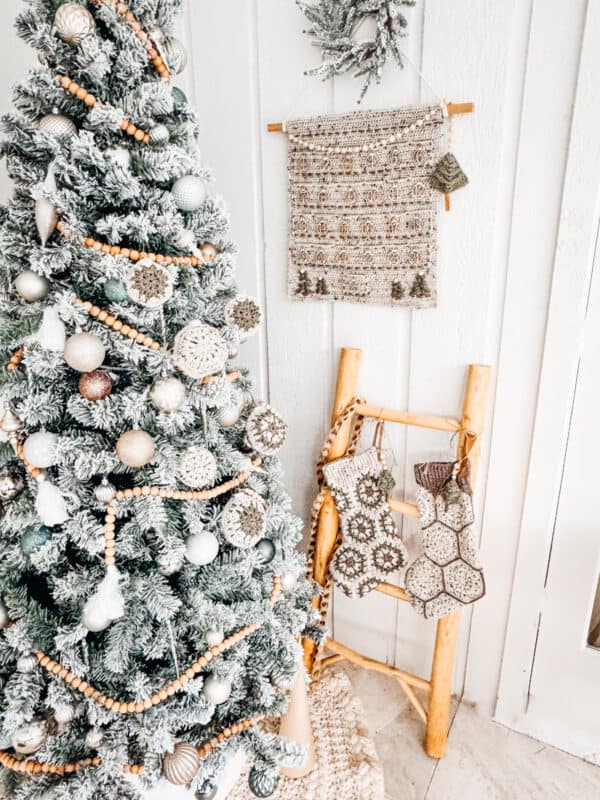
The festive season is fast approaching and if you’re looking for a fun and creative way to count down the days until Christmas, then a crochet advent calendar can be the perfect solution. Not only will it be functional, but it will also make for a beautiful addition to your Christmas decorations. Love handmade holiday decor? Also check out the matching Crochet Granny Hexagon Stocking or the Macchiato Tree Skirt Crochet Pattern.
Disclosure: This post contains affiliate links. Please read my disclosure for more info.
The best part? You can make your own crochet advent calendar for free with this easy-to-follow pattern. In this blog, we will explore everything you need to know to create your own beautiful advent calendar, including a video tutorial to make the process even easier.
What you’ll love about the Christmas Advent Calendar.
Check Your Craft Supplies – You Might Find A Treasure
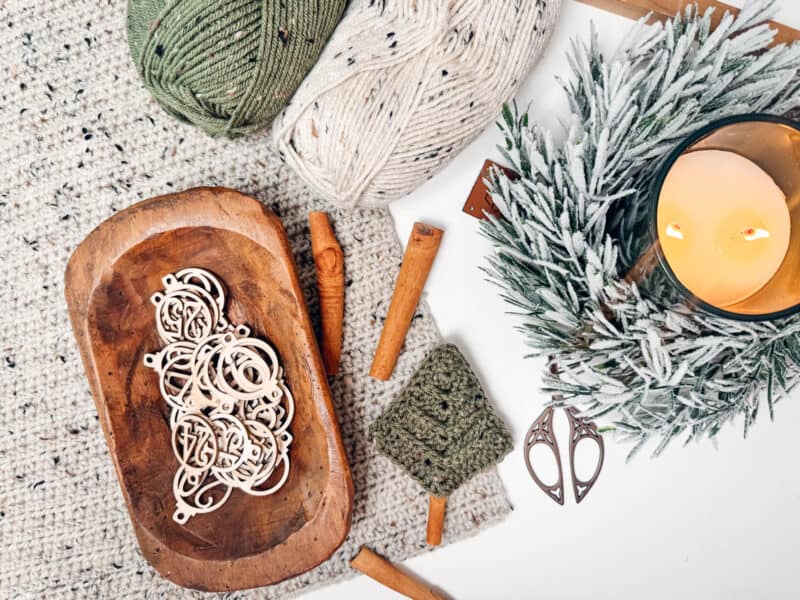
We all have bought little trinkets here and there, or gotten a surprise in a grab bag, that we loved but we stashed it away. Now is the time to go through your craft supplies and see what beads, buttons, wooden tags, ribbons, or anything else that might add to your advent calendar. Get creative and use up some of those forgotten about craft trinkets.
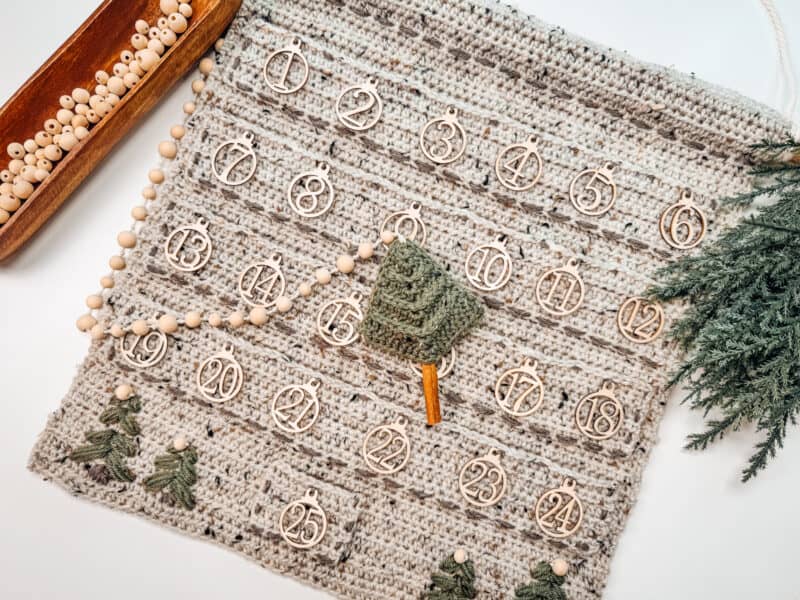
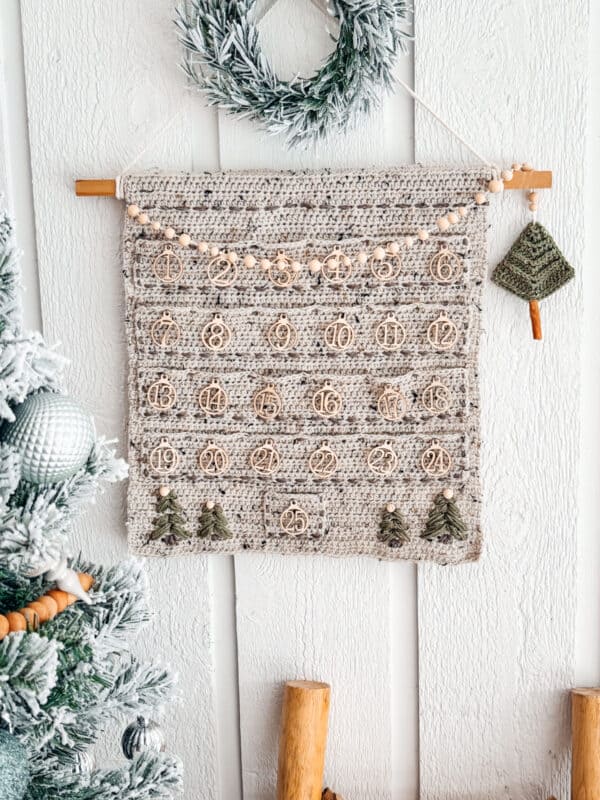
Crochet Advent Calendar – Crochet Pattern
Save the Crochet Pattern on Ravelry
Pin this Free Crochet Stocking Pattern for Later.
Either view this pattern right here on the blog, or grab the individual pattern on Ravelry or Etsy.
Supplies for the Crochet Advent Calendar
Yarn
Brava Tweed Worsted
97% Premium Acrylic, 3% Viscose, 218yds/100g. Weight: 4 Worsted
Colorways Shown: Wren, Wasabi, & Mink
Yarn Quantities
350 total yds: 2 Balls Wren, 1 ball of each Wasabi & Mink
Get Creative With Supplies & Yarn Colors
This is a great project for diving into your stash and making gifts! This holiday home decor is crocheted flat and in pieces that are sewn together.
Yarn Substitutions
Brava Worsted – 100% Premium Acrylic, 218yds/100g
Mary Maxim Maximum Value Yarn – 100% Acrylic, 474yds/8oz
Red Heart Super Saver – 100% Acrylic, 364yds/7oz
Crochet Hook
Size G (4.0mm) Crochet Hook, or hook to obtain gauge.
Notions
Scissors
Yarn Needle
Removable Stitch Marker
String (optional)
Macrame Cord (optional), 34 inches
Cinnamon Stick (or regular stick)
Wood Numbers
Wooden Dowel
Wooden Beads
Skill Level
Beginner Crocheter
Sizing
16” From the cuff to toe; 6.5 inches across.
Abbreviations
ch – chain
hdc – half double crochet
MC – Magic Circle
sc – single crochet
sl st – slip stitch
st(s) – stitch(es)
Stsc – stacked single crochet
Gauge
14 sts and 11 rows = 4″ by 4″ in half double
crochet, blocked.
How to Crochet A Gauge Swatch
Row 1: Ch 20, Stsc in first, hdc in the remaining sts across, turn.
Row 2: Ch 1 (does not count as a st), Stsc 1, hdc in each st across, turn.
Repeat Row 2 until there are 14 rows. Measure your swatch and adjust as needed.
Are you struggling to match gauge? Check out the blog post on What is Crochet Gauge and How To Fix It
Special Crochet Stitches
Stacked Single Crochet (Stsc): Do NOT chain, insert hook into next stitch, yo, pull up a loop, yo and pull through both loops, insert hook in the vertical bar below, yo, pull up a loop, yo and pull through both loop on hook.
Magic Circle (MC): Start by creating a loop with your yarn. The tail of the working yarn will be over the working end. Insert your hook into the loop from behind. Yarn over and pull through the loop. Work the stitches as instructed into the loop.
Notes for the Christmas Crochet Stocking
- Using a stitch marker at the beginning of each row is recommended.
- Work the first row of chains in the back humps.
- This crochet pattern uses standard US terminology.
All the festive makes
Check Out The Set
If you love the look, check out the matching free patterns!
Advent Calendar Video Tutorial
Want to see this pattern in action? Visuals are always a great way to follow along with the pattern.


How To Crochet A Festive Advent Calendar
To Unlock Exclusive Subscriber Content click the Box below and join for free! Grow will pop up so you can subscribe to my Blog. Enter your email and create a password. Every time you see Exclusive Content on my Blog, log in to your account!
Advent Calendar Written Instructions
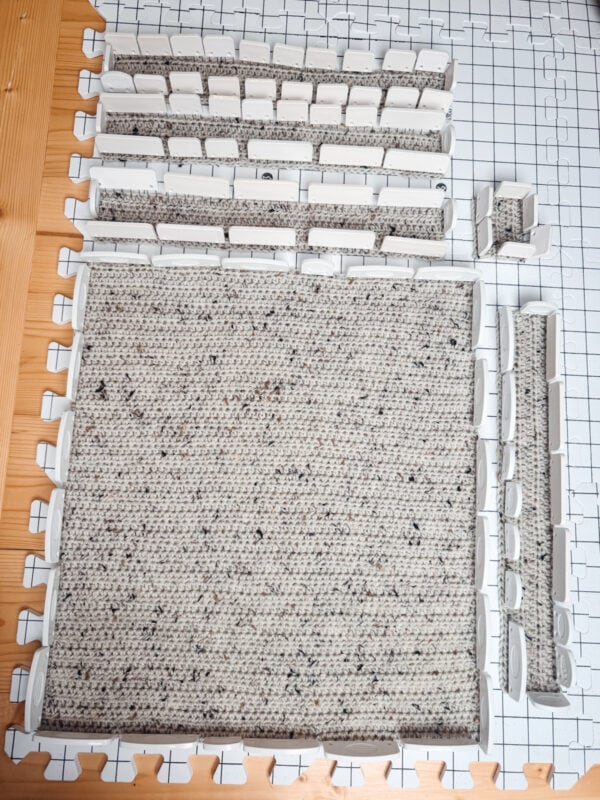
Main Crochet Background
Row 1: Ch 60, Stsc in the first ch from the hook, hdc in the remaining sts across, turn. | 60 sts
Rows 2-55: Stsc 1, hdc in each remaining st across, turn.
Take a moment to make sure the sizing is correct and add more rows if needed.
Fasten off and weave in ends.
Get Organized to Gift
Want an easy way to gift handmade this season? I’ve created a printable gift tag with instructions on care for you handmade item. Plus a bonus gift list pdf organizer. Get this with the pattern on Etsy.

Long Advent Boxes (Make 4)
Row 1: Ch 55, Stsc in the first ch from the hook, hdc in the remaining sts across, turn. | 55 sts
Rows 2-6: Stsc 1, hdc in each st across, turn.
Fasten off and weave in ends.
Advent 25th Box
Row 1: Ch 11, Stsc in the first ch from the hook, hdc in the remaining sts across, turn. | 11 sts
Rows 2-6: Stsc 1, hdc in each st across, turn.
Fasten off and weave in ends.
Quick Tip
Block background and advent boxes for the best finished look before assembly.
Get a blocking kit from WeCrochet.
Crochet Christmas Tree (Make 2)
Row 1: Inside MC ch 1, Stsc, hdc 2, pull ring closed, do not join, turn. | 3 sts
Row 2: Third loop Stsc 1, third loop hdc 3 in next st, hdc 1, turn. | 5 sts
Row 3: Third loop Stsc 1, third loop hdc 1, third loop hdc 3 in next st, third loop hdc 2, turn. | 7 sts
Row 4: Third loop Stsc 1, third loop hdc 2, third loop hdc 3 in next st, third loop hdc 3, turn. | 9 sts
Row 5: Third loop Stsc 1, third loop hdc 3, third loop hdc 3 in next st, third loop hdc 4, turn. | 11 sts
Row 6: Third loop Stsc 1, third loop hdc 4, third loop hdc 3 in next st, third loop hdc 5, turn. | 13 sts
Row 7: Third loop Stsc 1, third loop hdc 5, third loop hdc 3 in next st, third loop hdc 6, turn. | 15 sts
Row 8: Third loop Stsc 1, third loop hdc 6, third loop hdc 3 in next st, third loop hdc 7, turn. | 17 sts
Row 9: Third loop Stsc 1, third loop hdc 7, third loop hdc 3 in next st, third loop hdc 8, turn. | 19 sts
Fasten off and weave in ends for the first tree.
Repeat all the steps again for a second tree, but do not fasten off.
Joining the Crochet Trees
Place one tree on top of the other with prefered sides facing out.

Sl st around the perimeter of the trees, working through the tree closest to you, then farthest away, to join them together. For a sharp look, ch 1 at each corner of the tree.
Note before the next steps: If you are nervous about the stick coming out, you can place a bit of hot glue or craft glue on the stick before inserting it between the trees.
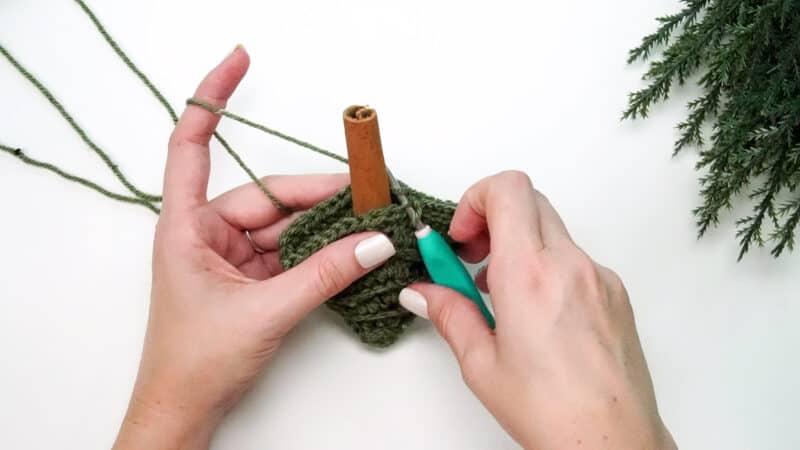
Once you are at the center bottom of the tree, place the cinnamon stick and crochet around it, skipping only one stitch, if possible, on the front and the back. Work this tightly so it holds the cinnamon stick in place.


Assembling the Calendar
Place the dowel (or stick) at the top of the main background. Fold the crochet fabric over the dowel and begin stitching across to seam around the dowel. These stitches are an intentional part of the design. On the front of the advent calendar, I added a dash that went across two stitches and then only did a one-stitch dash on the back.


The next step will be to sew all of the advent boxes in place. To do this, we can use the background rows as a guide. I suggest pinning the pieces in place to make this step easier. Each of the long boxes and short box will be two rows apart.

Starting at the top corner of each box, tack the short edge of the box to the background, then continue along the bottom edge and up along the remaining short edge. Do this for each advent box.
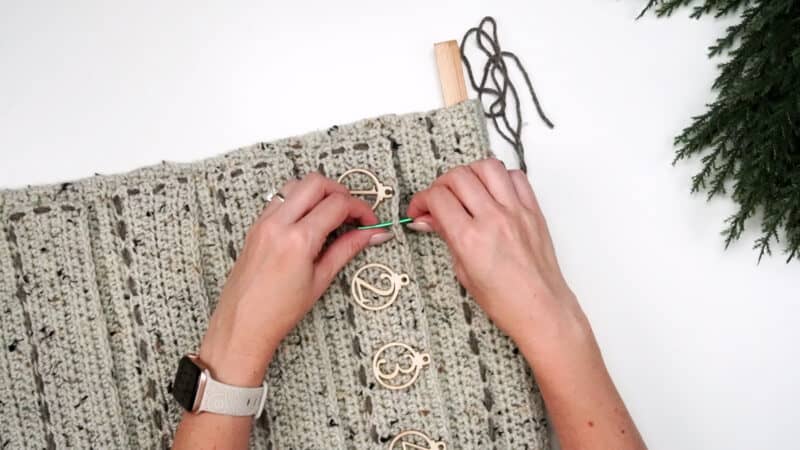
Now, it’s time to add the numbers. There will be 6 numbers placed on each of the long advent boxes. Place the numbers as desired along the top edge of the box and sew in place.
We will be sewing the advent boxes between the numbers to create an opening for our Christmas tree. Find the center point between each number, and sew the advent box to the background from top to bottom. Do this for each of the long advent boxes to create 24 individual openings.

Attaching the Tree
Using yarn and wooden beads of your choosing, create a decorative strand and then stitch it to your tree. Attach the other end to one side of the dowel. This way you won’t lose your cute little Christmas tree.
Remember to make the strand long enough to reach every box!
Another option is to simply use a strand of yarn for this step.

Join The Kindest Community
Join our vibrant community of crafters on Facebook today. Whether you enjoy crafting with others or simply have burning questions, we’ve got you covered – join us now!
Creating the Hanging Strand
We can use a macrame cord to create a way to hang the calendar. If you don’t have any don’t worry! Another option is to crochet an i-cord with this tutorial on How To Crochet An I-cord.
Watch the video on the best way to tie a knot on each side of the rope (or i-cord) to attach it to the dowel. Or use your preferred knot method.

Embroidered Tree Embellishment
I like to use double strands when creating these as it makes it go faster. Using your tapestry needle and green yarn, embroider on little trees by sewing upside-down rows of V’s.

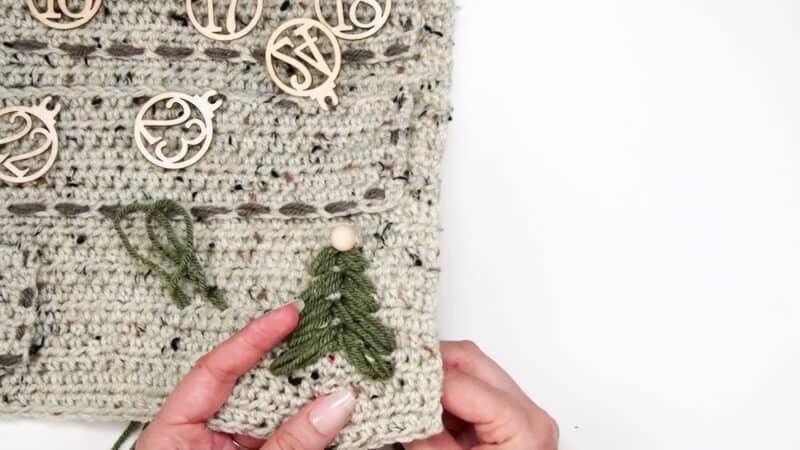
Then, using the brown yarn, create a triangle shape for the trunk. Place a small wooden bead at the top of the trees if desired.

Finishing the Crochet Stockings
Weave in any ends, block if needed. Hang and enjoy!
What to Fill Your Advent Calendar With
With this crochet advent, there is no need to fill the pockets, however if you want to you can fill it up with festive treats. You can use small chocolates, candies, or any other small items that fit into the pockets. Fill each pocket with something that will bring a smile to your face every day leading up to Christmas. And don’t forget to put a little something extra in the final pocket on Christmas Eve!
How To Store Your Handmade Crochet Advent Calendar
If you’ve made a handmade crochet advent calendar, it can be tricky to figure out how to store it for next year! Luckily, there are some simple tips and tricks that can help you protect your handmade creation. Here are just a few of them:
1. Keep it clean – To maintain its shape and color, avoid getting dust or dirt on your crochet piece by storing in an airtight container when possible. This will also prevent any critters from making themselves at home!
2. Follow the label – When washing and caring for your crocheted item, follow the instructions provided on the yarn label to ensure it looks great for years to come.
3. Avoid direct sunlight – Sunlight can cause colors to fade over time, so keep your project away from bright windows or in a protective cover if necessary.
By following these tips, you’ll be able to ensure that your crocheting projects stay beautiful for years to come. Happy creating!
Well, That Was Fun! What’s Next?
Well, That Was Fun! What’s Next?