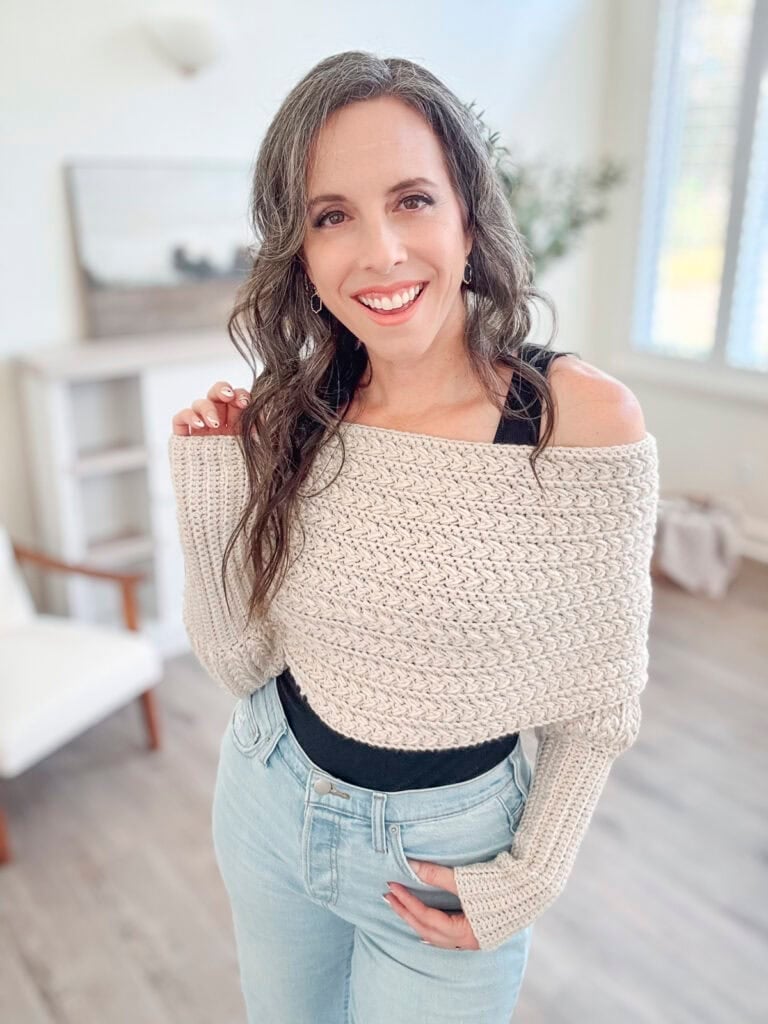
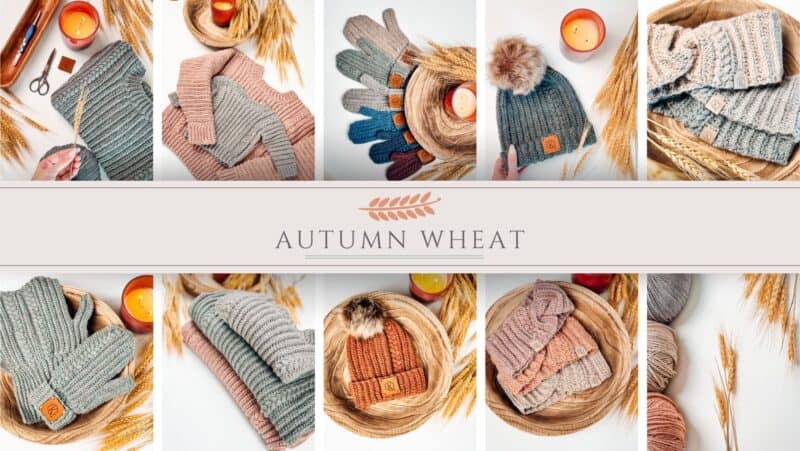
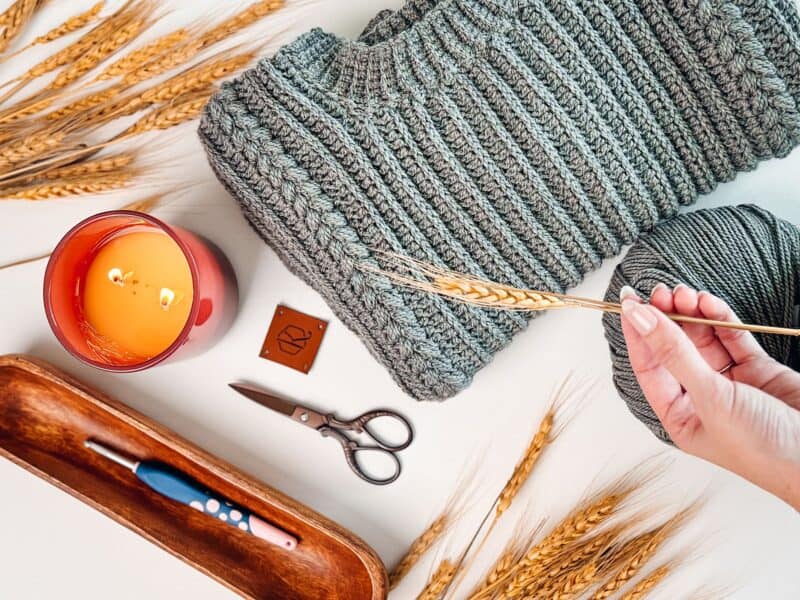
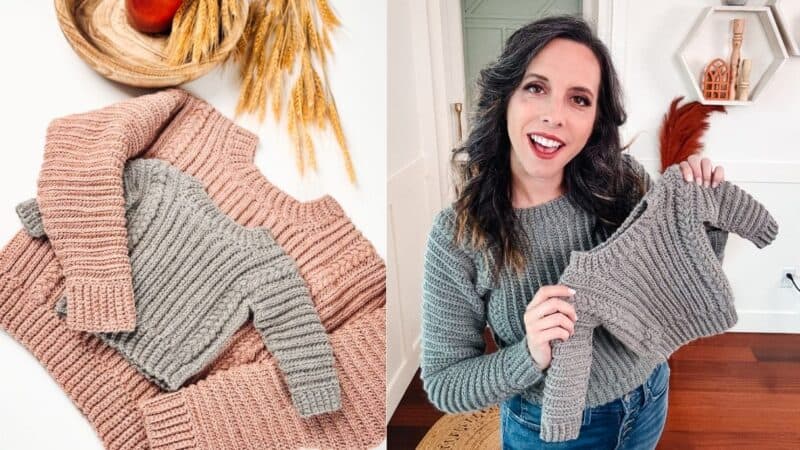
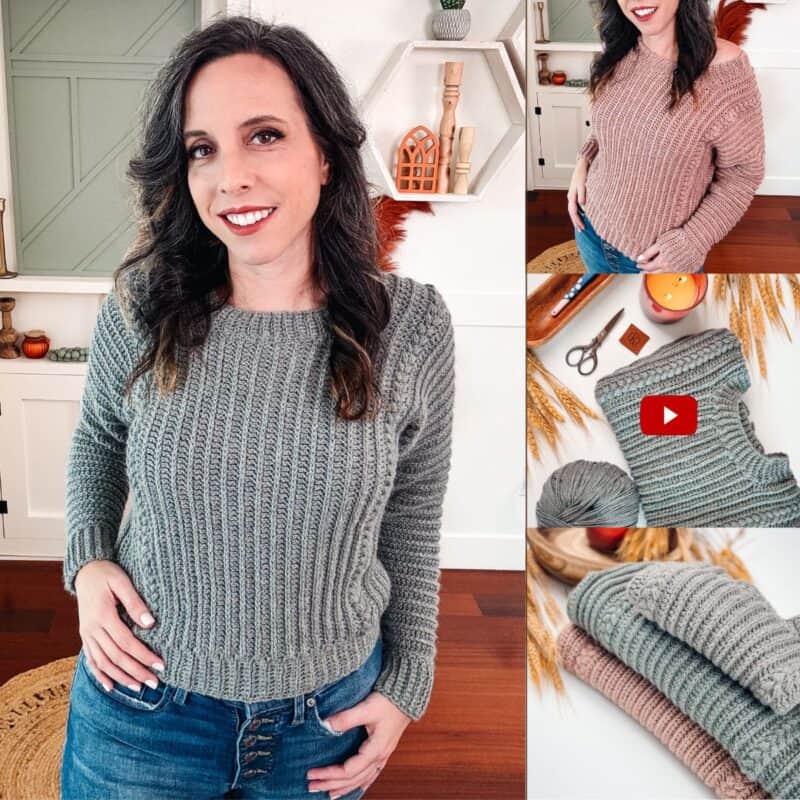
Honestly? The sweaters at the store weren’t speaking to me. They all looked the same and none of them had the everyday style I actually wanted to wear. So I started experimenting with different sweater constructions, and I fell hard for this two-seam style. It’s so satisfying to take a flat piece of fabric, fold it, and bam, a new sweater. The puff stitches were a holdover from my Macchiato Sweater, where I loved how they looked, so I tucked them into Autumn Wheat as a small detail at the bust. Autumn Wheat is the everyday sweater I couldn’t find at the store.

Disclosure: This post contains affiliate links. Please read my disclosure for more info.
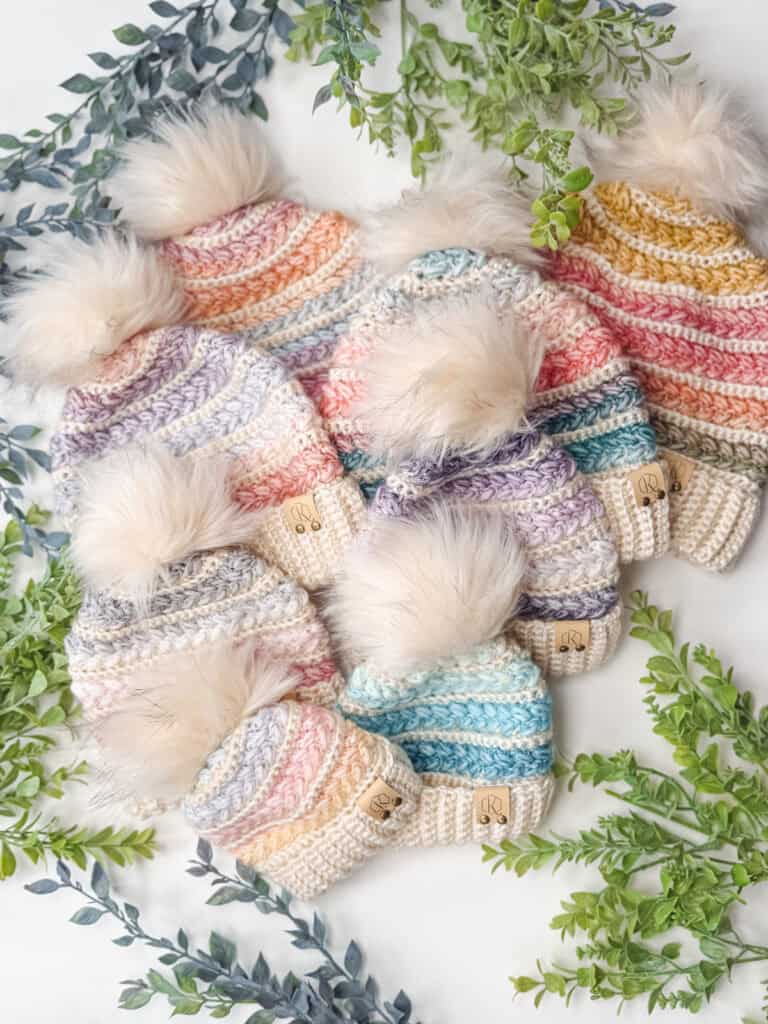
With our easy-to-follow instructions, video tutorials, and flat construction, even beginners can create a stylish crochet pullover. And this style also comes as a cardigan, check out the Autumn Wheat Beginner Crochet Cardigan, or even make a matching hat with the Autumn Wheat Easy Hat.
The Autumn Wheat Sweater will become one of your favorite crochet projects because of the simple and relaxing construction. It’s a great project to work on while binge watching your favorite show on Netflix!
This easy sweater pattern uses a light worsted weight yarn and unique version of the half double crochet stitch to achieve a knit-look fabric. Ready to get started? Grab some yarn and let’s go!
The Autumn Wheat Sweater has nine sizes included, and once complete, you can style it with jeans and boots for an easy fall look. Or dress it up with some fancy jewelry and boots to wear out to your local coffee shop or date night. If you like the simple puff stitches on this sweater, you’ll love the Toasty Wheat Sweater!
Updated May 2026
WeCrochet has discontinued Upcycle Worsted, the yarn I originally designed Autumn Wheat in. The post now recommends Heatherly Sport as the primary yarn, with notes on how Upcycle compares for anyone who still has it in their stash.
What you’ll love about this crochet pullover sweater pattern.
How the Autumn Wheat Sweater is constructed (cuff to cuff)
This is a cuff-to-cuff sweater crocheted flat. We will start with making the ribbing for one cuff, work the sleeve and increase, then crochet the first section of the body, the front & back sections to make room for the neck, the second part of the body, then the second sleeve while decreasing, and then the final cuff. This only needs two seams to become a crochet pullover! A similar two seam construction that uses mosaic color work is the Seabird Mosaic Crochet Cardigan.

Autumn Wheat vs Toasty Wheat: Which Sweater Should You Make?
I get this question constantly, so let’s settle it. I designed both Autumn Wheat and Toasty Wheat as cuff-to-cuff, two-seam sweaters in worsted weight, but they’re built around different stitches and they wear differently on the body.
Quick comparison
| Autumn Wheat | Toasty Wheat | |
|---|---|---|
| Main stitch | Third loop hdc | Wheat Stitch™ (flo / blo alternation) |
| Visible texture | Subtle knit-look ridges | Deep, woven texture |
| Stitch speed | Faster | Slower |
| Best for | A first cuff-to-cuff sweater | A second sweater, or for texture lovers |
| Special feature | Puff stitch row at the bust | Wheat Stitch center |
| Time to finish (size M) | About 18 to 22 hours | About 24 to 30 hours |
Pick Autumn Wheat if
You’ve never made a sweater, or you want a quieter, knit-look fabric that reads as a wardrobe staple. The third loop hdc is easy to memorize, the puff stitch row only happens twice, and most of your time is spent on calm, repetitive rows. It’s the sweater I recommend for a first attempt.
Pick Toasty Wheat if
You’re a confident intermediate who wants more visible texture, or you’re building a Wheat Stitch™ collection. The Wheat Stitch creates a deep, basket-weave fabric that catches light and gets compliments, but it needs more attention per row because of the front loop / back loop alternation.
Or make both
They layer beautifully and wear differently enough that you won’t feel like you’re repeating yourself. Autumn Wheat is the everyday sweater. Toasty Wheat is the statement sweater.
Get the Autumn Wheat Pattern Collection
Join in on the crochet along happening now! Either view this pattern right here on the blog, or grab the individual pattern on Ravelry or Etsy. Or you can purchase the entire Autumn Wheat Collection.
Autumn Wheat Crochet Sweater FAQs
Is this pattern good for a first sweater?
Yes, this is one of the most beginner-friendly sweater constructions you can make. The Autumn Wheat sweater is worked flat in two pieces, then folded and seamed up the sides, so you’re not tracking yoke increases or working in the round if that intimidates you. If you can work half double crochet and follow a stitch count, you can make this. The puff stitch row looks fancier than it is, and there’s a video tutorial walking through every step.
What is the third loop half double crochet, and why does this pattern use it?
The third loop hdc is a small modification where you work into the horizontal bar that sits behind the top two loops of a half double crochet stitch. It creates a knit-look ridge on the front of the fabric, which is exactly the look I was chasing for an everyday sweater. I picked it over a standard hdc because regular hdc fabric can read a little stiff and crocheted, and I wanted Autumn Wheat to look more like the wardrobe staples I was failing to find at the store. There’s a full tutorial on the blog if you’ve never worked into the third loop before.
Can I make the sleeves longer or shorter?
Absolutely, and this is one of the perks of cuff-to-cuff construction. Because you start at the cuff and work toward the body, you can add or remove rows at the wrist before you reach the underarm shaping. Just keep your stitch count consistent and add or subtract in pairs of rows so the front and back match. If you’re going significantly longer, double-check your yarn quantity because longer sleeves use more than you’d think.
What yarn weight works best for this sweater?
Autumn Wheat is written for worsted weight (CYC 4), and that’s the weight I’d recommend if you want the same drape and fit as the sample. The third loop hdc plays best with a smooth, plied worsted because the ridge it creates needs definition to show up. If you want to substitute, look for something with similar yardage per gram and the same recommended hook range, and always make a gauge swatch before you commit to a size. You might find that some DK weight yarns are similar to the recommended one.
Can I make this sweater in plus sizes?
Yes, the Autumn Wheat pattern includes nine sizes from XS to 5X, with full bust measurements ranging from approximately 32 inches to 60 inches finished. Cuff-to-cuff construction is genuinely one of the better methods for plus sizes because you can try the sweater on partway through, which is hard to do with a top-down yoke. The body length and width is also fully adjustable since you control how many rows you work after the underarm. If you’re between sizes, I always recommend sizing up and adjusting body and sleeve length from there.
Autumn Wheat Sweater supplies (yarn, hook, notions)
Yarn
Heatherly Sport Yarn Weight: Light Worsted / DK 80% Acrylic, 20% Merino Wool, 328yds/100g. Shown in Colorways Peach Fuzz, Agave, and Gravity
A note on the yarn Heatherly Sport is technically a sport / light worsted weight, slightly thinner than a standard worsted. Always check gauge before you commit to a size, since a small tension difference can change the final fit.
Yarn Quantities
1150 (1190, 1250, 1400, 1500) (1700, 1900, 2150, 2375) yds
4 (4, 4, 5, 5) (6, 6, 7, 8) hanks
A Note On The Yarn & Substitutes
Please note, other weights can work as WeCrochet Upcycle varies per ball and tends to be on the thinner side, be sure to check gauge.
Yarn Substitutions for the Autumn Wheat Sweater (and Why Each One Works)
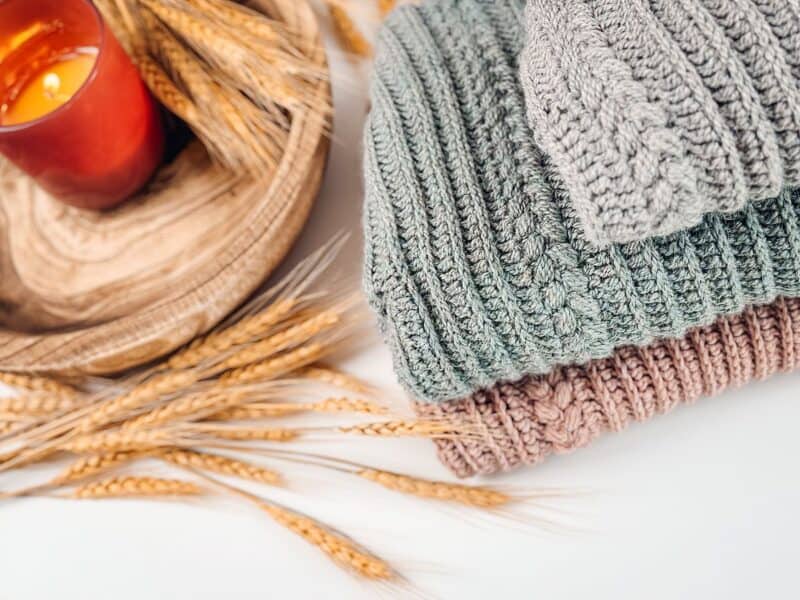
The main yarn for Autumn Wheat is Heatherly Sport (80% Acrylic, 20% Merino Wool, 328 yds per 100g). It’s a light worsted that gives the finished sweater a softer, slightly dressier drape than a heavier worsted, and it’s what you see in the photos throughout this post. But Heatherly Sport isn’t your only option, and several substitutes work beautifully here. Here’s how each one performs and when I’d reach for it.
Already have WeCrochet Upcycle? Read this first.
If you bought Upcycle Worsted (33% Alpaca, 34% Wool, 33% Acrylic, 219 yds per 100g) for this pattern before WeCrochet discontinued it, you’re in great shape. Upcycle was the original yarn I designed Autumn Wheat in, and it gives the sweater a beautiful heathered, lived-in look thanks to the alpaca and wool content. Use what you have. The pattern works exactly the same. The only thing to know is that Upcycle ran slightly thinner than a true worsted, so check gauge twice before committing to a size.
Heatherly Sport
This is the yarn shown in most of the photos, so if you love the look of the sample, this is your match. Heatherly Sport is 80% Acrylic and 20% Merino Wool with 328 yards per 100g, which means you’ll need fewer balls than the Upcycle yardage suggests. The drape is slightly lighter and more fluid than Upcycle, and the merino content gives it just enough softness against the skin without being itchy. The “third loop” hdc still creates that knit-look ridge, but the overall fabric reads as a touch dressier. Pick Heatherly Sport when you want a more polished, less rustic finish, or when you want a sweater that’s easier to layer under a jacket.
Brava Worsted
If you want a workhorse sweater you can throw in the washing machine, Brava is the answer. It’s 100% Premium Acrylic with 218 yards per 100g, so the yardage swap from Upcycle is almost one to one. Brava has slightly less drape than the Upcycle blend because there’s no animal fiber, but it holds stitch definition beautifully, which means the puff stitch row at the bust pops more than it does in the alpaca version. Color depth is also more saturated since acrylic takes dye richly. Pick Brava Worsted for a sweater you’ll actually wear and wash, or when you’re crocheting in a color WeCrochet doesn’t carry in Upcycle.
Mighty Stitch
This one is my recommendation if you want machine-washable plus a bit of warmth. Mighty Stitch is 80% Acrylic and 20% Superwash Wool with 208 yards per 100g, so plan on a couple extra balls compared to Upcycle. The wool content adds a softness and breathability that pure acrylic lacks, and the superwash treatment means it can still go in the washer. Stitch definition sits between Brava (sharpest) and Upcycle (softest). Pick Mighty Stitch when you want the easy care of Brava but with a slightly more luxurious hand, especially for a transitional fall sweater that you’ll wear weekly.
Swish DK
Swish DK is the upgrade pick. It’s 100% Fine Superwash Merino Wool with 110 yards per 50g, which is a lighter weight than the others, so this is the substitute that requires the most attention to gauge. You will need significantly more balls than the pattern calls for, and you should swatch twice before committing to a size because dropping from worsted to DK changes both your stitch count and your row count. The payoff is real, though. Swish gives you a luxurious, drapey, dressed-up version of Autumn Wheat with the kind of softness that makes the sweater feel expensive. Pick Swish DK when you want a date-night version, when you’re gifting the sweater for a milestone (graduation, retirement, a first-baby gift), or when you simply want to crochet something that feels indulgent.
Quick comparison
If you remember nothing else: Heatherly Sport for the sample look, Brava for the wash-and-go life, Mighty Stitch for the everyday upgrade, and Swish DK for the splurge. Whatever you pick, swatch in the third loop hdc before you start, because the knit-look fabric only shows up when your gauge is on, and small tension differences between yarns can change which size fits you best.
Crochet Hook
Size H (5.0mm) Crochet Hook, or hook to obtain gauge.
Notions
Scissors
Yarn Needle
Removable Stitch Marker
Skill Level
Advanced Beginner
Sizing
XS (S, M, L, 1X) (2X, 3X, 4X, 5X)
To fit chest: 32 (34, 38, 42, 46) (50, 54, 58, 62). Actual measurements are in schematic.
Ease: This garment is meant to be worn with a 3-5 inch positive ease.
Abbreviations
ch – chain
blo – back loop only
flo – front loop only
hdc – half double crochet
hdc2tog -half double crochet two together
Puff sts – puff stitch
rem – remaining
RS – right side
sc – single crochet
sl st – slip stitch
st(s) – stitch(es)
WS – wrong side
Special Crochet Stitches
Half Double Crochet In The Third Loop: What’s really cool about half double crochet is that there’s a third loop on the back of your stitch. If you work hdc into the third loop, you get a totally different, knit-like fabric.
For this pattern, we are going to be working in rows, which means we will work on the row below in the third loop on the front of our work. Need a visual? Watch the video tutorial of this stitch.

Puff Stitch: Yarn over and insert your hook into the stitch/space. Yarn over again and pull up a long loop. (Yarn over and insert your hook into the same stitch/space. Yarn over again and pull up a long loop) two more times (7 loops on the hook). Yarn over and pull through the first 6 loops, yarn over and pull through remaining loops.
Gauge
17 sts and 11 rows = 4″ by 4″ in half double crochet worked in the third loop, blocked.
How to Crochet A Gauge Swatch
Working a gauge swatch will let you know if you will have the correct sizing for this pattern. A gauge swatch helps you practice the stitches used in this project and improve your stitch work for a flawless look.
Are you struggling to match gauge? Check out the blog post on What is Crochet Gauge and How To Fix It
Gauge Swatch Instructions:
Row 1: Ch 21, hdc in the 2nd ch from the hook and in the remaining sts across, turn.
Row 2: Ch 1 (does not count as a st), hdc in the third loop in each st across, turn.
Repeat Row 2 until there are 14 rows. Measure your swatch and adjust as needed.
Notes for the Autumn Wheat Sweater
- The yarn suggested in this pattern can vary in thickness depending on the color. It’s very important to keep checking the gauge to make sure the sizing is correct.
- A ch 1 at the beginning of a row is not counted as a stitch.
- Using a stitch marker at the beginning of each row is recommended.
- The instructions and stitch counts are given for the smallest size, with the larger sizes in brackets ( ).
- Before you dive into your project, take a moment to identify the stitch and row counts that match the size you’re making. By highlighting or marking them, you’ll save time and effort later on. Trust us, this small step will make a big difference in your crochet journey!
- When brackets are used, [….] repeat the instructions inside the brackets as indicated.
- This Pattern Uses Standard US Terminology
Want the matching child version? The Cuff-to-Cuff Child Sweater is the matching mini for your kiddo. They make a perfect mommy and me set for fall photos.
Autumn Wheat Sweater Video Tutorial:
Watch how easy and beginner-friendly it is to work up this crochet piece with a tutorial.

Click the box below to unlock this exclusive subscriber content for free. Add your email and create a password. If you are having trouble, reset your password or log in to the Grow Portal.
I’m thrilled to share this amazing crochet pattern with you! Please don’t copy, paste, or distribute this pattern. Prefer an ad-free experience? Purchase a digital PDF file for a small fee from one of my online stores. I appreciate your support and readership. You are why I can keep doing what I love and sharing it with others. Thank you from the bottom of my heart.
Autumn Wheat Flat Sweater Written Instructions
First Cuff
Row 1: Ch 1, flo hdc across, turn. | 32, (34, 34, 36, 36) (38, 38, 40, 40) sts
Row 2 (increasing row): Ch 1, (the hdc sts will be in the third loop for the remaining of the pattern unless indicated otherwise), hdc 2 in the first st, hdc in each st across until the last st, hdc 2 in the last stitch, turn. | 34, (36, 36, 38, 38) (40, 40, 42, 42) sts
How to Work a Non-increasing Row: Ch 1, hdc in each st across, turn.
Increasing Repeats
XS: Repeat increasing row on every 2nd row 15 times, then continue to work non-increasing rows until a total of 46 sleeve rows. | 64 sts
S: Repeat increasing row on every 2nd row 16 times, then continue to work non-increasing rows until a total of 46 sleeve rows. | 68 sts
M: Repeat increasing row on every 2nd row 18 times, then continue to work non-increasing rows until a total of 46 sleeve rows. | 72 sts
L: Repeat increasing row on every 2nd row 19 times, then continue to work non-increasing rows until a total of 46 sleeve rows. | 76 sts
1X: Repeat increasing row on every 2nd row 21 times, then continue to work non-increasing rows until a total of 46 sleeve rows. | 80 sts
2X: Repeat increasing row every row 4 times, then repeat increasing row every 2 rows 18 times, then continue to work non-increasing rows until a total of 46 sleeve rows. | 84 sts
3X: Repeat increasing row every row 10 times, then repeat increasing row every 2 rows 16 times, for a total of 46 sleeve rows. | 92 sts
4X: Repeat increasing row every row 12 times, then repeat increasing row every 2 rows 15 times, for a total of 46 sleeve rows. | 96 sts
5X: Repeat increasing row every row 16 times, then repeat increasing row every 2 rows 13 times, for a total of 46 sleeve rows. | 100 sts
Join The Kindest Community
Join our vibrant community of crafters on Facebook today. Whether you enjoy crafting with others or simply have burning questions, we’ve got you covered – join us now!
First Sweater Body Section
Quick Tip
Want to more or less room in the bust? Add or remove rows in the First Body Section. Keep a note to do the same in the Second Body Section.
Note: Beg ch determines the length of the sweater, to alter the length, work more or fewer chs in an even number.
Attach 2nd ball of yarn to the opposite side of the row from the working yarn, ch 52, fasten off.
Row 1: Ch 53, sc in 2nd ch from hook, sc in next 9 chs, hdc in next 42 chs, hdc in next 64 (68, 72, 76, 80) (84, 92, 96, 100) sleeve sts, hdc in next 42 chs, sc in last 10 chs, turn. | 168 (172, 176, 180, 184) (188, 196, 200, 204) sts
Tip: You can use a stitch marker to mark the ribbing stitches so it’s easy to see when those should start and stop.
Reminder: hdc sts will go back to worked in the third loop unless indicated otherwise.
Rows 2-10: Ch 1, blo sc in first 10 sts, hdc in each st across until 10 sts rem, blo sc in last 10 sts, turn.
Rows 11-12: Ch 1, blo sc in first 10 sts, [skip the next st, sc in next, work a puff st into the skipped st] work until the last 10 sts, blo sc in last 10 sts, turn.
Row 13: Ch 1, blo sc in first 10 sts, hdc across without working in the third loop until 10 sts rem, blo sc in last 10 sts, turn.
Rows 14- 16 (18, 20, 22, 24) (28, 30, 32, 34): Ch 1, blo sc in first 10 sts, hdc across (working in the third loop) until 10 sts rem, blo sc in last 10 sts, turn.
Back of Sweater Section
Row 1: Ch 1, blo sc in first 10 sts, hdc in next 62 (64, 66, 68, 70) (72, 76, 78, 80) sts, turn. | 72 (74, 76, 78, 80) (82, 86, 88, 90) sts.
Row 2: Ch 1, hdc in 62 (64, 66, 68, 70) (72, 76, 78, 80) sts, blo sc in last 10 sts, turn.
Rows 3- 20 (20, 20, 20, 20) (22, 22, 22, 22): Repeat Rows 1-2.
Fasten off.
Front Section
Row 1: Sk 24 sts from the last st worked in Row 1 of Back Section, join with a sl st, ch 1, hdc 62 (64, 66, 68, 70) (72, 76, 78, 80) sts, blo sc in the last 10 sts, turn. | 72 (74, 76, 78, 80) (82, 86, 88, 90) sts.
Row 2: Ch 1, blo sc in the first 10 sts, hdc 62 (64, 66, 68, 70) (72, 76, 78, 80) sts, turn.
Row 3: Ch 1, hdc 62 (64, 66, 68, 70) (72, 76, 78, 80) sts, blo sc in the last 10 sts, turn. | 72 (74, 76, 78, 80) (82, 86, 88, 90) sts.
Rows 4- 20 (20, 20, 20, 20) (22, 22, 22, 22): Repeat Rows 2-3.
Before fastening off, ch 24 sts for the neck space, then fasten off.
Quick Tip
Did you know that our tension can vary depending on our mood? To ensure that our garments turn out just right, let’s make sure we maintain consistent sizing. A quick tip is to check the gauge every 10-20 rows and make any necessary adjustments. This way our hard work on the crochet sweater pattern pays off and looks great.
Second Sweater Body Section
Row 1: With RS facing, attach yarn to last st on Back Section, ch 1, blo sc in first 10 sts, hdc in next 62 (64, 66, 68, 70) (72, 76, 78, 80) sts Back Section, ch 24, hdc in next 62 (64, 66, 68, 70) (72, 76, 78, 80) sts of Front Section, blo sc in last 10 sts, turn. | 168 (172, 176, 180, 184) (188, 196, 200, 204) sts
Rows 2- 4 (6, 8, 10, 12) (16, 18, 20, 22): Ch 1, blo sc in first 10 sts, hdc across until 10 sts rem, blo sc in last 10 sts, turn.
Row 5 (7, 9, 11, 13) (17, 19, 21, 23): Ch 1, blo sc in first 10 sts, [skip the next st, sc in next, work a puff st into the skipped st] work until the last 10 sts, blo sc in last 10 sts, turn.
Row 6 (8, 10, 12, 14) (18, 20, 22, 24): Repeat previous puff row, turn.
Row 7 (9, 11, 13, 15) (19, 21, 23, 25): Ch 1, blo sc in first 10 sts, hdc across without working in the third loop until 10 sts rem, blo sc in last 10 sts, turn.
Next 9 Rows: Ch 1, blo sc in first 10 sts, hdc across (working in the third loop) until 10 sts rem, blo sc in last 10 sts, turn and fasten off the last row.
Second Sleeve – Decreasing
Row 1: Sk 52 sts, join to the nest st with a sl st, ch 1, hdc in the same and next 64 (68, 72, 76, 80) (84, 92, 96, 100) sts, leaving rem sts unworked, turn. | 64 (68, 72, 76, 80) (84, 92, 96, 100) sts.
How to work a decreasing row: Ch 1, hdc2tog, hdc until the last 2 sts, hdc2tog, turn. | 62 (66, 70, 74, 78) (82, 90, 94, 98) sts.
How to work a non-decreasing row: Ch 1, hdc in each st across, turn.
Sleeve Decreasing Repeats
XS: Work 13 non-decreasing rows, then work a decreasing row, repeat decreasing row on every 2nd row 15 times, then continue to work non-decreasing rows until a total of 46 sleeve rows. | 32 sts
S: Work 11 non-decreasing rows, then work a decreasing row, repeat decreasing row on every 2nd row 16 times, then continue to work non-decreasing rows until a total of 46 sleeve rows. | 34 sts
M: Work 7 non-decreasing rows, then work a decreasing row, repeat decreasing row on every 2nd row 18 times, then continue to work non-decreasing rows until a total of 46 sleeve rows. | 34 sts
L: Work 5 non-decreasing rows, then work a decreasing row, repeat decreasing row on every 2nd row 19 times, then continue to work non-decreasing rows until a total of 46 sleeve rows. | 36 sts
1X: Work 1 non-decreasing row, then repeat decreasing row on every 2nd row 21 times, then continue to work non-decreasing rows until a total of 46 sleeve rows. | 36 sts
2X: Work 3 non-decreasing row, then work a decreasing row, repeat decreasing row on every 2nd row 18 times, then repeat decreasing row every row 4 times, then continue to work non-decreasing rows until a total of 46 sleeve rows. | 38 sts
3X: Repeat decreasing row on every 2nd row 16 times, then repeat decreasing row every row 11 times, then continue to work non-decreasing rows until a total of 46 sleeve rows. | 38 sts
4X: Repeat decreasing row on every 2nd row 15 times, then repeat decreasing row every row 13 times, then continue to work non-decreasing rows until a total of 46 sleeve rows. | 40 sts
5X: Repeat decreasing row on every 2nd row 13 times, then repeat decreasing row every row 17 times, then continue to work non-decreasing rows until a total of 46 sleeve rows. | 40 sts
Second Cuff
Row 1: Ch 11, sc in the 2nd ch from the hook and and in each st across, sl st into the flo of the next 2 sleeve sts, turn. | (10 sts)
Row 2: Skip the 2 sl sts, blo sc in each st across, turn.
Row 3: Ch 1 (does not count as a st), blo sc in each st across, sl st into the flo of the next 2 sleeve sts, turn.
Rows 4 – 32, (34, 34, 36, 36) (38, 38, 40, 40): Repeat Rows 2-3 until all sts across the sleeve edge have been worked, fasten off and weave in ends.
How to Seam The Sweater
Wash and block. Fold sweater in half with RS facing out and WS together, align Sleeves and Body.
With yarn needle and preferred seaming method sew side seams beginning at bottom hem working up to Sleeves, then sew across Sleeves in one continuous seam. Repeat the seam on other side.
Neck Ribbing
Row 1: Join with sl st in side of Neck, ch 8, sc in the 2nd ch from hook and across back towards neckline, sl st in next 2 sts of Neck, turn. | (7 sts)
Row 2: Sk 2 sl sts, blo sc 7, turn.
Row 3: Ch 1, blo sc 7, sl st in next 2 sts (1 stitch per edge row around the neckline), turn.
Next Rows: Rep Rows 2-3 for ribbing around Neck.
Join last row to beginning row by slip stitching through blo of first and last row at the same time.
Fasten off.
Finishing the Easy Crochet Sweater Pattern
Weave in any ends and block again if necessary. Wear and enjoy! If you are looking for more fun crochet garment patterns, check out the Crochet Granny Square Cardigan or the Whimsical Crochet Cardigan Dress Pattern.
How to wash and care for a wool-blend crochet sweater.
Crocheted sweaters are unique, stylish wardrobe staples that can last for many years if they’re cared for properly. Here are some tips to help you keep your crochet sweater looking and feeling its best:
1. Hand Wash Only Machine washing can damage the fibers of a crocheted fabric, so be sure to always handwash your sweater. Use a mild detergent and cold to lukewarm water.
2. Lay Flat To Dry When you’re ready to dry your sweater, lay it flat on a towel or drying rack away from direct heat or sunlight. This will help the fabric retain its shape and texture.
3. Store Properly Hang your crocheted sweaters in a cool, dry place, such as your closet. If you live in a humid climate, you may want to consider using a cloth garment bag or cedar chest with mothballs for extra protection.
4. Spot Clean When Necessary To remove stains, use only gentle spotting techniques like dabbing and blotting. Avoid rubbing or scrubbing the fabric as it can damage the delicate fibers. For best results, take your sweater to a professional cleaner for more stubborn stains and discolorations.
Following these tips will keep your crocheted sweaters looking fresh and new!
How to Style the Autumn Wheat Sweater
Once your sweater is seamed, blocked, and dry, the fun part starts. Here are four ways I actually wear Autumn Wheat in real life, with notes on what makes each one work.
Casual, with jeans and boots
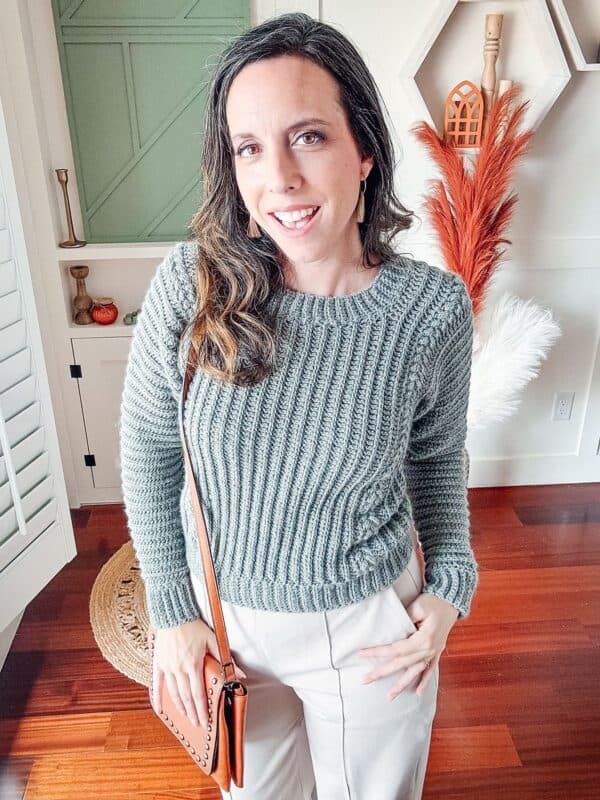
This is the everyday default and the look I had in mind when I designed Autumn Wheat. Pair the sweater with a high-rise straight or bootcut jean and ankle boots in a warm brown or cognac. The relaxed fit of the sweater (3 to 5 inches of positive ease) sits naturally over a higher waist without bunching. Add small gold hoops and a leather crossbody bag and you’ve got a school drop-off, coffee run, or weekend errand outfit that looks pulled together without trying.
Date night, dressed up
The puff stitch row at the bust gives Autumn Wheat just enough detail to dress up. Tuck the front into a black midi skirt or wide-leg trouser, add pointed-toe boots or block-heel mules, and finish with a longer pendant necklace that draws the eye down through the puff stitch row. A swipe of red lipstick takes the whole look from cozy to intentional in about thirty seconds.
Layered over a slip dress
This is my favorite shoulder-season styling trick. A satin or silky slip dress in a complementary tone (think bronze with the sage colorway, or cream with a burgundy version) peeks out below the sweater hem and at the neckline if your sweater has any V to it. The contrast between the soft, textured sweater and the smooth slip dress is what makes this work. Add tall boots for fall or sandals for a transitional spring look.
Office casual, with trousers
For workplaces that lean business casual, Autumn Wheat layers cleanly over a button-down (collar peeking out at the neckline) with high-rise wide-leg trousers in camel, charcoal, or black. Loafers or a low block heel finish the look. The third loop hdc fabric reads as polished, not crafty, which is the whole reason I chose that stitch for this design.
Tag me when you wear it
Whatever way you style yours, I want to see it. Tag @brianakdesigns on Instagram or use #brianakdesigns so I can share your version with the community. Some of my favorite styling ideas have come from seeing how you all wear my patterns out in the wild.
Well, That Was Fun! What’s Next?