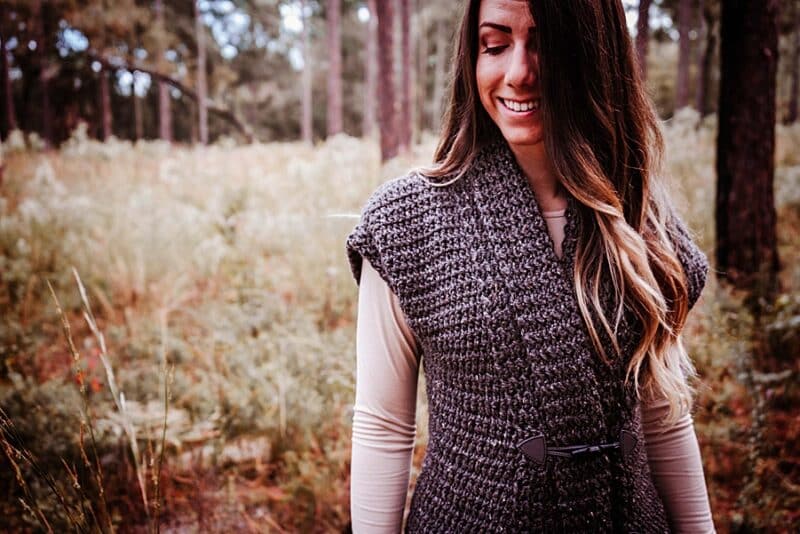
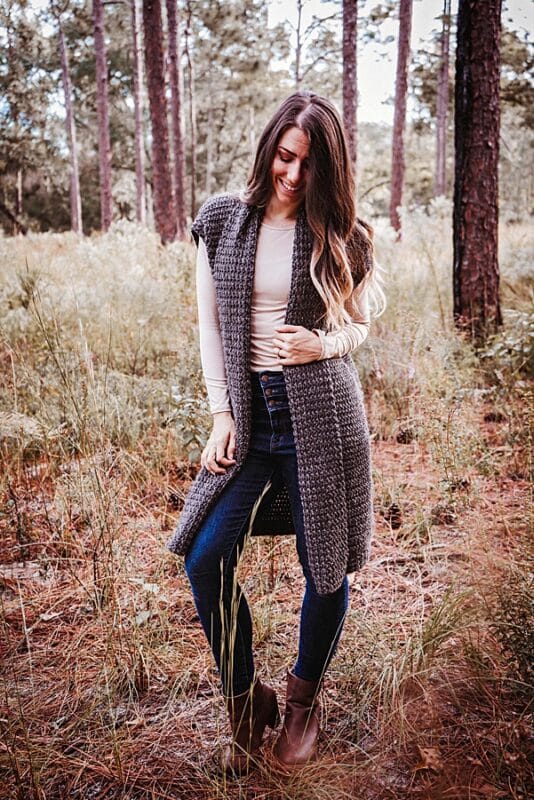
The Whimsical Crochet Cardigan Pattern is perfect if this is your first attempt or if you are an experienced crocheter. The simplistic stitches and construction make it a breeze to work up, especially with the visuals of a video tutorial.
Disclosure: This post contains affiliate links. Please read my disclosure for more info.
How to Crochet a Cardigan for Beginners
How To Style A Crochet Cardigan
Crochet cardigans can add a pop of color to an outfit, add warmth when the weather is cold, and provide protection from wind or rain. They can tie together an outfit with a complementary color or be dressy enough to wear with formal attire. Crochet cardigans also add some glam to your wardrobe in an instant.
Crochet cardigans are excellent for this time of year. They are versatile and can be styled for every occasion.
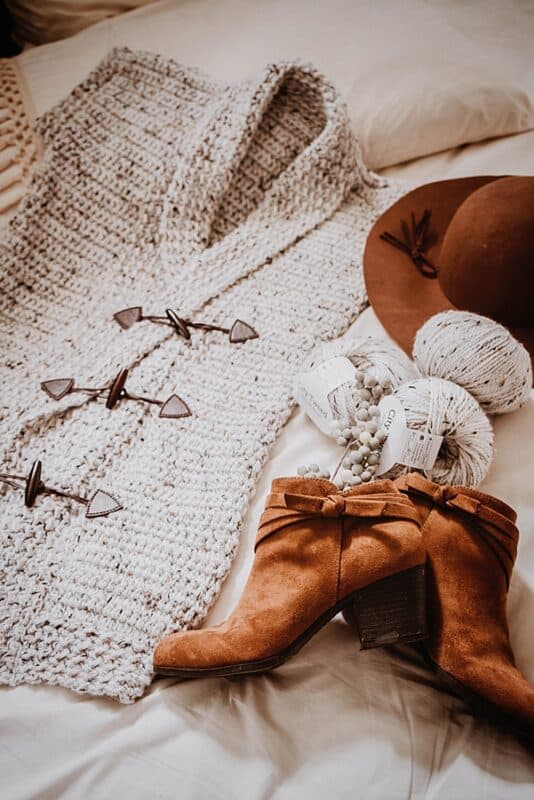
Winter might be cold, but that doesn’t mean it can’t be magical. Style the Whimsical Cardigan a variety of ways to show off your skills and figure.

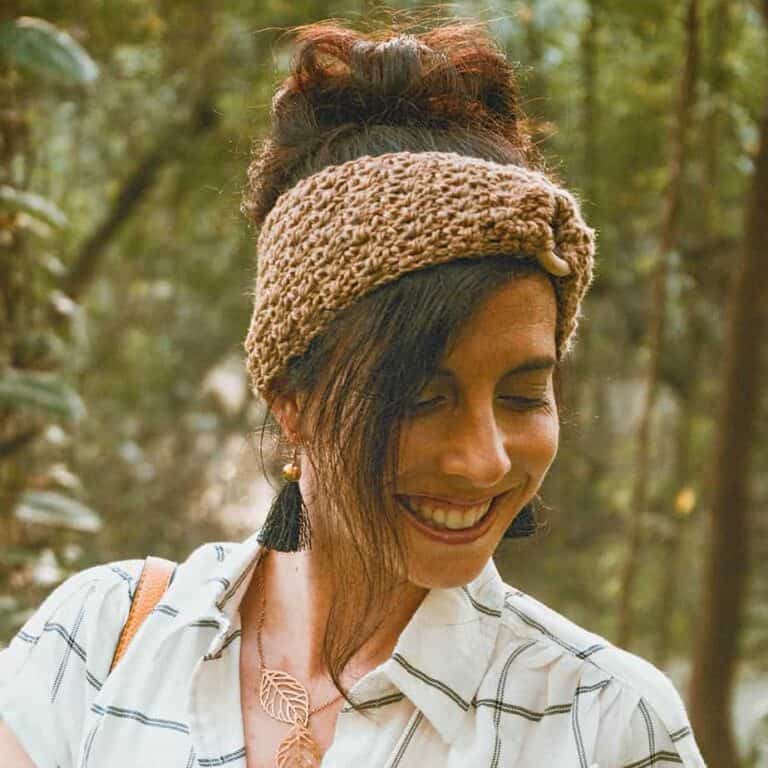
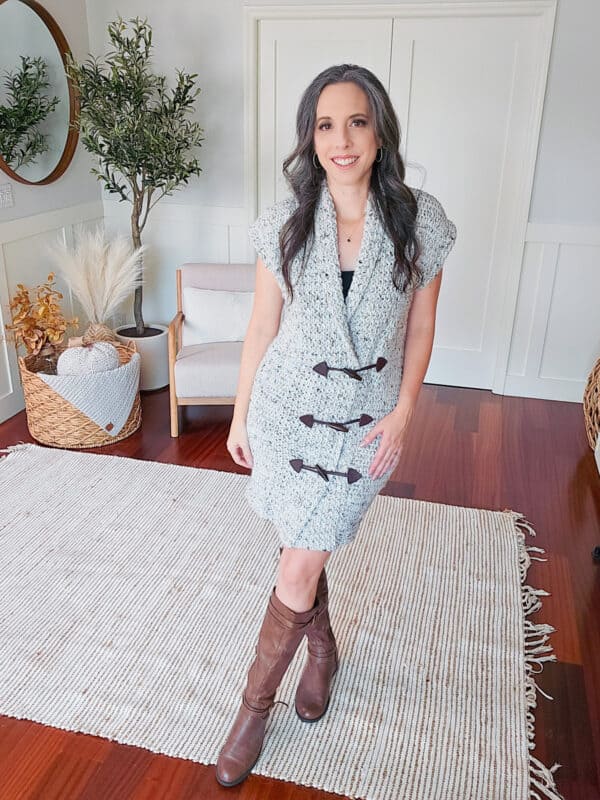
Crochet Cardigan For the Office
Pair your cardigan dress with a pair of tights, long sleeve top, and heels. Not feeling like trekking through the snow with heels? A pair of ankle boots will be useful for those slick sidewalks and still be in style. Throw on a pair of neutral earrings and you are ready for your next Zoom call.
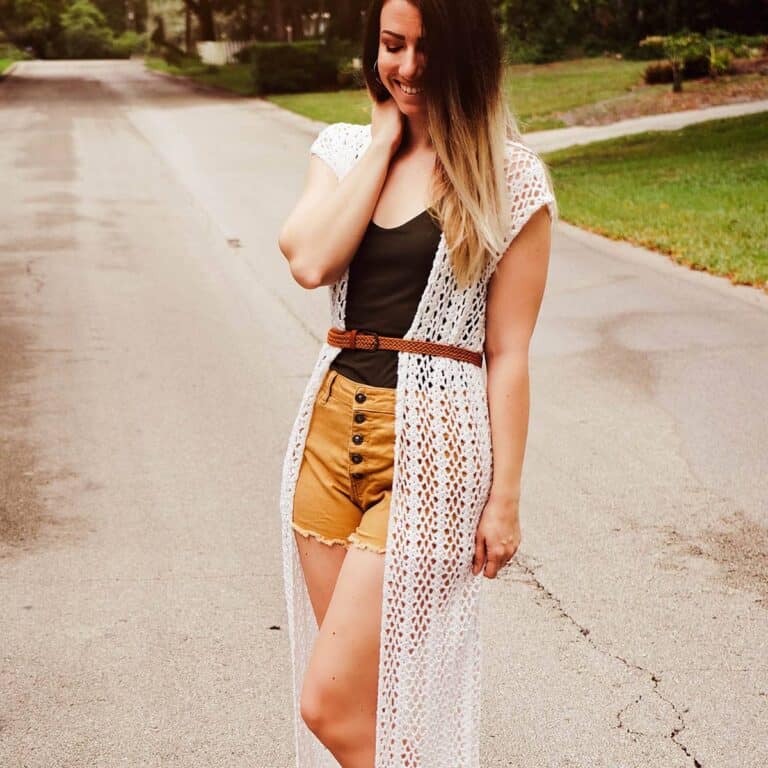
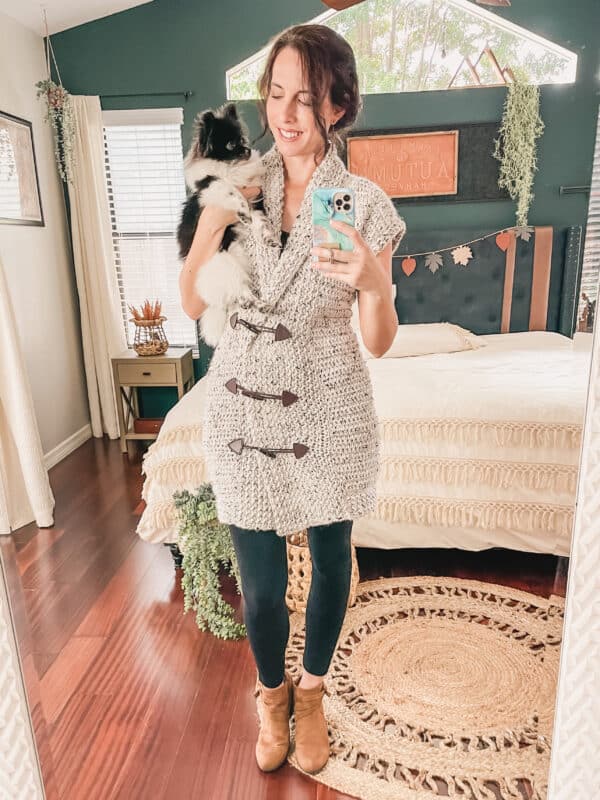
Wear A Cardigan On the Move
Meeting up with the girls for coffee? Grab those skinny jeans, pull on those high boots, and grab that leather bag. For something even more casual, grab the Uggs or even a pair of loafers.
A Crochet Cardigan for Lounging
You can purchase the Whimsical Cardigan Dress Pattern on WeCrochet.
Binging that new murder show? This calls for the leggings. It’s easy to wear with the Whimsical Crochet Cardigan and it will feel like you are wrapped in a warm blanket when you reach for that ice cream treat. No need to keep your hair down, pull it up and let the textured trim be the show.
Dress Up With a Cardigan for Date Night
For date night, you really can’t go wrong with tights, leggings, or jeans. Throw a pop of color by layering a light silk scarf. Since the Whimsical Cardigan Dress is all about the neutrals and textures, feel free to go bold with big earrings or a chunky necklace. Layer over a light sweater if it’s extra chilly. And for a mild winter, go for shorts and show off those legs.

How To Customize A Crochet Cardigan
The construction of the Whimsical Cardigan Dress allows for some customizing, let’s go through making this the perfect winter garment for you.
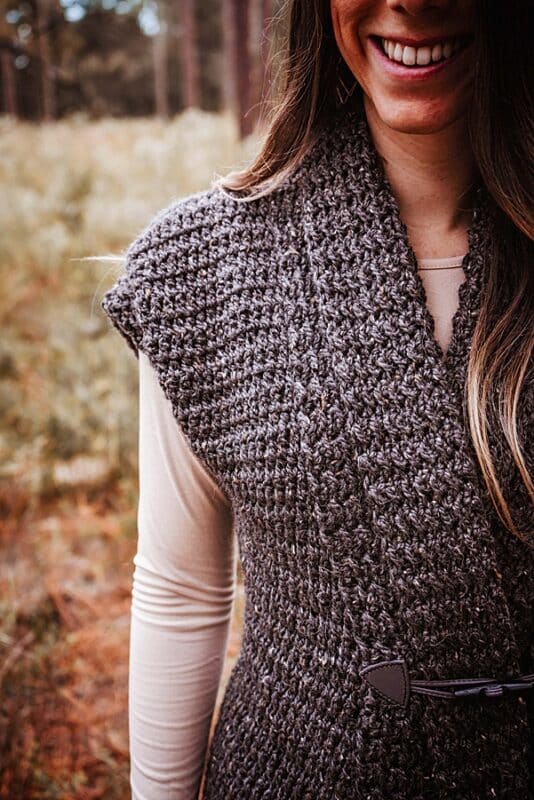
Crochet A Thicker Front Trim
If you’ve created the trim, and don’t feel like it’s enough, keep adding more rows. Or if you want to wear this open on the front, less trim will decrease that overlap.
Wear As A Cardigan or Duster
Can this be worn as a cardigan? Yes! Leave off the toggles and it’s simply a cute, open-front, cardigan. You can even use a belt to add a little style.
Wear As A Dress or Short Cardigan
Want this a bit longer? Or shorter? Before splitting for the arms, hold up the garment around your body and see how you like the length. Add more rows for more length or do fewer rows for a shorter length. Remember, there will be a trim on the bottom, but that can also be adjusted. The trim is where you will really fine-tune your custom length.
How to Adjust the Cardigan Sleeve Length
Want sleeves? Slip stitch around the sleeve opening as instructed, but then work the Ehdc between the stitches for the main part of the arms. Decrease stitches as you work the sleeve to taper towards the wrist. Then top off your wrist with the same stitch as used for the front trim.
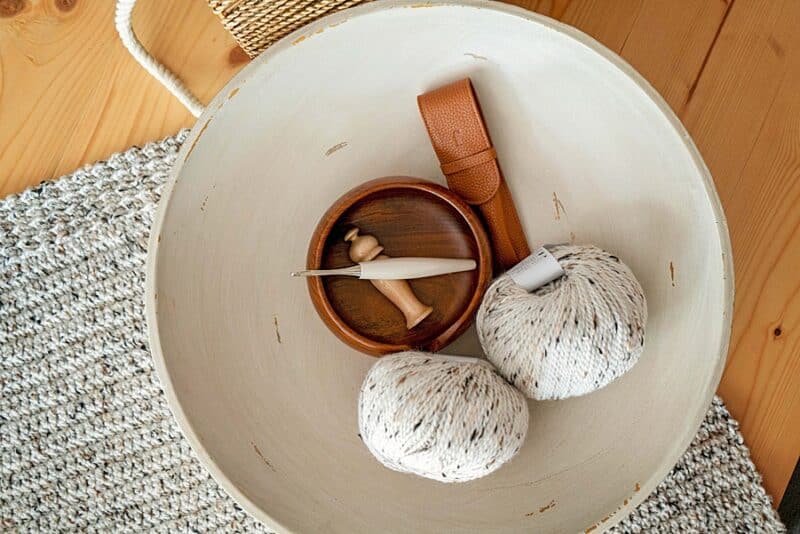
About the Yarn & Substitutes:
This crochet cardigan pattern uses City Tweed Aran Yarn from WeCrochet.
It’s one of the prettiest yarns on the market and does all the fancy texture for you. Let the tweed and luxurious fibers do the talking. No need for anything fancy, this yarn takes care of the cozy and classic style.
Here are yarn suggestions for substitutes:
Simply Alpaca Aran, 100% Superfine Alpaca (246 yds/100g)
About the Techniques Used:
The unique, double-sided, texture in the pattern is created by working the Extended Half Double Crochet Between Stitches. This is a fun stitch to learn and use. If you want to practice this stitch I have two free patterns on the blog that use this pretty texture:
Ehdc Between Stitches Free Crochet Beanie Hat Pattern
Extended Half Double Crochet Between Stitches Pattern
Ehdc Between Stitches Video Tutorial

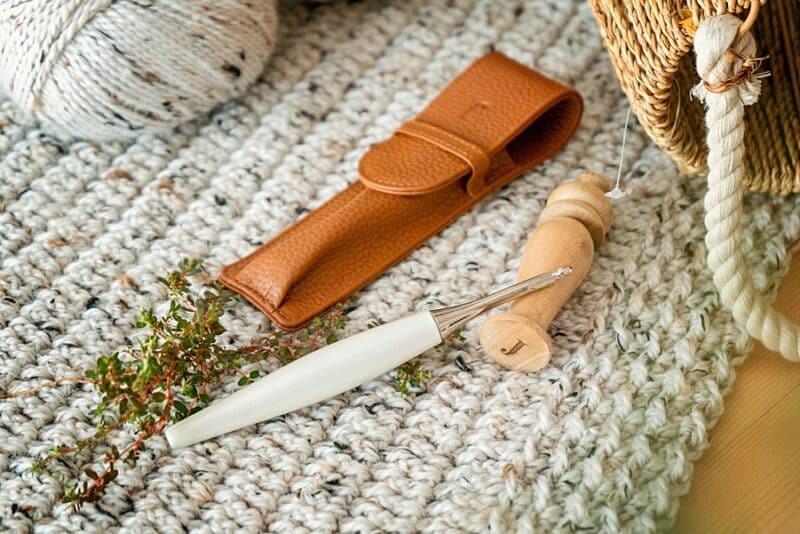
What you will need to crochet the cardigan dress:
Crochet Hook:
Notions:
Removable stitch markers if needed
Yarn needle to weave in ends
Scissors
Front Fastener/Closure Toggles (3)
Yarn:
WeCrochet City Tweed (Aran/HW Weight, 55% Merino Wool, 25% Superfine Alpaca, 20% Donegal Tweed, 164 yds/150 m, 100 g)
Colorways Shown: Snowbank or Obsidian
9 (10, 10, 11, 11) (12, 13, 14, 15) balls
Yardage:
XSmall: 1,450 yds (1,325 m)
Small: 1,500 yds (1,372 m)
Medium: 1,550 yds (1,417 m)
Large: 1,650 yds (1,509 m)
1X: 1,800 yds (1,646 m)
2X: 1,950 yds (1,783 m)
3X: 2,100 yds (1,920 m)
4X: 2,250 yds (2,057 m)
5X: 2,400 yds (2,195 m)
Abbreviations/Stitches:
blo – back loop only
ch – chain
ehdc – extended half double crochet
sc – single crochet
sc3tog – single crochet 3 sts together
sl st – slip stitch
Stsc – stacked single crochet
st(s) -stitch(es)
Gauge:
11 sts by 8 rows = 4” square in ehdc between stitches
Skill Level:
Easy/Beginner
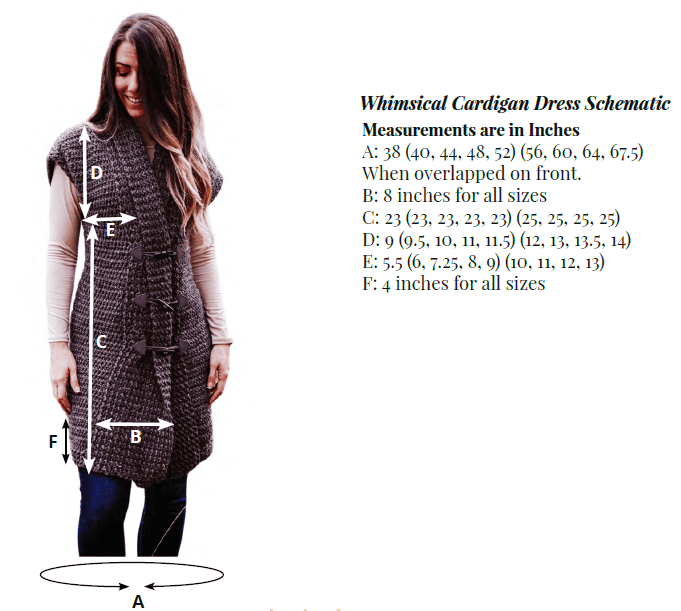
Size/Measurements:
Finished Bust Sizes
XSmall: 38” (96 cm)
Small: 40” (102 cm)
Medium: 44” (112 cm)
Large: 48” (122 cm)
1X: 52” (132 cm)
2X: 56” (142 cm)
3X: 60” (152 cm)
4X: 64” (163 cm)
5X: 67.5” (171 cm)
This garment has 8-10 inches of ease.
Crochet Cardigan Notes:
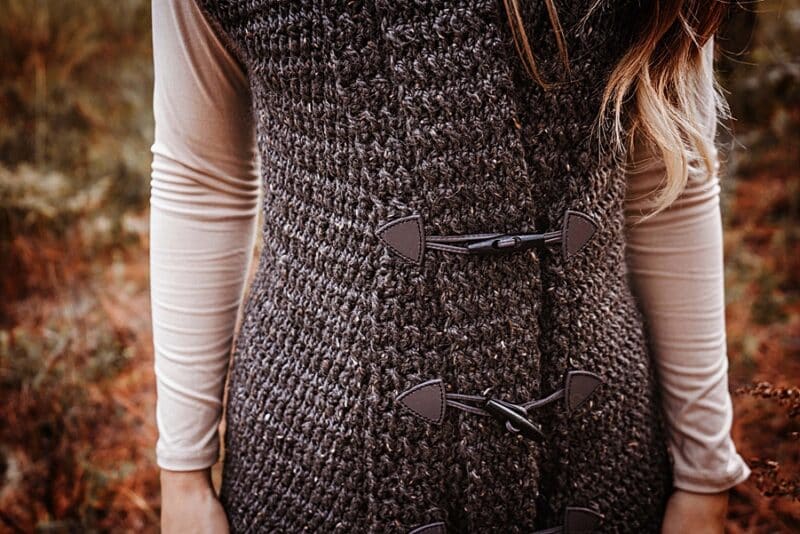
The Whimsical Crochet Dress is worked in rows starting from the bottom to the underarm. It’s then split into three panels for the front right, back, and front left. The shoulders are seamed and then a bottom trim is added. The front trim is then worked around the front opening. The same trim is used around the arms for a pop of texture. Last, toggles are sewn on for a finishing touch.
Whimsical Crochet Cardigan Dress Video Tutorial

Purchase the ad-free pdf on Etsy or Ravelry.
Click the box below to unlock this exclusive subscriber content for free. Add your email and create a password. If you are having trouble, reset your password or log in to the Grow Portal.
I’m thrilled to share this amazing crochet pattern with you! Please don’t copy, paste, or distribute this pattern. Prefer an ad-free experience? Purchase a digital PDF file for a small fee from one of my online stores. I appreciate your support and readership. You are why I can keep doing what I love and sharing it with others. Thank you from the bottom of my heart.
Written Instructions for the Whimsical Cardigan Dress
More Notes:
Sizes are written as: XS ( S, M, L, 1X) (2X, 3X, 4X, 5X)
When working in rows use a Stacked Single Crochet instead of a chain 1.
Use a stitch marker to keep track of the first stitch in the row.
Special Stitches:
Extended Half Double Crochet (ehdc): https://youtu.be/bf4XbL7Mn50
Ehdc: Yo, insert hook into stitch, yo, pull up a loop, yo and draw through the first loop only forming a chain stitch., yo and draw through remaining loops on hook.
Body
Row 1:
Ch 82 (88, 100, 110, 122) (132, 144, 154, 164) and Stsc in the first chain from the hook, ehdc in each remaining sts across, turn. St Count: 82 (88, 100, 110, 122) (132, 144, 154, 164)
Row 2:
Stsc between the first two ehdc sts in the row, ehdc between each st across until the last st, ehdc in the last, turn. St Count: 82 (88, 100, 110, 122) (132, 144, 154, 164)
Repeats:
Repeat Row 2 for 46 (46, 46, 46, 46) (50, 50, 50, 50) total rows or until desired length from underarm to thigh, minus 1-3 inch trim (you will determine what thickness of trim preferred later on. St Count: 82 (88, 100, 110, 122) (132, 144, 154, 164)
Separate for Arms
Right Section Panel
Row 1:
Stsc between the first two ehdc sts in the row, ehdc between each st across for 14 (16, 19, 21, 24) (27, 29, 32, 35)sts, turn leaving the remaining sts unworked. St Count: 15 (17, 20, 22, 25) (28, 30, 33, 36)
Row 2:
Stsc between the first two ehdc sts in the row, ehdc between each st across until the last st, ehdc in the last, turn. St Count: 15 (17, 20, 22, 25) (28, 30, 33, 36)
Repeats:
Repeat Row 2 for 18 (19, 20, 22, 23) (24, 26, 27, 28) total rows for the armhole depth. Fasten off leaving a tail for seaming. St Count: 15 (17, 20, 22, 25) (28, 30, 33, 36)
Center Back Section Panel
Row 1:
With the same side facing as with Row 1 of the Right Section Panel, attach yarn to the next space between sts left of the last stitch worked on the Right Section. Stsc in the space, ehdc between each st across for 51 (53, 59, 65, 71) (75, 83, 87, 91) sts, turn leaving the remaining sts unworked. St Count: 52 (54, 60, 66, 72) (76, 84, 88, 92)
Row 2:
Stsc between the first two ehdc sts in the row, ehdc between each st across until the last st, ehdc in the last, turn. St Count: 52 (54, 60, 66, 72) (76, 84, 88, 92)
Repeats:
Repeat Row 1 for 18 (19, 20, 22, 23) (24, 26, 27, 28) total rows for the armhole depth. Fasten off. St Count: 52 (54, 60, 66, 72) (76, 84, 88, 92)
Left Section Panel
Row 1:
With the same side facing as with Row 1 of the Right Section Panel, attach yarn to the next space between sts left of the last stitch worked on the Center Back Section. Stsc in the space, ehdc between each st across for 14 (16, 19, 21, 24) (27, 29, 32, 35)sts, turn. St Count: 15 (17, 20, 22, 25) (28, 30, 33, 36)
Row 2:
Stsc between the first two ehdc sts in the row, ehdc between each st across until the last st, ehdc in the last, turn. St Count: 15 (17, 20, 22, 25) (28, 30, 33, 36)
Repeats:
Repeat Row 2 for 18 (19, 20, 22, 23) (24, 26, 27, 28) total rows for the armhole depth. Fasten off, leaving a tail for seaming. St Count: 15 (17, 20, 22, 25) (28, 30, 33, 36)
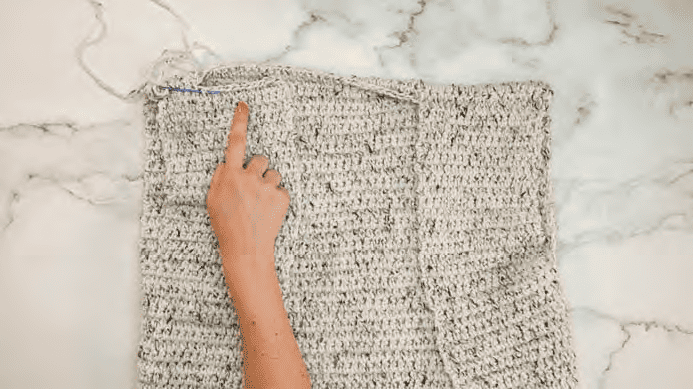
Seaming Shoulders
With the wrong side facing, lay the garment flat. Fold in the left and right sections. Seam the top 15 (17, 20, 22, 25) (28, 30, 33, 36) stitches to the first 15 (17, 20, 22, 25) (28, 30, 33, 36) stitches from each side of the center back panel. See image.
Bottom Trim
Row 1 (RS):
With the right side of the garment facing, and the garment upside down (the arm holes are closest to you), attach yarn to the bottom right corner and join.
Stsc in first, sl st in next,* hdc in next, sl st in next*; repeat from * to * across, turn.
St Count: 82 (88, 100, 110, 122) (132, 144, 154, 164)
Repeats:
Stsc in first, sl st in next,* hdc in next, sl st in next*; repeat from * to * across, turn.
Repeat this step for an odd number of rows. For the sample 9 rows were crocheted, but feel free to customize to your desired length. Continue to Front Trim.
St Count: 82 (88, 100, 110, 122) (132, 144, 154, 164)
Front Trim
Row 1 (RS):
Rotate your garment to begin to work around the front opening. The right side of the garment will be facing you and the front trim will start at the bottom left corner of the cardigan opening. Ch 1 on the corner, sl st around the opening placing approx 3 sl sts per 2 rows and sl st in each st along the back of the neck. Keep your tension relaxed on the sl sts so they don’t cause any pulling or puckering of the front. End with an even st count. St Count: Even number of stitches.
Repeats:
Stsc in first, sl st in next,* hdc in next, sl st in next*; repeat from * to * across, turn.
Repeat this step for 25 rows, but feel free to customize to your desired width.

Short Sleeve Arms
Set Up:
With the right side facing, attach yarn to the underarm and join. Sl st 50 (50, 50, 54, 54) (56, 56, 58, 58) stitches evenly around the opening, join. St Count: 50 (50, 50, 54, 54) (56, 56, 58, 58)
Row 1 (RS):
Working in the blo of the sl stitches, Stsc in first, sl st in next,* hdc in next, sl st in next*; repeat from * to * around, join and turn. St Count: 50 (50, 50, 54, 54) (56, 56, 58, 58)
Row 2 (WS):
Stsc in first, sl st in next,* hdc in next, sl st in next*; repeat from * to * around, join and turn. St Count: 50 (50, 50, 54, 54) (56, 56, 58, 58)
Repeats:
Repeat rounds 1-2 for an odd number of rounds. For the sample, 5 rounds were crocheted, but feel free to customize to your desired sleeve length. Fasten off and weave in ends.
Finishing
Attach the toggles to the front by sewing them in place, and block if necessary. Wear and enjoy!
Well, That Was Fun! What’s Next?