Granny All the Way Stocking Collection
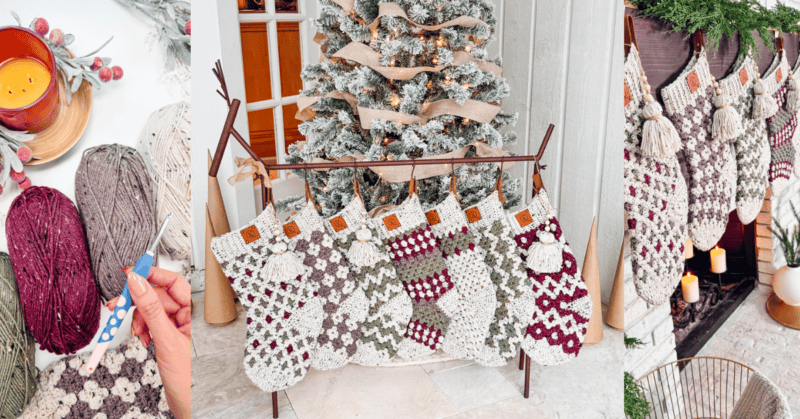
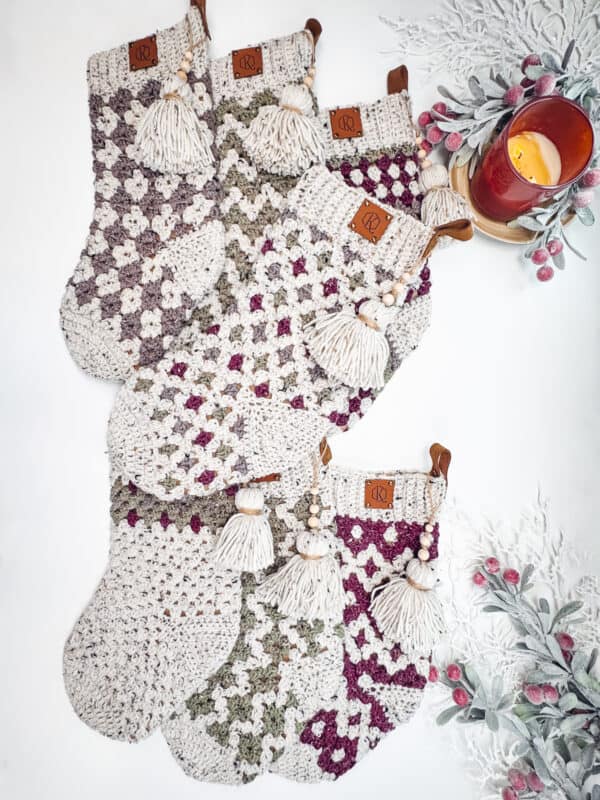
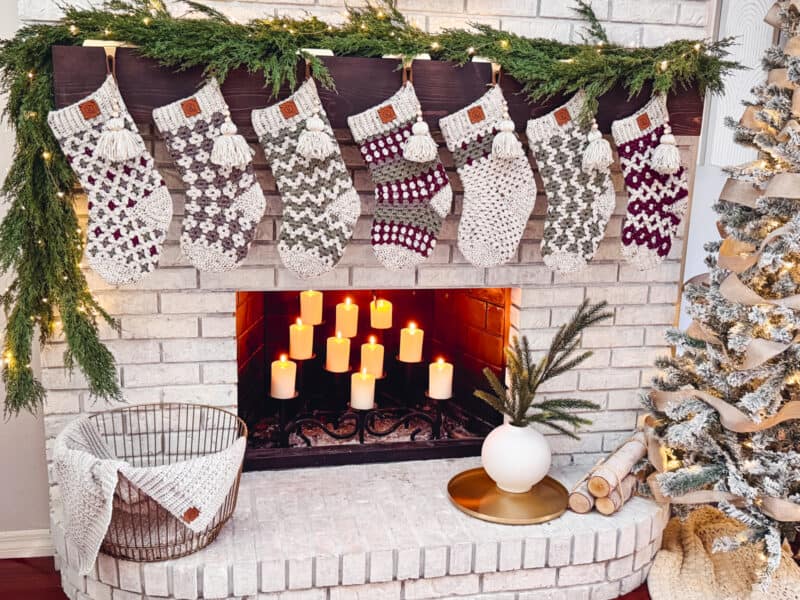
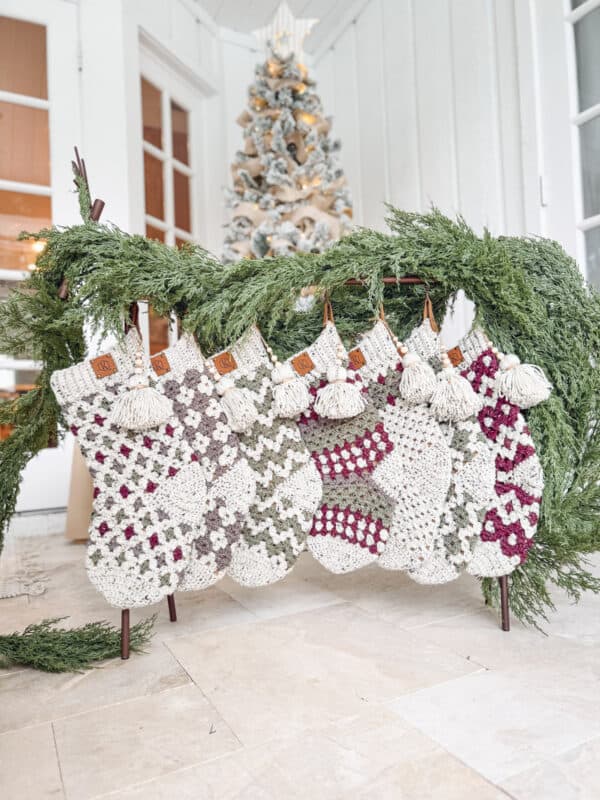
The Granny All the Way Stockings crochet pattern set features seven unique granny stitch stockings, each with its own delightful colorwork design! These fun and festive stockings are perfect for adding a cozy, handmade touch to your holiday decorations. Whether you hang them by the fireplace or use them as cheerful accents around the house, they’ll bring joy for years to come. With their timeless charm, these stockings are sure to become a treasured part of your holiday traditions! Make a coordinating Hexagon Granny Stocking, Festive Wheat Stocking, or Textured Stocking (with Gift Card Holder) to add even more cheer to your home!
Disclosure: This post contains affiliate links. Please read my disclosure for more info.
Once you crochet these stockings, you will want to make the matching Granny All the Way Ornament Collection.
Crochet Supplies
Yarn
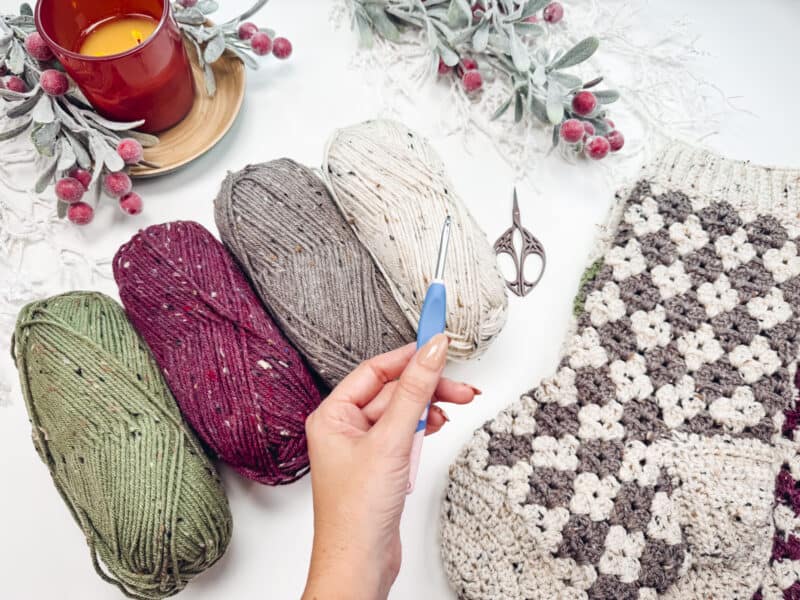
Brava Tweed Worsted
97% Premium Acrylic, 3% Viscose 218yds/100g
Colorways SHown: Wren, Wasabi, Mink, & Boysenberry
Yarn Quantities
Approx 265 total yards per stocking.
Each stocking will use different amounts of the different colors.
Yarn Substitutions
Brava Worsted
100% Premium Acrylic, 218yds/100g
Mighty Stitch
80% Acrylic, 20% Superwash Wool 208yds/100g
Mary Maxim Starlette Worsted
100% Ultra Soft Acrylic, 180yds/100g
Remember always to check the gauge and drape when substituting yarns.
Crochet Hook
Size US H (5.0mm) Crochet Hook or hook to obtain gauge.
Notions
Scissors
Yarn Needle
Removable Stitch Marker
Skill Level
Advanced Beginner
What you’ll love about this pattern.
🩶 Timeless Granny Stitch – The classic look of the granny stitch makes these stockings perfect heirloom pieces.
🩶 Rhythmic and Relaxing – The flow of the stitch is relaxing! Turn on some holiday music and let your fingers dance!
🩶 Customizable – Use colors of your choosing and add flair to your stocking with tassels, bells, beads, or leather tags.
One Size
Stocking measures approximately 17.5″ long and 6.5″ wide.
Abbreviations
blo – back loop only
ch – chain
dc – double crochet
RS – right side
sc – single crochet
sl st – slip stitch
st(s) – stitch(es)
Stsc – Stacked Single Crochet
WS – wrong side
Gauge
15 sts and 19 rows = 4″ by 4″ in granny st pattern with 5.0mm hook
How to Crochet A Gauge Swatch
Working a gauge swatch will let you know if you will have the correct sizing for this pattern. It will also help you practice the stitches used in this project and improve your stitch work for a flawless look.
Are you struggling to match the gauge? Check out the blog post on What is Crochet Gauge and How To Fix It
Construction
The Granny All the Way Stockings are easy-peasy to make, and they work up quickly. We’ll start by creating a toe, and then we’ll work the body of the stocking in the chosen granny stitch colorwork design, leaving an opening for the heel. Then, we’ll add a simple ribbing to the top and add the heel and a hanging loop to finish. Feel free to add other embellishments like tassels, bells, or even little Christmas trees, like the one from my Advent Calendar.
Looking for more colorwork stockings? Check out the White Spruce Stocking and the Prancing Deer Stocking!
Special Stitches
Stacked Single Crochet (Stsc): Do NOT chain, insert hook into next stitch, yo, pull up a loop, yo and pull through both loops, insert hook in the vertical bar below, yo, pull up a loop, yo and pull through both loops on the hook.
Pattern Notes
- A ch 1 at the beginning of a row is not counted as a stitch.
- Using a stitch marker at the beginning of each row is recommended.
- Keep the blo sc sts loose for the ribbing. Making them too tight will result in the top of the stocking being too tight.
- Each stocking will have the same instructions for the Toe, Top Ribbing, and Heel. The Body sections will vary depending on the desired colorwork style.
Subscribe & Like
Video Tutorial for the Granny All the Way Stockings Part 1
Relax & Crochet
Upgrade to the Printable PDF
Beautifully formatted to print and relax while crocheting. The paid pattern includes:
The Ad-Free PDF can be purchased on Etsy or Ravelry.

Click the box below to unlock this exclusive subscriber content for free. Add your email and create a password. If you are having trouble, reset your password or login to the Grow Portal.
I’m thrilled to share this amazing crochet pattern with you! Please don’t copy, paste, or distribute this pattern. Prefer an ad-free experience? Purchase a digital PDF file for a small fee from one of my online stores. I appreciate your support and readership. You are why I can keep doing what I love and sharing it with others. Thank you from the bottom of my heart.
Written Crochet Pattern Instructions
Join The Kindest Community
Join our vibrant community of crafters on Facebook today. Whether you enjoy crafting with others or simply have burning questions, we’ve got you covered – join us now!
Video Tutorial for the Granny All the Way Stockings Part 2
Stocking Body
The next sections are for customizing the look of your stocking and granny stitch colorwork. Choose which of the following 7 pattern options you like best for the body of the stocking.
Style
Feel free to use any colors you prefer for these stockings. Make a Taylor Swift-inspired striped stocking or a rainbow polka dot stocking. The color combinations are truly endless with this collection! Whip up a few Hexagon Ornaments and Autumn Wheat Baubles to use up those leftover yarn scraps when you’re done making your stockings!
Small Diamonds Stocking
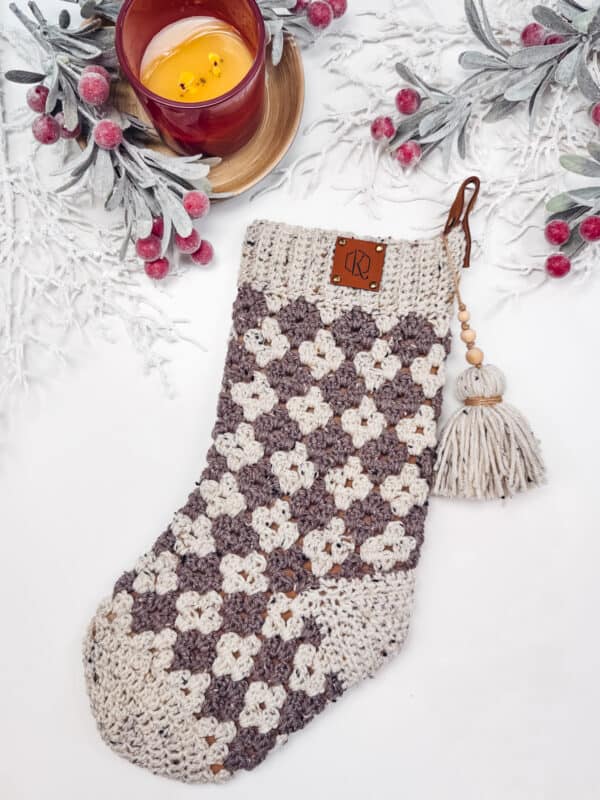
Rnd 1 (WS):
Stsc in the first, 2 dc in same st, skip 2 sts, *3 dc in next st, skip 2 sts; repeat from * around, join to top of Stsc with Color D, turn. | 48 sts, 16 granny groups
Rnd 2 (RS):
Working into the first space, Stsc, 2 dc in same space, *with Color A 3 dc in next space, with Color D 3 dc in next space; repeat from * around until the last space, with Color A 3 dc in last space, join to top of Stsc with Color D, turn.
Rnd 3:
Working into the first space, Stsc, 2 dc in same space, *3 dc in next space; repeat from * around, join to top of Stsc, turn.
Rnd 4:
Repeat Rnd 2, change to Color A at the end of the Rnd.
Rnd 5:
Working into the first space, Stsc, 2 dc in same space, *3 dc in next space; repeat from * around, join to top of Stsc with Color D.
Rnds 6-9:
Repeat Rnds 2-5.
Rnd 10:
Repeat Rnd 2.
Rnd 11:
Working into the first space, Stsc, 2 dc in same space, [3 dc in next space] 8 times; ch 22, skip the remaining sts in the round, join to top of Stsc with Color D, turn. | 9 granny groups, and 22 ch sts
Rnd 12:
Stsc in the first ch, 2 dc in same ch, skip 2 chs, [with Color A 3 dc in next ch, skip 2 chs, with Color D 3 dc in next ch, skip 2 chs] 3 times; skip 2 chs, with Color A 3 dc in last ch st, [with Color D 3 dc in next space, with Color A dc in next space] 4 times, join to top of Stsc with Color D, turn. | 48 sts, 16 granny groups
Rnd 13:
Repeat Rnd 5.
Rnds 14-25:
Repeat Rnds 2-5 an additional 3 times.
Rnds 26-28:
Repeat Rnds 2-4.
Fasten off Color D. Go to Top Ribbing.
Zig Zag Stocking
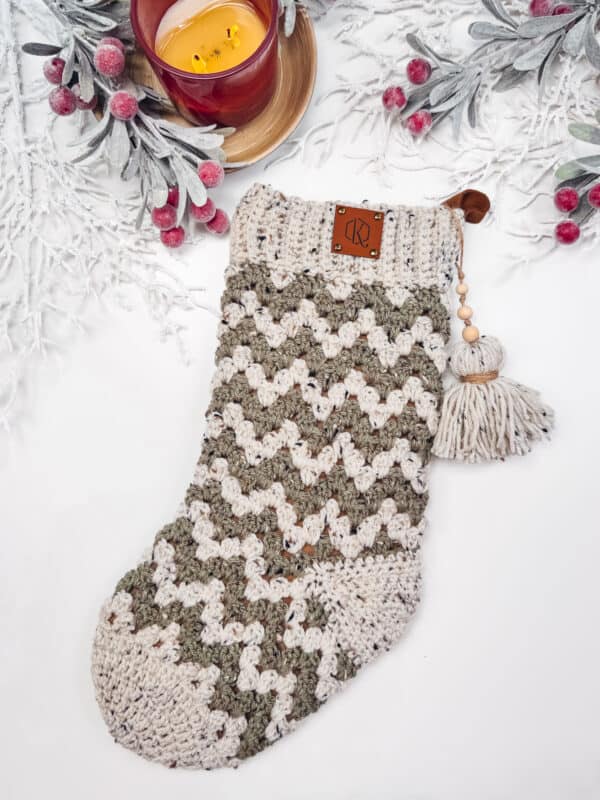
Rnd 1 (WS):
Stsc in the first, 2 dc in same st, skip 2 sts, *3 dc in next st, skip 2 sts; repeat from * around, join to top of Stsc with Color C, turn. | 48 sts, 16 granny groups
Rnd 2 (RS):
Working into the first space, Stsc, 2 dc in same space, *with Color A 3 dc in next space, with Color C 3 dc in next space; repeat from * around until the last space, with Color A 3 dc in last space, join to top of Stsc with Color C, turn.
Rnd 3:
Working into the first space, Stsc, 2 dc in same space, *3 dc in next space; repeat from * around, join to top of Stsc with Color A, turn.
Rnd 4:
Working into the first space, Stsc, 2 dc in same space, *with Color C 3 dc in next space, with Color A 3 dc in next space; repeat from * around until the last space, with Color C 3 dc in last space, join to top of Stsc with Color A, turn.
Rnd 5:
Working into the first space, Stsc, 2 dc in same space, *3 dc in next space; repeat from * around, join to top of Stsc with Color C, turn.
Rnds 6-9:
Repeat Rnds 2-4
Rnd 10:
Repeat Rnd 2.
Rnd 11:
Working into the first space, Stsc, 2 dc in same space, [3 dc in next space] 8 times; ch 22, skip the remaining sts in the round, join to top of Stsc with Color A, turn. | 9 granny groups, and 22 ch sts
Rnd 12:
Stsc in the first ch, 2 dc in same ch, skip 2 chs, [with Color C 3 dc in next ch, skip 2 chs, with Color A 3 dc in next ch, skip 2 chs] 3 times; skip 2 chs, with Color C 3 dc in last ch, [with Color A 3 dc in next space, with Color C 3 dc in next space] 4 times, join to top of Stsc with Color A, turn. | 48 sts, 16 granny groups
Rnd 13:
Repeat Rnd 5.
Rnds 14-25:
Repeat Rnds 2-5 an additional 3 times.
Rnds 26-28:
Repeat Rnds 2-4.
Fasten off Color C. Go to Top Ribbing.
Gemstone Stocking
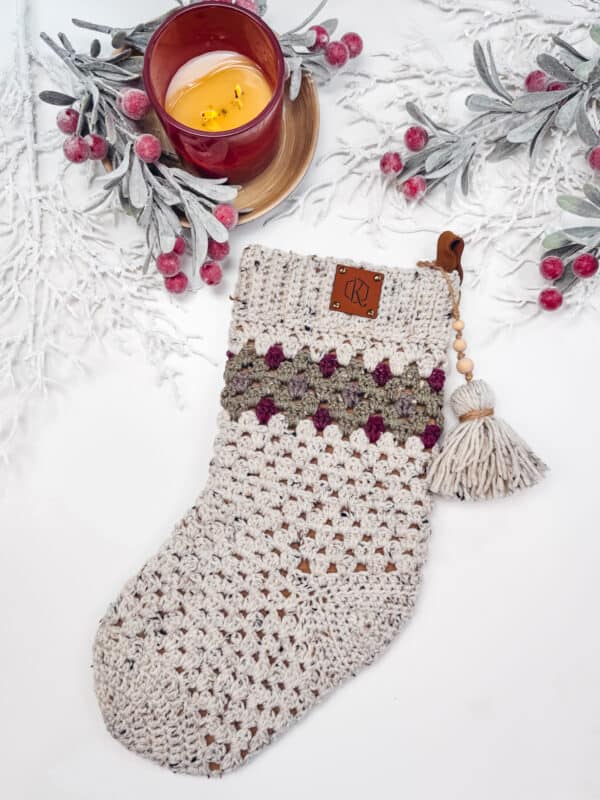
Rnd 1 (WS):
Stsc in the first, 2 dc in same st, skip 2 sts, *3 dc in next st, skip 2 sts; repeat from * around, join to top of Stsc, turn. | 48 sts, 16 granny groups
Rnd 2 (RS):
Working into the first space, Stsc, 2 dc in same space, *3 dc in next space; repeat from * around, join to top of Stsc, turn.
Rnds 3-10:
Repeat Rnd 2.
Rnd 11:
Working into the first space, Stsc, 2 dc in same space, [3 dc in next space] 8 times; ch 22, skip the remaining sts in the round, join to top of Stsc, turn. | 9 granny groups, and 22 ch sts
Rnd 12:
Stsc in the first ch, 2 dc in same ch, skip 2 chs, *3 dc in next ch, skip 2 chs; repeat from * across the chs until the last ch, 3 dc in last ch, 3 dc in the remaining spaces between granny groups around, join to top of Stsc, turn. | 48 sts, 16 granny groups
Rnds 13-20:
Repeat Rnd 2.
Rnd 21:
Stsc, 2 dc in same st, skip 2 sts, *3 in next st, skip 2 sts; repeat from * around, join to top of Stsc with Color B. Fasten off Color A.
Rnd 22:
Working into the first space, Stsc, 2 dc in same space, *with Color C 3 dc in next space, with Color B 3 dc in next space; repeat from * around until the last space, with Color C 3 dc in last space, join and turn. Fasten off Color B.
Rnd 23:
Working into the first space, Stsc, 2 dc in same space, *3 dc in next space; repeat from * around, join and turn.
Rnd 24:
Working into the first space, Stsc, 2 dc in same space, *with Color D 3 dc in next space, with Color C 3 dc in next space; repeat from * around until the last space, with Color D 3 dc in last space, join to top of Stsc with Color C, turn. Fasten off Color D.
Rnd 25:
Repeat Rnd 3, joining with Color B at the end of the Rnd.
Rnd 26:
Repeat Rnd 2, joining at the end of the Rnd with Color A. Fasten off all other colors.
Rnd 27:
Working into the first space, Stsc, 2 dc in same space, *3 dc in next space; repeat from * around, join and turn.
Rnd 28:
Repeat Rnd 2. Do not fasten off and go to Top Ribbing.
Large Diamond Stocking
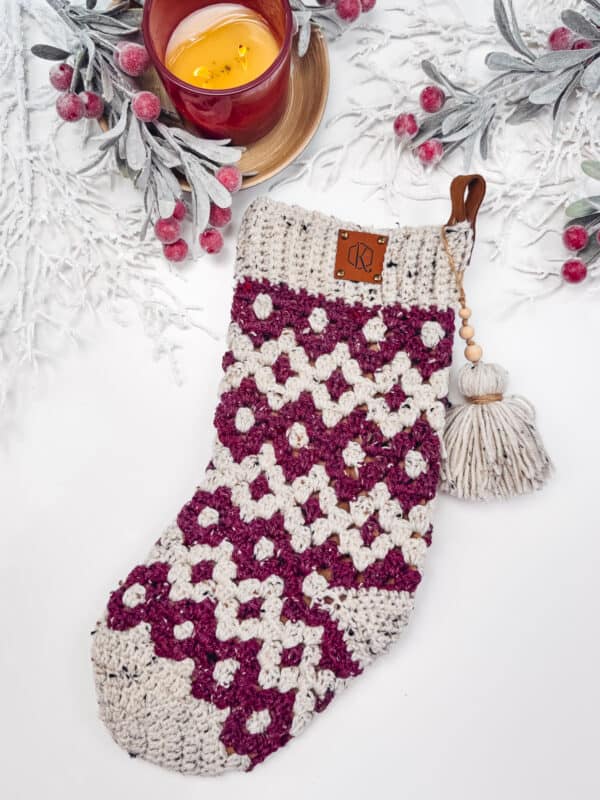
Rnd 1 (WS):
With Color B, Stsc in the first, 2 dc in same st, skip 2 sts, with Color A 3 dc in next st, skip 2 sts, *with Color B 3 dc in next space, skip 2 sts, with Color A 3 dc in next st, skip 2 sts; repeat from * around, join to top of Stsc with Color B, turn. | 48 sts, 16 granny groups
Rnd 2 (RS):
With Color B, Stsc in first space, 2 dc in same space, *3 dc in next space; repeat from * around, join and turn.
Rnd 3:
With Color A, Stsc in first space, 2 dc in same space, *with Color B 3 dc in next space, with Color A 3 dc in next space; repeat from * around until the last space, with Color B 3 dc in last space, join and turn.
Rnd 4:
Repeat Rnd 2.
Rnd 5:
With Color B, Stsc in first space, 2 dc in same space, with Color A 3 dc in next space, *with Color B 3 dc in next space, with Color A 3 dc in next space; repeat from * around, join and turn.
Rnd 6:
With Color A, Stsc in first space, 2 dc in same space, *3 dc in next space; repeat from * around, join and turn.
Rnd 7:
Repeat Rnd 3.
Rnd 8:
Repeat Rnd 6.
Rnd 9:
Repeat Rnd 5.
Rnd 10:
Repeat Rnd 2.
Rnd 11:
With Color A, Stsc in first space, 2 dc in same space, with Color B 3 dc in next space, [with Color A 3 dc in next space, with Color B 3 dc in next space] three times, with Color A 3 dc in next space; ch 22, skip the remaining sts in the round, join to top of Stsc with Color B, turn.| 9 granny groups and 22 ch sts
Rnd 12:
Stsc in the first ch, 2 dc in same ch, skip 2 chs, *3 dc in next ch, skip 2 chs; repeat from * across the chs until the last ch, 3 dc in last ch, 3 dc in the remaining spaces between granny groups around, join to top of Stsc, turn. | 48 sts, 16 granny groups
Rnds 13-18:
Repeat Rnds 5-10.
Rnds 19-26:
Repeat Rnds 3-10.
Rnds 27-28:
Repeat Rnds 3-4.
Change to Color A and fasten off Color B. Go to Top Ribbing.
Granny Stripes Stocking
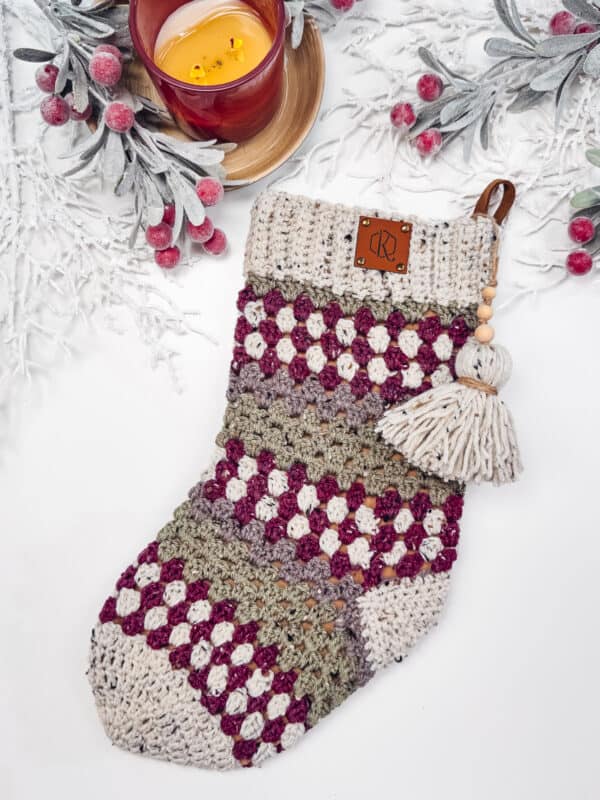
Tip: Carry the yarn up the inside of the stocking unless it will be carried multiple rows. Fasten off and reattach as needed.
Rnd 1 (WS):
With Color B, Stsc in the first, 2 dc in same st, skip 2 sts, *3 dc in next st, skip 2 sts; repeat from * around, join to top of Stsc with Color A, turn. | 48 sts, 16 granny groups
Rnd 2 (RS):
Stsc in first space, 2 dc in same space, *3 dc in next space; repeat from * around, join with Color B, turn.
Rnd 3:
Stsc in first space, 2 dc in same space, *3 dc in next space; repeat from * around, join with Color A, turn.
Rnds 4-5:
Repeat Rnds 2-3, at the end of Rnd 5 change to color C, turn.
Rnds 6-9:
Stsc in first space, 2 dc in same space, *3 dc in next space; repeat from * around, join and turn. At the end of Rnd 8 change to Color D.
Rnd 10:
Stsc in first space, 2 dc in same space, *3 dc in next space; repeat from * around, join and turn.
Rnd 11:
Working into the first space, Stsc, 2 dc in same space, [3 dc in next space] 8 times; ch 22, skip the remaining sts in the round, join to top of Stsc with Color B, turn. | 9 granny groups and 22 ch sts
Rnd 12:
Stsc in the first ch, 2 dc in same ch, skip 2 chs, *3 dc in next ch, skip 2 chs; repeat from * across the chs until the last ch, 3 dc in last ch, 3 dc in the remaining spaces between granny groups around, join to top of Stsc with Color A, turn. | 48 sts, 16 granny groups
Rnds 13-21:
Repeat Rnds 2-10.
Rnd 22:
Repeat Rnd 10, changing to Color B at the end of the rnd.
Rnd 23:
Repeat Rnd 3.
Rnds 24-28:
Repeat Rnds 2-6.
Change to Color A and fasten off all colors. Go to Top Ribbing.
Video Tutorial for the Granny All the Way Stockings Part 2
Alternating Diamonds Stocking
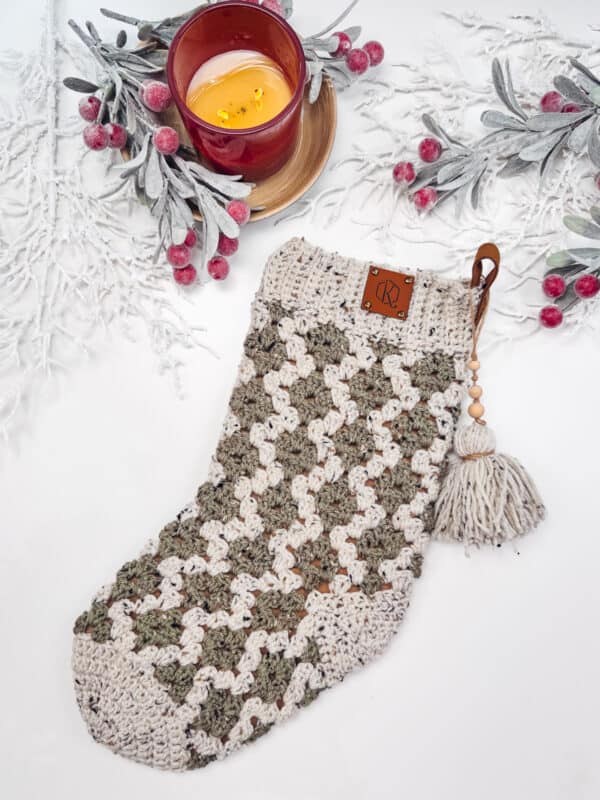
Rnd 1 (WS):
With Color C, Stsc in the first, 2 dc in same st, skip 2 sts, *[with Color A 3 dc in next st, skip 2 sts] twice, [with Color C 3 dc in next st, skip 2 sts] twice; repeat from * around until the last 11 sts, [with Color A 3 dc in next st, skip 2 sts] twice, with Color C 3 dc in next st, skip 2 sts, join to top of Stsc with Color C, turn. | 48 sts, 16 granny groups
Rnd 2 (RS):
Working into the first space, Stsc, 2 dc in same space, *with Color A 3 dc in next space, with Color C 3 dc in next space; repeat from * around until the last space, with Color A 3 dc in last space, join and turn.
Rnd 3:
Working into the first space, Stsc, 2 dc in same space, *with Color C 3 dc in each of the next 2 spaces, with Color A 3 dc in each of the next 2 spaces; repeat from * around until the last 3 spaces, with Color C 3 dc in each of the next 2 spaces, with Color A 3 dc in the last space, join to top of Stsc with Color C, turn.
Rnd 4:
Repeat Rnd 2.
Rnd 5:
Working into the first space, Stsc, 2 dc in same space, *with Color A 3 dc in each of the next 2 spaces, with Color C 3 dc in each of the next 2 spaces; repeat from * around until the last 3 spaces, with Color A 3 dc in each of the next 2 spaces, with Color C 3 dc in the last space, join to top of Stsc and turn.
Rnd 6:
Repeat Rnd 2.
Rnds 7-10:
Repeat Rnds 2-6.
Rnd 11:
Working into the first space, Stsc, 2 dc in same space, with Color C 3 dc in each of the next 2 spaces, with Color A 3 dc in each of the next 2 spaces, with Color C 3 dc in each of the next 2 spaces, ch 22, skip the remaining sts in the round, join to top of Stsc with Color A, turn. | 9 granny groups and 22 ch sts
Rnd 12:
Join the Color C and Stsc in the first ch, 2 dc in same ch, skip 2 chs, [with Color A 3 dc in next ch, skip 2 chs, with Color C 3 dc in next ch, skip 2 chs] 3 times; skip 2 chs, with Color A 3 dc in last ch, [with Color C 3 dc in next space, with Color A 3 dc in next space] 4 times, join to top of Stsc with Color C, turn. | 48 sts, 16 granny groups
Rnd 13:
Repeat Rnd 5.
Rnds 14-25:
Repeat Rnds 2-5 an additional 3 times.
Rnds 26-28:
Repeat Rnds 2-4.
Fasten off Color C. Go to Top Ribbing.
Polka Dot Stocking
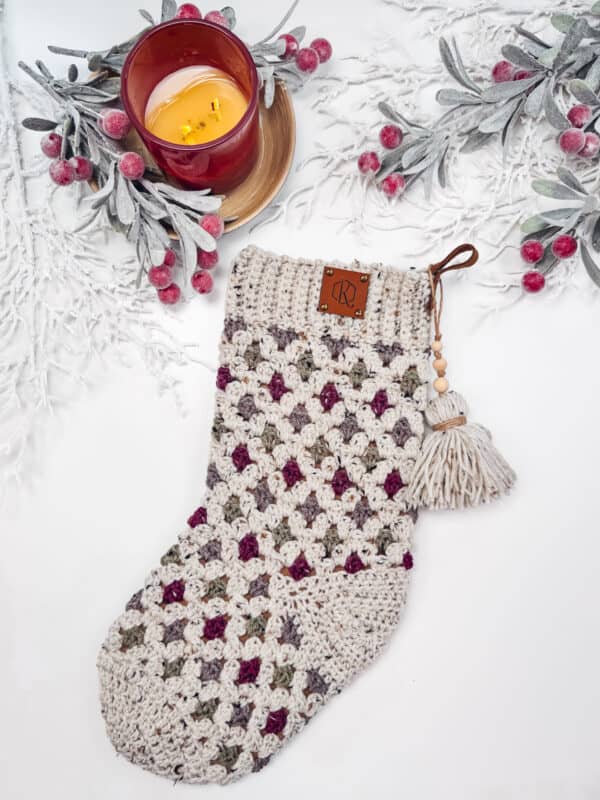
Rnd 1 (WS):
Stsc in the first, 2 dc in same st, skip 2 sts, *3 dc in next st, skip 2 sts; repeat from * around, join to top of Stsc with Color C, turn. | 48 sts, 16 granny groups
Rnd 2 (RS):
Working into the first space, Stsc, 2 dc in same space, *with Color A 3 dc in next space, with Color C 3 dc in next space; repeat from * around until the last space, with Color A 3 dc in last space, join to top of Stsc and turn.
Rnd 3:
Working into the first space, Stsc, 2 dc in same space, *3 dc in next space; repeat from * around, join to top of Stsc and turn.
Rnd 4:
Working into the first space, Stsc, 2 dc in same space, *with Color D 3 dc in next space, with Color A 3 dc in next space; repeat from * around until the last space, with Color D 3 dc in last space, join to top of Stsc with Color A, turn.
Rnd 5:
Repeat Rnd 3, joining with Color B at the end of the rnd.
Rnd 6:
Working into the first space, Stsc, 2 dc in same space, *with Color A 3 dc in next space, with Color B 3 dc in next space; repeat from * around until the last space, with Color A 3 dc in last space, join to top of Stsc and turn.
Rnd 7:
Repeat Rnd 3.
Rnd 8:
Working into the first space, Stsc, 2 dc in same space, *with Color C 3 dc in next space, with Color A 3 dc in next space; repeat from * around until the last space, with Color C 3 dc in last space, join to top of Stsc with Color A, turn.
Rnd 9:
Repeat Rnd 3, joining with the Color D at the end of the rnd.
Rnd 10:
Working into the first space, Stsc, 2 dc in same space, *with Color A 3 dc in next space, with Color D 3 dc in next space; repeat from * around until the last space, with Color A 3 dc in last space, join to top of Stsc and turn.
Rnd 11:
Working into the first space, Stsc, 2 dc in same space, [3 dc in next space] 8 times; ch 22, skip the remaining sts in the round, join to top of Stsc with Color A, turn. | 9 granny groups and 22 ch sts
Rnd 12:
Stsc in the first ch, 2 dc in same ch, skip 2 chs, [with Color B 3 dc in next ch, skip 2 chs, with Color A 3 dc in next ch, skip 2 chs] 3 times; skip 2 chs, with Color B 3 dc in last ch, [with Color A 3 dc in next space, with Color B 3 dc in next space] 4 times, join to top of Stsc with Color A, turn. | 48 sts, 16 granny groups
Rnd 13:
Repeat Rnd 3.
Rnds 14-24:
Repeat Rnds 2-12.
Rnd 25:
Repeat Rnd 3.
Rnds 26-28:
Repeat Rnds 2-4.
Fasten off Color C. Go to Top Ribbing.
Video Tutorial for the Granny All the Way Stockings Part 2
Top Ribbing
Row 1:
With Color A, ch 10 (or 25 for a foldover cuff), in blo sc in second chain from hook and across to body, sl st 2 sts on the body (these do not count as sts), turn. | 9 (24) sts
Row 2:
Skip the two sl sts from the body, blo sc in each st across, turn. | 9 (24) sts
Row 3:
Ch 1, blo sc in each st across, sl st 2 sts on the body, turn.
Repeats:
Repeat Rows 2-3 around the top of the stocking body. Join last row to beginning row by slip stitching through blo of first and last row at the same time with the WS facing.
Stocking Heel
See video for working the corners and reducing holes.
Rnd 1:
Attach Color A to the edge of the stitch from Rnd 12 on a corner, ch 1, *hdc2tog by working into the edge stitch and the first st of the rnd, hdc 22, hdc2tog by working into the next st and the edge stitch; repeat from * by working around the other side of the heel and decreasing on the corners, join and turn. | 48 sts
Rnd 2:
Ch 1, [hdc2tog, hdc 20, hdc2tog] twice, join and turn. | 44 sts
Rnd 3:
Ch 1, [hdc2tog, hdc 18, hdc2tog] twice, join and turn. | 40 sts
Rnd 4:
Ch 1, [hdc2tog, hdc 16, hdc2tog] twice, join and turn. | 36 sts
Rnd 5:
Ch 1, [hdc2tog, hdc 14, hdc2tog] twice, join and turn. | 32 sts
Rnd 6:
Ch 1, [hdc2tog, hdc 12, hdc2tog] twice, join and turn. | 28 sts
Rnd 7:
Ch 1, [hdc2tog, hdc 10, hdc2tog] twice, join and turn. | 24 sts
Fasten off leaving a long tail, fold the opening of the heel in half from top to bottom, seam the opening closed. Weave in ends.
Finishing
Use a strip of leather and a leather punch to create a hanging loop and stitch to the top of the stocking, or make an i-cord hanging loop.
Weave in all ends, wash, and lightly block if desired.
Subscribe to my youtube channel
Hanging up handmade stockings is such a joyful way to decorate for the holidays! Each one adds a unique, cozy charm that fills the room with warmth and love. Choose a favorite spot—by the fireplace, along a stair railing, or even on a wall display—and secure them with hooks or festive ribbon. The Reindeer Amigurumi and Snowman Amigurumi are perfect little projects to add to stockings for your little ones!
Cheers, and happy crocheting!
Well That Was Fun! What’s Next?
📌 PIN THIS POST – Don’t lose this project; save it to your Pinterest crochet board so you can quickly come back to it again.
💌 SHARE – Share your yarn choice, in-progress, or finished projects on Facebook or Instagram and use the hashtag #brianakdesigns
🥂 JOIN – Join the kindest crafters in the Briana K Designs Community Group on Facebook. We love yarny friends!
🔗 RAVELRY LINK -Link and share your project on Ravelry. Having inspirational photos can help crafters.


