Holiday Mug Rugs Free Knit Pattern
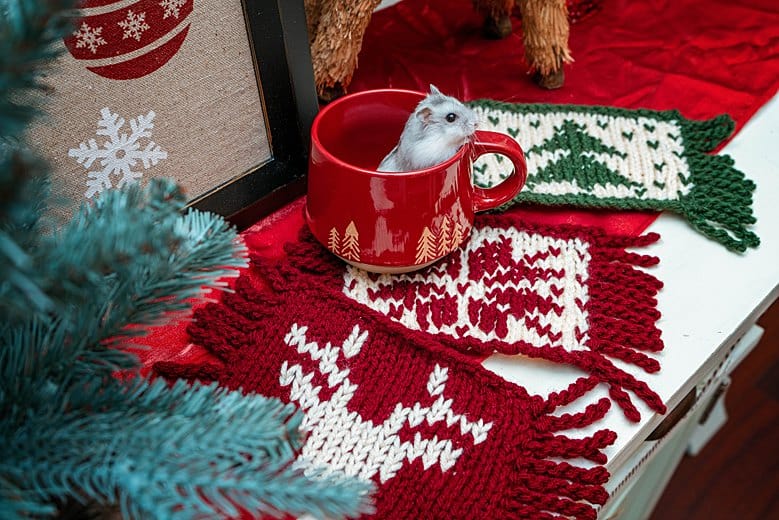
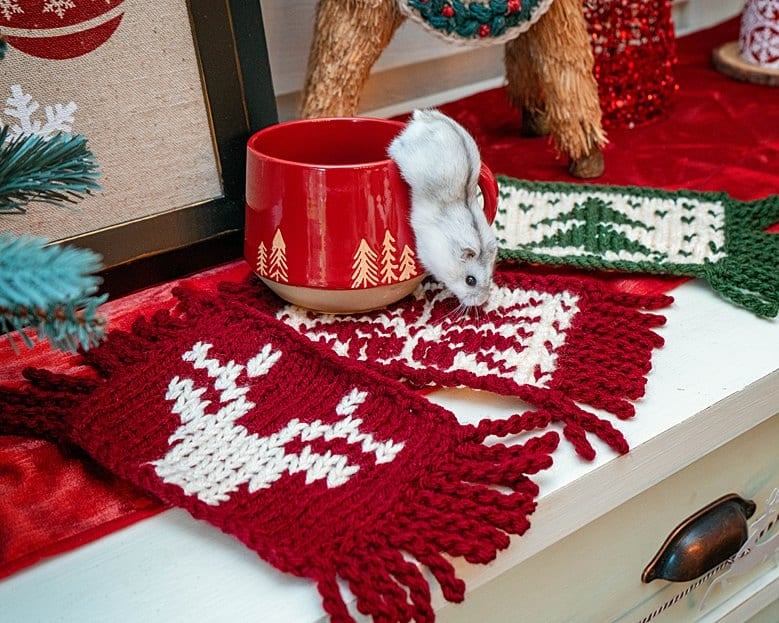
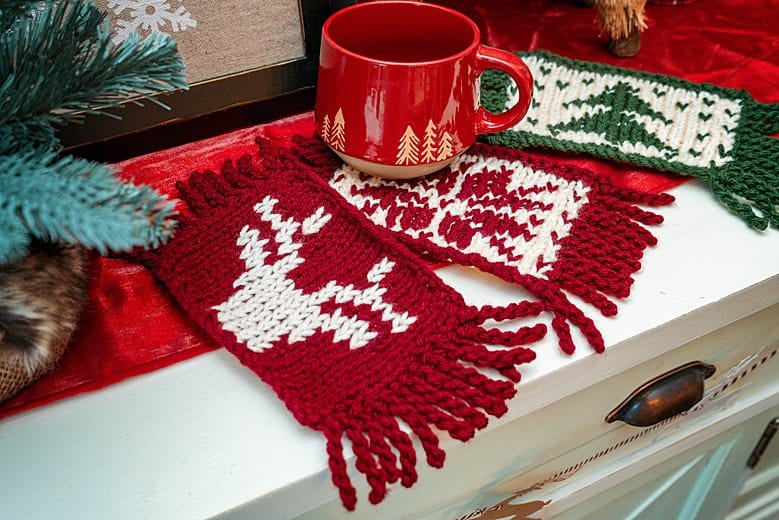
You know I can't get enough of all the holiday home decor and my little hamster buddy, Marlow. I have to say, while the Holiday Mug Rugs are for warm drinks, I could see using one as a rug for Marlows little house. He does seem to like the festive colors.
Disclosure: This post contains affiliate links, meaning I get a commission if you decide to make a purchase through my links, at no cost to you.
Prefer to use a hook? Get the Crochet Mug Rug Patterns.
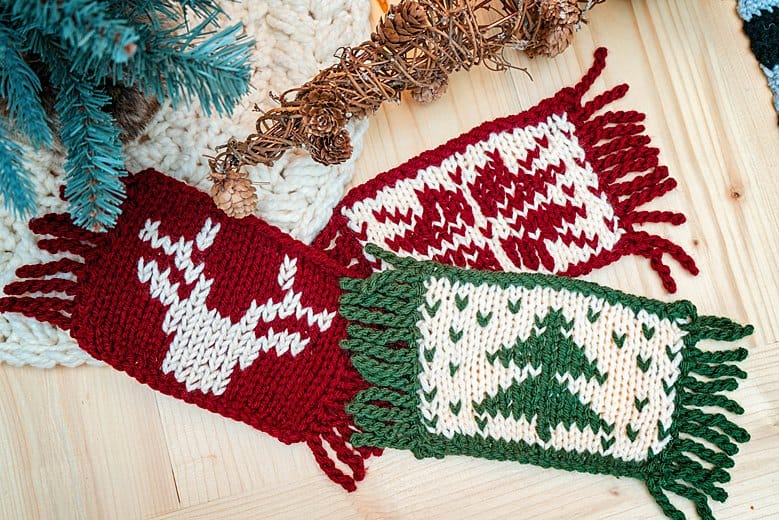
Hey hold on a second little Marlow! Where are you going?
Marlow is ready to jump right in, are you? Before you get started, take a moment to hop on over to Ways to Colorwork in Crochet. Learn about the different ways to do crochet color-work but also for a freebie!
The printable Sheep Yarn Bobbins are super helpful and also cute. You can even cut them out on a cutting machine!

Holiday Mug Rug Supplies
Knitting Needle:
5.5 mm (9), Knit Picks Needles
Notions:
Yarn Needle
Scissors
In colorways: Cream, Dublin & Wine
Yardage:
• Approx. 30 Yards [28 meters] per rug
Abbreviations/Stitches:
k- knit
p- purl
RS- Right Side
WS- Wrong Side
Gauge:
13 sts and 17 rows = 4” [10 cm]
Measurements/Sizes:
6.5 inches (16.5 cm) wide
5 inches (13 cm) tall
Without fringe
Skill Level:
Easy/Advanced Beginner
Holiday Mug Rugs Notes
- Please note, matching gauge both horizontal and vertical can be difficult. Extra rows can be added at the top if needed so it is more important to match the stitch gauge versus the row gauge.
- This pattern is worked from the bottom up in rows.
- Since there are a wrong side and a right side to the mug rugs, I used a combination of intarsia and carrying yarn across the back for the color work. Experiment and see what works best for you.
- Please visit https://brianakdesigns.com/ways-to-colorwork-in-crochet/ for a full tutorial on colorwork as well as a FREE Sheep Yarn Bobbin Printable to assist you with this project. No one loves tangles.
- On the RS knit the knit sttiches, on the WS purl the knit sts.

Holiday Mug Rugs Instructions
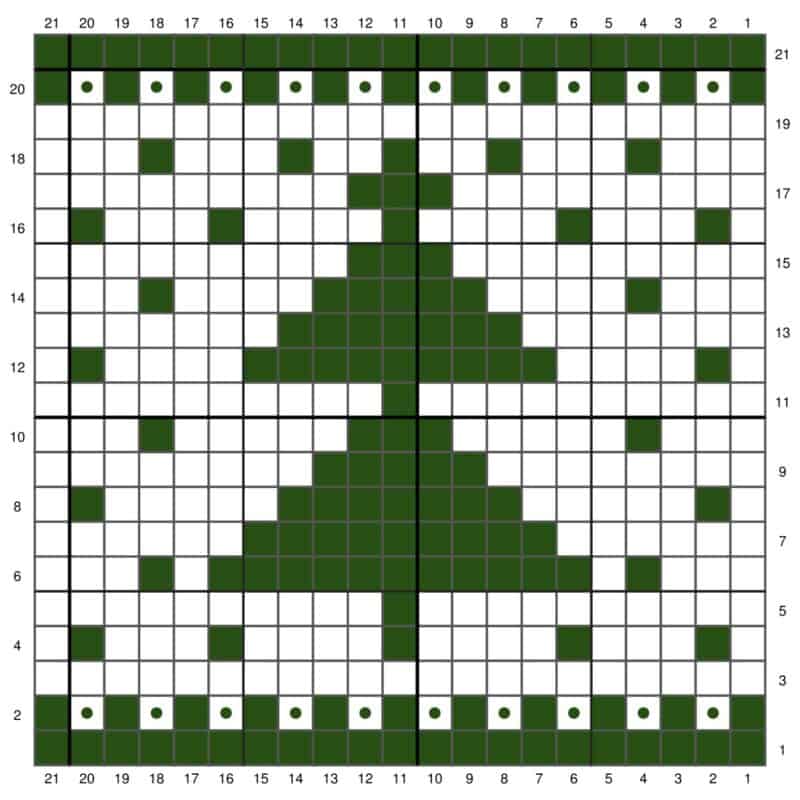
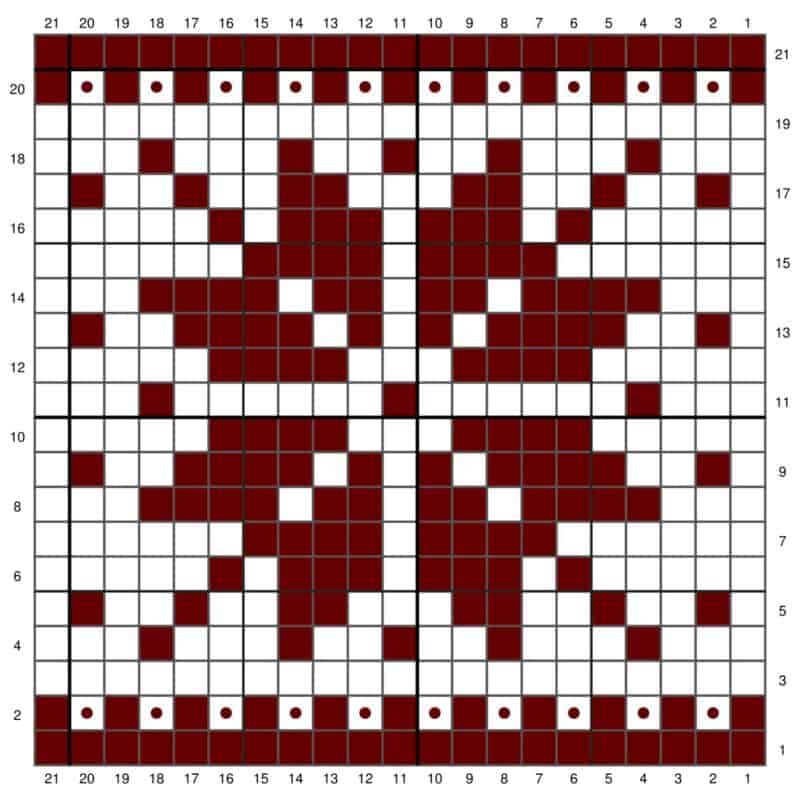
Green Tree Mug Rug
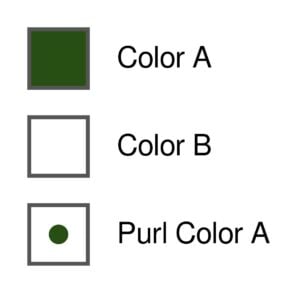
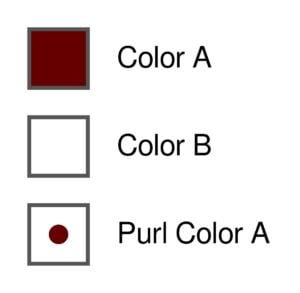
Dublin (Color A)
Cream (Color B)
← Row 1 [RS]: (Color A) Cast on 21 stitches with the long tail or cable cast on.
→ Row 2 [WS]: *(Color A) x 1, (Purl Color A) x 1*; repeat from * to * until last sts, Color A
← Row 3 [RS]: (Color B) x 21
→ Row 4 [WS]: (Color B) x 1, (Color A) x 1, (Color B) x 3, (Color A) x 1, (Color B) x 4, (Color A) x 1, (Color B) x 4,
(Color A) x 1, (Color B) x 3, (Color A) x 1, (Color B) x 1
← Row 5 [RS]: (Color B) x 10, (Color A) x 1, (Color B) x 10
→ Row 6 [WS]: (Color B) x 3, (Color A) x 1, (Color B) x 1, (Color A) x 11, (Color B) x 1, (Color A) x 1, (Color B) x 3 ← Row 7 [RS]: (Color B) x 6, (Color A) x 9, (Color B) x 6
→ Row 8 [WS]: (Color B) x 1, (Color A) x 1, (Color B) x 5, (Color A) x 7, (Color B) x 5, (Color A) x 1, (Color B) x 1 ← Row 9 [RS]: (Color B) x 8, (Color A) x 5, (Color B) x 8
→ Row 10 [WS]: (Color B) x 3, (Color A) x 1, (Color B) x 5, (Color A) x 3, (Color B) x 5, (Color A) x 1, (Color B) x 3
← Row 11 [RS]: (Color B) x 10, (Color A) x 1, (Color B) x 10
→ Row 12 [WS]: (Color B) x 1, (Color A) x 1, (Color B) x 4, (Color A) x 9, (Color B) x 4, (Color A) x 1, (Color B) x 1 ← Row 13 [RS]: (Color B) x 7, (Color A) x 7, (Color B) x 7
→ Row 14 [WS]: (Color B) x 3, (Color A) x 1, (Color B) x 4, (Color A) x 5, (Color B) x 4, (Color A) x 1, (Color B) x 3 ← Row 15 [RS]: (Color B) x 9, (Color A) x 3, (Color B) x 9
→ Row 16 [WS]: (Color B) x 1, (Color A) x 1, (Color B) x 3, (Color A) x 1, (Color B) x 4, (Color A) x 1, (Color B) x
4, (Color A) x 1, (Color B) x 3, (Color A) x 1, (Color B) x 1
← Row 17 [RS]: (Color B) x 9, (Color A) x 3, (Color B) x 9
→ Row 18 [WS]: (Color B) x 3, (Color A) x 1, (Color B) x 3, (Color A) x 1, (Color B) x 2, (Color A) x 1, (Color B) x
2, (Color A) x 1, (Color B) x 3, (Color A) x 1, (Color B) x 3
← Row 19 [RS]: (Color B) x 21
→ Row 20 [WS]: (Color A) x 1, (Purl Color A) x 1, (Color A) x 1, (Purl Color A) x 1, (Color A) x 1, (Purl Color A) x 1, (Color A) x 1, (Purl Color A) x 1, (Color A) x 1, (Purl Color A) x 1, (Color A) x 1, (Purl Color A) x 1, (Color A)
x 1, (Purl Color A) x 1, (Color A) x 1, (Purl Color A) x 1, (Color A) x 1, (Purl Color A) x 1, (Color A) x 1, (Purl Color A) x 1, (Color A) x 1
← Row 21 [RS]: Bind Off (Color A) x 21
To create a twisted fringe, visit this blog post: https://brianakdesigns.com/how-to-make-twistedfringe/

To Unlock Exclusive Subscriber Content click the Box below and join for free by simply adding your email and creating a password! If you are having troubles, reset your password or login to the Grow Publisher Portal.
I'm thrilled to share this amazing crochet pattern with you, many patterns on my blog are absolutely free! I kindly request that you don't copy and paste or distribute this pattern. Prefer an ad-free experience? Buy a digital PDF pattern for a small fee from one of my online stores for a seamless crafting journey. I appreciate your support and readership. You are the reason I can keep doing what I love and sharing it with others. So, thank you from the bottom of my yarn-loving heart!
Disclosure: This post contains affiliate links, meaning I get a commission if you decide to make a purchase through my links at no cost to you.Join The Kindest Community
Join our vibrant community of crafters on Facebook today. Whether you enjoy crafting with others or simply have burning questions, we've got you covered - join us now!
Red Fair Isle Mug Rug
Wine (Color A)
Cream (Color B)
← Row 1 [RS]: (Color A) Cast on 21 stitches with the long tail or cable cast on.
→ Row 2 [WS]: *(Color A) x 1, (Purl Color A) x 1*; repeat from * to * until last sts, Color A
← Row 3 [RS]: (Color B) x 21
→ Row 4 [WS]: (Color B) x 3, (Color A) x 1, (Color B) x 3, (Color A) x 1, (Color B) x 2, (Color A) x 1, (Color B) x 2,
(Color A) x 1, (Color B) x 3, (Color A) x 1, (Color B) x 3
← Row 5 [RS]: (Color B) x 1, (Color A) x 1, (Color B) x 2, (Color A) x 1, (Color B) x 2, (Color A) x 2, (Color B) x 3,
(Color A) x 2, (Color B) x 2, (Color A) x 1, (Color B) x 2, (Color A) x 1, (Color B) x 1
→ Row 6 [WS]: (Color B) x 5, (Color A) x 1, (Color B) x 1, (Color A) x 3, (Color B) x 1, (Color A) x 3, (Color B) x 1,
(Color A) x 1, (Color B) x 5
← Row 7 [RS]: (Color B) x 6, (Color A) x 4, (Color B) x 1, (Color A) x 4, (Color B) x 6
→ Row 8 [WS]: (Color B) x 3, (Color A) x 4, (Color B) x 1, (Color A) x 2, (Color B) x 1, (Color A) x 2, (Color B) x 1,
(Color A) x 4, (Color B) x 3
← Row 9 [RS]: (Color B) x 1, (Color A) x 1, (Color B) x 2, (Color A) x 4, (Color B) x 1, (Color A) x 1, (Color B) x 1,
(Color A) x 1, (Color B) x 1, (Color A) x 4, (Color B) x 2, (Color A) x 1, (Color B) x 1
→ Row 10 [WS]: (Color B) x 5, (Color A) x 4, (Color B) x 3, (Color A) x 4, (Color B) x 5
← Row 11 [RS]: (Color B) x 3, (Color A) x 1, (Color B) x 6, (Color A) x 1, (Color B) x 6, (Color A) x 1, (Color B) x 3
→ Row 12 [WS]: (Color B) x 5, (Color A) x 4, (Color B) x 3, (Color A) x 4, (Color B) x 5
← Row 13 [RS]: (Color B) x 1, (Color A) x 1, (Color B) x 2, (Color A) x 4, (Color B) x 1, (Color A) x 1, (Color B) x 1,
(Color A) x 1, (Color B) x 1, (Color A) x 4, (Color B) x 2, (Color A) x 1, (Color B) x 1
→ Row 14 [WS]: (Color B) x 3, (Color A) x 4, (Color B) x 1, (Color A) x 2, (Color B) x 1, (Color A) x 2, (Color B) x
1, (Color A) x 4, (Color B) x 3
← Row 15 [RS]: (Color B) x 6, (Color A) x 4, (Color B) x 1, (Color A) x 4, (Color B) x 6
→ Row 16 [WS]: (Color B) x 5, (Color A) x 1, (Color B) x 1, (Color A) x 3, (Color B) x 1, (Color A) x 3, (Color B) x
1, (Color A) x 1, (Color B) x 5
← Row 17 [RS]: (Color B) x 1, (Color A) x 1, (Color B) x 2, (Color A) x 1, (Color B) x 2, (Color A) x 2, (Color B) x 3,
(Color A) x 2, (Color B) x 2, (Color A) x 1, (Color B) x 2, (Color A) x 1, (Color B) x 1
→ Row 18 [WS]: (Color B) x 3, (Color A) x 1, (Color B) x 3, (Color A) x 1, (Color B) x 2, (Color A) x 1, (Color B) x
2, (Color A) x 1, (Color B) x 3, (Color A) x 1, (Color B) x 3
← Row 19 [RS]: (Color B) x 21
→ Row 20 [WS]: (Color A) x 1, (Purl Color A) x 1, (Color A) x 1, (Purl Color A) x 1, (Color A) x 1, (Purl Color A) x
1, (Color A) x 1, (Purl Color A) x 1, (Color A) x 1, (Purl Color A) x 1, (Color A) x 1, (Purl Color A) x 1, (Color A) x
1, (Purl Color A) x 1, (Color A) x 1, (Purl Color A) x 1, (Color A) x 1, (Purl Color A) x 1, (Color A) x 1, (Purl Color A) x 1, (Color A) x 1
← Row 21 [RS]: Bind Off (Color A) x 21
To create a twisted fringe, visit this blog post: https://brianakdesigns.com/how-to-make-twisted-fringe/
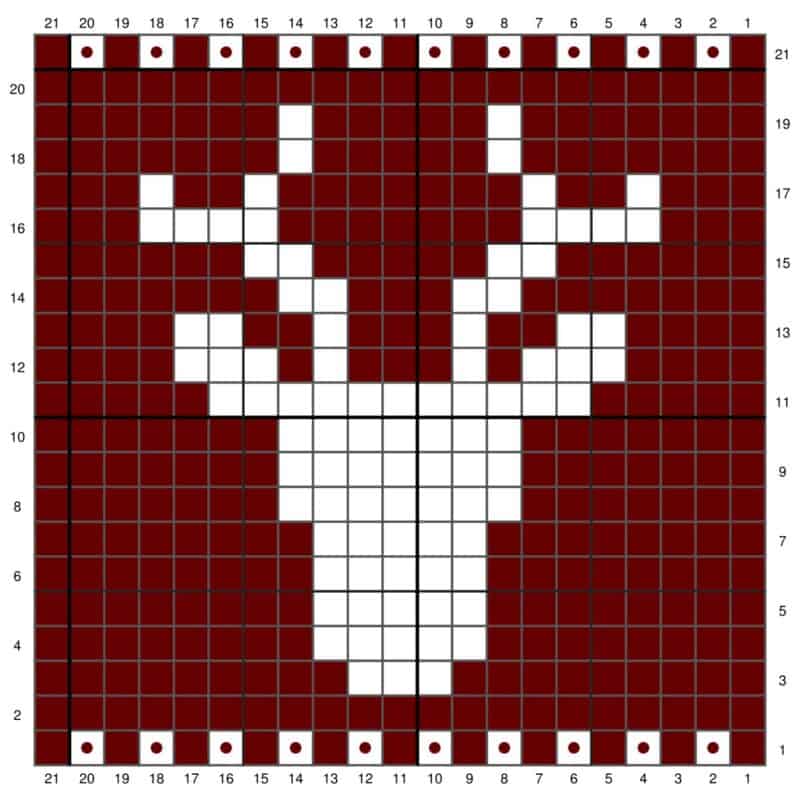
Deer Mug Rug
Wine (Color A)
Cream (Color B)
← Row 1 [RS]: (Color A) Cast on using the Alternating Calbe Cast on 1x1 Ribbing.
→ Row 2 [WS]: (Color A) x 21
← Row 3 [RS]: (Color A) x 9, (Color B) x 3, (Color A) x 9
→ Row 4 [WS]: (Color A) x 8, (Color B) x 5, (Color A) x 8
← Row 5 [RS]: (Color A) x 8, (Color B) x 5, (Color A) x 8
→ Row 6 [WS]: (Color A) x 8, (Color B) x 5, (Color A) x 8
← Row 7 [RS]: (Color A) x 8, (Color B) x 5, (Color A) x 8
→ Row 8 [WS]: (Color A) x 7, (Color B) x 7, (Color A) x 7
← Row 9 [RS]: (Color A) x 7, (Color B) x 7, (Color A) x 7
→ Row 10 [WS]: (Color A) x 7, (Color B) x 7, (Color A) x 7
← Row 11 [RS]: (Color A) x 5, (Color B) x 11, (Color A) x 5
→ Row 12 [WS]: (Color A) x 4, (Color B) x 3, (Color A) x 1, (Color B) x 1, (Color A) x 3, (Color B) x 1, (Color A) x 1, (Color B) x 3, (Color A) x 4
← Row 13 [RS]: (Color A) x 4, (Color B) x 2, (Color A) x 2, (Color B) x 1, (Color A) x 3, (Color B) x 1, (Color A) x
2, (Color B) x 2, (Color A) x 4
→ Row 14 [WS]: (Color A) x 7, (Color B) x 2, (Color A) x 3, (Color B) x 2, (Color A) x 7
← Row 15 [RS]: (Color A) x 6, (Color B) x 2, (Color A) x 5, (Color B) x 2, (Color A) x 6
→ Row 16 [WS]: (Color A) x 3, (Color B) x 4, (Color A) x 7, (Color B) x 4, (Color A) x 3
← Row 17 [RS]: (Color A) x 3, (Color B) x 1, (Color A) x 2, (Color B) x 1, (Color A) x 7, (Color B) x 1, (Color A) x
2, (Color B) x 1, (Color A) x 3
→ Row 18 [WS]: (Color A) x 7, (Color B) x 1, (Color A) x 5, (Color B) x 1, (Color A) x 7
← Row 19 [RS]: (Color A) x 7, (Color B) x 1, (Color A) x 5, (Color B) x 1, (Color A) x 7
→ Row 20 [WS]: (Color A) x 21
← Row 21 [RS]: Bind Off (Color A) in 1 x 1 rib
To create a twisted fringe, visit this blog post: https://brianakdesigns.com/how-to-make-twistedfringe/
Finishing With Twisted Fringe
Well That Was Fun! What's Next?
