

This crochet sun hat pattern has been living in my WIP basket for over a year. I started it, hit a wall on the brim shaping, set it down — and then completely forgot about it until I was digging around for a project bag one afternoon and there it was, still on the hook, staring at me.
Disclosure: This post contains affiliate links. Please read my disclosure for more info.
Before You Hook: Crochet Pattern Details
🧶 Yarn Used: Village Yarn Craft Cotton (100% cotton, 115yds/71g, held double)
⚖️ Yarn Weight: DK / light worsted, held double
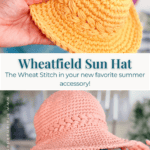
🧵 Featured Stitch: Wheat Stitch™ (single crochet plus puff stitch band)
🪝 Hook Size: US I (5.5mm) Crochet Hook, or hook to obtain gauge
Save for Later • Get a Summary • Pick Up Where You Left Off
I picked it back up, finished the brim that same night, and immediately wondered why I ever put it down. The thing that had tripped me up, getting the brim increases to lie flat without flaring, turned out to be exactly what makes this crochet sun hat look so good. The secret is two things working together: holding the yarn double the whole time for real structure and body, and an optional plastic-coated wire enclosed in the final brim round that keeps the shape exactly where you put it, all day long. I reworked the shaping, tested it across all seven sizes from newborn to large adult, and by the time I was done, I had a pattern I genuinely love. Sometimes a project just needs to marinate.
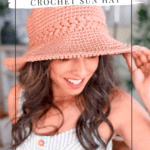
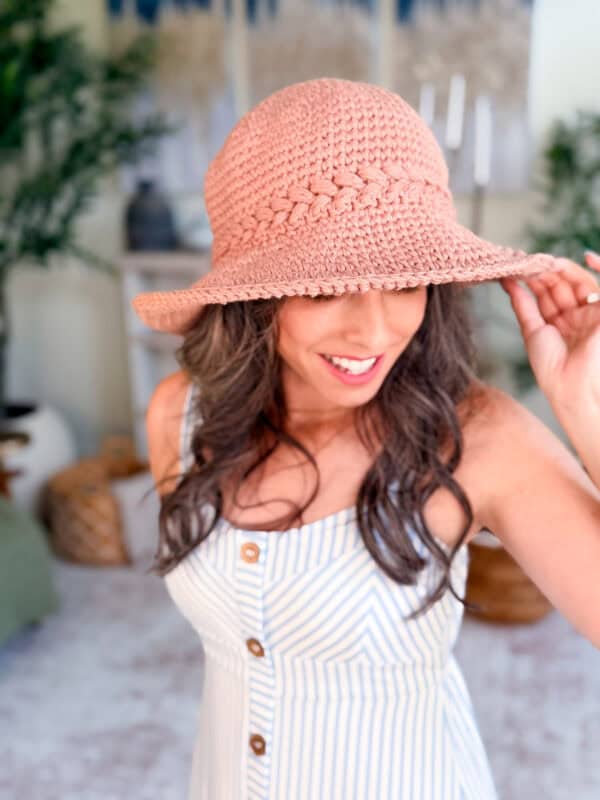
I made the final sample in Village Yarn Craft Cotton in a soft, natural tone and wore it out the same week. It’s lighter than it looks and surprisingly comfortable even on a hot afternoon — the cotton breathes well, and the double-held fabric has enough structure that it sits on your head without feeling heavy or stiff. I’ve been designing crochet patterns for over a decade, and this one earned its spot on the blog the old-fashioned way — a year in the WIP basket, a late-night finish, and a crochet sun hat I actually can’t stop wearing. Pair it with the Willow Mesh Market Bag or the Circle Leaf Market Bag, and you’ve got a farmers market look that’s completely handmade and completely stunning.
Why You’ll Love This Wheatfield Crochet Sun Hat
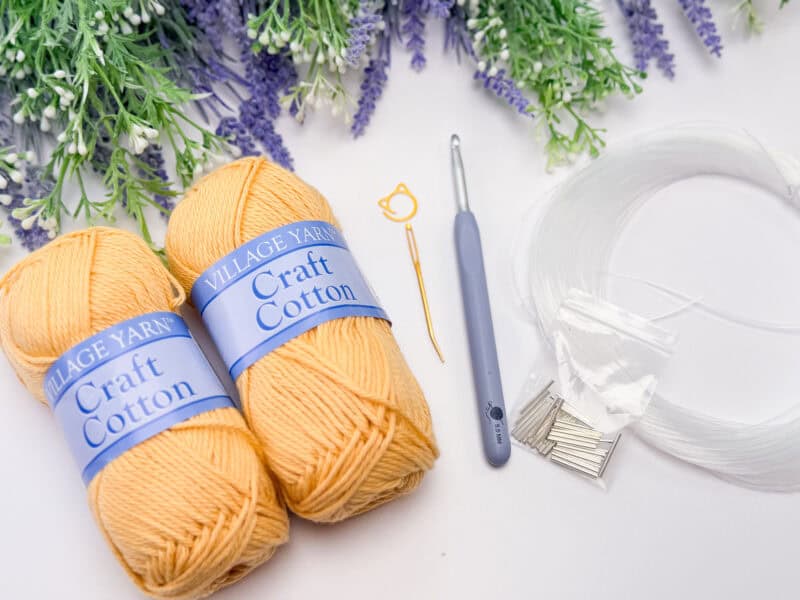
Wheatfield Crochet Sun Hat Supplies
Yarn
Village Yarn Craft Cotton
100% Cotton, 115yds/71g
Yarn Quantities
By size: 125 (169, 196, 276) (356, 437, 454) yards
2 (2, 2, 3) (4, 4, 4) balls
Yarn Substitutions
Herrschners Cottage Cotton — 60% Cotton/40% Acrylic, 207yds/100g
WeCrochet Dishie — 100% Cotton, 190yds/100g
Premier Home Cotton — 85% Recycled Cotton/15% Polyester, 131yds/75g
When substituting, stick with a cotton or cotton-blend yarn in the same weight. Cotton’s lack of stretch is what gives the brim its crisp shape and keeps the hat from sagging over time. Stretchier fibers like wool or acrylic relax with wear and lose their form.
Remember always to check the gauge and drape when substituting yarns.
Crochet Hook
Size US I (5.5mm) Crochet Hook or hook to obtain gauge.
Notions
Scissors
Yarn Needle
Removable Stitch Marker
Plastic Wire (Optional)
Jewelry Pliers (Optional)
Skill Level
You’ll need to be comfortable working in continuous rounds and following per-size instructions. The Wheat Stitch is fully explained in the pattern and in the video tutorial, so if you haven’t made it before, you’ll pick it up quickly.
Sizing & Finished Measurements
The Wheatfield Crochet Sun Hat pattern comes in 7 sizes: Newborn, Baby, Toddler, Child, Teen, Adult, and Large Adult. It’s designed to fit head circumferences of 14 (16, 18, 20) (22, 23, 24) inches.
Finished measurements (crown depth A /hat height B / brim diameter C):
Large Adult: 8.25″ / 7″ / 14″ | circ 24.5″
Newborn: 4.5″ / 3.75″ / 7.75″ | circ 14″
Baby: 5″ / 4.25″ / 9″ | circ 16″
Toddler: 5.75″ / 5″ / 9.5″ | circ 18″
Child: 6.25″ / 5.5″ / 10.75″ | circ 20″
Teen: 7″ / 6.25″ / 12.75″ | circ 22″
Adult: 7.75″ / 6.75″ / 14″ | circ 23.25″
Abbreviations
blo – back loop only
ch – chain
RS/WS – Right Side/Wrong Side
sc – single crochet
sl st – slip stitch
st(s) – stitch(es)
Gauge
12 sts and 13 rows = 4″ by 4″ yarn held double in single crochet.
Because this hat is sized to fit specific head circumferences, gauge really does matter here. Take a few minutes to make a swatch before you start — it’ll save you from making a child-sized hat when you wanted an adult one.
How to Crochet A Gauge Swatch
Working a gauge swatch will let you know if you will have the correct sizing for this pattern. It will also help you practice the stitches used in this project and improve your stitch work for a flawless look.
Are you struggling to match the gauge? Check out the blog post on What is Crochet Gauge and How To Fix It
Special Stitches Used in This Pattern
The Wheat Stitch
The Wheat Stitch is the star of this hat. It’s a combination of a single crochet and a modified puff stitch worked back into the skipped stitch. The result is a raised, braided-looking texture that sits beautifully around the base of the crown like a woven hat band.
It’s worked over just two rounds in this pattern, which means it’s a quick section to complete — but the visual impact is significant. First-timers will want to watch the video section for this stitch before diving in.
Full Wheat Stitch tutorial: How to Crochet the Wheat Stitch
Puff Stitch
Yarn over, insert hook into the stitch, yarn over, and pull up a long loop — repeat once more in the same stitch (5 loops on hook). Yarn over and pull through the first 4 loops, then yarn over and pull through remaining loops. This is used as part of the Wheat Stitch repeat.
How the Crochet Sun Hat is Made
This hat is worked from the top down in continuous rounds, starting with a magic ring at the center of the crown. You’ll increase outward through the crown using strategically alternated increase placement — this keeps the top looking smooth and even rather than showing obvious “spokes” where the increases happen. It’s a small detail that makes the finished hat look a lot more polished.
Once the crown is the right diameter for your size, you work even rounds to form the hat’s sides. Then the Wheat Stitch band is worked over two rounds, giving the hat that signature textured detail. After the band, you’ll increase outward again through the brim rounds, building out to the finished brim width.
The final round is where the optional wire comes in. If you want a structured brim that holds its shape, you’ll cut your plastic-coated wire to size (the pattern includes a wire length guide for every size), enclose it in the final round as you sc around, then secure the ends with jewelry pliers before fastening off.
No seams, no sewing, no complicated finishing — just weave in your ends, and it’s done. For more simple summary patterns, check out the Double Bloom Scrunchie, Circle Leaf Water Bottle Holder, and Wheat Stitch Tank Top.
Why Cotton Is the Right Yarn for a Sun Hat
This comes up every time I post a sun hat pattern, so let’s talk about it. Cotton has very low stretch compared to wool or acrylic, and that’s actually what you want in a structured hat. When you work a hat in a stretchy yarn, the brim slowly relaxes and sags with wear. You can block it back into shape, but it’ll lose structure again. Cotton holds its form.
Cotton also breathes. An acrylic hat sits on your head like a little greenhouse in hot weather. Cotton allows airflow, which is the whole point of wearing a hat on a sunny day.
The one trade-off is that cotton is less forgiving if your gauge is off — it doesn’t have the same ease and give as wool. This is why I really recommend swatching for this pattern. A small gauge difference across a whole hat adds up quickly.
Using Plastic-Coated Wire in a Crochet Hat Brim
If you’ve never used hat wire before, it sounds more complicated than it is. You’re essentially just crocheting around a wire circle on the final round, which completely encases it in fabric. The pattern includes a wire length guide by size, so you don’t have to guess.
Use plastic-coated wire (sometimes called millinery wire or hat wire), not bare metal wire. The plastic coating prevents any sharp ends from poking through the fabric and is more comfortable against the skin. Jewelry pliers make it easy to bend and tuck the joined wire ends neatly into the fabric before you fasten off.
If you’d rather skip the wire entirely, the hat still looks great — it’ll just have a softer brim. This is totally personal preference, and the pattern supports both options.
How to Wash and Store Your Wheatfield Sun Hat
Hand wash in cool water with a mild detergent. Press out the excess water gently — don’t wring or twist, especially if you used the wire brim, since this can warp the shape. Lay it flat to dry, and prop the crown up so it keeps its rounded shape.
Skip the washing machine and the dryer. Heat shrinks cotton and, over time, weakens the fibers. Between wears, store the hat somewhere it won’t get crushed: sitting upright on its crown or hanging from a hook so the brim stays flat. A well-cared-for cotton hat will last many seasons.
Wheatfield Sun Hat FAQs
What yarn weight is this pattern?
The Wheatfield Sun Hat uses a DK or light worsted-weight cotton, worked with the yarn held double throughout. Village Yarn Craft Cotton is the primary yarn, made from 100% cotton and available in 115 yards per 71g ball. Holding the yarn double gives the fabric the density and structure the hat needs without resorting to a heavier-weight yarn.
Do I have to use the wire brim?
No — the wire is completely optional. The hat looks great without it, and the brim will still have a nice shape from the cotton yarn and the double-held construction. The wire just gives the brim a more structured, crisp finish that holds its shape all day without any reshaping. If you’re making the hat for a baby or toddler, you’ll probably want to skip the wire anyway.
What if I’ve never done the Wheat Stitch before?
No worries at all. The Wheat Stitch is explained step by step in the written pattern, and there’s a dedicated section in the video tutorial that walks you through it slowly. I also have a standalone Wheat Stitch tutorial on the blog if you want to practice it before starting the hat. It’s a beginner-friendly textured stitch that looks way more impressive than the effort it takes.
Can I substitute a different yarn?
Yes, but stick with a cotton or cotton-blend yarn in the same weight. The pattern includes three suggested substitutes: Herrschners Cottage Cotton (60% cotton/40% acrylic), WeCrochet Dishie (100% cotton), and Premier Home Cotton (85% recycled cotton/15% polyester). Avoid anything with significant stretch — wool, acrylic, and stretchy blends will cause the brim to sag and lose structure with wear
How do I know which size to make?
Measure the head circumference (the distance around the head just above the ears) and match it to the size in the pattern: 14″ Newborn, 16″ Baby, 18″ Toddler, 20″ Child, 22″ Teen, 23″ Adult, 24″ Large Adult. If you’re between sizes, go up. The hat can also be blocked slightly larger if needed.
Can I sell finished hats made from this pattern?
Yes. Finished items made from Briana K Designs patterns may be sold on a small scale. Credit to Briana K Designs is not required but is always appreciated. The pattern itself may not be copied, resold, or shared.
Pattern Notes
- Using a stitch marker at the beginning of each round is recommended.
- A ch 1 at the beginning of a round is not counted as a stitch.
- This Pattern Uses Standard US Terminology. I use affiliate links and follow GPSR Compliance: privacy & disclosure policy here.
Subscribe & Like
Relax & Crochet
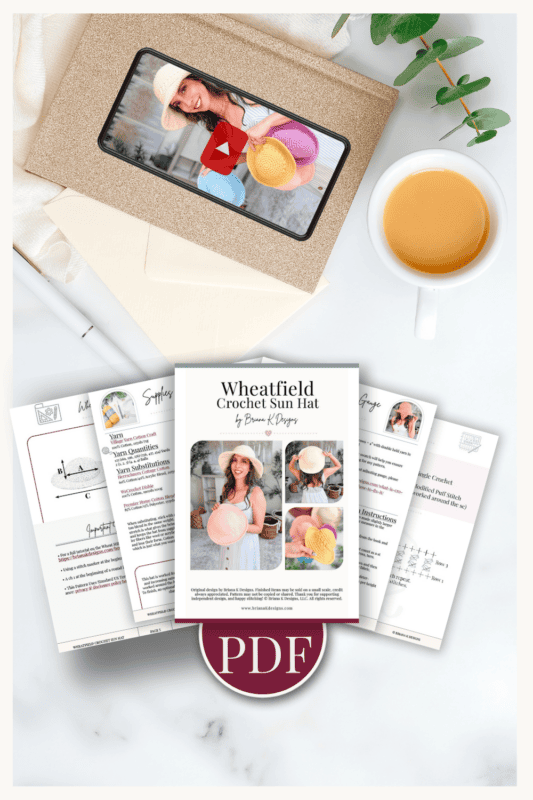
Upgrade to the Printable PDF
Beautifully formatted to print and relax while crocheting. The paid pattern includes:
The Ad-Free PDF can be purchased on Etsy or Ravelry.
Click the box below to unlock this exclusive subscriber content for free. Add your email and create a password. If you are having trouble, reset your password or log in to the Grow Portal.
I’m thrilled to share this amazing crochet pattern with you! Please don’t copy, paste, or distribute this pattern. Prefer an ad-free experience? Purchase a digital PDF file for a small fee from one of my online stores. I appreciate your support and readership. You are why I can keep doing what I love and sharing it with others. Thank you from the bottom of my heart.
Wheatfield Sun Hat Written Crochet Pattern Instructions
Rnd 7:
*2sc in next, sc in the next 5 sts; repeat from * around. | 42 sts
Stop here for Newborn and go to Hat Top Repeats.
Rnd 8:
*sc in next 3 sts, 2sc in next, sc in the next 3 sts; repeat from * around. | 48 sts
Stop here for Baby and go to Hat Top Repeats.
Rnd 9:
*2sc in next, sc in the next 7 sts; repeat from * around. | 54 sts
Stop here for Toddler and go to Hat Top Repeats.
Rnd 10:
*sc in the next 4 sts, 2sc in next, sc in the next 4 sts; repeat from * around. | 60 sts
Stop here for Child and go to Hat Top Repeats.
Rnd 11:
*2sc in next, sc in the next 9 sts; repeat from * around. | 66 sts
Stop here for Teen and go to Hat Top Repeats.
Adult ONLY:
Rnd 12:
*sc in the next 15 sts, 2sc in next; repeat from * once more, *sc in the next 16 sts, 2sc in next; repeat from * once more. | 70 sts
Go to Hat Top Repeats.
Adult Large ONLY:
Rnd 12:
*sc in the next 5 sts, 2sc in next, sc in the next 5 sts; repeat from * around. | 72 sts
Rnd 13:
*sc in the next 35 sts, 2sc in next; repeat from * around. | 74 sts
Go to Hat Top Repeats.
Style Tip
The natural cotton palette of this hat means it coordinates with just about everything in a summer wardrobe. Pair it with sundresses, linen sets, swim coverups, denim shorts, or a flowy maxi skirt. It sits beautifully with a woven tote or straw bag for markets, beach days, or garden afternoons.
For hair styling under the hat: loose waves or a low bun lets the crown sit comfortably, and wearing it over two braids gives a sweet, casual finish. If you want to personalize it, a ribbon or a thin scarf tied around the base of the crown makes an easy, swappable hat band. Tuck in a sprig of dried flowers or a small fabric bloom for a seasonal touch.
Hat Top Repeats
Sc in each st around for 2 (3, 4, 5) (6, 7, 8) rounds | 42 (48, 54, 60) (66, 70, 74) sts
At the end of this section there will be a total of 9 (11, 13, 15) (17, 19, 21) rnds.
Wheat Stitch Rounds
Setup: Sl st to next st. This will help even out the transition for these stitches, the st marker will go into the first st of the next rnd for the beginning of the round.
Rnds 1-2:
Skip the first st, sc in the next, working back into the skipped st work a puff st, * skip the next st, sc in the next, work a puff st into the skipped st; repeat from * around, join and turn.
Rnd 3:
Do not ch 1, sc in each st around, do not join and work continuously, work over the joined sl st from previous rnd. | 42 (48, 54, 60) (66, 70, 74) sts
Join The Kindest Community
Join our vibrant community of crafters on Facebook today. Whether you enjoy crafting with others or simply have burning questions, we’ve got you covered – join us now!
Newborn Hat Brim
Rnd 1:
*sc in the next 3 sts, 2sc in next, sc in the next 3 sts; repeat from * around. | 48 sts
Rnd 2:
*2sc in next, sc in the next 7 sts; repeat from * around. | 54 sts
Rnd 3:
*sc in the next 4 sts, 2sc in next, sc in the next 4 sts; repeat from * around. | 60 sts
Rnd 4:
*2sc in next, sc in the next 9 sts; repeat from * around. | 66 sts
Rnd 5:
*sc in the next 5 sts, 2sc in next, sc in the next 5 sts; repeat from * around. | 72 sts
Baby Hat Brim
Rnd 1:
*2sc in next, sc in the next 7 sts; repeat from * around. | 54 sts
Rnd 2:
*sc in the next 4 sts, 2sc in next, sc in the next 4 sts; repeat from * around. | 60 sts
Rnd 3:
*2sc in next, sc in the next 9 sts; repeat from * around. | 66 sts
Rnd 4:
*sc in the next 5 sts, 2sc in next, sc in the next 5 sts; repeat from * around. | 72 sts
Rnd 5:
*2sc in next, sc in the next 11 sts; repeat from * around. | 78 sts
Rnd 6:
*sc in the next 6 sts, 2sc in next, sc in the next 6 sts; repeat from * around. | 84 sts
Toddler Hat Brim
Rnd 1:
*sc in the next 4 sts, 2sc in next, sc in the next 4 sts; repeat from * around. | 60 sts
Rnd 2:
*2sc in next, sc in the next 9 sts; repeat from * around. | 66 sts
Rnd 3:
*sc in the next 5 sts, 2sc in next, sc in the next 5 sts; repeat from * around. | 72 sts
Rnd 4:
*2sc in next, sc in the next 11 sts; repeat from * around. | 78 sts
Rnd 5:
*sc in the next 6 sts, 2sc in next, sc in the next 6 sts; repeat from * around. | 84 sts
Rnd 6:
*2sc in next, sc in the next 13 sts; repeat from * around. | 90 sts
Child Hat Brim
Rnd 1:
*2sc in next, sc in the next 9 sts; repeat from * around. | 66 sts
Rnd 2:
*sc in the next 5 sts, 2sc in next, sc in the next 5 sts; repeat from * around. | 72 sts
Rnd 3:
*2sc in next, sc in the next 11 sts; repeat from * around. | 78 sts
Rnd 4:
*sc in the next 6 sts, 2sc in next, sc in the next 6 sts; repeat from * around. | 84 sts
Rnd 5:
*2sc in next, sc in the next 13 sts; repeat from * around. | 90 sts
Rnd 6:
* sc in the next 7 sts, 2sc in next, sc in the next 7 sts; repeat from * around. | 96 sts
Rnd 7:
*2sc in next, sc in the next 15 sts; repeat from * around. | 102 sts
Teen Hat Brim
Rnd 1:
*sc in the next 5 sts, 2sc in next, sc in the next 5 sts; repeat from * around. | 72 sts
Rnd 2:
*2sc in next, sc in the next 11 sts; repeat from * around. | 78 sts
Rnd 3:
*sc in the next 6 sts, 2sc in next, sc in the next 6 sts; repeat from * around. | 84 sts
Rnd 4:
*2sc in next, sc in the next 13 sts; repeat from * around. | 90 sts
Rnd 5:
*sc in the next 7 sts, 2sc in next, sc in the next 7 sts; repeat from * around. | 96 sts
Rnd 6:
*2sc in next, sc in the next 15 sts; repeat from * around. | 102 sts
Rnd 7:
* sc in the next 8 sts, 2sc in next, sc in the next 8 sts; repeat from * around. | 108 sts
Rnd 8:
*sc in the next 17 sts, 2sc in next; repeat from * around. | 114 sts
Rnd 9:
*sc in the next 9 sts, 2sc in next, sc in the next 9 sts; repeat from * around. | 120 sts
Adult Hat Brim
Rnd 1:
*sc in the next 8 sts, 2sc in next; repeat from * 5 more times, *sc in the next 7 sts, 2sc in next; repeat from * once more. | 78 sts
Rnd 2:
*sc in the next 6 sts, 2sc in next, sc in the next 6 sts; repeat from * around. | 84 sts
Rnd 3:
*2sc in next, sc in the next 13 sts; repeat from * around. | 90 sts
Rnd 4:
*sc in the next 7 sts, 2sc in next, sc in the next 7 sts; repeat from * around. | 96 sts
Rnd 5:
*2sc in next, sc in the next 15 sts; repeat from * around. | 102 sts
Rnd 6:
* sc in the next 8 sts, 2sc in next, sc in the next 8 sts; repeat from * around. | 108 sts
Rnd 7:
*2sc in next, sc in the next 17 sts; repeat from * around. | 114 sts
Rnd 8:
* sc in the next 9 sts, 2sc in next, sc in the next 9 sts; repeat from * around. | 120 sts
Rnd 9:
*2sc in next, sc in the next 19 sts; repeat from * around. | 126 sts
Large Adult Hat Brim
Rnd 1:
*sc in the next 7 sts, 2sc in next; repeat from * 3 more times, *sc in the next 6 sts, 2sc in next; repeat from * 5 more times. | 84 sts
Rnd 2:
*2sc in next, sc in the next 13 sts; repeat from * around. | 90 sts
Rnd 3:
* sc in the next 7 sts, 2sc in next, sc in the next 7 sts; repeat from * around. | 96 sts
Rnd 4:
*2sc in next, sc in the next 15 sts; repeat from * around. | 102 sts
Rnd 5:
* sc in the next 8 sts, 2sc in next, sc in the next 8 sts; repeat from * around. | 108 sts
Rnd 6:
*2sc in next, sc in the next 17 sts; repeat from * around. | 114 sts
Rnd 7:
*sc in the next 9 sts, 2sc in next, sc in the next 9 sts; repeat from * around. | 120 sts
Rnd 8:
*2sc in next, sc in the next 19 sts; repeat from * around. | 126 sts
Rnd 9:
* sc in the next 10 sts, 2sc in next, sc in the next 10 sts; repeat from * around. | 132 sts
Final Round/Finishing
Wire Length Guide (optional): Cut your plastic-coated wire to the following length before beginning the final round: approximately 29 (33, 35, 39) (45, 47, 49) inches for Newborn (Baby, Toddler, Child) (Teen, Adult, Large Adult). This accounts for the full brim circumference plus a few extra inches for overlap when joining the ends. Use jewelry pliers to bend and secure both ends together, tucking the joined end neatly into the crochet fabric before you fasten off.
Final Round: Working around a hat wire, if desired, sc in each st around.
Sl st in next, fasten off, and create an invisible join.
Weave in all ends and enjoy wearing your new hat! Remember to always throw on a hat when out in the sun to protect your skin.
A year in the making, and worth every single stitch. I hope you love making this one as much as I did — eventually.
More Crochet Patterns You’ll Love
If you enjoyed this pattern, here are a few more from the Briana K Designs studio that coordinate beautifully with a summer wardrobe:
Petal Loop Lanyard
Wheat Stitch Turtle
Summer House Crossbody Bag
Granny Swim Cover
Key Largo Lace Top
Cheers, and happy crocheting!
Well, That Was Fun! What’s Next?