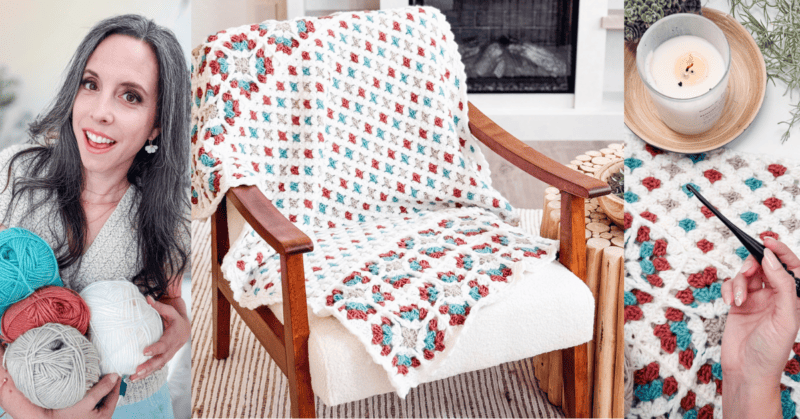
Modern Granny Square & Stitch Blanket Pattern


The Windowpane Granny Stitch Blanket is a beautiful blend of modern design and classic crochet charm! This versatile pattern features a simple construction comprising three sections: a top and bottom section made with eye-catching Windowpane Granny Squares, and a center section utilizing the timeless Granny Stitch we all know and love. Easily customized, this blanket is perfect for a wide range of uses, from baby gifts to bedspreads.
Disclosure: This post contains affiliate links. Please read my disclosure for more info.
And the best part? The color combinations are endless — go sleek with solids or have fun mixing and matching your favorite shades. It’s an easy and enjoyable project that you’ll love making just as much as using. If you like colorful blanket projects, you’ll love the Block Stitch Blanket and the Colorful Hues Granny Blanket! And you can use that leftover yarn from your project to create a Granny (Easter) Basket – just leave off the bunny bits and you’ll have a gorgeous and functional piece of decor!

Crochet Supplies
Yarn
Herrschners Worsted 8
100% Acrylic; 489yds/226g
Shown in Sleet (Color A), Ivory (Color B), Glacier (Color C), & Clay (Color D)
Lion Brand Ferris Wheel
100% Acrylic; 70yds/85g
Colorway: Vintage Carousel with Herrschners Worsted 8 in White
Yarn Quantities
Yardage will vary based on size of blanket.
Receving Blanket Size – 1260yds.
Yarn Substitutions
Brava – 100% Premium Acrylic, 218yds/100g
Mary Maxim Maximum Value – 100% Acrylic, 474yds/227g
Red Heart Roll With It – 389yds/150g
with
Red Heart Super Saver – 389yds/150g
Remember always to check the gauge and drape when substituting yarns.
Crochet Hook
Size US H (5.0mm) Crochet Hook or hook to obtain gauge.
Notions
Scissors
Yarn Needle
Removable Stitch Marker
Skill Level
Advanced Beginner
What you’ll love about this pattern.
🩶 The Windowpane Granny Square is super fun to make!
🩶 Simple Construction – The Blanket is made in three sections, then joined together.
🩶 Endless Color Combinations – Use one color for a gorgeously textured throw (with limited ends to weave in), or add as many colors as you’d like!
Sizes
Seven size options are provided in the full pattern.
Video Tutorial and Written Pattern below show Receiving Blanket Size – approx. 38.5″ x 42″.
Abbreviations
blo – back loop only
ch – chain
dc – double crochet
dtr – double treble crochet
sc – single crochet
sl st – slip stitch
st(s) – stitch(es)
Stsc – stacked single crochet
YO – yarn over
Gauge
13 sts and 8 rows = 4″ by 4″ in granny st pattern.
Each Windowpane Granny Square will be approx. 5.5″.
How to Crochet A Gauge Swatch
Working a gauge swatch will let you know if you will have the correct sizing for this pattern. It will also help you practice the stitches used in this project and improve your stitch work for a flawless look.
Are you struggling to match the gauge? Check out the blog post on What is Crochet Gauge and How To Fix It
Construction
This blanket is constructed in three separate sections—the top, middle, and bottom—before being joined together. We’ll begin by creating the two granny square panels using the join-as-you-go method. Next, we’ll crochet the center panel in simple granny stitch rows. Once all three sections are complete, we’ll seam them together and finish off the project with a clean and cozy crochet border.
For more simply constructed blankets, check out the Braided Wheat Blanket (the border is built into each row!) and the Totally Textured Blanket.
Special Stitches
Stacked Single Crochet (Stsc): Do NOT chain, insert hook into next stitch, yo, pull up a loop, yo and pull through both loops, insert hook in the vertical bar below, yo, pull up a loop, yo and pull through both loops on the hook.
Double Treble: Yarn over your hook three times, then insert the hook into the stitch where you want to place the stitch. Yarn over and pull up a loop (you’ll have five loops on your hook). Yarn over and pull through the first two loops (you’ll have four loops remaining), yarn over and pull through the next two loops (three loops left), yarn over and pull through two more loops (two loops left), and finally, yarn over and pull through the last two loops on your hook to complete the stitch.
Pattern Notes
- The Granny Square pattern is written using two Colors: Color A (Rnds 1, 3, & 4) and Color B (Rnds 2 & 5). To use more colors, substitute Color A in Rnds 3 & 4 for Colors C & D.
- To make the Body of the Blanket, simply chain an even number of stitches for the width, and then work the instructions for the blanket until the desired height. This can be crocheted in a solid color or switched between colors.
- How to Change Colors: On the last stitch in the last group, or at the end of a row, work the last YO in the new color and drop the previous color to the wrong side of the work.
- This Pattern Uses Standard US Terminology.
Combining Granny Squares and Granny Stitch in One Blanket
Subscribe & Like
Video Tutorial for the Windowpane Granny Blanket
Wrap yourself in cozy color with this Granny Square and Stitch Crochet Blanket Pattern—the perfect mix of classic charm and modern design. This free crochet pattern walks you through how to crochet granny squares and combine them with the timeless granny stitch for a stunning and stash-busting afghan.
Whether you’re a beginner looking for an easy granny stitch blanket tutorial or a seasoned maker wanting a relaxing project, this blanket is a fun and rewarding make. With a video tutorial, printable PDF, and clear step-by-step instructions, you’ll be creating a modern granny square blanket that’s perfect for gifting, home décor, or curling up on the couch. Get inspired by the granny square throw blanket pattern, everyone will be reaching for it season after season.
Relax & Crochet
Upgrade to the Printable PDF
Beautifully formatted pdf pattern to print and relax while crocheting. The paid pattern includes:
The Ad-Free PDF can be purchased on Etsy or Ravelry.
Click the box below to unlock this exclusive subscriber content for free. Add your email and create a password. If you are having trouble, reset your password or login to the Grow Portal.
I’m thrilled to share this amazing crochet pattern with you! Please don’t copy, paste, or distribute this pattern. Prefer an ad-free experience? Purchase a digital PDF file for a small fee from one of my online stores. I appreciate your support and readership. You are why I can keep doing what I love and sharing it with others. Thank you from the bottom of my heart.
Written Crochet Pattern Instructions
Windowpane Granny Square
Each Granny Square will measure approx 5 inches.
Rnd 1:
With Color A and inside a Magic Ring, Stsc, ch 2, [3 dc, ch 2] 3 times, 2 dc, sl st to the top of the Stsc to join. | 4 granny groups & 4 ch spaces
Please Note: Make your first Windowpane Granny Square as written. To join-as-you-go, watch video before working Rnd 5. An alternate option is to seam the granny squares together later with needle and yarn.
For Receiving Size Blanket: Make 28 total squares (14 in top/bottom section).
Join The Kindest Community
Join our vibrant community of crafters on Facebook today. Whether you enjoy crafting with others or simply have burning questions, we’ve got you covered – join us now!
Center of Blanket
Row 1 (WS):
With Color B, ch 121, working in the first ch from the hook, Stsc, dc in each remaining ch across, turn. | 121sts
Row 2 (RS):
Stsc in first, work 2 dc between the next 2 sts, *with Color A skip 3 sts and 3 dc between next dc sts, with Color B skip 3 sts and 3 dc between next dc sts; repeat from * until the last 3 sts of the row, with Color B skip 2 sts, dc in last, turn.
Row 3:
With Color B, Stsc in first, 2 dc in the first space, *3 dc in next space between the granny st groups; repeat from * until the last 3 sts of the row, skip 2 sts, dc in last, turn.
Row 4:
With Color A (or rotating between colors), Stsc in first, 2 dc in the first space, *with Color B 3 dc in next space between the granny st groups, with Color A 3 dc in next space between the granny st groups; repeat from * until the last 3 sts of the row, with Color A skip 2 sts, dc in last, turn.
Row 5:
Repeat Row 3.
Repeats:
Repeat Rows 2-5 until there are a total of 40 Rows. Do not fasten off.

Blocking
To make seaming a bit easier, it’s recommended to block the pieces to dimensions.
Seaming
Line up the Blanket Body piece with the Granny Squares and pin together with clips or stitch markers. With Color B, insert your hook into the front loop of the edge stitch on the Granny Squares, next insert into the stitch on the Blanket, yarn over, and pull through all loops.
Continue to sl st the pieces of fabric together evenly across. These will have a different number of stitches, so they won’t add up one-to-one; you will need to skip some stitches from the Blanket edge.

Border
Rnd 1:
With Color of Choice and working along the edge of the blanket, join near one corner, ch 1, sc. (Place a stitch marker in this st to mark the first st of the Round.) *Insert your hook into the left bar of the sc just made, then insert into the next space on the edge of the Blanket. Yarn over and pull a loop through the Blanket fabric and also through one loop on the hook. Yarn over and pull through two loops on the hook. Repeat from * all the way around the edges of the Blanket, working one st per every sc row, and 2 sts per dc row on the long sides (one st in each st of the short sides), and working a ch 1 and another st on the corner edges, join. Please see video.
Rnd 2:
Ch 1, sc in first, ch 2, 2 dc into the same st, skip 2 sts, *sc, ch 2, 2 dc in the same st, skip 2; repeat from * around and work the corners as (3 dc, ch 2, 3 dc) in each corner. Join to the first st in the rnd, fasten off.
Finishing
Subscribe to my youtube channel
Weave in all ends and block to dimensions if needed.
There’s just something so special about granny squares and the granny stitch. These timeless designs bring warmth, charm, and a touch of nostalgia to any space, including your closet.
Whether you’re making a full blanket (like the Gemstone Hues Blanket or the Granny Square Snowflake Quilt), or adding a few squares to the bottom of a gorgeous top (like the Summer Granny Top or Dress), or making a stunning bag (like the Flower Granny Square Bag or the Granny Stitch Clutch), your project is full of that cozy, handmade magic that never goes out of style.
The granny stitch and granny squares are fun to create, easy to customize, and full of creative possibilities. No matter your color palette or skill level, granny squares have a way of making every home—and wardrobe—feel a little more comforting and a lot more loved.
Cheers, and happy crocheting!
Well That Was Fun! What’s Next?
📌 PIN THIS POST – Don’t lose this project; save it to your Pinterest crochet board so you can quickly come back to it again.
💌 SHARE – Share your yarn choice, in-progress, or finished projects on Facebook or Instagram and use the hashtag #brianakdesigns
🥂 JOIN – Join the kindest crafters in the Briana K Designs Community Group on Facebook. We love yarny friends!
🔗 RAVELRY LINK -Link and share your project on Ravelry. Having inspirational photos can help crafters.