How to Crochet a Top Down Cardigan with an Optional Hood
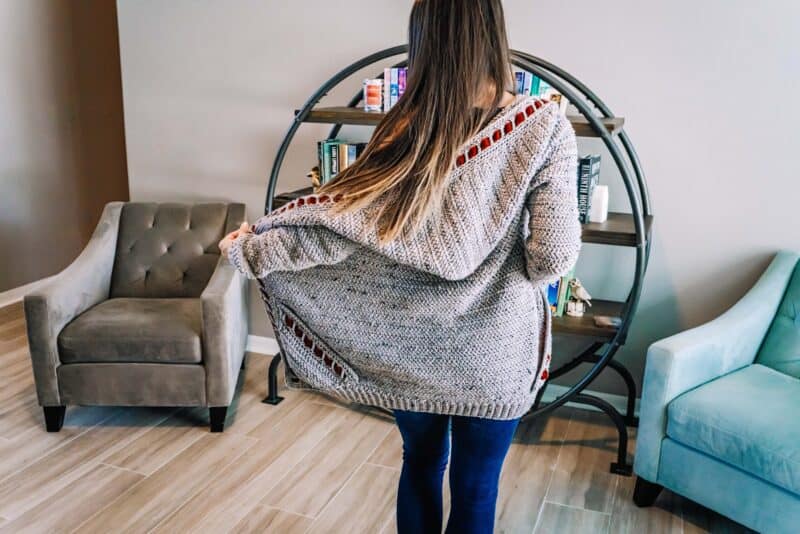
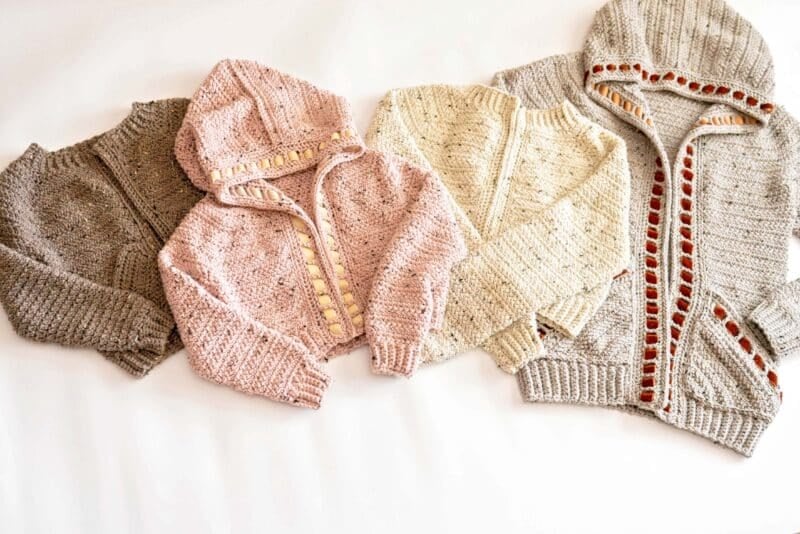
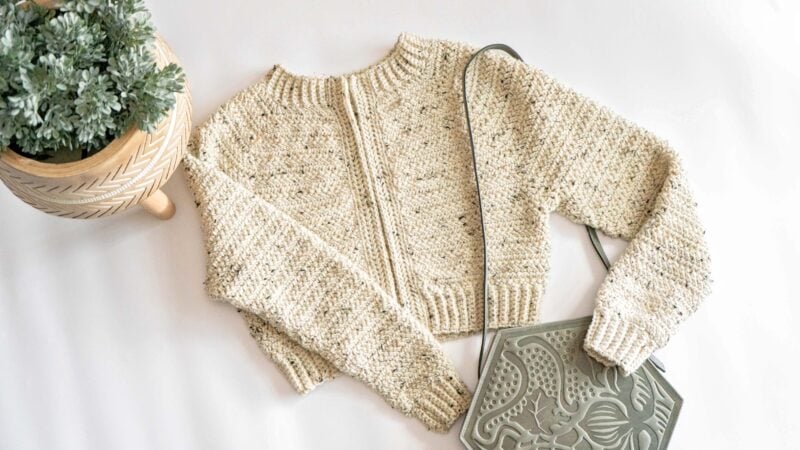
The Cascade Adult Crochet Cardigan is a fun project in that you get to choose your adventure. Each option makes this cardigan more fun than the last choice. You can choose your length; Crop, Mid-length, or Hip-length. Then choose to add a Hood or Pockets, and last but not least, choose your edging.
Disclosure: This post contains affiliate links. Please read my disclosure for more info.
Like the Diamond Crochet Cardigan, the Cascade Adult Crochet Cardigan is one of those perfect layering pieces that can fit almost any season. If you prefer to work a cardigan that’s crocheted flat, visit the Autumn Wheat Beginner Crochet Cardigan.
Keep scrolling for the free base version, or purchase the pattern on Ravelry, Etsy, Ribblr, or WeCrochet for all the styling options.
Want an Ad-Free PDF Download of this pattern?
This pattern is available in my shops:
How to Style the Cascade Adult Crochet Cardigan:
Casual – The Cascade Adult Crochet Cardigan will add a stylish edge to your favorite jeans and flats or knee-high boots while out for dinner with your friends and family. For an extra added touch I would add the Herringbone Crochet Clutch so you have a place to put all your essentials.
Dressy – No matter where you are headed, work or date night, a simple boat neck dress with a longer version of the Cascade Adult Crochet Cardigan belted at your natural waist paired with your favorite heels will have you feeling that confidence boost that looks amazing on everyone. To complete your look, I would add the Nettleton Crochet Bag.
Weekend Lounging – The Cascade Adult Crochet Cardigan is cozy enough to wear with yoga pants on the couch while watching your favorite show. Or if changing out of your PJ’s isn’t appealing, just layer the Cascade Adult Crochet Cardigan over them and enjoy your day! For an added layer of comfort snuggle in with the Tapestry Arrow Crochet Blanket and rest your feet on the Crochet Cable Floor Pouf.
Which way will you style the Cascade Adult Crochet Cardigan?
Cascade Crochet Cardigan Supplies


Crochet Hook:
Notions:
Removable stitch markers if needed
Yarn needle to weave in ends
Scissors
Blocking Mats and Pins (optional)
Yarn:
WeCrochet Brava Tweed Worsted, 97% Premium Acrylic, 3% Viscose, 218yds/100g
Colorway: Stratus
Yardage:
This will vary depending on the cardigan construction choices and modifications. Add 30% more yardage for a hood and more/less adjusting for length. This is based on the waist-length cardigan.
Adult: 1150 (1200, 1300, 1450, 1600) (1750, 1875, 1925, 2000)
Balls: 6 (6, 6, 7, 8) (9, 9, 9, 10)
Abbreviations/Stitches:
blo- back loop only
ch – chain
dc – double crochet
flo – front loop only
hbdc – herringbone double crochet
hsc – herringbone single crochet
MC – Magic Circle
Reverse hdc
Reverse sc
RS – right side
Stsc – stacked single crochet
st(s) – stitch(es)
Tr – treble crochet
WS – wrong side
YO – yarn over
Gauge:
11 sts x 8 rows = 4×4 inches in hbdc
Skill Level:
Easy Beginner
Size:
This garment has a 2-3” ease.
Bust Sizes (does not include ease):
X-Small (Small, Medium, Large, 1X) (2X, 3X, 4X, 5x)
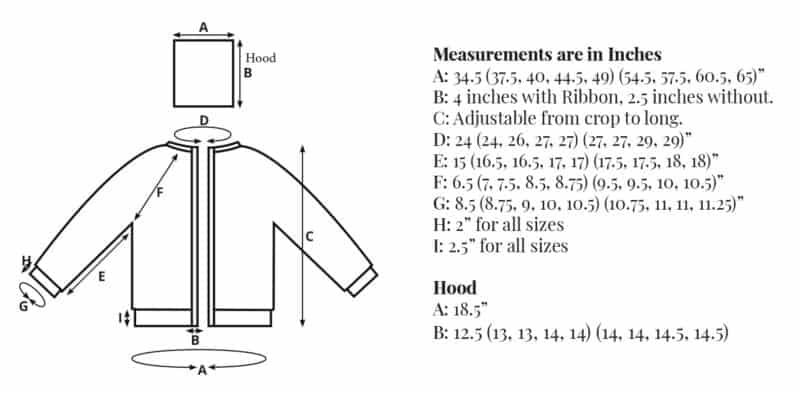
34.5 (37.5, 40, 44.5, 49) (54.5, 57.5, 60.5, 65)”
See schematic for finished garment measurements.
Notes:
The Cascade Crochet Cardigan is worked from top down rows in the raglan style.
This pattern has several options for customization, which creates so many possibilities! Plan out how you want your cardigan to look as you go or before getting started. Do you want it long or cropped? Do you want a hood or no hood? Ribbon the front trim or no? And of course, will there be pockets? So many choices!
Starting chains are not used in this pattern; instead, use the Stacked Single Crochet (see Special Stitches).
About Ribbing Gauge:
Ribbing can be fickle when it comes to matching gauges. I find each crocheter can be very different in tension. Find the right tension for you by going up or down a crochet hook size. The Ribbing will create a more fitted appearance, just maintain consistent tension. If tension is too tight, fabric might pucker, to avoid this keep a loose tension or use a larger hook.
Crochet Diamond Cardigan Video Tutorial:

Special Stitches:
Stacked Single Crochet (Stsc): Do NOT chain, insert hook into next stitch, yo, pull up a loop, yo and pull through both loops, insert hook in the vertical bar below, yo, pull up a loop, yo and pull through both loop on hook.
Stacked Double Crochet (Stdc): Do NOT chain, insert hook into next stitch, yo, pull up a loop, yo and pull through both loops, (insert hook in the vertical bar below, yo, pull up a loop, yo and pull through both loops on hook) twice.
Herringbone Double Crochet (Hbdc): YO and insert hook into the stitch, YO and pull up a loop and pull through the first loop on the hook, YO and pull through one loop on the hook, YO and pull through the remaining two loops on the hook.
Herringbone Single Crochet (Hsc): insert the hook through the vertical bar of the previous single crochet stitch, insert into the next stitch and pull up a loop, yarn over and pull through all three loops on the hook.
Reverse sc: bring the working yarn towards the front of your work and insert the crochet hook into the first stitch from the back to the front (working in reverse), yarn over, pull up a loop to the back, yarn over and pull through both loops on the hook.
Reverse Hsc: insert the hook through the vertical strand on the backside of work from right to left, insert the hook into the next stitch from back to front (working in reverse), yarn over, pull up a loop to the back, yarn over and pull through all three loops on the hook.
How to have straight edges with the hbdc stitch
If straight crochet edges make your crochet heart happy, here is a modification of the last stitch of the hbdc sts in rows. This can be used for this cardigan to achieve a nice fabric.


Click the box below to unlock this exclusive subscriber content for free. Add your email and create a password. If you are having trouble, reset your password or login to the Grow Portal.
I’m thrilled to share this amazing crochet pattern with you! Please don’t copy, paste, or distribute this pattern. Prefer an ad-free experience? Purchase a digital PDF file for a small fee from one of my online stores. I appreciate your support and readership. You are why I can keep doing what I love and sharing it with others. Thank you from the bottom of my heart.
Cardigan Schematic
Neck & Yoke
Read through this entire section before starting to understand the process of working the yoke.
With I hook, ch 68 (68, 72, 76, 76) (76, 76, 80, 80).
Row 1 (RS):
Working in the back humps of the chains, Stsc in first st from the hook, Hbdc in the next 8 (8, 9, 10, 11) (12, 13, 14, 14) sts, 2 Hbdc in each of the next 2 sts, mark the space between the two increases, Hbdc in the next 12 (12, 12, 12, 10) (8, 6, 6, 6) sts, 2 Hbdc in each of the next 2 sts, mark the space between the two increases, Hbdc in the next 18 (18, 20, 22, 24) (26, 28, 30, 30) sts, 2 Hbdc in each
of the next 2 sts, mark the space between the two increases, Hbdc in the next 12 (12, 12, 12, 10) (8, 6, 6, 6) sts, 2 Hbdc in each of the next 2 sts, mark the space between the two increases, Hbdc in the next 8 (8, 9, 10, 11) (12, 13, 14, 14) sts, dc in last, turn. 76 (76, 80, 84, 84) (84, 84, 88, 88) sts
Repeats:
Repeat Increasing Row for 3 (5, 5, 7, 11) (18, 18, 17, 21) more rows, then go to Yoke Increasing Continued (see below). 100 (116, 120, 140, 140) (220, 220, 208, 256) sts
For size 5x go to Split the Body & Sleeves.
Yoke Increasing Continued:
Alternate an Increasing Row and a Non-Increasing Row for 12 (12, 12, 12, 8) (2, 2, 4, -) more rows. At this point there are 16 (18, 18, 20, 20) (21, 21, 22, 22) total rows for the Neck & Yoke, do not fasten off. 148 (164, 168, 188, 204) (236, 236, 240, 256) sts
How To Increase or Not Increase:
Increasing Row: Stsc in first st, [Hbdc to one stitch before the marker, 2 Hbdc in the next 2 sts, mark the space between the two increases] four times, Hbdc to the last st, dc in last, turn. 84 (84, 88, 92, 92) (92, 92, 96, 96) sts – each row will increase by 8 sts.
Non-increasing Row: Stsc in first st, Hbdc to the last st (moving the stitch markers up a row between sts), dc in last, turn.

Split the Body & Sleeves
This row will create the armholes and stitches for the body. The armholes will be worked later, after the body stitches are done.
Row 1 (WS):
Stsc, Hbdc 19 (21, 22, 25, 28) (33, 34, 35, 37), ch 2 (2, 4, 4, 4) (2, 4, 6, 8), skip 34 (38, 38, 42, 44) (50, 48, 48, 52) sts, Hbdc 40 (44, 46, 52, 58) (68, 70, 72, 76), ch 2 (2, 4, 4, 4) (2, 4, 6, 8), skip 34 (38, 38, 42, 44) (50, 48, 48, 52) sts, Hbdc 19 (21, 22, 25, 28) (33, 34, 35, 37), dc in last, turn. 84 (92, 100, 112, 124) (140, 148, 156, 168) body sts
Body Continued
Row 1:
Stsc in first st, Hbdc across until the last st (including the chain sts), dc in last, turn. 84 (92, 100, 112, 124) (140, 148, 156, 168) sts
Row 2:
Stsc in first st, Hbdc across until the last st, dc in last, turn.
Repeats:
Repeat Row 2 until there is a total of 7 rows for a cropped cardigan, or 14 rows for a mid-length cardigan, or 32 rows for a long cardigan, do not fasten off.
This can be adjusted to be any length by crocheting more or less rows.
Bottom of Cardigan Ribbing
The ribbing will be worked in rows and joined along the bottom edge of the cardigan as you crochet.
Row 1:
Ch 14 (14, 14, 14, 16) (16, 16, 16, 16), sc in the second chain from hook and across to body of the cardigan, sl st the next 2 sts on the bottom body edge (these do not count as sts), turn. 13 (13, 13, 13, 15) (15, 15, 15, 15) sts
Row 2:
Skip the 2 sts from the body edge, blo sc in each st across to the last st, sc in both loops
of the last st, turn. 13 (13, 13, 13, 15) (15, 15, 15, 15) sts
Row 3:
Ch 1 (does not count as a stitch), sc through both loops of the first st, blo sc in each st across, sl st the next 2 sts along the bottom body edge, turn.
Repeats: Repeat Rows 2-3 around the bottom of the cardigan body. Fasten off and weave in ends.
Cardigan Arms
Rnd 1 (RS):
Join yarn to the center underarm, Stsc in first, work the remaining 35 (39, 41, 45, 47) (51, 51, 53, 59) sts around in Hbdc, join and turn. 36 (40, 42, 46, 48) (52, 52, 54, 60) sts
Rnd 2 (Dec Rnd):
Stsc, dc2tog, work in Hbdc to the last two sts in round, dc2tog, join and turn. 2 sts decreased. 34 (38, 40, 44, 46) (50, 50, 52, 58) sts
Non-Dec Rnd:
Stsc, Hbdc in remaining sts around, join and turn.
Repeats:
XS: [Work Non-Dec Rnd for 3 rounds, work Dec Rnd for 1 round] 5 times. Then work Non-Dec Rnd 8 times for a total of 28 rnds for the arms. 24 sts
S: [Work Non-Dec Rnd for 3 rounds, work Dec Rnd for 1 round] 6 times. Then work Non-Dec Rnd 6 times for a total of 30 rnds for the arms. 26 sts
M: [Work Non-Dec Rnd for 3 rounds, work Dec Rnd for 1 round] 7 times. Then work Non-Dec Rnd 2 times for a total of 32 rnds for the arms. 26 sts
L: [Work Non-Dec Rnd for 3 rounds, work Dec Rnd for 1 round] 8 times. There is a total of 34 rnds for arms. 28 sts
1x: [Work Non-Dec Rnd for 3 rounds, work Dec Rnd for 1 round] 8 times. There is a total of 34 rnds for arms. 30 sts
2x: [Work Non-Dec Rnd for 1 round, work Dec Rnd for 1 round] 4 times. Then [Work Non-Dec Rnd for 3 rounds, work Dec Rnd for 1 round] 6 times There is a total of 34 rnds for arms. 30 sts
3x: [Work Non-Dec Rnd for 1 round, work Dec Rnd for 1 round] 1 time. Then [Work Non-Dec Rnd for 3 rounds, work Dec Rnd for 1 round] 8 times. There is a total of 36 rnds for arms. 32 sts
4x: [Work Non-Dec Rnd for 1 round, work Dec Rnd for 1 round] 3 times. Then [Work Non-Dec Rnd for 3 rounds, work Dec Rnd for 1 round] 7 times. There is a total of 36 rnds for arms. 32 sts
5x: [Work Non-Dec Rnd for 1 round, work Dec Rnd for 1 round] 9 times. Then [Work Non-Dec Rnd for 3 rounds, work Dec Rnd for 1 round] 4 times. There is a total of 36 rnds for arms. 32 sts
Do not fasten off and go to Cuff Ribbing.
Cuff Ribbing
Row 1:
With the 5.0mm H-hook, ch 10, sc in second chain from hook and across to sleeve, sl st 2 sts along the arm edge (these do not count as sts), turn. 9 sts
Row 2:
Skip the two sts from the sleeve, in blo sc in each st across until the last st, sc in both loops of the last st, turn. 9 sts
Row 3:
Ch 1 (does not count as a stitch), sc through both loops of the first st, blo sc in each st
across, sl st 2 sts along the sleeve, turn.
Repeats:
Repeat Rows 2-3 around the the bottom of th arm. Join last row to beginning row by slip stitching through blo of first and last row at the same time with the WS facing.
Repeat Arm & Cuff for the second arm.

Non-Hood Neck Trim
With the RS facing, attach the yarn to the top left corner of the neck.
Row 1:
Ch 8, sc in second chain from hook and across to body of cardigan, sl st the next 2 sts on the top neck edge (these do not count as sts), turn. 7 sts
Row 2:
Skip the 2 sts from the neck edge, in blo sc in each st across until the last st, sc in both loops of the last st, turn.
Row 3:
Ch 1 (does not count as a stitch), sc through both loops of the first st, blo sc in each st across, sl st the next 2 sts along the neck edge, turn.
Repeats:
Repeat Rows 2-3 around the neck edge. Do not fasten off and go to front trim.
Front Trim for Non-Hooded Option
Set Up:
Continue to slip stitch down the front RS edge of the cardigan, placing 3 sl sts per 2 rows, turn.
Row 1 (WS):
Ch 1, in the flo, sc in first, reverse hsc across for the remaining sts in the row, turn.
Row 2 (RS):
Ch 1, sc in first, hsc across for the remaining sts in the row, turn.
Row 3:
Ch 1, sc in first, reverse hsc across for the remaining sts in the row, fasten off at the end of the row.
For the other front side of the cardigan, start by joining the yarn and slip stitching across the row with the RS facing. Repeat Rows 1-3 above.
Finishing
Weave in all ends, light block if necessary, wear and enjoy!
Check out some of my other patterns!
Cute Crochet Baby Boots Free Pattern
Prism Triangle Colorwork Cowl Free Patterns
Well That Was Fun! What’s Next?
📌 PIN THIS POST – Don’t lose this project; save it to your Pinterest crochet board so you can quickly come back to it again.
💌 SHARE – Share your yarn choice, in-progress, or finished projects on Facebook or Instagram and use the hashtag #brianakdesigns
🥂 JOIN – Join the kindest crafters in the Briana K Designs Community Group on Facebook. We love yarny friends!
🔗 RAVELRY LINK -Link and share your project on Ravelry. Having inspirational photos can help crafters.