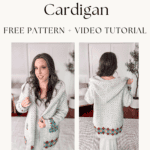
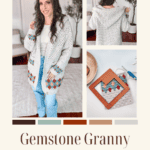
Gemstone Granny Crochet Cardigan Pattern
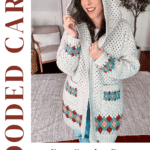
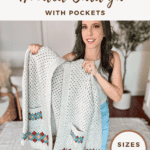
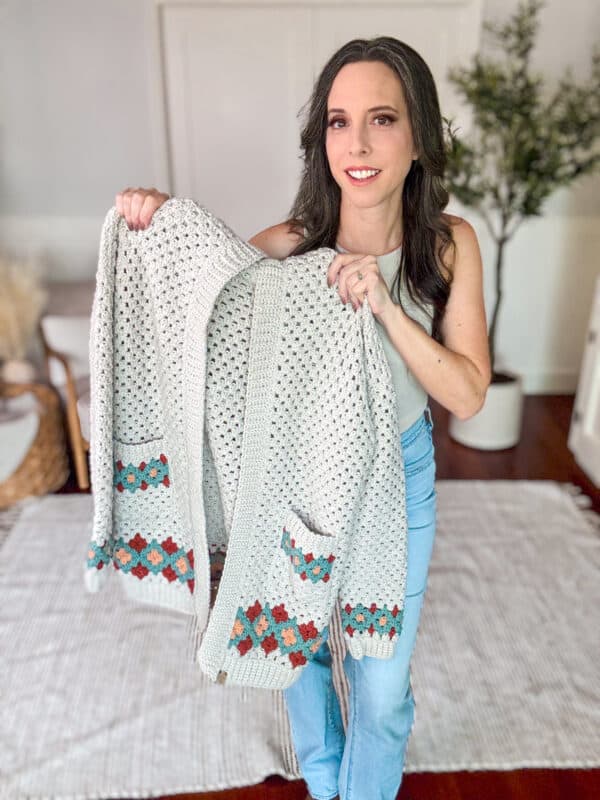
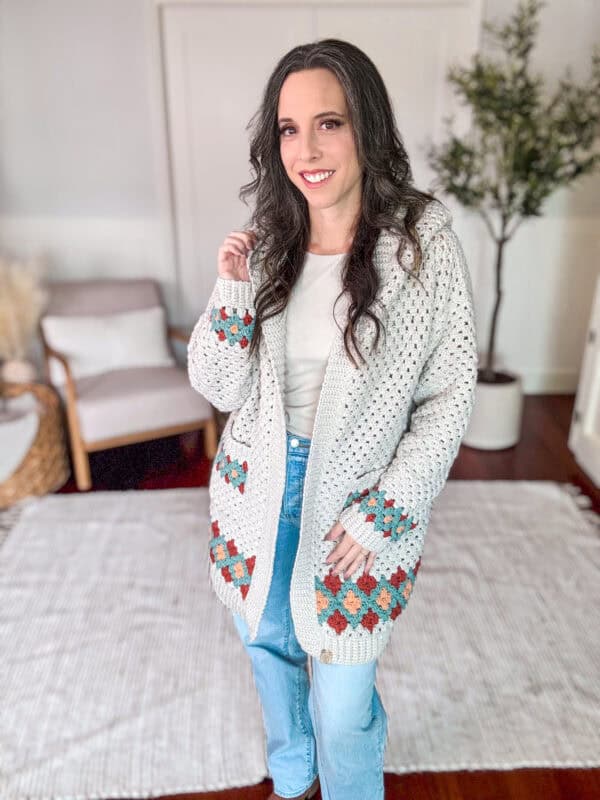
Meet Your New Go-To Fall Essential: The Gemstone Granny Crochet Cardigan! As the temperature drops and the cozy season kicks in, it’s time to wrap yourself in warmth and style. This stunning and long cardigan perfectly combines comfort, functionality, and timeless design. In sizes XS - 5X, this cardigan has a gorgeous drape that flatters all bodies.

Disclosure: This post contains affiliate links. Please read my disclosure for more info.
We will work the body of this crochet cardigan from the bottom up, then split for the front and back panels. It's seamed at the shoulders, and a hood is added to the top. The sleeves are worked separately, from the cuff up, and then seamed to the armhole. Perfect for crocheters of all levels, this pattern comes with detailed instructions, including a full video tutorial to guide you through each step.
Looking for more size-inclusive long crochet cardigans? The Whimsical Cardigan Dress and the Hummingbird Cardigan are perfect for adding chic and stylish texture to your wardrobe!
Crochet Supplies
Yarn
Lion Brand Color Theory
100% Acrylic, 246yds/100g
Color A: Moonbeam
Color B: Canyon
Color C: Tourmaline
Color D: Himalayan Salt
Yarn Quantities
2415 (2550, 2665, 2750, 2920) (3090, 3265, 3440, 3610) total yds
Number of Skeins:
Color A:
9 (9, 10, 11, 11) (12, 13, 13, 14) skeins
Color B, C, D:
1 (1, 1, 1, 1) (1, 1, 2, 2) skeins
Yarn Substitutions
Lion Brand Mandala Ombre
100% Acrylic, 344 yds/150g
Hobbii Kind Feather
100% Premium Acrylic, 257yds / 3.5oz
Mary Maxim Starlette Worsted
100% Ultra Soft Acrylic, 180yds/100g
WeCrochet Swish
100% Fine Superwash Merino Wool 110yds/50g
Remember always to check the gauge and drape when substituting yarns.
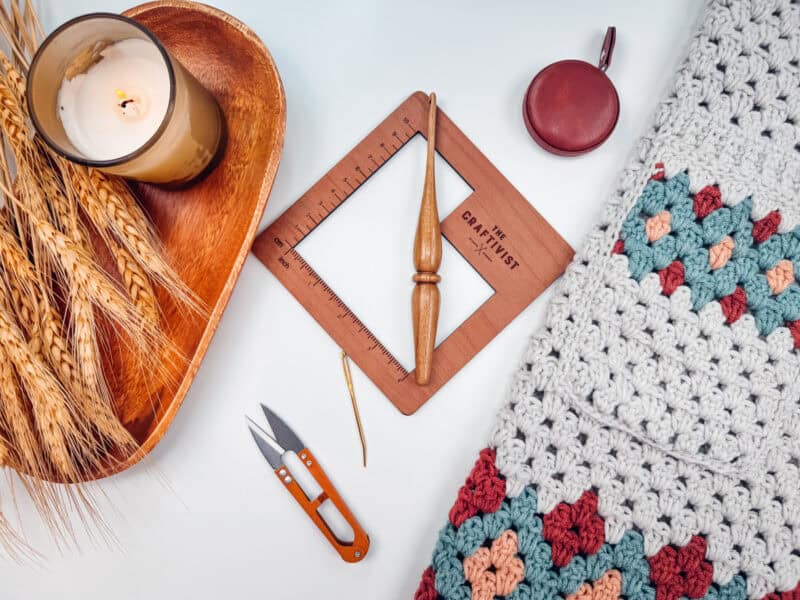
Crochet Hook
Size US H (5.0mm) Crochet Hook or hook to obtain gauge.
Notions
Scissors
Yarn Needle
Removable Stitch Marker
Skill Level
Intermediate
What you'll love about this pattern.
🩶 Charming Granny Stitch Colorwork: This cardigan features beautifully crafted granny stitch diamonds that add a pop of color and texture, making it an eye-catching addition to any fall wardrobe.
🩶 Comfortable & Functional Hood: Whether you’re out for a walk in the crisp autumn air or lounging at home, the hood adds an extra layer of warmth and coziness, keeping you snug all season long.
🩶 Thoughtful Construction: Designed to be practical yet stylish, this cardigan is crocheted from the bottom up, allowing for a seamless fit that drapes beautifully. The addition of front pockets provides both style and utility, making it the perfect layering piece for your everyday adventures.
🩶 Versatile Length: The longer length of this cardigan makes it ideal for pairing with jeans, leggings, or even dresses, offering endless styling possibilities for the fall and winter months.
Sizes
XS (S, M, L, 1X) (2X, 3X, 4X, 5X)
To fit chest: 32 (34, 38, 42, 46) (50, 54, 58, 62)
Actual measurements: 36 (40, 44, 48, 51.75) (55.5, 59.5, 63.5, 67)
This garment has a relaxed fit and is meant to be worn with a 4-6 inch ease. For a more fitted look, go down a size.
Abbreviations
blo - back loop only
ch - chain
dc - double crochet
flo - front loop only
rnd - round
sc - single crochet
sl st - slip stitch
st(s) - stitch(es)
Stsc - Stacked single crochet
Gauge
15 sts and 9 rows = 4" by 4" in granny st pattern.
How to Crochet A Gauge Swatch
Working a gauge swatch will let you know if you will have the correct sizing for this pattern. It will also help you practice the stitches used in this project and improve your stitch work for a flawless look.
Are you struggling to match the gauge? Check out the blog post on What is Crochet Gauge and How To Fix It
Gauge Swatch Instructions
Ch 26
Row 1:
Working in the first ch from hook, Stsc first ch, 2 dc in next ch, *skip 2 chs, 3 dc in next ch; repeat from * until the last 3 chs, skip 2 chs, dc in last, turn. | 25 sts
Row 2:
Stsc in first, 2 dc in the first space, *3 dc in the next space between the granny st groups; repeat until the last 3 sts of the row, skip 2 sts, dc in last, turn.
Repeats:
Repeat Row 2 until the swatch is at least 5 inches to measure.
Construction
The Gemstone Granny Cardigan is worked from bottom up, then split for the front and back panels. It's seamed at the shoulders, and a hood is added to the top. The sleeves are worked separately, from the cuff up, and then seamed to the armhole.
Love crochet cardigans? Try making the Autumn Wheat Beginner Crochet Cardigan or the Get Comfy Cardigan!
Special Stitches
Stacked Single Crochet (Stsc): Do NOT chain, insert hook into next stitch, yo, pull up a loop, yo and pull through both loops, insert hook in the vertical bar below, yo, pull up a loop, yo and pull through both loops on the hook.
Pattern Notes
- Using a stitch marker at the beginning of the row is recomended.
- The instructions and stitch counts are given for the smallest size, with the larger sizes in brackets ( ).
- Before you dive into your project, take a moment to identify the stitch and row counts that match the size you're making. By highlighting or marking them, you'll save time and effort later on. Trust us, this small step will make a big difference in your knitting or crochet journey!
- When doing colorwork, always carry your yarn on the wrong side of the work.
Subscribe & Like
Video Tutorial for the Hooded Gemstone Granny Cardigan
Relax & Crochet
Upgrade to the Printable PDF
Beautifully formatted to print and relax while crocheting. The paid pattern includes:
The Ad-Free PDF can be purchased on Etsy or Ravelry.
Click the box below to unlock this exclusive subscriber content for free. Add your email and create a password. If you are having trouble, reset your password or login to the Grow Portal.
I'm thrilled to share this amazing crochet pattern with you! Please don't copy, paste, or distribute this pattern. Prefer an ad-free experience? Purchase a digital PDF file for a small fee from one of my online stores. I appreciate your support and readership. You are why I can keep doing what I love and sharing it with others. Thank you from the bottom of my heart.
Written Crochet Pattern Instructions
Row 13:
With Color A, Stsc in first, 2 dc in first space, *3 dc in next space between the granny st groups; repeat until the last 3 sts of the row, skip 2 sts, dc in last, turn.
Pocket Ribbing:
Row 1:
Ch 5, sc in 2nd ch from hook and across back towards the cardigan body, blo sl st in next 2 sts, turn. | 4 sc, 2 sl sts
Row 2:
Sk 2 sl sts, blo sc 4, turn.
Row 3:
Ch 1, blo sc 4, blo sl st in next 2 sts, turn.
Next Rows:
Rep Rows 2-3 for ribbing across the top of the pocket, fasten off leaving a long tail for sewing onto the cardigan.
Join The Kindest Community
Join our vibrant community of crafters on Facebook today. Whether you enjoy crafting with others or simply have burning questions, we've got you covered - join us now!
Bottom Ribbing
Row 1:
Ch 10, sc in 2nd ch from hook and across, turn. | 9 sts
Row 2:
Ch 1 (does not count as a stitch here and throughout), working in the blo, sc in each st across, turn. | 9 sts
Repeats:
Repeat Row 2 until there are 140 (152, 164, 188, 200) (212, 224, 248, 260) total rows of ribbing.
Rotate your ribbing to work across the long edge, ch 1, sl st 1 st per edge. | 140 (152, 164, 186, 200) (212, 224, 248, 260) sl sts

Style
Pair the cardigan with a simple tank top or t-shirt and your favorite pair of jeans or leggings for a casual day-out look. Add a crossbody bag like the Summer House Bag to keep it chic.
Layer the cardigan over a flowy dress or a maxi skirt and a fitted top. Add a wide-brimmed hat, some bangles, and a beautiful bag (like the Just a Rectangle Bag) for that perfect boho chic vibe.
Wear the cardigan over a blouse tucked into tailored pants or a pencil skirt for an office-ready look. Add classic pumps or simple loafers, and top it off with simple jewelry. A beautiful clutch will help finish the look and keep your personal things close.
Bottom of Cardi
Rows 1-10:
Follow the instructions for each size in the following section.
Extra Small, 2X, & 4X
Row 1 (WS): With Color A and working in the flo for this row, Stsc in first, 2 dc in next, *skip 2 sts, 3 dc in next; repeat from * until the last 3 sts in the row, skip 2 sts, dc in last, turn. | xs: 139; 2X: 211; 4X: 247 sts
Row 2 (RS): With Color B, Stsc in first, 2 dc in first space, *with Color A 3 dc in next 2 spaces (between the granny st groups), with Color B 3 dc in next space; repeat until the last st of the row, dc in last, turn. Fasten off Color A.
Row 3: With Color B, Stsc in first, 2 dc in first space, *3 dc in next space, with Color C 3 dc in next space, with Color B 3 dc in next space; repeat from * until the last st, dc in last, turn.
Row 4: With Color B, Stsc in first, 2 dc in first space, *With Color C 3 dc in each of the next 2 spaces, with Color B 3 dc in next space; repeat from * until the last st, with Color C dc in last, turn. Fasten off Color B.
Row 5: With Color C, Stsc in first, 2 dc in first space, *3 dc in next space, with Color D 3 dc in next space, with Color C 3 dc in next space; repeat from * until the last st, with Color D dc in last, turn.
Row 6: With Color C, Stsc in first, 2 dc in first space, *with Color D 3 dc in each of the next 2 spaces, with Color C 3 dc in next space; repeat from * until the last st, with Color D dc in last, turn.
Row 7: Repeat Row 5. Fasten off Color D.
Row 8: Repeat Row 4.
Row 9: Repeat Row 3. Fasten off Color C.
Row 10: Repeat Row 2. Fasten off Color B.
Medium & 1X
Row 1 (WS): With Color A and working in the flo for this row, Stsc in first, 2 dc in next, *skip 2 sts, 3 dc in next; repeat from * until the last 3 sts in the row, skip 2 sts, dc in last, turn. | Medium: 163; 1X: 199 sts
Row 2 (RS): With Color B, Stsc in first, 2 dc in first space, *with Color A 3 dc in each of the next 2 spaces (between the granny st groups), with Color B 3 dc in next space; repeat until the last 9 sts of the row, with Color A 3 dc in each of the next 2 spaces, with Color B dc in last, turn. Fasten off Color A.
Row 3: With Color B, Stsc in first, 2 dc in first space, *with Color C 3 dc in next space, with Color B 3 dc in each of the next 2 spaces; repeat from * until the last 9 sts, with Color C 3 dc in next space, with Color B 3 dc in next space, dc in last, turn.
Row 4: With Color B, Stsc in first, 2 dc in first space, *with Color C 3 dc in each of the next 2 spaces, with Color B 3 dc in next space; repeat from * until the last 9 sts, with Color C 3 dc in each of the next 2 spaces, with Color B dc in last, turn. Fasten off Color B.
Row 5: With Color C, Stsc in first, 2 dc in first space, *with Color D 3 dc in next space, with Color C 3 dc in each of the next 2 spaces; repeat from * until the last 9 sts, with Color D 3 dc in next space, with Color C 3 dc in next space, with Color D dc in last, turn.
Row 6: With Color C, Stsc in first, 2 dc in first space, *with Color D 3 dc each of the next 2 spaces, with Color C 3 dc in next space; repeat from * until the last 9 sts, with Color D 3 dc each of the next 2 spaces, with Color C dc in last, turn.
Row 7: Repeat Row 5. Fasten off Color D.
Row 8: Repeat Row 4.
Row 9: Repeat Row 3. Fasten off Color C.
Row 10: Repeat Row 2. Fasten off Color B.
Small, Large, 3X, & 5X
Row 1 (WS): With Color A and working in the flo for this row, Stsc in first, 2 dc in next, *skip 2 sts, 3 dc in next; repeat from * until the last 3 sts in the row, skip 2 sts, dc in last, turn. | 139 (Small: 151; Large: 187; 3X: 223; 5X: 259 sts
Row 2 (RS): With Color B, Stsc in first, 2 dc in first space, *with Color A 3 dc in each of the next 2 spaces (between the granny st groups), with Color B 3 dc in next space; repeat until the last 6 sts of the row, with Color A 3 dc in next space, dc in last, turn. Fasten off Color A.
Row 3: With Color C, Stsc in first, 2 dc in first space, *with Color B 3 dc in each of the next 2 spaces, with Color C 3 dc in next space; repeat from * until the last 6 sts, with Color B 3 dc in next space, dc in last, turn.
Row 4: With Color B, Stsc in first, 2 dc in first space, *with Color C 3 dc in each of the next 2 spaces, with Color B 3 dc in next space; repeat from * until the last 6 sts, with Color C 3 dc in next space, dc in last, turn. Fasten off Color B.
Row 5: With Color D, Stsc in first, 2 dc in first space, *with Color C 3 dc in each of the next 2 spaces, with Color D 3 dc in next space; repeat from * until the last 6 sts, with Color C 3 dc in next space, with Color D dc in last, turn.
Row 6: With Color C, Stsc in first, 2 dc in first space, *with Color D 3 dc each of the next 2 spaces, with Color C 3 dc in next space; repeat from * until the last 6 sts, with Color D 3 dc in next space, dc in last, turn.
Row 7: Repeat Row 5. Fasten off Color D.
Row 8: Repeat Row 4.
Row 9: Repeat Row 3. Fasten off Color C.
Row 10: Repeat Row 2. Fasten off Color B.
Rows 11-45 for all sizes:
Stsc in first, 2 dc in first space, *3 dc in the next space between the granny st groups; repeat until the last 3 sts of the row, skip 2 sts, dc in last, turn.
Customization Tip:
I've given the row count for the sample shown, but add or remove rows to increase or decrease the length. Measure from under your arm and down your side to get an idea of what suits you best.
Customization Tips
- This can easily be modified to be a shorter or longer cardigan. After completing the colorwork section, we work with one color until the underarm. Adjusting the rows in this section will change the length of the garment.
- This can be crocheted with long or short sleeves. When you like the length, simply stop adding rows to the sleeves and proceed to the scalloped trim edging.
- This can be modified to a drop-shoulder vest by omitting the sleeves and creating a simple single crochet trim around the sleeve opening.
First Front Panel
Row 1:
Stsc in first, 2 dc in first space, 3 dc in next 10 (11, 12, 14, 15) (16, 17, 19, 20) spaces, dc in next space, turn. | 34 (37, 40, 46, 49) (52, 55, 61, 64) sts; 11 (12, 13, 15, 16) (17, 18, 20, 21) granny groups + 1 sts
Row 2:
Stsc in first, 2 dc in first space, *3 dc in next space between the granny st groups; repeat until the last 3 sts of the row, skip 2 sts, dc in last, turn.
Rows 3 - 17 (18, 19, 20, 21) (22, 23, 24, 24):
Repeat Row 2. Fasten off leaving a long tail end to stitch the shoulder seam later.
Back Panel
Row 1:
Join yarn to the space next to the First Panel row. Stsc and 2 dc in the space,*3 dc in next 21 (23, 25, 29, 31) (33, 35, 39, 42) spaces, dc in next space, turn. | 67 (73, 79, 91, 97) (103, 109, 121, 127) sts; 22 (24, 26, 30, 32) (34, 36, 40, 42) granny groups + 1 sts
Row 2:
Stsc in first, 2 dc in first space, *3 dc in next space between the granny st groups; repeat until the last 3 sts of the row, skip 2 sts, dc in last, turn.
Repeats:
Repeat Row 2 until there are 17 (18, 19, 20, 21) (22, 23, 24, 24) total rows for the back panel. Fasten off.
Second Front Panel
Row 1:
Join yarn to the space next to the Back Panel row. Stsc and 2 dc in the space, *3 dc in next space between the granny st groups; repeat until the last 3 sts of the row, skip 2 sts, dc in last, turn. | 34 (37, 40, 46, 49) (52, 55, 61, 64) sts; 11 (12, 13, 15, 16) (17, 18, 20, 21) granny groups + 1 sts
Row 2:
Stsc in first, 2 dc in first space, *3 dc in next space between the granny st groups; repeat until the last 3 sts of the row, skip 2 sts, dc in last, turn.
Rows 3-17 (18, 19, 20, 21) (22, 23, 24, 24):
Repeat Row 2. Fasten off leaving a long tail end to stitch the shoulder seam later.
Cuff Ribbing
The ribbing will be worked in rows then joined and worked in the round. Start with Color A.
Row 1:
Ch 8, sc in 2nd ch from the hook and across, turn. | 7 sts
Row 2:
Ch 1 (does not count as a stitch here and throughout), working in the blo sc in each st across, turn. | 7 sts
Repeats:
Repeat Row 2 until there are 36 (36, 39, 39, 42) (42, 45, 45, 45) total rows of ribbing.
Join:
Slip Stitch Row 1 and current Row together by working through the blo of the current row and the blo loop from the first row.
Rotate your ribbing to work across the long edge, ch 1, sl st 1 st per edge. | 36 (36, 39, 39, 42) (42, 45, 45, 45) sl sts
Sleeve
Setup:
Working along the edge of the ribbing, sl st one stitch per row, join and turn. The rest of the pattern will be worked in rounds. The next round can be worked in the flo if desired.
Rnd 1 (WS):
Working in the same st as joined, Stsc, 2 dc in same st, skip 2 sts, *3 in next st, skip 2 sts; repeat from * around, join to Stsc with Color C, turn. Fasten off Color A.| 36 (36, 39, 39, 42) (42, 45, 45, 45) sts
Rnd 2 (RS):
Working into the first space, Stsc, 2 dc in same space, *with Color B 3 dc in next space, with Color C 3 dc in next space; repeat from * around, with Color B 3 dc in last space, join to Stsc with Color C, turn. Fasten off Color B.
Rnd 3:
Working into the first space, Stsc, 2 dc in same space, 3 dc in each space around, join and turn.
Rnd 4:
Working into the first space with Color D, Stsc, 2 dc in same space, *with Color C 3 dc in next space, with Color D 3 dc in next space; repeat from * until the last space, with Color C 3 dc in last space, join to Stsc with Color C and turn. Fasten off Color D.
Rnd 5:
Repeat Rnd 3.
Rnd 6:
Repeat Rnd 2, joining with Color A. Fasten off Color B & C.
Next, we will start to increase the sleeve circumference. The instructions needed for each size are as follows:
Non-Increase Rnd:
Stsc in first, 2 dc in the same space, 3 dc in the remaining spaces around, join and turn.
How to Increase:
Increase Rnd 1:
Increases are best worked under the arm as follows, work 4 dc in the first space, continue in the granny stitch pattern around.
Increase Rnd 2:
Work in the granny stitch until you reach the 4 dc group, 3 dc in the center space between the 4 dc sts.
Size XS: [Work Increase Rnds 1-2, then 4 rounds without increasing] 6 times, then work 3 more rounds without increasing. Fasten off yarn leaving a long tail for seaming. | 54 sts, 45 Rnds
Size S: [Work Increase Rnds 1-2, then 2 rounds without increasing] 8 times, then work 7 more rnds without increasing. Fasten off yarn leaving a long tail for seaming. | 60 sts, 45 Rnds
Size M: [Work Increase Rnds 1-2, then 1 rounds without increasing] 10 times, then work 9 more rnds without increasing. Fasten off yarn leaving a long tail for seaming. | 66 sts, 45 Rnds
Size L: [Work Increase Rnds 1-2, then 1 round without increasing] 12 times, then work 3 more rnds without increasing. Fasten off yarn leaving a long tail for seaming. | 72 sts, 45 Rnds
Size 1X: [Work Increase Rnds 1-2, then 1 round without increasing] 10 times, then work 9 more rnds without increasing. Fasten off yarn leaving a long tail for seaming. | 72 sts, 45 Rnds
Size 2X: [Work Increase Rnds 1-2, then 1 round without increasing] 12 times, then work 3 more rnds without increasing. Fasten off yarn leaving a long tail for seaming. | 78 sts, 45 Rnds
Size 3X: [Work Increase Rnds 1-2, then 1 rounds without increasing] 12 times, then work 3 more rnds without increasing. Fasten off yarn leaving a long tail for seaming. | 78 sts, 45 Rnds
Size 4X & 5X: [Work Increase Rnds 1-2, then 1 rnd without increasing] 14 times. Then repeat rnds 1-2 one more time. Fasten off yarn leaving a long tail for seaming. | 84 sts, 47 Rnds
Repeat for Second Sleeve.
Seaming the Shoulders
Lay the body panel flat with the wrong side facing. Fold each side panel in and seam until the last 5 inches of the front panel, starting at the shoulder edge.
This will allow room for the hood. If omitting the hood, seam the entire shoulder.
Hood
Row 1 (RS):
Join Color A to the left corner of the neck opening. Stsc in first, 2 dc in next, *skip 2 sts, 3 dc in next; repeat from * across the top edge (placing a granny group on the seam), until the last 3 sts in the row, skip 2 sts, dc in last, turn. | 82 sts; 27 granny groups + 1 st
Row 2 (WS):
Stsc in first, 2 dc in first space, *3 dc in the next space between the granny st groups; repeat until the last 3 sts of the row, skip 2 sts, dc in last, turn.
Rows 3-30:
Repeat Row 2. Fasten off leaving a long tail for seaming.
*You can adjust the height of your hood by crocheting fewer or more rows.
Fold the hood in half, and with your yarn needle and Color A yarn, seam the top of the hood together. Weave in ends.
Front Ribbing
Setup:
With the right side facing, join to the bottom front left corner of the cardigan, sl st around the front opening (including the hook), placing approx 2 sts per row, keeping sts as even as possible, turn.
Row 1:
Ch 8, sc in the 2nd ch from hook and across back towards the cardigan body, flo sl st in next 2 sts, turn. | 7 sc, 2 sl sts
Row 2:
Sk 2 sl sts, blo sc 7, turn.
Row 3:
Ch 1, blo sc 7, flo sl st in next 2 sts, turn.
Next Rows:
Rep Rows 2-3 for ribbing around the front opening.
Fasten off.
Subscribe to my youtube channel
Assembly
The last steps will be to pin the sleeves to the sleeve opening and seam the sleeves to the body.
Then, place the pockets in desired location and sew the pockets to the body around the three bottom edges.
Finishing
Weave in any ends, block the garment if needed, and enjoy!
Crochet cardigans are the ultimate blend of comfort, style, and creativity, making them a fantastic addition to any wardrobe. These versatile garments are perfect for layering, whether you’re dressing up for a special occasion or simply cozying up on a chilly day.
Want some inspiration on how to style your crochet hooded cardigan?
1. Casual Day Out:
- Pair it with: High-waisted jeans, a simple tee or tank, and ankle boots or sneakers.
- Accessories: Add a crossbody bag and a beanie for a cozy look. Keep jewelry minimal with small hoop earrings or studs.
- Style Tip: Leave the cardigan open to show off your top underneath, allowing the texture of the granny stitch to shine.
2. Effortless Layering:
- Pair it with: A fitted long-sleeve turtleneck and leggings or slim-fit pants.
- Accessories: Belt the cardigan at the waist to accentuate your silhouette, and finish the look with knee-high boots or loafers.
- Style Tip: Use neutral colors for the layers underneath to let the vibrant granny stitch colorwork take center stage.
3. Cozy Evening Vibes:
- Pair it with: A maxi dress or a flowy skirt and a simple top.
- Accessories: Layer on long necklaces, a wide-brimmed hat, and cozy socks with ankle boots.
- Style Tip: Pull the hood up for an extra cozy vibe, especially on chilly evenings, creating a relaxed and boho-chic look.
And if you loved these also check out the Campside Cardigan and the Snuggle Puff Cardi!
Cheers, and happy crocheting!
Well That Was Fun! What's Next?
📌 PIN THIS POST - Don't lose this project; save it to your Pinterest crochet board so you can quickly come back to it again.
💌 SHARE - Share your yarn choice, in-progress, or finished projects on Facebook or Instagram and use the hashtag #brianakdesigns
🥂 JOIN - Join the kindest crafters in the Briana K Designs Community Group on Facebook. We love yarny friends!
🔗 RAVELRY LINK -Link and share your project on Ravelry. Having inspirational photos can help crafters.