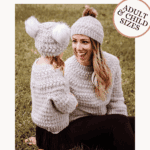
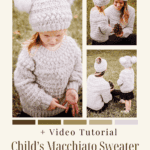

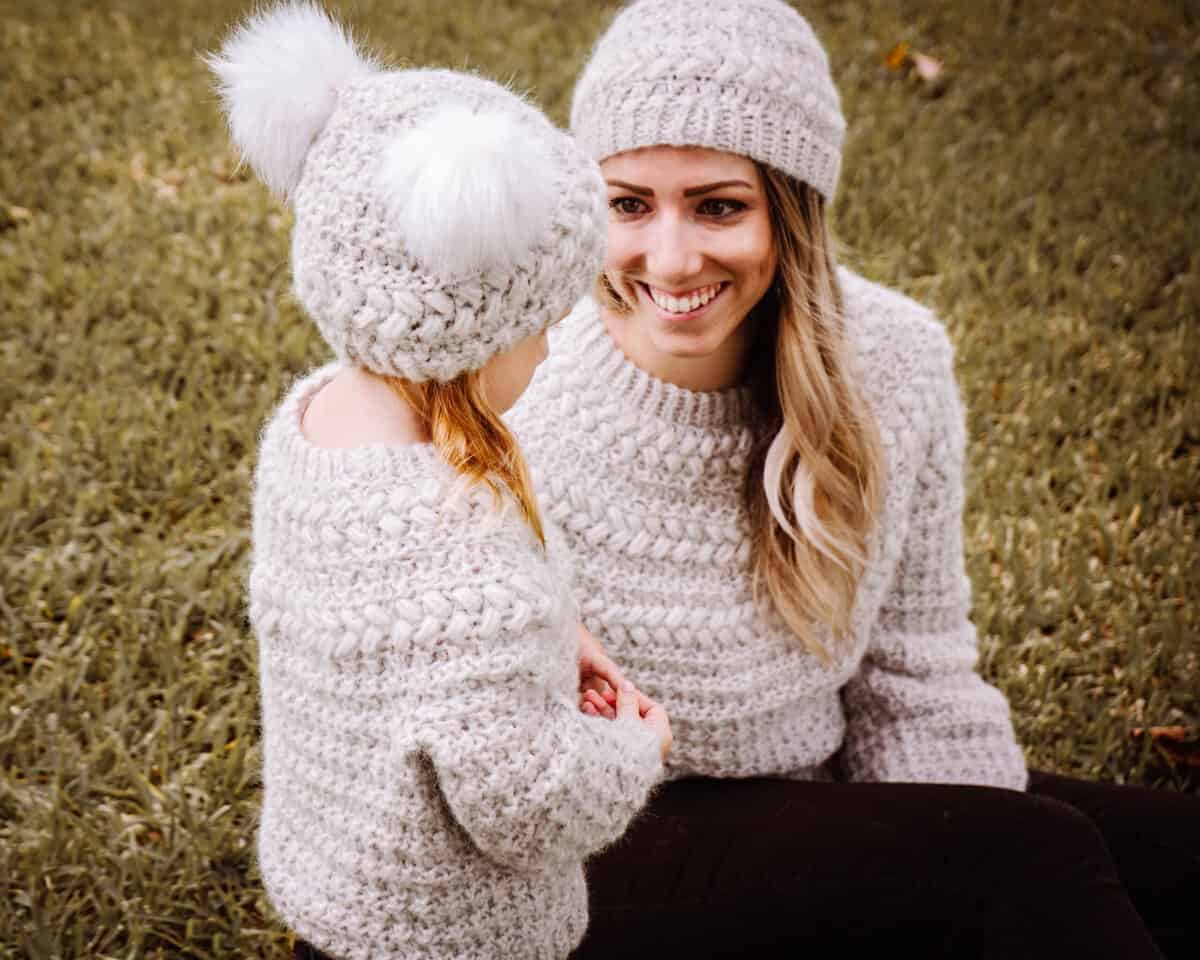
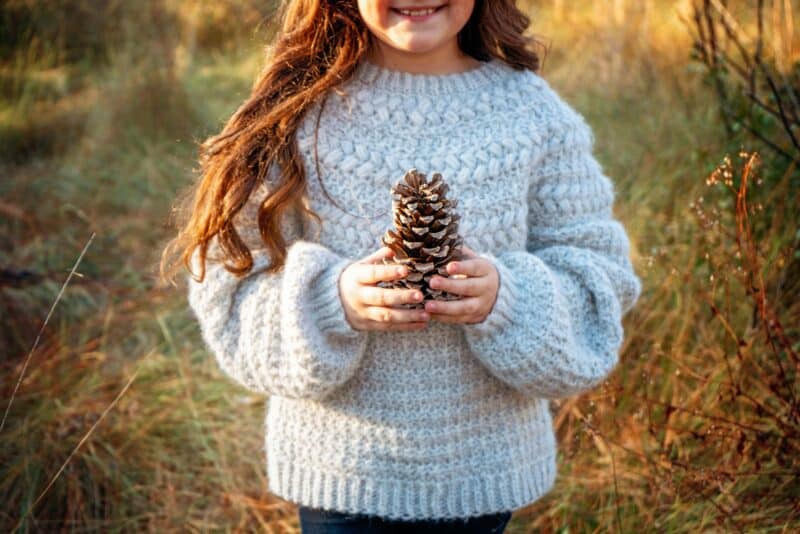
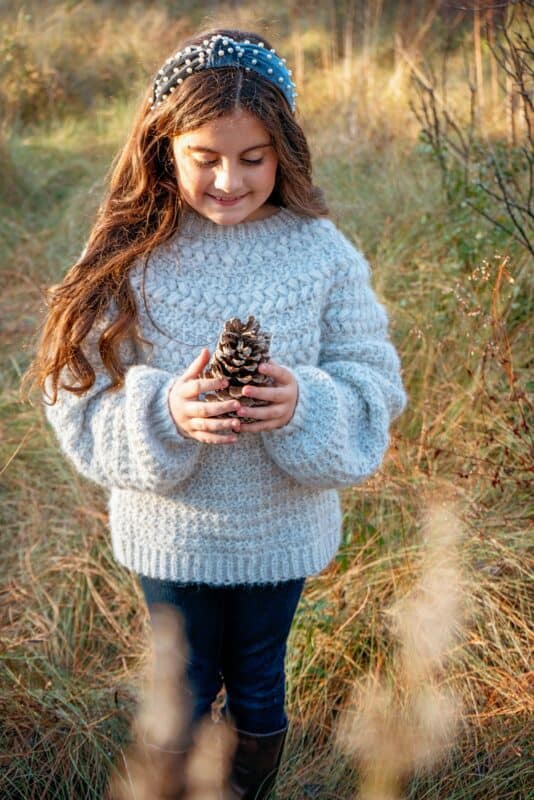
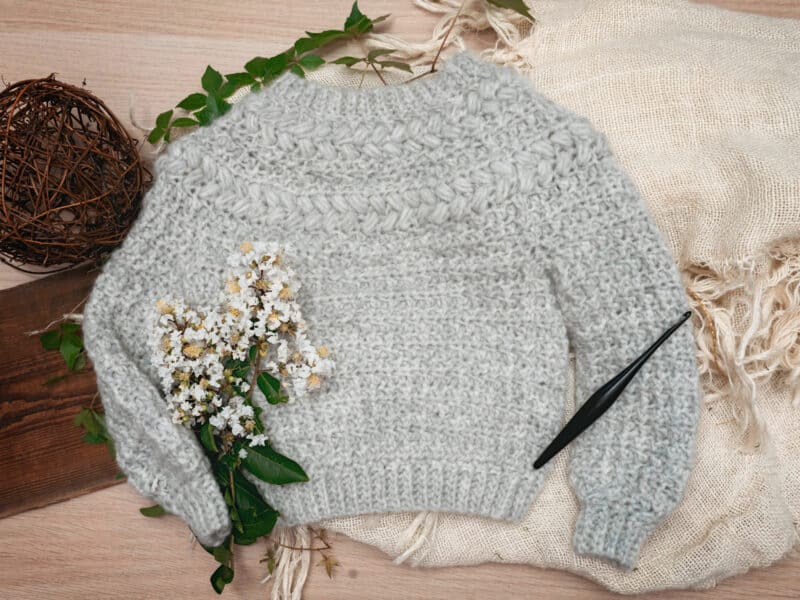
Looking for a cozy and stylish crochet sweater to make for your little one? The Macchiato Child Crochet Sweater is here—and it’s the perfect match for the adult-sized version! With its seamless, top-down raglan construction and puff stitch details, this free child crochet sweater pattern is modern, comfy, and beginner-friendly.
Make a Handmade Memory with This Free Child Crochet Sweater Pattern!
Disclosure: This post contains affiliate links. Please read my disclosure for more info.
You’ll also find a full video tutorial to guide you every step of the way, so even if this is your first sweater, you can make it with confidence. Sizes range for toddlers and children, and it’s a great piece for matching family outfits.
The top-down construction is worked the same way as the stylish and cozy adult Macchiato Crochet Sweater and has a matching Macchiato Crochet Beanie.
What you’ll love about this pattern.
- Zero Seams! – With this top-down construction, this crochet garment worked as one piece without any seaming.
- Gorgeous Yoke – The puff stitches around the yoke are easy and add a focal point, similar to the Macchiato Poncho Pattern.
- Quick Project – Crafted with a lightweight bulky yarn, this crochet sweater not only provides a delightful feel but also allows for a fast and effortless creation process.
- Lots of Size Options – 7 size options from 1 year to teen.
Modern Baby & Child Crochet Fashion
If you love making handmade garments for your kids, the Easy Free Crochet Vest Pattern is a great place to start. It includes 18 sizes from baby to adult, making it perfect for matching family sets. Prefer a classic sweater style? The Everyday Crochet Knit-Look Sweater Pattern is another seamless, top-down raglan design that uses simple stitches for a clean, timeless look—great for all skill levels. Both patterns offer comfort, versatility, and style for your handmade wardrobe.
Supplies Needed for the Macchiato Child Crochet Sweater
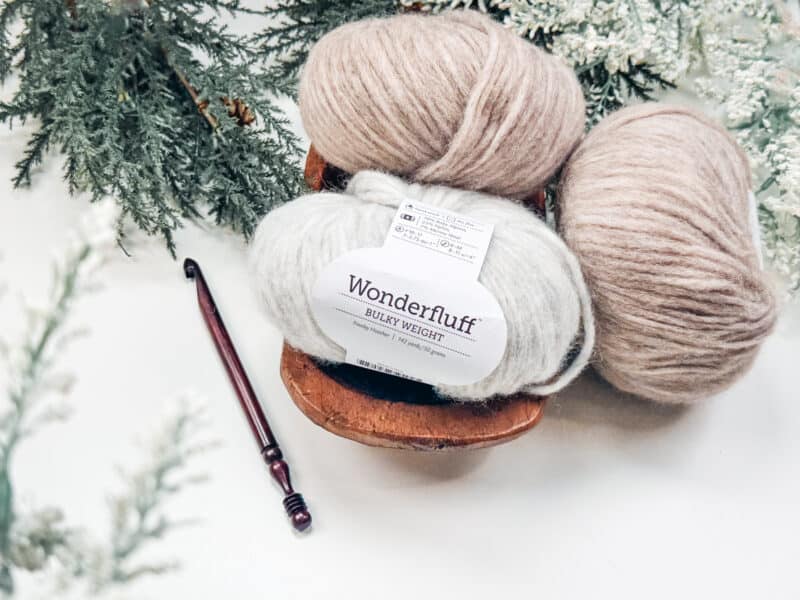
Yarn
WeCrochet Wonderfluff Bulky (5 Weight) in Finnley Heather, 70% Baby Alpaca, 23% Nylon, 7% Merino Wool; 142 yds/50g.
Color Inspiration For Your Sweater
Yarn Quantities
(300, 450, 500, 600; 700, 800, 850)
3 (4, 4, 5, 5, 6, 6) Balls
Yarn Substitutions
Brava Bulky – 100% Premium Acrylic; 136yds/100g
Swish Bulky – 100% Fine Superwash Merino Wool; 137yds/100g
Remember to always check gauge and drape when substituting yarns.
Crochet Hook
Size J (6.0mm) Crochet Hook, or hook to obtain gauge.
Notions
Scissors
Yarn Needle
Removable Stitch Marker
Skill Level
Advanced Beginner
Sizing
1 (2, 4, 6, 8, 10/12, 14/16) Years
To fit chest:
20 (21, 23, 25, 26.5, 28, 31.5)”
More measurements are in schematic.
Ease: Finished bust measurements, including ease: 22 (25, 27, 29, 30.5, 32, 35.5)
Abbreviations
Alt –Alternatively
BLO -back loop only
Ch -chain
FLO -front loop only
Hdc -half double crochet
Hdc2tog -half double crochet two stitches together
Inc. – increase
Gauge
13 sts by 8.5 rows = 4” square
How to Crochet A Gauge Swatch
Working a gauge swatch will let you know if you will have the correct sizing for this pattern. A gauge swatch helps you practice the stitches used in this project and improve your stitch work for a flawless look.
Are you struggling to match gauge? Check out the blog post on What is Crochet Gauge and How To Fix It
Gauge Swatch Instructions:
Stitch pattern for gauge swatch: Ch 17, in second chain from hook hdc 1 in blo, hdc 1 in flo; repeat from * to * across, turn. Repeat these steps to make the gauge swatch with a ch 1 at the beginning of the row.
Construction of Macchiato Child’s Sweater
This child’s crochet sweater is worked from the top down in one seamless piece. Starting at the neckline with ribbing, you’ll crochet the raglan yoke while increasing evenly in the round. Puff stitch accents are added during this stage to give the sweater a fun, modern texture.
From there, you’ll separate for the sleeves and body, then work straight down to the hem. Last, the sleeves are crocheted in the round and finished with matching ribbed cuffs. No seaming required!
Special Stitches
Puff Stitch: Yarn over and insert your hook into the stitch/space. Yarn over again and pull up a long loop. (Yarn over and insert your hook into the same stitch/space. Yarn over again and pull up a long loop) two more times (7 loops on the hook). Yarn over and pull through the first 6 loops, yarn over and pull through remaining loops.
Established stitch pattern (est st pattern): *hdc 1 in blo, hdc 1 in flo*; repeat from * to * around increasing by placing two stitches in indicated stitch.
Macchiato Collection can be purchased on Etsy or Ravelry.
Notes
- A ch 1 at the beginning of a row is not counted as a stitch. Using a stitch marker at the beginning of each round is recommended.
- This sweater is worked in a top-down seamless yoke style. The instructions and stitch counts are given for the smallest size, with the larger sizes in brackets ( ).
- Before you dive into your project, take a moment to identify the stitch and row counts that match the size you’re making. By highlighting or marking them, you’ll save time and effort later on. Trust us, this small step will make a big difference in your crochet journey!
- When there is ‘no increase’ listed in the instructions, work the round without increasing. Where there is a ‘n/a’ listed in the instructions skip these as it’s not applicable to that size.
- This sweater is worked in the round turning at the beginning of each new round, place a stitch marker in the last stitch of the round to help keep track of first and last stitches. When increasing for sizes with two numbers (i.e 7/8), increase in the 7th stitch and then crochet 8 and also increase in the 8th stitch. For sizes Medium, Large, 2x, and 3x there will be extra stitches at the end of the round, finish those stitches in pattern.
This Pattern Uses Standard US Terminology.
❓ Frequently Asked Questions (FAQ)
Q: What skill level is needed for this child sweater pattern?
This is a confident beginner to intermediate level pattern. If you’re comfortable with basic stitches like double crochet and puff stitches, you’re ready for it!
Q: Is there a video tutorial?
Yes! A step-by-step video tutorial is included to guide you through the baby version, which uses the same construction techniques.
Q: What sizes are included?
The free pattern includes child sizes, from toddler through youth. For baby and adult sizes, see the other patterns in the Macchiato Collection.
Q: Can I make a matching adult sweater?
Yes! The Macchiato Adult Crochet Sweater uses the same construction and stitch style—perfect for a mommy-and-me or family set.
Video Tutorial for the Macchiato Child Sweater
Watch how easy and beginner-friendly it is to work up this crochet piece with a tutorial.

How to Crochet A Yoke Child Sweater
To Unlock Exclusive Subscriber Content click the Box below and join for free! Grow will pop up so you can subscribe to my Blog. Enter your email and create a password. Every time you see Exclusive Content on my Blog, log in to your account!
Ch 1, * hdc 1 in blo, hdc 1 in flo *; repeat from * to * around, join.
Rnd 2 (WS):
Turn and ch 1, * skip the first hdc st, hdc in the next, work a puff st into the skipped st *; repeat from * to * around, join.
Rnd 3:
Repeat Rnd 2 (Puff Round).
Rnd 4:
Turn and ch 1, work in established stitch pattern increasing 12 times, every 5th sts for sizes 1-8 and every 6th stitch for sizes 10/12 & 14/16 sts alt., join. There will be stitches left over for some sizes, complete those in established stitch pattern from here on out. | 72 (76, 78, 80, 82, 84, 88) sts.
Rnd 5:
Turn and ch 1, work in established stitch pattern increasing every 6th sts for sizes 1-8 and every 7th stitch for sizes 10/12 & 14/16 sts alt., join. | 84 (88, 90, 92, 94, 96, 100) sts.
Rnd 6:
Turn and ch 1, work in established stitch pattern increasing every 7th sts for sizes 1-8 and every 8th stitch for sizes 10/12 & 14/16 sts alt., join. | 96 (100, 102, 104, 106, 108, 112) sts.
Rnd 7-8:
Repeat Rnd 2 (Puff Round).
Rnd 9:
Turn and ch 1, work in established stitch pattern without increasing for size 1, and increasing every 8th sts for sizes 2-8 and every 9th stitch for sizes 10/12 & 14/16 sts alt., join. | 96 (112, 114, 116, 118, 120, 124) sts.
Sizes 2-8, 10/12 & 14/16 Only:
Rnd 10:
Turn and ch 1, work in established stitch pattern increasing every 9th sts for sizes 2-8 and every 10th stitch for sizes 10/12 & 14/16 sts alt., join. | na (124, 126, 128, 130, 132, 136) sts.
Sizes 4-8, 10/12 & 14/16 Only:
Rnd 11:
Turn and ch 1, work in established stitch pattern without increasing for size 4, and increasing every 10th sts for size 8 and every 11th stitch for sizes 10/12 & 14/16 sts alt., join. | na (na, 126, 140, 142, 144, 160) sts.
Sizes 6-8, 10/12 & 14/16 Only:
Rnd 12:
Turn and ch 1, work in established stitch pattern without increasing for size 6, and increasing every 11th sts for size 8 and every 12th stitch for sizes 10/12 & 14/16 sts alt., join. | na (na, na, 140, 154, 156, 160) sts.
Sizes 8, 10/12 & 14/16 Only:
Rnd 13:
Turn and ch 1, work in established stitch pattern without increasing for size 8, and increasing every 26th sts for size 10/12 and every 13th stitch for size 14/16 sts alt., join. | na (na, na, na, 154, 162, 172) sts.
Rnds 14-15:
Turn and ch 1, hdc 1 in blo, hdc 1 in flo; repeat from * to * around, join.
Sizes 14/16 Only
Rnd 16:
Turn and ch 1, hdc 1 in blo, hdc 1 in flo; repeat from * to * around, join.
Join The Kindest Community
Join our vibrant community of crafters on Facebook today. Whether you enjoy crafting with others or simply have burning questions, we’ve got you covered – join us now!

Fitting Tip
If you would like more stitches to customize fit around chest, work fewer stitches on the back body (section before doing first set of sleeve sts) in increments of two, and that will add to the stitches on the front of the sweater. Just make sure sleeve st counts and chains remain the same.
Separate the Macchiato Sweater Body & Sleeves
Rnd 1:
Turn and ch 1, *work in est st pattern for 29 (38, 40, 44, 46, 48, 50)sts, ch 7 (4, 7, 4, 3, 3, 4) for underarm sleeve, skip 19 (24, 23, 26, 31, 33, 36) sts for arm*; repeat from * to * one more time, join.
Macchiato Sweater Body
Rnd 1:
Turn and ch 1, work in est st pattern 72 (84, 94, 96, 98, 102, 108) around body stitches including the chains under the arms, join. | 72 (84, 94, 96, 98, 102, 108) sts
Rnd 2:
Turn and ch 1, work in est st pattern 72 (84, 94, 96, 98, 102, 108) around body stitches, join.
Repeat Rnd 2 for a total of 12 (14, 15, 16, 17, 18, 18) body rnds. From underarm to bottom before bottom rib measurement in inches is 5.5 (6.5, 7, 7.5, 8, 8.5, 8.5). If more length is desired repeat Rnd 2 more times until length minus repeat.

Macchiato Bottom Body Ribbing
Row 1:
Ch 7, in blo slip st in second chain from hook and across to body, sl st 2 sts on the body (these do not count as sts), turn. | 6 sts
Row 2:
Skip the two sl st sts from the body, in blo sl st in each st across, turn.
Row 3:
Ch 1, in blo sl st in each st across, sl st 2 sts on the body, turn.
Repeat Rows 2-3 around the bottom of the sweater body. Join last row to beginning row by slip stitching through blo of first and last row at the same time with the WS facing.
Macchiato Sweater Sleeves
Rnd 1:
With the appropriate RS or WS facing (opposite from the last row worked on yoke), attach yarn to the center st under the arm. Ch 1, work in est st pattern for 6 (28, 30, 32, 34, 36, 40) sleeve stitches around. | 6 (28, 30, 32, 34, 36, 40) sts
Rnd 2:
Turn and ch 1, work in est st pattern 26 (28, 30, 32, 34, 36, 40) sleeve stitches around.
Repeat Rnd 2 for a total of 14 (16, 18, 20, 22, 24, 26) sleeve rnds. From underarm to bottom of sleeve (before 2.5 inches for decrease & cuff rnds) measurement in inches is 6.5 (7.5, 8.5, 9.5, 10, 11, 12). If more length is desired Repeat Rnd 2 more times.
Decrease Rnd:
Turn and ch 1, work in est st pattern hdc2tog around, join. | 13 (14, 15, 16, 17, 18, 20) sts.
Macchiato Sleeve Cuff
Row 1:
With the RS facing Ch 7, in blo slip st in second chain from hook and across to sleeve body, sl st 2 sts on the sleeve body (these do not count as sts), turn. | 6 sts
Row 2:
Skip the two sts from the sleeve body, in blo sl st in each st across, turn.
Row 3:
Ch 1, in blo sl st in each st across, sl st 2 sts on the sleeve body, turn.
Repeat Rows 2-3 around the bottom of the sleeve. Join last row to beginning row by slip stitching through blo of first and last row at the same time with the WS facing.
Finishing Your Child’s Macchiato Sweater
Fasten off and weave in all ends. Use yarn and needle to close any holes/gaps under the arm. Lightly block and wear.
The Macchiato Child Crochet Sweater is a cozy, stylish project that brings handmade charm to your little one’s wardrobe. It’s a joy to crochet—and even more rewarding to see worn with love! To keep your child’s handmade sweater looking its best handwash or use a gentle machine cycle in cold water. Then lay flat to dry to maintain shape—avoid wringing or hanging when wet.
Looking for your next kid-friendly project? Try the Easy Child Crochet Sweater Pattern, a flat construction with just two seams—great for beginners! Or add to your set with the Easy Crochet Mittens Pattern For Beginners, perfect for keeping tiny hands warm. Both patterns are fun, fast, and make thoughtful gifts.
Well, That Was Fun! What’s Next?