Magical Stitches Holiday Edition Stockings
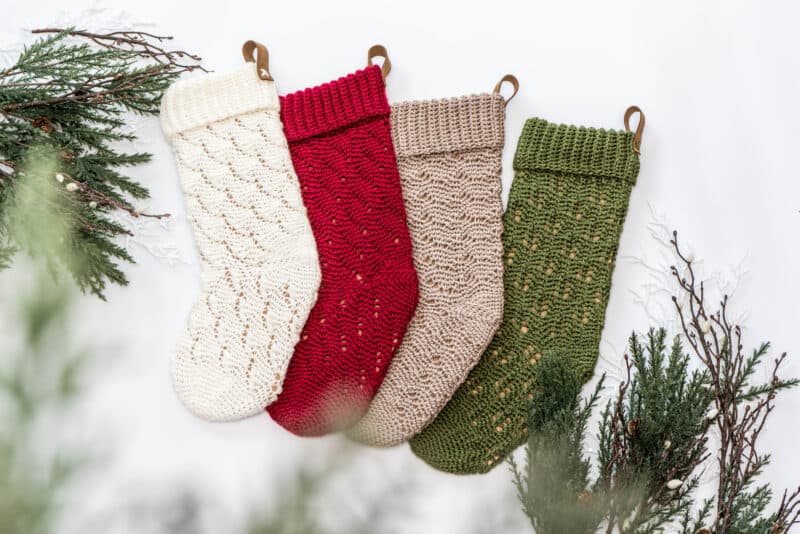
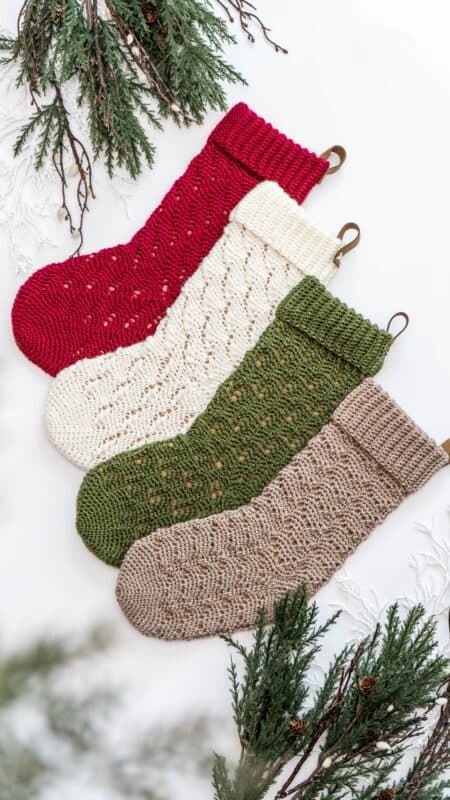
Get ready to deck the halls with the Magical Stitches Holiday Edition Stockings—a stunning collection of four different knit-look crochet stocking patterns that are easier to make than they appear! By using basic stitches that you probably already know, you can create knit-look stitches with your crochet hook! All four of the stockings in this collection were designed with the same stitch counts, so it’s kind of like a Christmasy Choose Your Own Adventure!
Disclosure: This post contains affiliate links. Please read my disclosure for more info.
The Mistletoe, Frosty, Jingle Bell, and Sugar Plum Stockings will bring timeless elegance and cozy charm to your holiday décor while delivering the satisfaction of handmade magic. For more Magical Stitches, check out Cinderella’s Pumpkin and the Happily Ever After Clutch!

Crochet Supplies
Yarn
Mary Maxim Mellowspun DK Yarn
100% Acrylic, 284 yds/100g
Colorways:
Juniper for the Mistletoe Stocking
Cream for the Jingle Bell Stocking
Garnet for the Sugar Plum Stocking
Taupe for the Frosty Stocking
Yarn Quantities
Total Yardage for each stocking is approx. 275 yds
Yarn Substitutions
WeCrochet Swish
100% Fine Superwash Merino Wool 110yds/50g
Premier Basix DK Yarn
100% Acrylic, 306yds/100g
Premier Colorfusion DK Yarn
100% Acrylic, 325yds/100g
Remember always to check the gauge and drape when substituting yarns.
Crochet Hook
Size US G (4.0mm) Crochet Hook or hook to obtain gauge.
Notions
Scissors
Yarn Needle
Removable Stitch Marker
Skill Level
Intermediate
What you'll love about this pattern.
🩶 Knit-Look Stitches - Ditch the needles, and grab your hook! We’re going to replicate knit stitches with simple crochet stitches - like the single crochet!
🩶 Gorgeous Texture - Each stocking is designed with a lacy knit-stitch look, perfect for adding charm and elegance to your home.
🩶 Customizable - Use colors to complement your aesthetic, and add bells, beads, leather tags, tassels, or any other embellishment you prefer to add flair and personalization.
One Size
Approximately 19” from folded cuff to toe, 11” circumference
Abbreviations
bo - bobble
ch - chain
rnd - round
sc - single crochet
ssc - split single crochet
ssc2tog - split single crochet 2 together
ssc3tog - split single crochet 3 together
sl st - slip stitch
st(s) - stitch(es)
Gauge
17 sts and 21 rows = 4" by 4" in ssc, not critical for these stockings
How to Crochet A Gauge Swatch
Working a gauge swatch will let you know if you will have the correct sizing for this pattern. It will also help you practice the stitches used in this project and improve your stitch work for a flawless look.
Are you struggling to match the gauge? Check out the blog post on What is Crochet Gauge and How To Fix It
Construction
Because these stockings all have the same stitch count, it’s easy to start immediately. First, we will start with the Toe and work in joined rounds. Then, we will pick up the preferred stocking bdy stitch - Mistletoe, Frosty, Jingle Bells, or Sugar Plum. To finish, we will add a cuff and heel to the stocking.
If you aren't familiar with the Split Single Crochet Stitch (ssc), also known as the waistcoat stitch, this is a great time to learn! Two of my favorite designs using this stitch are the Winter Crochet Slipper Socks and the Quick & Cushy Slippers.

Special Stitches
Bobble (bo): *Yarn over and insert your hook into the stitch, yarn over and pull up a loop* (3 loops on the hook. Repeat from * to * (5 loops on the hook), yarn over and pull through 4 loops on the hook, yarn over and pull through 2 loops on the hook.
Magic Circle: Start by creating a loop with your yarn. The tail of the working yarn will be over the working end. Insert your hook into the loop from behind. Yarn over and pull through the loop. Work the stitches as instructed into the loop.
Split Single Crochet (ssc): Insert hook between the legs of the stitch (on the back of work the hook should be under the horizontal bar and between the upside-down ‘V’ shape as well), yarn over, pull up a loop to the height of a single crochet, yarn over, pull through both loops on hook. Tip: Keep a loose tension so the stitches are easily worked.
Split Single Crochet Three Together (ssc3tog): Insert your hook into the first stitch and pull up a loop, skip the second st, insert your hook into the third stitch and pull up a loop, yarn over and pull through all the loops on the hook.
Pattern Notes
- These crochet stockings will be worked toe-up, leaving space for the heel to be worked last.
- The ch 2 spaces will count as 1 sts.
- Since this is worked continuously, a ch 1 at the beginning of the round is unnecessary. It is helpful to place a stitch marker on the first stitch of each row.
What is the ssc?
Let’s learn more about the split single crochet stitch, also known as the waistcoat stitch. I bet you already know how to make it! The ssc works as a single crochet; the only difference is where the hook is inserted. Instead of working through the top loops of the previous row/round’s stitch, the hook will be inserted between the ‘V’ of the stitch.
Insert hook between the legs of the stitch (on the back of the work, the hook should be under the horizontal bar and between the upside-down ‘V’ shape as well), yarn over, pull up a loop to the height of a single crochet, yarn over, pull through both loops on hook.
When entering the stitch, pull up the loop twice as high as you normally would; it will give the ‘V’ more space for the next round and make working the ssc comfortable.

If you want to practice a little, I highly recommend crocheting the Gift Card Stocking. It’s a fun and fast little project, perfect for last-minute gifting! And if you love this little version, I also included a full-size stocking with the same stitch.
Subscribe & Like
Video Tutorial for the Magical Stitches Stockings
Relax & Crochet
Upgrade to the Course
Beautifully formatted to print and relax while crocheting. The paid pattern includes:
The Course can also be purchased on Etsy.

Click the box below to unlock this exclusive subscriber content for free. Add your email and create a password. If you are having trouble, reset your password or login to the Grow Portal.
I'm thrilled to share this amazing crochet pattern with you! Please don't copy, paste, or distribute this pattern. Prefer an ad-free experience? Purchase a digital PDF file for a small fee from one of my online stores. I appreciate your support and readership. You are why I can keep doing what I love and sharing it with others. Thank you from the bottom of my heart.
Written Crochet Pattern Instructions
Rnd 12:
Rep Rnd 2.
Join The Kindest Community
Join our vibrant community of crafters on Facebook today. Whether you enjoy crafting with others or simply have burning questions, we've got you covered - join us now!

Briana's Number One Tip for the SSC:
Keep your hands loose and comfortable! If your hands are starting to hurt, then the tension of the stitch is too tight. So relax, breathe, unclench your jaw, and drop your shoulders back down to their normal position!
Mistletoe Stocking Body

Established 8 Stitch and 8 Round Repeat:
Rnd 1 Set Up:
*Ssc 1, skip 1, ssc 2, ch 2, ssc 1, ch 2, ssc 2, skip 1*; repeat from * to * until the end of the rnd. (48)sts
Rnd 1 for Repeats:
*Ssc 1, skip the ch space and ssc 1, ssc in next, ch 2, ssc 1, ch 2, ssc 1, ssc 1 and skip the ch space*; repeat from * to * until the end of the rnd. (48)sts
Rnds 2-4:
*Ssc 1, skip the next st and ssc 1, ssc in ch space, ch 2, ssc 1, ch 2, ssc in ch space, ssc 1 and skip the next st*; repeat from * to * until the end of the rnd.
Rnd 5:
*Ssc 1, ch 2, ssc 2, skip the ch space, ssc 1, skip the ch space, ssc 2, ch 2*; repeat from * to * until the end of the rnd.
Rnds 6-8:
*Ssc 1, ch 2, ssc in ch space, ssc 1, skip the next st, ssc 1, skip the next st, ssc 1, ssc in ch space, ch 2*; repeat from * to * until the end of the rnd.
Rnds 9-16:
Repeat Rnds 1-8.
Rnds 17-22:
Repeat Rnds 1-6.
Creating Room For the Heel & Leg Repeats
Rnd 23:
Ch 24, skip 24, and work the remaining sts in the rnd as Rnd 7. (This creates the heel.)
Rnd 24:
Sc into the first 24 sts of the rnd, and work the remaining sts in the rnd as Rnd 8.
Rnd 25:
(Ssc 1, skip 1, ssc 2, ch 2, ssc 1, ch 2, ssc 2, skip 1) three times, work the remaining sts as Rnd 1.
Rnds 26-32:
Repeat Rnds 2-8.
Rnds 33-56:
Repeat Rnds 1-8.
Do not fasten off. Go to Cuff.
Frosty Stocking Body

Established 8 Stitch Repeat:
Rnd 1:
*Ssc 1, ch 2 and ssc in next, ssc in next, skip 1, ssc 1, skip 1, ssc in the next 2 sts, ch 2*; repeat from * to * until the end of the rnd. (48)sts
Rnd 2:
*Ssc 1, ssc in the ch space, ch 2 and ssc in next, (skip 1, ssc 1) twice, ch 2 and ssc in the ch space*; repeat from * to * until the end of the rnd.
Rnd 3:
*Ssc 1, ssc in next, ssc in the ch space, ch 2, skip 1, ssc in next, skip 1, ch 2, ssc in the ch space, ssc in next*; repeat from * to * until the end of the rnd.
Rnd 4:
*Ssc in each st around, including one st in each ch space*; repeat from * to * until the end of the rnd.
Rnd 5-20:
Repeat Rnds 1-4.
Rnd 21-22:
Repeat Rnds 1-2.
Creating Room For the Heel & Leg Repeats
Rnd 23:
Ch 24, skip 24, work the remaining sts in the rnd as Rnd 3 of the established repeat. (This creates the heel.)
Rnd 24:
*Ssc in each st around, including the heel chains, and one st in each ch space*; repeat from * to * until the end of the rnd.
Rnd 25-52:
Repeat Rnds 1-4
Do not fasten off. Go to Cuff.
Jingle Bell Stocking Body

Established 6 Stitch Repeat:
Set Up Rnd 1:
*Ch 1 and ssc in first, skip the next st, ssc in the next 4*; repeat from * to * until the end of the round. (48) sts
Rnd 1 for Repeats:
*Ch 1, sc in the ch 1 space, skip the next st, ssc in next 4*; repeat from * to * until the end of the round. (48) sts
Rnd 2:
*Ch 1, sc in the ch 1 space, bo in next, skip the next st, ssc in next 3*; repeat from * to * until the end of the round.
Rnd 3:
*Ch 1, sc in the ch 1 space, ssc in next, bo in next, skip the next st, ssc in next 2*; repeat from * to * until the end of the round.
Rnd 4:
*Ch 1, sc in the ch 1 space, ssc in next 2 sts, bo in next, skip the next st, ssc in next 1*; repeat from * to * until the end of the round.
Rnd 5:
*Ch 1, sc in the ch 1 space, ssc in next 3 sts, sc into the top of the bobble st, skip the next st*; repeat from * to * until the end of the round.
Rnds 6-15:
Repeat Rnds 1-5.
Rnds 16-19:
Repeat Rnds 1-4.
Creating Room For the Heel & Leg Repeats
Rnd 20:
Ch 24, skip 24, work the remaining sts in the rnd as Rnd 5. (This creates the heel.)
Rnd 21:
Sc into the first 24 sts of the rnd, work the remaining sts in the rnd as Rnd 1.
Rnd 22:
(Ch 1, ssc 1, bo in next, skip the next st, ssc in next 3) four times, work the remaining sts as Rnd 2.
Rnds 23-25:
Repeat Rnds 3-5.
Rnds 26-50:
Repeat Rnds 1-5.
Do not fasten off. Go to Cuff.
Sugar Plum Stocking Body

Established 8 Stitch Repeat:
Rnd 1 Set-Up:
*Blo sc in first, ch 2 and ssc in the next 3 sts, skip the next st, ssc *3; repeat from * to * until the end of the rnd.
Rnd 1 Repeats:
*Blo sc in first, ch 2 and ssc in the next 3 sts, skip the ch spaces, ssc 3*; repeat from * to * until the end of the rnd.
Rnd 2:
*Blo sc in first, ssc in ch 2 space from the rnd below, ch 2, ssc in the next 3, skip the next st, ssc 2*; repeat from * to * until the end of the rnd.
Rnd 3:
*Blo sc in first, ssc in next, ssc in ch 2 space from the rnd below, ch 2, ssc in the next 3, skip the next st, ssc 1*; repeat from * to * until the end of the rnd.
Rnd 4:
*Blo sc in first, ssc in the next 2, ssc in ch 2 space from the rnd below, ch 2, ssc in the next 3, skip the next st*; repeat from * to * until the end of the rnd.
Rnds 5-20:
Repeat Rnds 1-4
Creating Room For the Heel & Leg Repeats
Rnd 21:
Ch 24, skip 24, work the remaining sts in the rnd as Rnd 1. (This creates the heel.)
Rnd 22:
Sc into the first 24 sts of the rnd, work the remaining sts in the rnd as Rnd 2.
Rnd 23:
(Blo sc in first, ssc in next, ssc and ch 2 in next, ssc in the next 3, skip the next st, ssc 1) three times, work the remaining sts in the rnd as Rnd 3.
Rnd 24:
Repeat Rnd 4.
Rnds 25-52:
Repeat Rnds 1-4
Do not fasten off. Go to Cuff.
Stocking Cuff
Row 1:
Ch 25, in blo sc in second chain from hook and across to body, sl st 2 sts on the body (these do not count as sts), turn. (24)sts
Row 2:
Skip the two sl sts from the body, in blo sc 23, sc 1, turn. (24)sts
Row 3:
Ch 1, sc 1, in blo sc 23, sl st 2 sts on the body, turn.
Repeats:
Repeat Rows 2-3 around the top of the stocking body. Join last row to beginning row by slip stitching through blo of first and last row at the same time with the WS facing.
Fasten off.
Stocking Heel
Rnd 1:
Join the yarn at the corner of the heel opening. Sc around the heel opening, do not join.
*Optional Tip: To reduce holes, sc2tog at the corners. (48)sts
Rnd 2:
*Ssc 1, sc3tog, ssc in the next 17 sts, sc3tog*; repeat from * to * around. (40)sts
Rnd 3:
*Ssc 1, sc3tog, ssc in the next 13 sts, sc3tog*; repeat from * to * around. (32)sts
Rnd 4:
*Ssc 1, sc3tog, ssc in the next 9 sts, sc3tog*; repeat from * to * around. (24)sts
Rnd 5:
*Ssc 1, sc3tog, ssc in the next 5 sts, sc3tog*; repeat from * to * around. (16)sts
Rnd 6:
*Ssc 1, sc2tog, ssc in the next 3 sts, sc2tog*; repeat from * to * around. (12)sts
Rnd 7:
*Ssc 1, sc2tog, ssc in the next 1 sts, sc2tog*; repeat from * to * around. (8)sts
Rnd 8:
Ssc in each st around. (8)sts
Fasten off leaving a tail, weave tail through the front loops of each stitch around then pull closed. Weave in ends.

Finishing
Subscribe to my youtube channel
Weave in all ends and lightly block if desired.
Use a strip of leather and a leather punch to create a strap and stitch to the top of the stocking for hanging. Alternatively, you can create an i-cord. Add any other embellishments of your choosing, and enjoy!
There’s nothing quite like the gorgeousness of handcrafted stockings to bring warmth and wonder to your holiday celebrations. With just a little effort, time, and patience, you can create stunning, heirloom-quality pieces that will be cherished for generations.
Whether you’re crafting for your family or creating heartfelt gifts, these handmade treasures tell a story of love and care and are sure to become a centerpiece of holiday traditions, spreading joy and magic for years to come! Now that you’re well-versed in the ssc stitch, add some gorgeous new flair to your wardrobe with the Pine Fair Isle Sweater (and matching hat) and the Lovely Lace Sweater!
Cheers, and happy crocheting!

Well That Was Fun! What's Next?
📌 PIN THIS POST - Don't lose this project; save it to your Pinterest crochet board so you can quickly come back to it again.
💌 SHARE - Share your yarn choice, in-progress, or finished projects on Facebook or Instagram and use the hashtag #brianakdesigns
🥂 JOIN - Join the kindest crafters in the Briana K Designs Community Group on Facebook. We love yarny friends!
🔗 RAVELRY LINK -Link and share your project on Ravelry. Having inspirational photos can help crafters.


