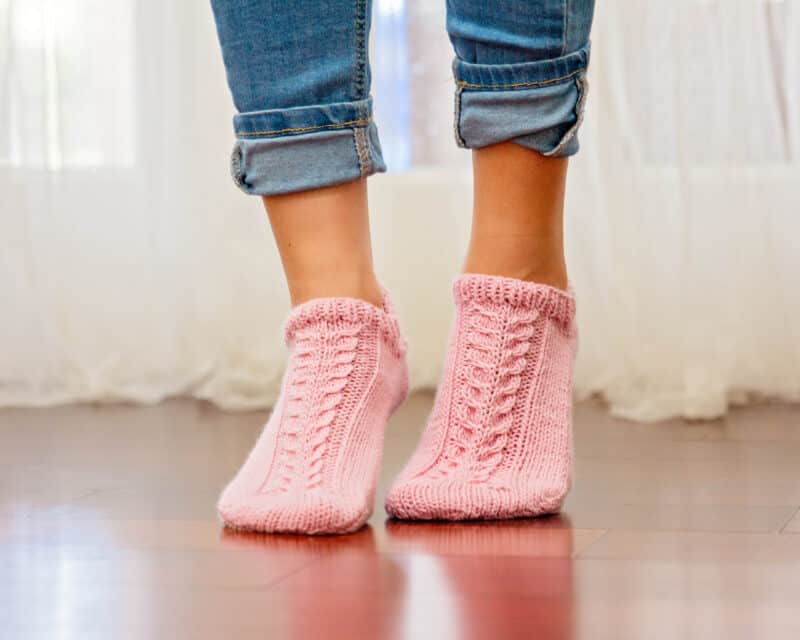
Have you always wanted to knit a pair of socks but feel intimidated by knitting in the round? Whims Easy Flat Knit Socks are a fun adventure into the sock world. You will knit a flat shape and then seam the heel and sides of the sock together. When you learn how to knit socks in rows, a whole new world opens up to you. So grab your needles and let’s get started.
Disclosure: This post contains affiliate links. Please read my disclosure for more info.
Want an Ad-Free PDF Download of this pattern?
This pattern is available in my shops:

Yarn Choice
I love using merino wool for cozy socks. But the Furls Whims yarn has been discontinued. I highly recommend substituting with Knit Picks Swish DK, or even some of these:
Wool of the Andes Worsted
Brava Worsted – non wool option.
Upcycle Alpaca Blend Worsted

Want to make even more socks? Are you ready to knit in the round? Check out the Free Knit Beginner Felici Sock Pattern for Cozy Toes.
And what if you wanted to try your hand at toe up socks? Come read this blog post: Conquer Toe Up Crochet & Knit Socks With These Terrific Patterns
How To Knit Socks in Rows
This pattern will teach you how to knit socks in rows, rather than in the round. It’s a short ankle sock design with a cable detail that’s really eye-catching. You’ll use the slip slip knit and purl stitches along with regular knits and purls to create these socks. You’ll knit them flat, seam them together, and probably be surprised by how well they fit!
Want to learn more about getting the right fit for handmade socks. Although designed for crochet, my guide to customizing socks will help you better understand knit sock sizes, too.
Whims Easy Flat Knit Socks Supplies:
Knitting Needles:
Size 6 (4.0 mm) needles or size to obtain gauge
Notions:
- Removable stitch markers if needed
- Yarn needle
- Scissors
- Cable Needle
Yarn:
Furls Whims DK is discontinued, substitute with Knit Picks Swish DK.
Yardage:
• 125 yards (114 m), 1 Ball Needed
Skill Level:
Advanced Beginner
Abbreviations/Stitches:
- p – purl
- k – knit
- k2tog – knit 2 sts together
- ssk – slip slip knit
- M1R – Make 1 Right
- M1L – Make 1 Left
- p2tog – purl 2 sts together
- ssp – slip slip purl
- st(s) – stitch(es)
- RS – Right Side
- WS – Wrong Side
Gauge:
18 sts and 24 rows = 4×4” (10 cm) in Stockinette Stitch
Measurements/Sizes
Fits shoe size 7-9

Whims Easy Flat Knit Socks Notes:
How to Adjust the Size:
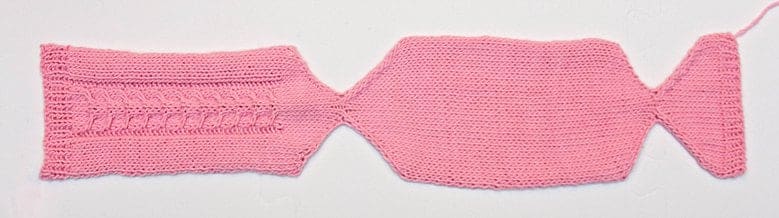
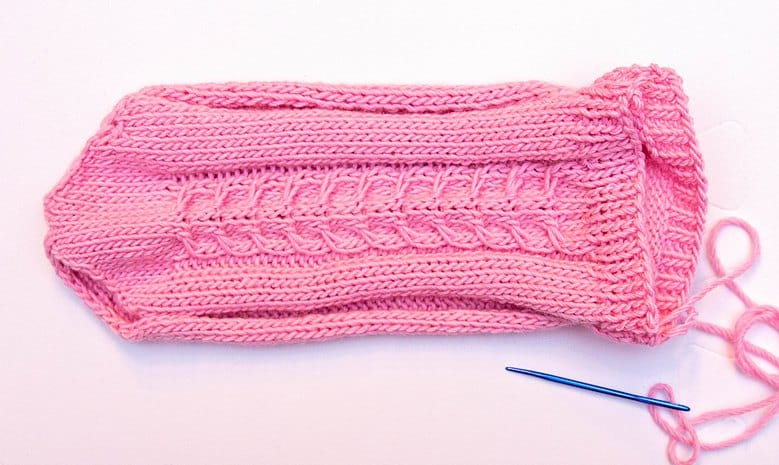
The image of the sock laid flat is helpful to understand the parts that would need adjusting. If you want to increase/decrease the length of the sock, taking out equal amounts of rows on the front part of the leg and sole will increase or reduce the length.
To make a wider or narrower sock cast on more or fewer stitches, still decreasing to four stitches for the heel and sole of the sock.
Special Stitches:
ssk (slilp slip knit): Slip 1 stitch knitwise from the left to the right needle. Slip another stitch knitwise from the left to the right needle. Return the slipped stitches in their twisted position back to the left-hand needle. Knit the 2 stitches together in their twisted position. This completes the ssk decrease.
ssp (slip slip purl): Slip 1 stitch knitwise from the left needle to the right needle. Slip 1 more stitch knitwise from the left needle to the right needle. Slip the 2 stitches back to the left-hand needle without twisting them. With the yarn held in the front, insert the right needle from left to right through the back of the second, then the first stitch. Wrap the yarn over, then under the right needle. Pull a loop through the 2 stitches. Drop the 2 stitches from the left needle.
M1L: (make 1 left): Pick up the bar between the stitch you knit and the one you’re about to knit, bringing the needle from front to back. Then knit into the back of the stitch.
M1R: (make 1 right): Pick up the bar between the last stitch you knit and the one you’re about to knit, bringing the needle from the back to the front. Then knit into the front of this stitch.
1/3 RC: Slip three stitches to a cable needle and hold in back, k1, knit the stitches from cable needle.
1/3 LC: Slip one stitch to cable needle and hold in front, k3, knit the stitch from cable needle.
Learn the Mattress Stitch or the Long Tail Cast On.
Whims Easy Flat Knit Socks Instructions:
Getting Started:
Cast on 28 sts using a long tail cast on.
Rows 1-4: K1, P1
Row 5: knit
Row 6: purl
Row 7-8: repeat rows 5-6
Heel Decreasing:
Row 1: k1, ssk, knit until last 3 sts, k2tog, k1
Row 2: p1, ssp, purl until last 3 sts, p2tog, p1
Repeat Heel Decreasing rows 1-2 until there are 4 sts on the needle.
Heel Increasing:
Row 1: k1, M1R, knit until last st, M1L, k1
Row 2: p1, M1R purlwise, purl until last st, M1L purlwise, p1
Repeat Heel Increasing rows 1-2 until there are 28 sts on the needle.
Sole Of Sock:
Row 1: knit
Row 2: purl
Row 3-42: repeat rows 1-2
Toe Of Sock:
Repeat Heel Decreasing & Increasing sections.
Instep & Front Part of Leg:
Row 1: k7, p2, k9, p2, k8
Row 2: p8, k2, p9, k2, p7
Row 3: k7, p2, 3/1 RC, k1, 1/3 LC, p2, k8
Row 4: p8, k2, p9, k2, p7
Repeats rows 1-4 eleven times.
Repeat row 1-2 one more time.
Front Rib:
Rows 1-4: K1, P1
Fasten off and weave in ends. Block each sock.
Seaming:
Using the mattress stitch we will first seam the heel. Using a piece of yarn and your needle, fold the heel at it’s narrowest part and sew it together on both sides.

Now fold the toe at it’s narrowest part and sew both sides of the sock together, starting at the toe and ending at the cuff. Weave in all ends on the wrong side an enjoy your new pair of ankle socks!

Well, That Was Fun! What’s Next?


Did I misread this as I thought it said the pattern was an Ad-free download until Sunday the 17th? I went over to Ravelery and it didn’t automatically do it and I don’t see any coupon listed or activated when on the site there listed either. I enjoy your patterns but sometimes it nice to be able to have a paper version for on the go projects too. Thank you
The freebie is through a link on the blog during the dates of the promotion, without a code or Ravelry. Thanks.
This is so exciting. What a great way to jump into socks! Briana my to-do list is busting with your designs!