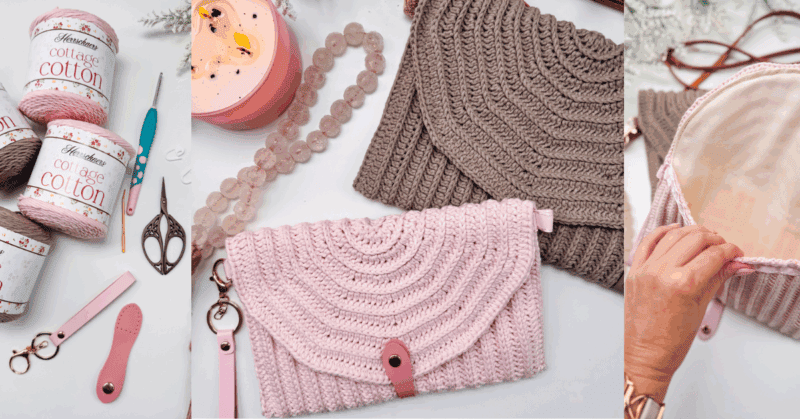
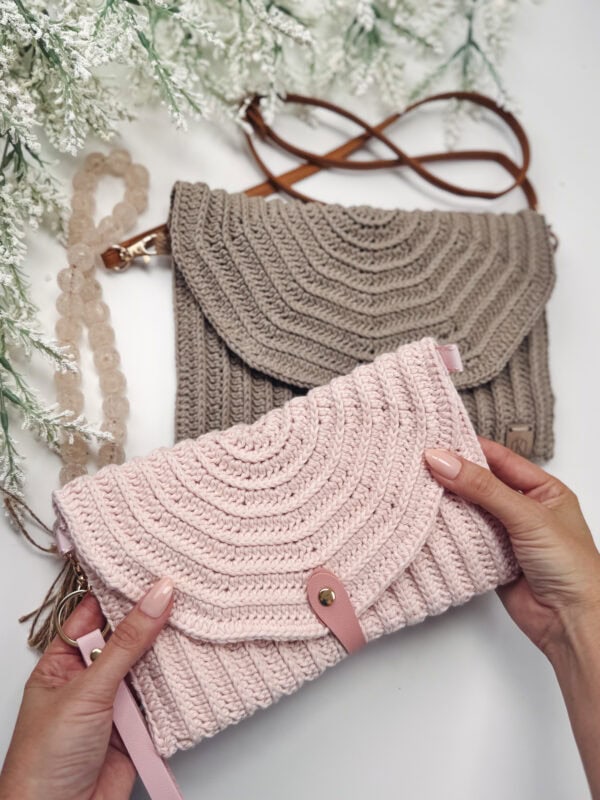
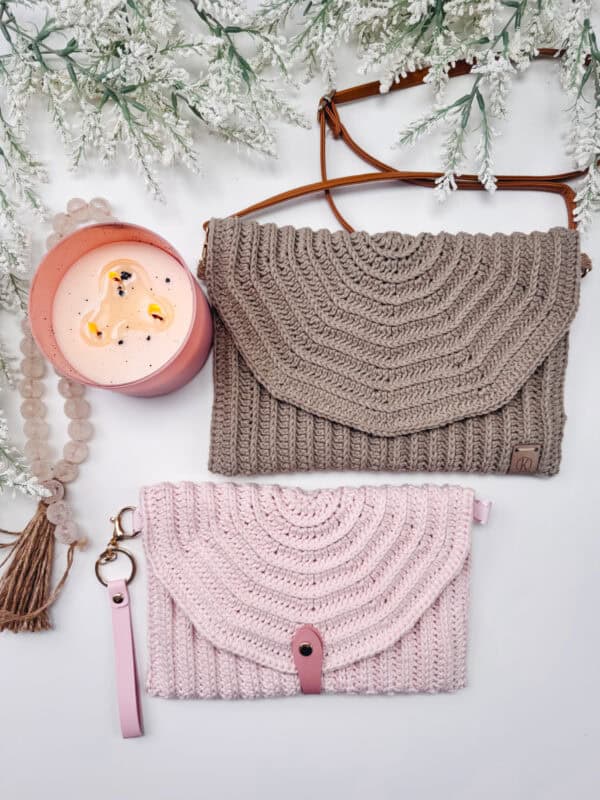
If you’re looking for an easy crochet clutch pattern that’s both quick to make and effortlessly stylish, the Easy Envelope Crochet Clutch is a perfect pick! This chic, beginner-friendly bag is worked flat using half double crochet (hdc) stitches in the third loop for beautiful texture. With minimal shaping and a clean, fold-over design, this project is ideal for new crocheters or anyone looking to create a chic crochet accessory in no time. Plus, you can fully customise it with a DIY liner, closure, or wristlet (or shoulder) strap for a handmade clutch that suits your personal style.
Disclosure: This post contains affiliate links. Please read my disclosure for more info.
This simple bag is a fun and functional project that adds handmade flair to any outfit! The smaller size will tuck easily inside a bigger bag like the Wheat Stitch Rectangle Bag or the Flower Granny Square Rectangle Bag, and it’s great for storing essentials like your phone, keys, or lip balm. Try adding a long shoulder or crossbody strap to the larger size clutch for a perfect hands-free date night accessory!

Crochet Supplies
Yarn
Herrschners Cottage Cotton
60% Cotton, 40% Acrylic Blend; 207yds/100g
Yarn Quantities
290 (325) yds
2 Balls
Yarn Substitutions
WeCrochet Shine – 60% Pima Cotton, 40% Modal, 75yds/50g
Lily Sugar ’n Cream Yarn – 100% Cotton, 120yds/71g
Lion Brand Made With Love – 60% Cotton, 40% Acrylic; 185yds/100g
Dishie – 100% Cotton; 190yds/100g
Remember always to check the gauge and drape when substituting yarns.
Crochet Hook
Size US G (4.0mm) Crochet Hook or hook to obtain gauge.
Notions
Scissors
Yarn Needle
Removable Stitch Marker
Fabric for Lining
Wristlet Hardware
Ribbon
Closure Snap
Skill Level
Advanced Beginner
What you’ll love about this pattern.
? Two sizes included – make a small clutch or a roomier shoulder bag!
? Customizable – add a liner, choose your favorite yarn, or mix and match hardware!
? Beginner-friendly pattern – simple rows, minimal shaping!
Two Sizes
Small (Large)
When folded, the bag measures 9 (10) inches wide and 6 (7) inches tall.
Abbreviations
ch – chain
hdc – half double crochet
sc – single crochet
sl st – slip stitch
st(s) – stitch(es)
Stsc – Stacked single crochet
yo – yarn over
Gauge
21 sts and 16 rows = 4″ by 4″ in hdc in the third loop
How to Crochet A Gauge Swatch
Working a gauge swatch will let you know if you will have the correct sizing for this pattern. It will also help you practice the stitches used in this project and improve your stitch work for a flawless look.
Are you struggling to match the gauge? Check out the blog post on What is Crochet Gauge and How To Fix It
Construction
The Easy Envelope Clutch is crocheted flat in rows, featuring one rounded edge and one straight edge. Once the panel is complete, simply fold it into thirds, add an optional crochet clutch liner (sewn by hand or machine), and seam the sides. Finish it off with hardware—such as a magnetic snap, wristlet clasp, or shoulder strap—to transform your clutch into a versatile crochet purse or handbag.
If smaller accessories like this clutch are your preference, check out the Happily Ever After Clutch, the Granny Stitch Clutch, and the Herringbone Clutch!
Special Stitches
Stacked Single Crochet (Stsc): Do NOT chain, insert hook into next stitch, yo, pull up a loop, yo and pull through both loops, insert hook in the vertical bar below, yo, pull up a loop, yo and pull through both loops on the hook.
Pattern Notes
- Using a stitch marker at the beginning of each row is recommended.
- The liner on the bag is optional, but it does add some structure to the design.
- For a structured and stylish clutch, try using worsted-weight cotton yarn or a cotton blend. These fibers help your bag hold its shape and offer great stitch definition.
- This clutch uses basic crochet stitches, including hdc in the third loop, and features simple construction. It’s a great beginner crochet bag project.
Subscribe & Like
Video Tutorial for the Easy Envelope Crochet Clutch
Relax & Crochet
Upgrade to the Printable PDF
Beautifully formatted to print and relax while crocheting. The paid pattern includes:
The Ad-Free PDF can be purchased on Etsy or Ravelry.
Click the box below to unlock this exclusive subscriber content for free. Add your email and create a password. If you are having trouble, reset your password or log in to the Grow Portal.
I’m thrilled to share this amazing crochet pattern with you! Please don’t copy, paste, or distribute this pattern. Prefer an ad-free experience? Purchase a digital PDF file for a small fee from one of my online stores. I appreciate your support and readership. You are why I can keep doing what I love and sharing it with others. Thank you from the bottom of my heart.
Written Crochet Pattern Instructions
Row 6:
Stsc in the first st, hdc 58 (74), [2 hdc in next, hdc in each of the next 4 sts] 6 times hdc 59 (75), turn. | 154 (186) sts
Row 7:
Stsc in the first st, hdc 58 (74), [2 hdc in next, hdc in each of the next 5 sts] 6 times hdc 59 (75), turn. | 160 (192) sts
Row 8:
Stsc in the first st, hdc 58 (74), [2 hdc in next, hdc in each of the next 6 sts] 6 times hdc 59 (75), turn. | 166 (198) sts
Row 9:
Stsc in the first st, hdc 58 (74), [2 hdc in next, hdc in each of the next 7 sts] 6 times hdc 59 (75), turn. | 172 (204) sts
Row 10:
Stsc in the first st, hdc 58 (74), [2 hdc in next, hdc in each of the next 8 sts] 6 times hdc 59 (75), turn. | 178 (210) sts
Row 11:
Stsc in the first st, hdc 58 (74), [2 hdc in next, hdc in each of the next 9 sts] 6 times hdc 59 (75), turn. | 184 (216) sts
Row 12:
Stsc in the first st, hdc 58 (74), [2 hdc in next, hdc in each of the next 10 sts] 6 times hdc 59 (75), turn. | 190 (222) sts
Row 13:
Stsc in the first st, hdc 58 (74), [2 hdc in next, hdc in each of the next 11 sts] 6 times hdc 59 (75), turn. | 196 (228) sts
For Size Small, stop here and go to Folding & Seaming. Continue for Size Large.
Row 14:
Stsc in the first st, hdc 74, [2 hdc in next, hdc in each of the next 12 sts] 6 times hdc 75, turn. | 234 sts
Row 15:
Stsc in the first st, hdc 74, [2 hdc in next, hdc in each of the next 13 sts] 6 times hdc 75, turn. | 240 sts
Row 16:
Stsc in the first st, hdc 74, [2 hdc in next, hdc in each of the next 14 sts] 6 times hdc 75, turn. | 246 sts
Row 17:
Stsc in the first st, hdc 74, [2 hdc in next, hdc in each of the next 15 sts] 6 times hdc 75, turn. | 252 sts
Row 18:
Stsc in the first st, hdc 74, [2 hdc in next, hdc in each of the next 16 sts] 6 times hdc 75, turn. | 258 sts
Row 19:
Stsc in the first st, hdc 74, [2 hdc in next, hdc in each of the next 17 sts] 6 times hdc 75, turn. | 264 sts
Join The Kindest Community
Join our vibrant community of crafters on Facebook today. Whether you enjoy crafting with others or simply have burning questions, we’ve got you covered – join us now!
Straight Top Edge
Next, rotate your work to crochet along the short flat side of the piece, ch 1, sc 1, *insert your hook into the left bar of the sc just made, then insert into the next space on the edge of thebag, yarn over and pull a loop through the bag fabric and also through one loop on the hook. Yarn over and pull through two loops on the hook. Repeat from * across the edge, fasten off, and weave in all ends.

Blocking & Liner
To block your cotton crocheted bag piece, start by gently soaking or spraying the piece in water until fully saturated, then carefully squeeze out the excess—do not wring. Lay the fabric flat on a blocking mat or towel, shaping it to the desired dimensions and straightening any edges. Pin it in place using rust-proof pins, making sure to maintain even tension across the piece. Allow it to air dry completely, which helps set the shape and smooth out any uneven stitches for a more polished, professional finish.
To sew a fabric lining, lay your blocked crochet piece on the fabric and use it as a template to cut out the lining, adding a ½ inch seam allowance; the fabric will sit just inside the main crochet piece.
Fold in all the raw edges of the fabric lining by about ½ inch to create clean seams. At the curved corners, cut small darts (triangular notches) to help the fabric lay flat when folded. Sew along the folded edges to prevent fraying.
Place the finished lining on top of the crochet bag fabric with wrong sides facing each other. If you’d like to add ribbon tabs, fold each ribbon piece in half and position them on the sides of the bag just below the curved area—tuck them between the lining and crochet fabric and pin them in place.
Finally, sew the lining to the crochet piece along the top edge, securing the lining and ribbon tabs at the same time.
You can also try a No-Sew Liner option.
Folding & Seaming
Fold the crochet bag panel into thirds, bringing the bottom section up and the top section down to form the bag’s shape. The two final seams will run along the straight side edges.
To join the sides, you can either use a yarn needle and matching yarn to whipstitch or mattress stitch them together, or use a sewing machine to sew through both layers along each side. Make sure to align the edges evenly before stitching to ensure a neat finish.
Subscribe to my youtube channel
Finishing
You can add hardware to finish off the bag, depending on your style preference. Attach a wristlet clasp to one side for a convenient grab-and-go option, or use a longer strap connected to the ribbon tabs for a shoulder or crossbody look. For a closure, consider sewing on a snap clasp or magnetic button. Feel free to customize the finishing touches to suit your needs and personal style!
Simple crocheted accessories are a fun and easy way to add personality and charm to any wardrobe. Whether it’s a stunning shawl like the Boho Pineapple Wrap, a trendy bag like the Danbury Rectangle Bag, or a cute hat like the Houndstooth Beanie, these handmade touches can elevate even the most basic outfits.
The best part? They’re quick to make, customizable, and full of character. With just a hook and some yarn, you can create stylish pieces that show off your creativity and make your wardrobe truly one of a kind.
Cheers, and happy crocheting!
Well, That Was Fun! What’s Next?