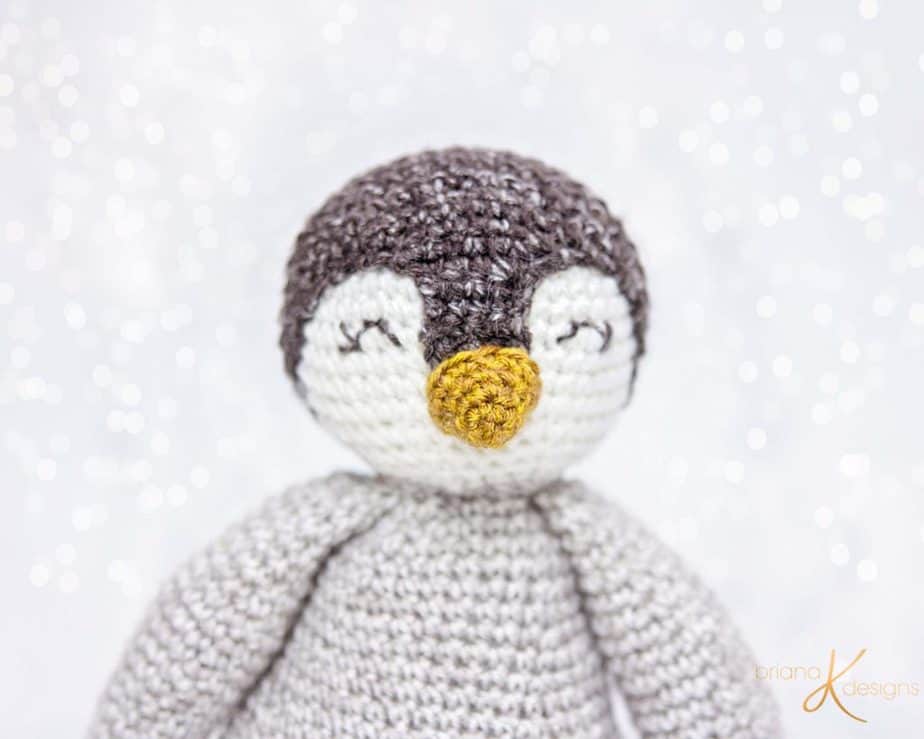
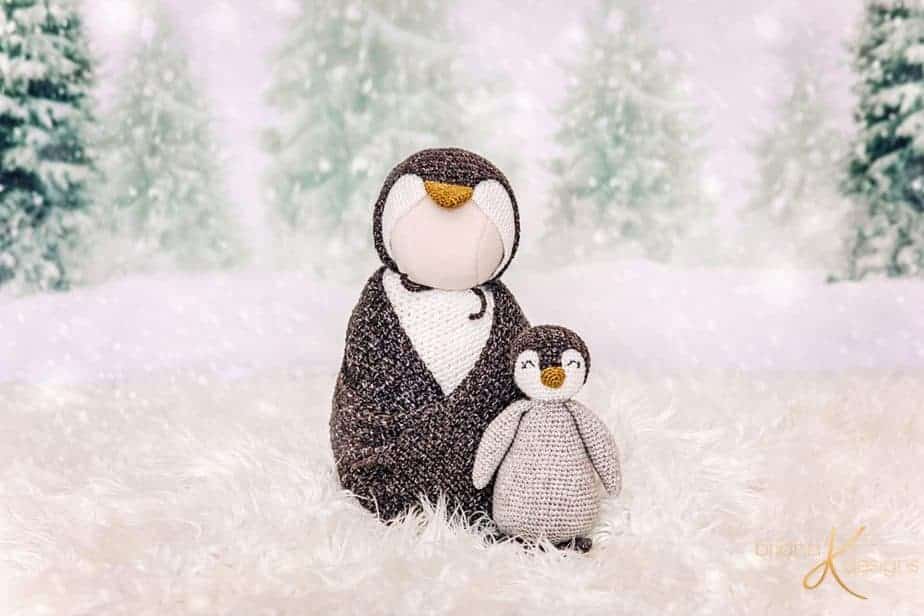
Isn’t this little Penguin Buddy Crochet Pattern a cute winter companion? I first designed this toy in 2019. Immediately, my boys began asking to keep these penguins for themselves. So, I know from firsthand experience that these are great handmade gifts for little ones.
Disclosure: This post contains affiliate links. Please read my disclosure for more info.
You don’t have to be little to enjoy this penguin stuffy, though! He is cute for holiday decor or to just have around at any time of year. And of course, I think he makes an excellent gift for all ages. Who wouldn’t enjoy cuddling up with this toy? Plus, knit and crochet penguins are trending this year, which is why I’ve decided to republish this pattern. I wanted to make sure you could find it if you haven’t seen it, yet.
Check out the Penguin Buddy Knit Pattern, which is the knit version of this cute crochet penguin design.
Fun Facts About Penguins
Why are knit and crochet penguins trending right now? Partly it’s because they’re cute. Partly it’s because it’s winter and they’re snuggly. But there’s also a resurgence of interest in penguins in general because they are really special creatures. Here are just a few fun facts about penguins:
- Penguins live in various places all around the world. Surprisingly, only one of ~18 species lives above the Southern Hemisphere.
- Penguins range in size from just 10″ tall to over 4′ tall! Our little crochet penguin is just a little bit smaller than the smallest real penguins out there.
- Penguins are monogamous. The father watches the eggs of unhatched babies while the mom goes out to hunt. Go Mom Penguins!
- Penguins swim; they don’t fly. Some can swim over 20 mph. They typically only go about 30-60 feet deep. However some species go much deeper; the biggest ones go well over 1000 feet deep.

Supplies for the Penguin Buddy Crochet Pattern
• Size US G (4.0 mm) crochet hook
• Removable stitch markers if needed
• Yarn needle to weave in ends
• Fiberfill or stuffing
Yarn:
Yarn Bee Soft & Sleek DK Yarn
in colorways:
Ivory
Cedar
Linen
Dijon
Yarn substitutions (check gauge):
• Bernat Baby Sport
• Paintbox Yarns Baby DK
• Plymouth Yarn Deambaby DK
Skill Level:
• Advanced Beginner
Measurements:
Penguin stands about 7.5” (19 cm) tall
Abbreviations:
• ch – chain
• sc – single crochet
• sc2tog – single crochet two together
• st(s) – stitch(es)
Yardage:
• 135 yards (124 m)
Gauge:
• 22 sts and 28 rows = 4” (10 cm)
in single crochet stitch
Notes for the Penguin Buddy Crochet Pattern:
- This crochet buddy is worked in pieces and then hand sewn together.
- The Ch 1 at the beginning of the row does not count as a stitch.
- In order to reduce a traveling seam use the hook over method. This occurs when completing the last step of the single crochet. Instead of placing the yarn over the hook, place the hook over the yarn, and complete stitch.
- This pattern is worked in the round continuously without joining. Use a stitch marker to keep track of rounds.
Helpful Videos
Here are some of the video tutorials that will help you with the Penguin Buddy Crochet Pattern in case you get stuck.
No More Twisted Chains:
Magic Circle/Ring:
Invisible Decrease (sc2tog):
Want an Ad-Free PDF Download of this pattern?
This pattern is available in my shops:
Click the box below to unlock this exclusive subscriber content for free. Add your email and create a password. If you are having trouble, reset your password or log in to the Grow Portal.
I’m thrilled to share this amazing crochet pattern with you! Please don’t copy, paste, or distribute this pattern. Prefer an ad-free experience? Purchase a digital PDF file for a small fee from one of my online stores. I appreciate your support and readership. You are why I can keep doing what I love and sharing it with others. Thank you from the bottom of my heart.
Penguin Buddy Crochet Pattern Instructions:
Begin to stuff with fiberfill as you go. 30 sts
Rnd 17:
*sc2tog, sc 3; repeat * around. 24 sts
Rnd 18:
*sc2tog, sc 2; repeat * around. 18 sts
Rnd 19:
*sc2tog, sc 1; repeat * around. 12 sts
Rnd 20:
sc2tog around.
Fasten off and use tail end to weave through remaining stitches and close hole. Weave in ends, set aside until assembly. 6 sts
Crochet Penguin Body:
Rnd 1:
With Light Grey yarn chain 20. 20 sts
Rnd 2:
*2 sc in first, sc 4; repeat * around. 24 sts
Rnd 3:
sc in each stitch around. 24 sts
Rnd 4:
*2 sc in first, sc 5; repeat * around. 28 sts
Rnd 5:
sc in each stitch around. 28 sts
Rnd 6:
*2 sc in first, sc 6; repeat * around. 32 sts
Rnd 7:
sc in each stitch around. 32 sts
Rnd 8:
*2 sc in first, sc 7; repeat * around. 36 sts
Rnd 9:
sc in each stitch around. 36 sts
Rnd 10:
*2 sc in first, sc 8; repeat * around. 40 sts
Rnd 11:
sc in each stitch around. 40 sts
Rnd 12:
*2 sc in first, sc 9; repeat * around. 44 sts
Rnd 13:
sc in each stitch around. 44 sts
Rnd 14:
*2 sc in first, sc 10; repeat * around. 48 sts
Rnd 15:
sc in each stitch around. 48 sts
Rnd 16:
*2 sc in first, sc 7; repeat * around. 54 sts
Rnd 17:
sc in each stitch around. 54 sts
Rnd 18:
*2 sc in first, sc 8; repeat * around. 60 sts
Rnd 19:
sc in each stitch around. 60 sts
Rnd 20:
*2 sc in first, sc 9; repeat * around. 66 sts
Rnds 21-26:
sc in each stitch around. 66 sts
Rnd 27:
*sc2tog, sc 9; repeat * around. 60 sts
Rnd 28:
*sc2tog, sc 8; repeat * around. 54 sts
Rnd 29:
*sc2tog, sc 7; repeat * around. 48 sts
Rnd 30:
*sc2tog, sc 6; repeat * around. 42 sts
Rnd 31:
*sc2tog, sc 5; repeat * around. 36 sts
Rnd 32:
*sc2tog, sc 4; repeat * around. 30 sts
Rnd 33:
*sc2tog, sc 3; repeat * around. 24 sts
Rnd 34:
*sc2tog, sc 2; repeat * around.
Begin to stuff with fiberfill as you go. 18 sts
Rnd 35:
*sc2tog, sc 1; repeat * around. 12 sts
Rnd 36:
sc2tog around.
Fasten off and use tail end to weave through remaining stitches and close hole. Weave in ends, set aside until assembly. 6 sts
Crochet Penguin Arms (make 2):
Rnd 1:
With Light Grey yarn sc 6 in Magic Ring. 6 sts
Rnd 2:
2 sc in each stitch around. 12 sts
Rnds 3-4:
sc in each stitch around. 12 sts
Rnd 5:
*2 sc in first, sc 5; repeat * around. 14 sts
Rnd 6:
sc in each stitch around. 14 sts
Rnd 7:
*2 sc in first, sc 6; repeat * around. 16 sts
Rnd 8:
sc in each stitch around. 16 sts
Rnd 9:
*2 sc in first, sc 7; repeat * around. 18 sts
Rnd 10:
sc in each stitch around. 18 sts
Rnd 11:
*2 sc in first, sc 8; repeat * around. 20 sts
Rnds 12-16:
sc in each stitch around. 20 sts
Rnd 17:
*sc2tog, sc 8; repeat * around.
Begin to stuff with fiberfill as you go. 18 sts
Rnd 18:
sc in each stitch around. 18 sts
Rnd 19:
*sc2tog, sc 7; repeat * around. 16 sts
Rnd 20:
sc in each stitch around. 16 sts
Rnd 21:
*sc2tog, sc 6; repeat * around. 14 sts
Rnds 22-23:
sc in each stitch around.
Fasten off and leaving a 12 inch tail, set aside until assembly. 14 sts
Crochet Penguin Head Piece:
Row 1:
With Black yarn ch 5, sc in 2nd stitch form hook and across, turn. 4 sts
Rows 2-5:
Ch 1, sc 4, turn. 4 sts
Row 6:
Ch 1, 2sc in first, sc until last stitch, 2 sc in last, turn. 6 sts
Rows 7-22:
Repeat row 6 until stitch count is 38 38 sts
Work in Rounds
Ch 2, sl st in first stitch from previous row to join and begin working in the round.
Rnd 23:
sc in each stitch around (including chains). 40 sts
Rnd 24:
*sc2tog, sc 6; repeat * around. 35 sts
Rnd 25:
*sc2tog, sc 5; repeat * around. 30 sts
Rnd 26:
*sc2tog, sc 4; repeat * around. 25 sts
Rnd 27:
*sc2tog, sc 3; repeat * around. 20 sts
Rnd 28:
*sc2tog, sc 2; repeat * around. 15 sts
Rnd 29:
*sc2tog, sc 1; repeat * around.
Fasten off and use tail end to weave through remaining stitches and close hole. Weave in ends, set aside until assembly. 10 sts
Crochet Penguin Beak:
Rnd 1:
With Yellow yarn sc 4 in Magic Ring. 4 sts
Rnd 2:
*2sc in first, sc; repeat * around. 6 sts
Rnd 3:
*2sc in first, sc 2; repeat * around. 8 sts
Rnd 4:
*2sc in first, sc 3; repeat * around. 10 sts
Rnd 5:
*2sc in first, sc 4; repeat * around.
Fasten off and leaving a 12 inch tail, set aside until assembly. 12 sts
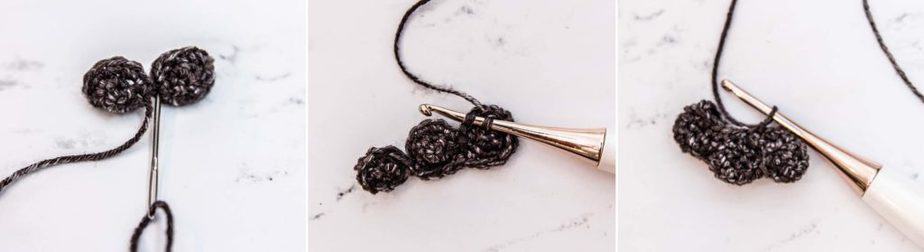
Crochet Penguin Toes Small (make 4):
Rnd 1:
With Black yarn sc 4 in Magic Ring, join. 4 sts
Rnd 2:
Ch 1, 2 sc in each stitch around, join.
Fasten off and leave tail end to attach to other toes. Weave in ends, set aside until penguin feet. 8 sts
Crochet Penguin Toes Big (make 2):
Rnd 1:
With Black yarn sc 4 in Magic Ring, join.
Rnd 2:
With Black yarn sc 4 in Magic Ring, join.
Rnd 3:
Ch 1, *2sc in first, sc 3; repeat * around, join. Fasten off and leave the tail end to attach to other toes. Weave in ends, set aside until penguin feet.
Penguin Feet (make 2):
For each foot, one big toe and two small toe pieces will be used. Using a yarn needle, sew one small toe and a big toe together by joining one stitch on each side. Repeat one more time by sewing a small toe to the other side of the big toe. Attach yarn and prepare to crochet around the remaining stitches, the sewn joined stitches will not be worked. 24 total stitches are worked around the exterior of the joined toes.
Rnd 1:
sc in each stitch around. 24 sts
Rnd 2:
*sc2tog, sc 4; repeat * around. 20 sts
Rnds 3-5:
sc in each stitch around. 20 sts
Rnd 6:
*sc2tog, sc 3; repeat * around. 16 sts
Rnd 7:
sc in each stitch around. 16 sts
Rnd 8:
*sc2tog, sc 2; repeat * around. Begin to stuff foot with fiberfill. 12 sts
Rnd 9:
*sc2tog, sc 1; repeat * around.
Fasten off and use tail end to weave through remaining stitches and close hole. Weave in ends, set aside until assembly 8 sts
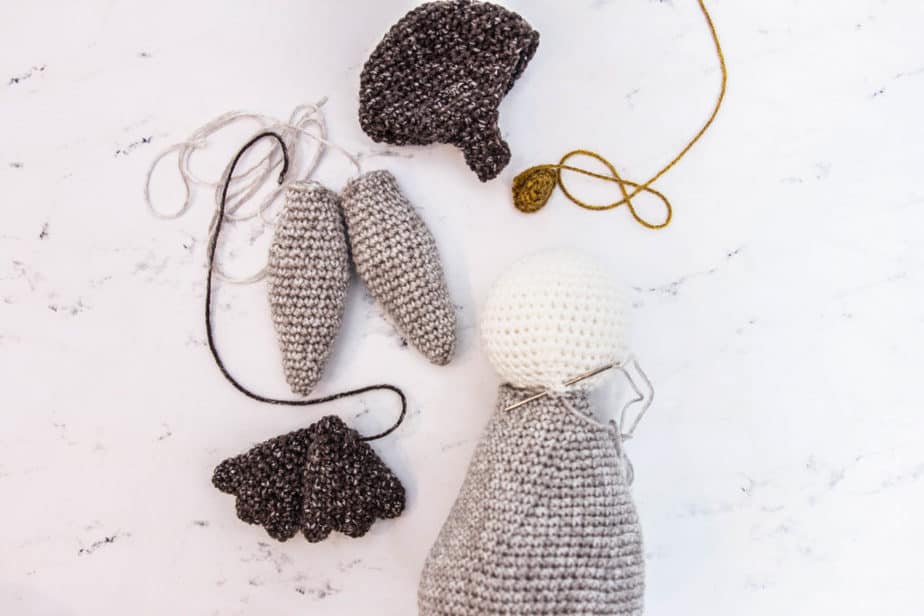
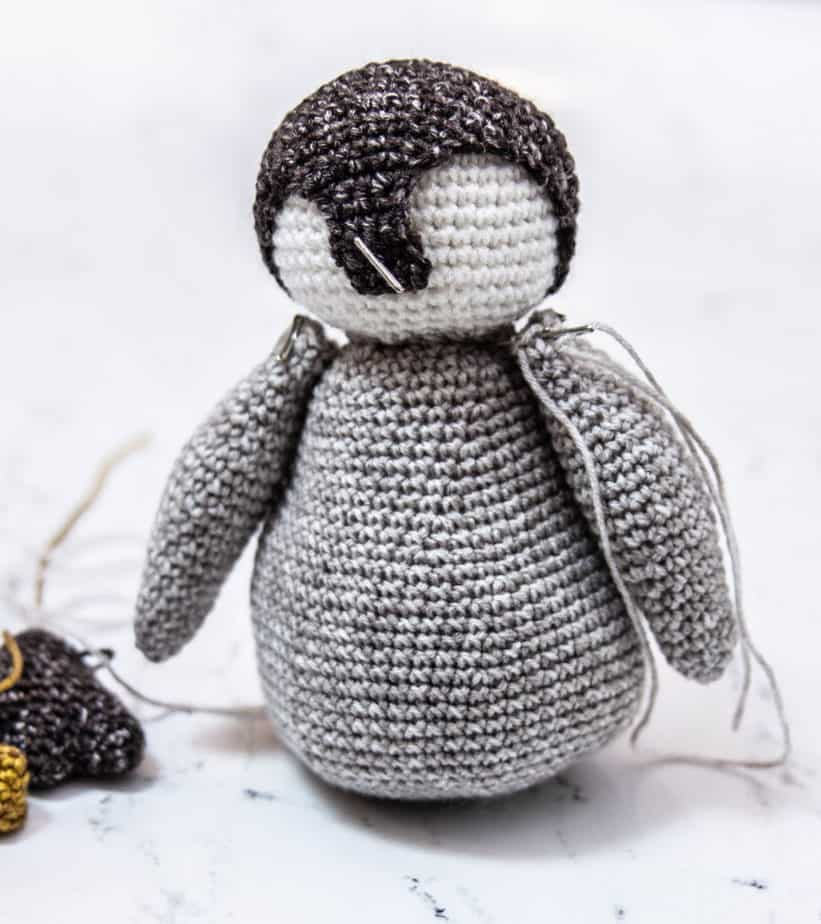
Penguin Assembly:
Using a yarn needle and black yarn, sew the headpiece onto the penguin head.
Next, sew the head to the body.
Then attach arms, feet, and beak. Use pins to put in place if helpful.
For the eyes, use black yarn to stitch a U, or upside-down U, and small eyelashes.
Newborn Penguin Crochet Outfit
I got my start as a designer in the photography prop industry. It was soon after I had my first son I loved anything newborn-related. By the time I had my second son, I had such a passion for newborn photography that I had become a newborn photographer. While I no longer take photography clients, I still enjoy designing newborn props. It’s also nostalgia for when mine were so little. If I could reverse time, I would put my baby boys in this cuddly Newborn Penguin Crochet Outfit outfit.
You don’t have to be little to enjoy this penguin stuffy! He is cute for holiday decor or to just have around. And of course, I think he makes a great gift for all ages.
Supplies for the Newborn Penguin Crochet Outfit:
• Size US G (4.0 mm) crochet hook
US I (5.5 mm) crochet hook
• Removable stitch markers if needed
• Yarn needle to weave in ends
• Fiberfill or stuffing
Yarn:
Yarn Bee Soft & Sleek DK Yarn
in colorways: Ivory, Cedar, Linen, Dijon
Yarn substitutions (check gauge):
• Bernat Baby Sport
• Paintbox Yarns Baby DK
• Plymouth Yarn Deambaby DK
Skill Level:
• Advanced Beginner
Measurements:
Bonnet Depth 5” (13 cm)
Bonnet Height 5.5” (14 cm)
Wrap Length 60” (152 cm)
Wrap Width 12” (30 cm)
Abbreviations:
• ch – chain
• sc – single crochet
• sc2tog – single crochet two together
• st(s) – stitch(es)
Yardage:
• 850 yards (777 m) for each wrap
• 125 yards (114 m) for bonnet
Gauge:
• 22 sts and 28 rows = 4” (10 cm)
in single crochet stitch
Notes for the Newborn Penguin Crochet Outfit:
- The Ch 1 at the beginning of the row does not count as a stitch.
- To reduce a traveling seam when working in the round, use the hook over method. This occurs when completing the last step of the single crochet. Instead of placing the yarn over the hook, place the hook over the yarn, and complete the stitch.
- An alternative to crocheting the wraps is to purchase a stretchy knit fabric 12 inches wide and 60 inches long.
Newborn Penguin Crochet Outfit Instructions
Penguin Wrap (make two, 1 Cedar and 1 Ivory):
| Row | Description | Stitch Count |
| 1 | With I hook, Ch 68 sts, sc in 4th chain from hook (these chains will count as first st) *ch 1, skip 1, sc 1; repeat * until end of the row, turn. | 66 |
| 2 | Ch 2, sc in chain space from the previous row, *ch 1, skip 1, sc 1; repeat * until end of row. The last sc will be worked into the space between the ch 2 turning chain and the sc from the previous row. | 66 |
| 3-270 | Repeat Row 2 for 270 rows or desired length. Fasten off and weave in ends. | 66 |
Penguin Bonnet Ivory:
| Round | Description | Stitch Count |
| 1 | With Ivory yarn and G hook, sc 8 in Magic Circle, join. | 8 |
| 2 | Ch 1 (doesn’t count as stitch), 2 sc in each stitch around, join. | 16 |
| 3 | Ch 1, sc in each stitch around, join. | 16 |
| 4 | Ch 1, *2sc in first, sc in next; repeat * around, join. | 24 |
| 5 | Ch 1, sc in each stitch around, join. | 24 |
| 6 | Ch 1, *2sc in first, sc in next 2; repeat * around, join. | 32 |
| 7 | Ch 1, sc in each stitch around, join. | 32 |
| 8 | Ch 1, *2sc in first, sc in next 3; repeat * around, join. | 40 |
| 9 | Ch 1, sc in each stitch around, join. | 40 |
| 10 | Ch 1, *2sc in first, sc in next 4; repeat * around, join. | 48 |
| 11 | Ch 1, sc in each stitch around, join. | 48 |
| 12 | Ch 1, *2sc in first, sc in next 5; repeat * around, join. | 56 |
| 13 | Ch 1, sc in each stitch around, join. | 56 |
| 14 | Ch 1, *2sc in first, sc in next 6; repeat * around, join. | 64 |
| 15-34 | Ch 1, sc in each stitch around, join. | 64 |
| Fasten off and weave in ends. Set aside until bonnet assembly. |
Penguin Bonnet Cedar:
| Row | Description | Stitch Count |
| 1 | With Cedar yarn and G hook, ch 11, sc in the second chain from hook and across, turn. | 10 |
| 2 | Ch 1 (doesn’t count as stitch), 2sc in first, sc until last st, 2sc in last, turn. | 12 |
| 3-28 | Repeat row 2 until stitch count is 64 | 64 |
| 29 | Ch 1, *sc2tog, sc 6; repeat * across, turn. | 56 |
| 30 | Ch 1, *sc2tog, sc 5; repeat * across, turn. | 48 |
| 31 | Ch 1, *sc2tog, sc 4; repeat * across, turn. | 40 |
| 32 | Ch 1, *sc2tog, sc 3; repeat * across, turn. | 32 |
| 33 | Ch 1, *sc2tog, sc 2; repeat * across, turn. | 24 |
| 34 | Ch 1, sc2tog, sc 20, sc2tog, turn. | 22 |
| 35 | Ch 1, sc2tog, sc 18, sc2tog, turn. | 20 |
Finishing: Fold the flat row worked in half and seam closed to create the back of the bonnet. Weave in ends
Penguin Bonnet Beak:
| Round | Description | Stitch Count |
| 1 | With Dijon yarn and G hook, sc 8 in Magic Circle, join. | 8 |
| 2 | Ch 1, *2sc in first, sc in next; repeat * around, join. | 12 |
| 3 | Ch 1, sc in each stitch around, join. | 12 |
| 4 | Ch 1, *2sc in first, sc in next 2; repeat * around, join. | 16 |
| 5 | Ch 1, sc in each stitch around, join. | 16 |
| 6 | Ch 1, *2sc in first, sc in next 3; repeat * around, join. | 20 |
| 7-8 | Ch 1, sc in each stitch around, join. Leaving a long tail to sew to bonnet, fasten off. | 20 |
Penguin Bonnet Assembly & Ties:
I find it’s easier to sew the ivory and cedar bonnet pieces together by placing them onto a small ball. Line up the back base of bonnets together and pin it into place. Pull the front edges together and pin them in place at the top center.
Using a yarn needle and cedar yarn, sew the cedar bonnet headpiece onto the ivory bonnet piece. Using the tail end of the beak, stitch to the front top center of the bonnet.
Ties: Using G-hook, attach yarn to one side front bottom corner of the bonnet. Chain 51, slip stitch in the second chain from hook and across. Fasten off and weave in ends. Repeat for the other side.
Well, That Was Fun! What’s Next?


I need help with the start of the body. How do you get a chain of 20 to being in the round with 24 stitches in second round. Are we doing the 24 stitches down the Shaun then 24 on the other side of the chain for 48 stitches? I’m confused
You will chain 20 and then begin to work continuously in the round. So on the second round, work into the chains, while also increasing. Some of the chains will have two stitches placed into them.
Please help with the headpiece, cannot figure how to progress from row 22 as there will be 80 stitches all round.
The headpiece will not go all the way around the penguins head so you will stop increasing, join, and work the back. Think of it like the cap/top head part of a hat.
Hola. Pudiste resolver el casco del pingüino? Help me please
I’m having a hard time with the feet. I have sewn the toes together but I’m not sure where to attach to start around the toes for the 24 stitches. Any help is appreciated!
As shown in the images, you will be crocheting around all the stitch of each of the toes which joins them together as one piece to continue creating the foot.
Where is free knitting pattern for this penguin please
https://brianakdesigns.com/penguin-buddy-knit-pattern/
Hi! I’m having a little trouble creating the feet off of the toes. I have attached 2 sets of one big and two little toes together, but am confused how to start stitching off of the toes.
I love the format of your patterns!! I wish all patterns were written this way, so easy to follow.
Thank you so much 🙂
On the Penguin head piece Rnd 23 says: sc in each st around (including chains) 40 sts. Does that mean I have to sc in the chain 1 space at the beginning of Rnd 22? If so then I will only have 39 sts. Please help.
Hola. Pudiste resolver el casco del pingüino? Help me please
I’m having trouble the the headpiece. I get to where you Chain 2 and start in a round and cannot get it to work out
I see what you are referring to. I have updated that to reflect the proper instructions for beginning to work in the round. 🙂
Hi, I am confused on how to start working in the round on the headpiece after Ive gotten 22 rows w/ 38 stitch. Is there a video?
Thank you Briana for the quick response, and thanks a lot for the pattern.
Hanks for the pattern!
I’m having trouble understanding how to do the feet!
I’ve made 4 small and 2 large toes but the instructions imply I need 4 large and I’m not clear how to proceed . Help please !
He’s all made but needs his feet !
It will be four small toes and two large toes. Instructions have been updated, thank you.
Thank you for the pattern. Started to make one for my grandson!
Hi there! I was curious where the knit version of this pattern is available?
Hi! I have fixed the links above to be clickable now. Thanks for alerting me, I had thought they were working. The knit version can be found here: https://brianakdesigns.com/penguin-buddy-knit-pattern/
Hi love this pattern but have only used head,bonnet,beak, and feet . Will attach to a wooden ring to make a teether. Loving the way the head has turned out …
Hola. Estoy muy confundida con la pieza de la cabeza. Disculpa no se como progresar y trabajar en redondo. Gracias, si alguien conoce un video que me pueda recomendar o explicar bien, gracias gracias
I don’t understands the ch20 beginning for the body. Do i close this to make a round?THat means there is an opening at the top. Does the head get sewn onto that opening?
Yes, you will work this continuously in the round and the head will be sewn to the top of this opening.
Hello, I am assuming 1 skein of each color of yarn. Is this correct? Thank you.
That is correct 🙂
Does the big toe go in between the to little toes or is it big toe little toe and another little toe beside the first little.toe
It’s the big toe and then the little toes following, but you can do whatever you prefer.
Hello,
I have made all my toes and joined one big and two small and am ready to crochet again but I’m confused as to where to start the first stitch around for the 24 stitches. And is it 24 then turn for the next row? Help!
These are simply adorable! 🙂 Thank you for the pattern.