


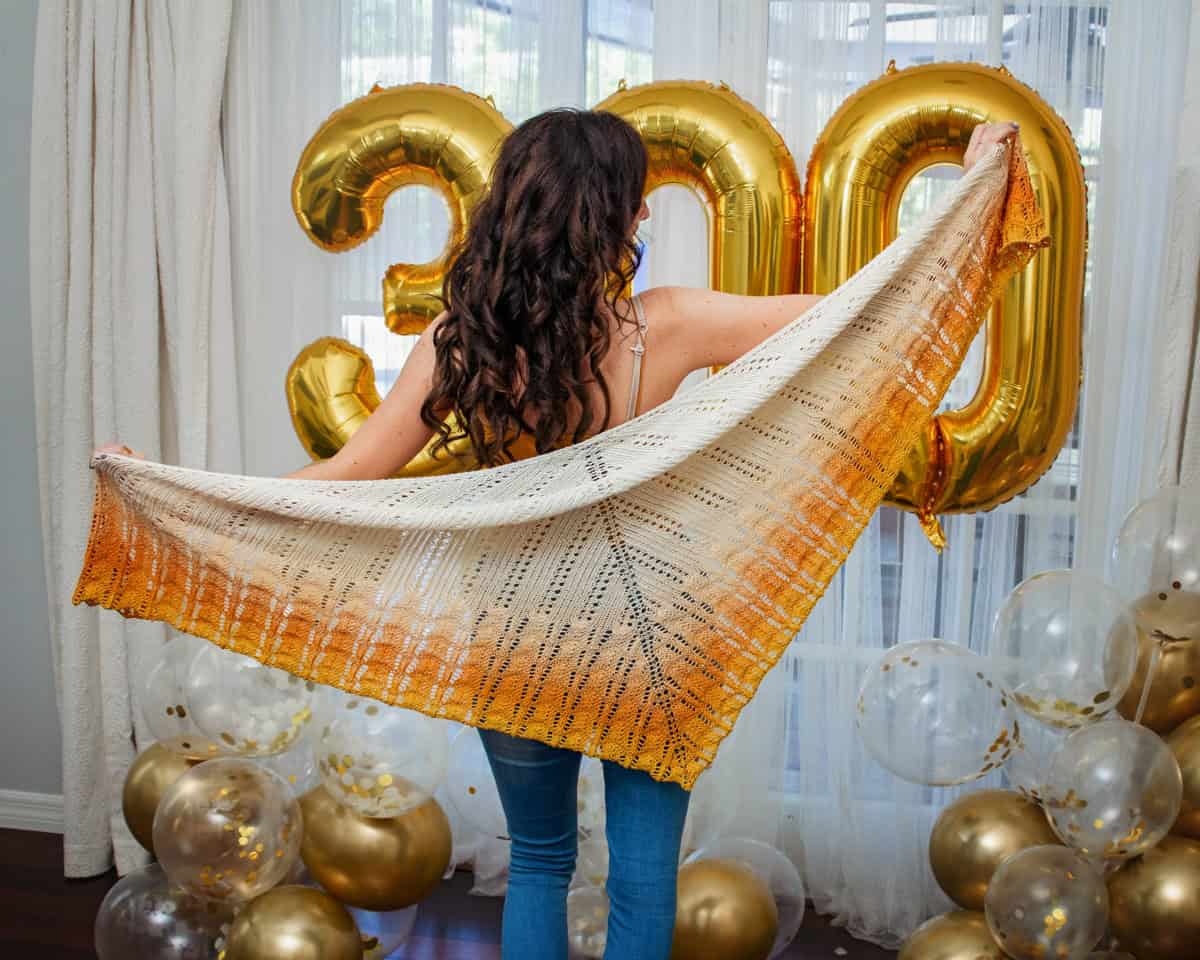
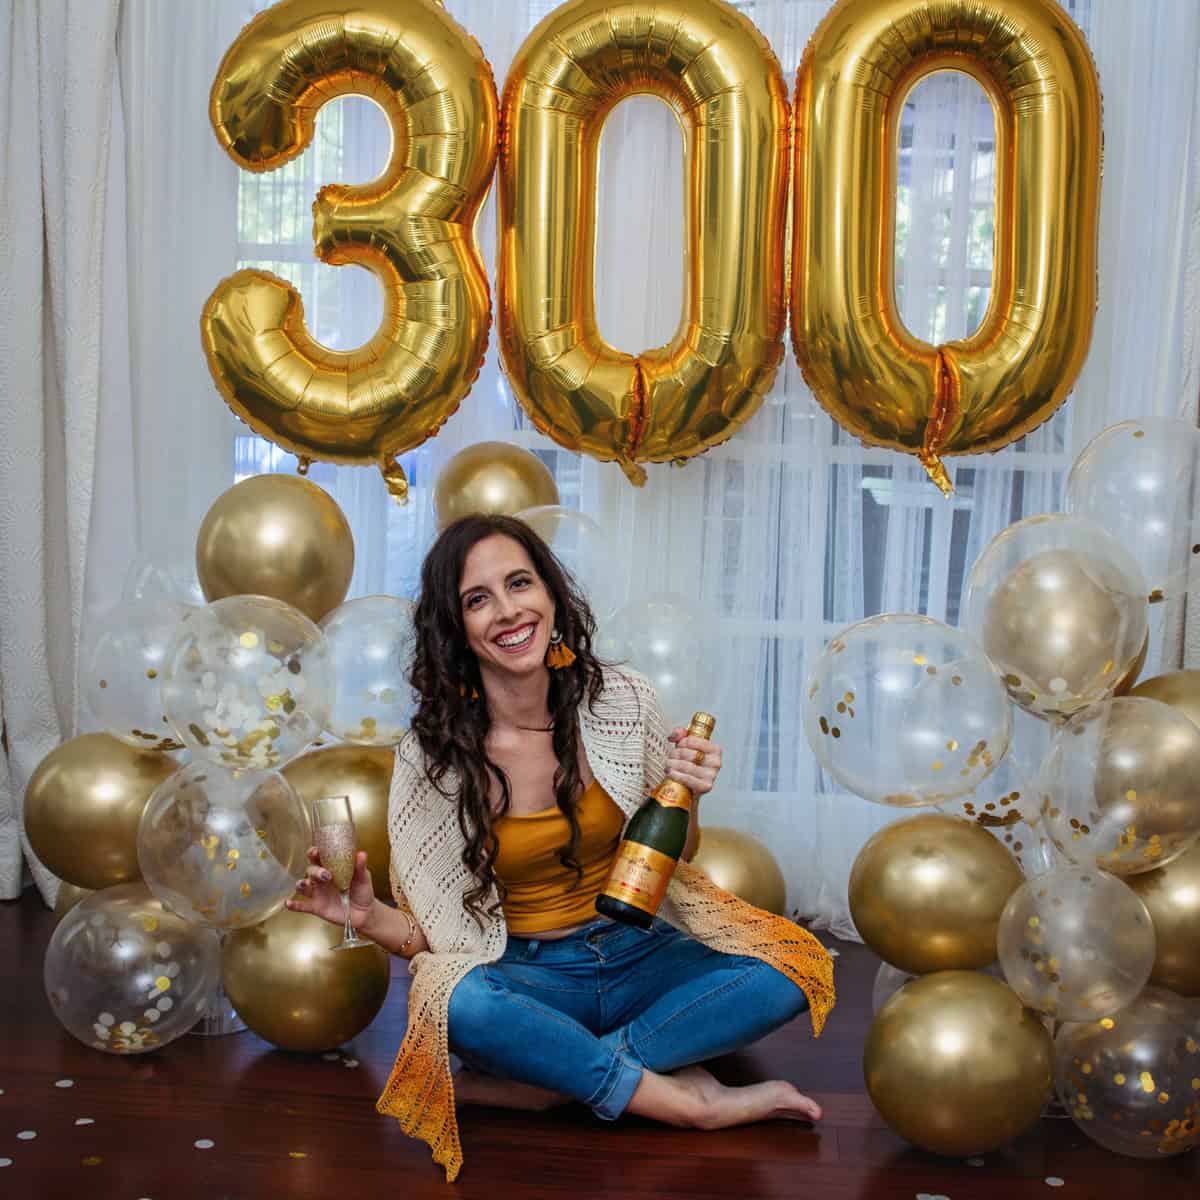
I’m here! I can’t believe it and I’m seriously shocked. The Ray of Sunshine Knit Shawl is my 300th pattern! I have been so excited watching this day approach and I look back at all I’ve learned along the way. And all I have yet to learn!
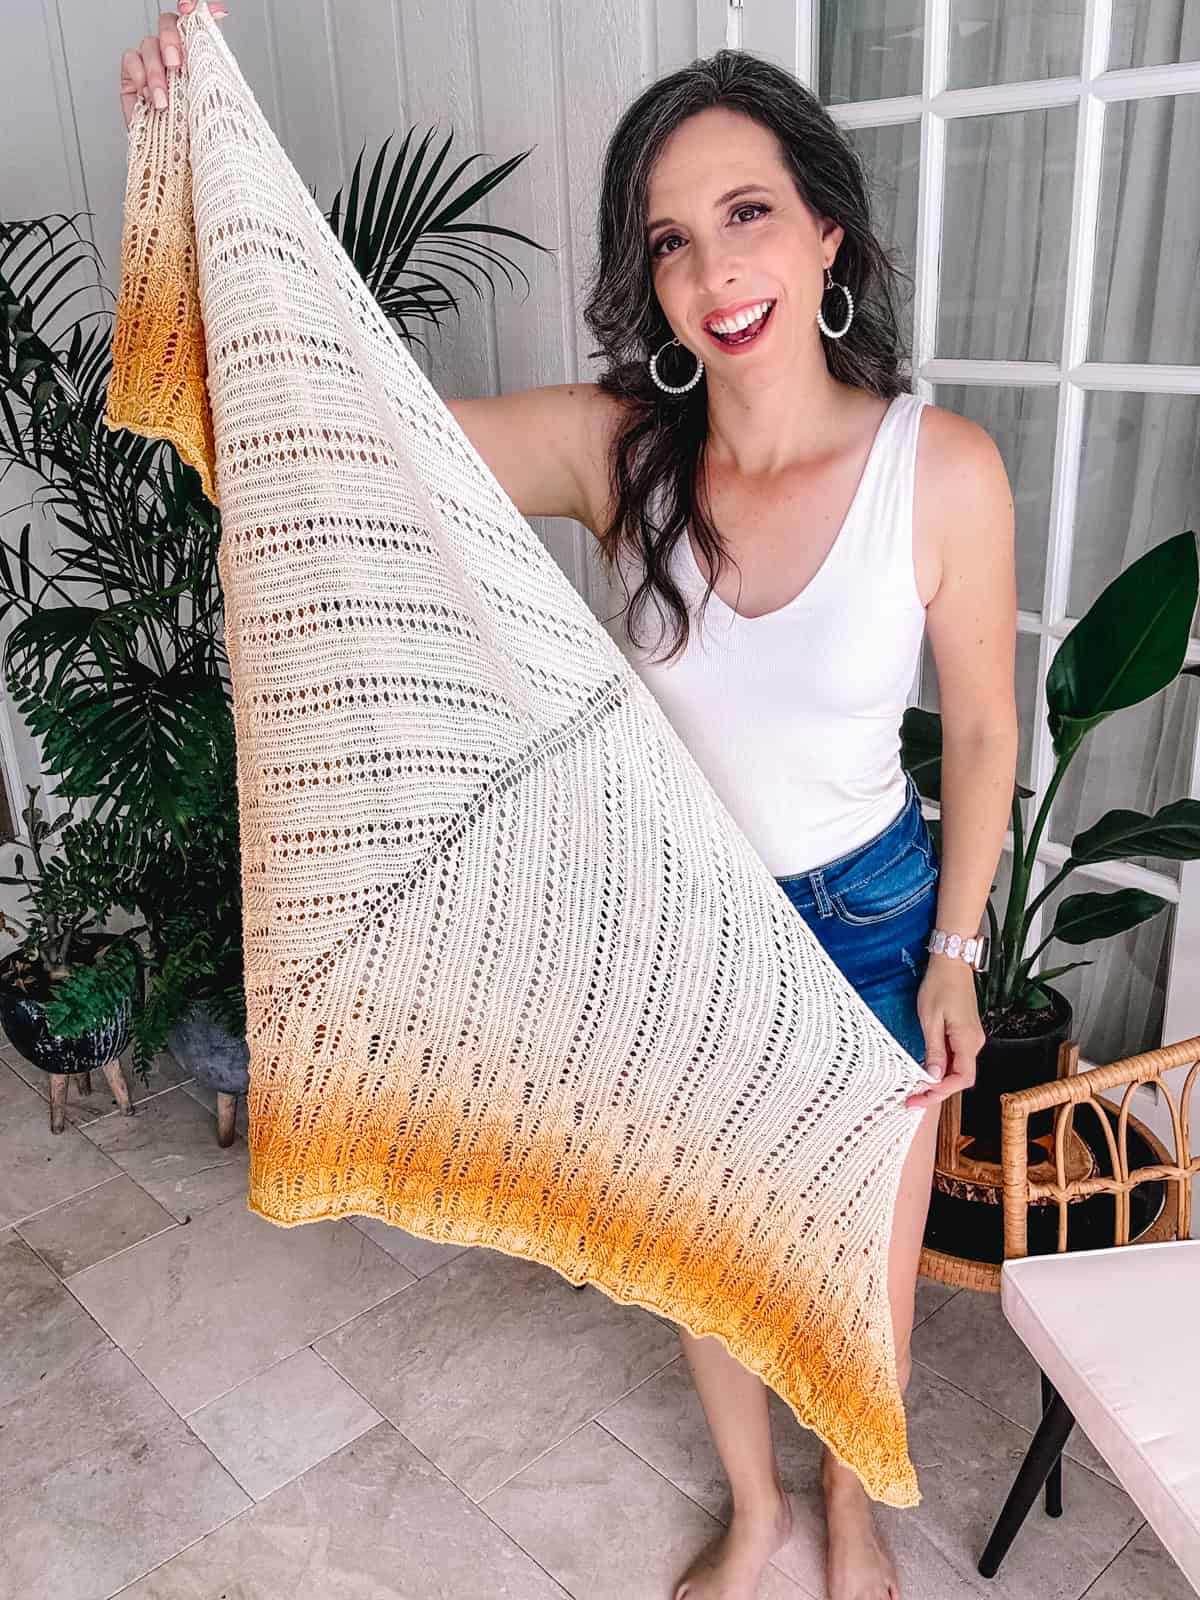
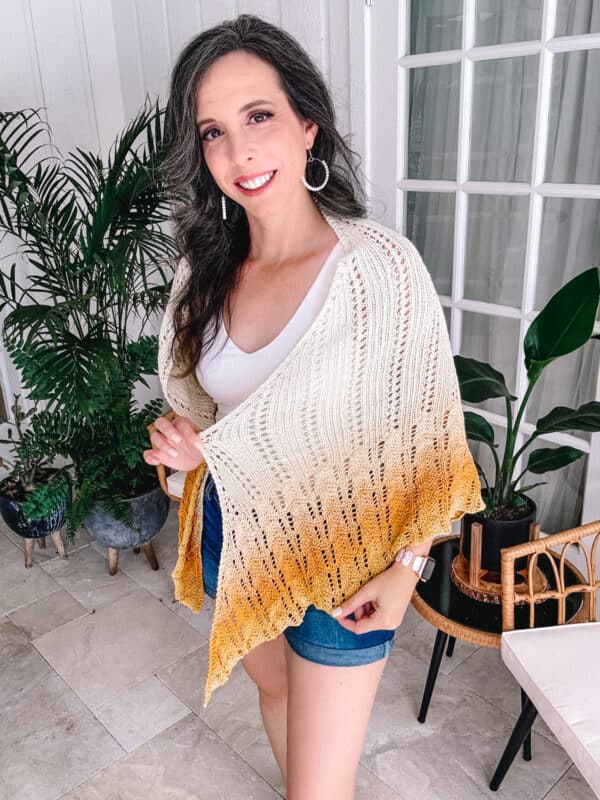
This pattern was inspired by sunshine! Something we all need and we can’t live without. I get a lot of sunshine down here in Florida, and I relish living in tropical weather. This lace knit shawl has a stitch chart as well as written instructions to guide you through each row. And if you love lacy knit stitches, also check out the Light Summer Shawl Knit Pattern or the Lace Sleeve Knit Sweater Pattern.
Disclosure: This post contains affiliate links. Please read my disclosure for more info.
The one thing we all have in common is the sun. No matter where you are each day is rises and falls on all of humanity. It’s been our symbol of hope and brings happiness wherever it touches. So be the sunshine whenever possible, and I hope this knit shawl is a reminder of that.
What you’ll love about this knit shawl pattern.
Ray of Sunshine Knit Shawl Supplies
Knitting Needle:
• Size 5 (3.75 mm) Circular Needles – a minimum of 40 inches.
Notions:
Yarn needle to weave in ends
Scissors
Stitch Markers
Row Counter
Yarn:
Yarn Bee – Rainbow Wrapsody Yarn (Discontinued)
Other Yarn Options:
KnitPicks Chroma Fingering
Cotton Kings Sultan Deluxe From Hobbii
Hobbii Dahlia
Hobbii Dolce Cashmere
Yardage:
918 yards/ball
Abbreviations/Stitches:
- cdd – center double decrease
- k – knit
- k2tog – knit two together
- ktbl – knit through back loop
- p – purl
- p2tog – purl two together
- p tbl – purl through back loop
- RS- Right Side
- sl st- Slip Stitch
- ssk – slip slip knit
- ssp – slip slip purl
- sts- Stitches
- WS- Wrong Side
- yo – yarn over
Gauge:
Gauge is not critical for this shawl as it can be made with a variety of yarns.
22 stitches by 33 rows = 4×4” (10 cm)
Measurements:
Depth: 36” (91 cm)
Width: 80” (203 cm)
Skill Level:
Intermediate
Knit Pattern Notes
This pattern has 3 stitches on either side of the shawl as an edging. There are knit on EVERY row and are NOT shown on the chart. There is also a center spine stitch separating the two identical triangles. The center spine stitch is NOT shown on the chart. For the center spine stitch, knit it on the RS row, and purl on the WS row.
For Example:
When beginning with Row 1, it should be knit as follows:
Row1 (RS): k3 (side stitches), yo, k1, yo, k1 (center stitch), yo, k1, yo, k3 (side stitches)
Row 2 (WS): k3 (side stitches), p7 (both sides plus the center spine stitch), k3 (side stitches)
It is important to place stitch markers at the increases for this pattern. It will help you be more relaxed as you knit because it’s one less thing to worry about. Use a different colored stitch marker at the beginning of the row. This way it’s easy to know at a glance if you are working on a right side or wrong side row.
Relax & Knit
Upgrade to the Printable PDF
Beautifully formatted to print and relax while crocheting. The paid pattern includes:
The ad-free knit pattern is available on Ravelry.
Click the box below to unlock this exclusive subscriber content for free. Add your email and create a password. If you are having trouble, reset your password or log in to the Grow Portal.
I’m thrilled to share this amazing crochet pattern with you! Please don’t copy, paste, or distribute this pattern. Prefer an ad-free experience? Purchase a digital PDF file for a small fee from one of my online stores. I appreciate your support and readership. You are why I can keep doing what I love and sharing it with others. Thank you from the bottom of my heart.
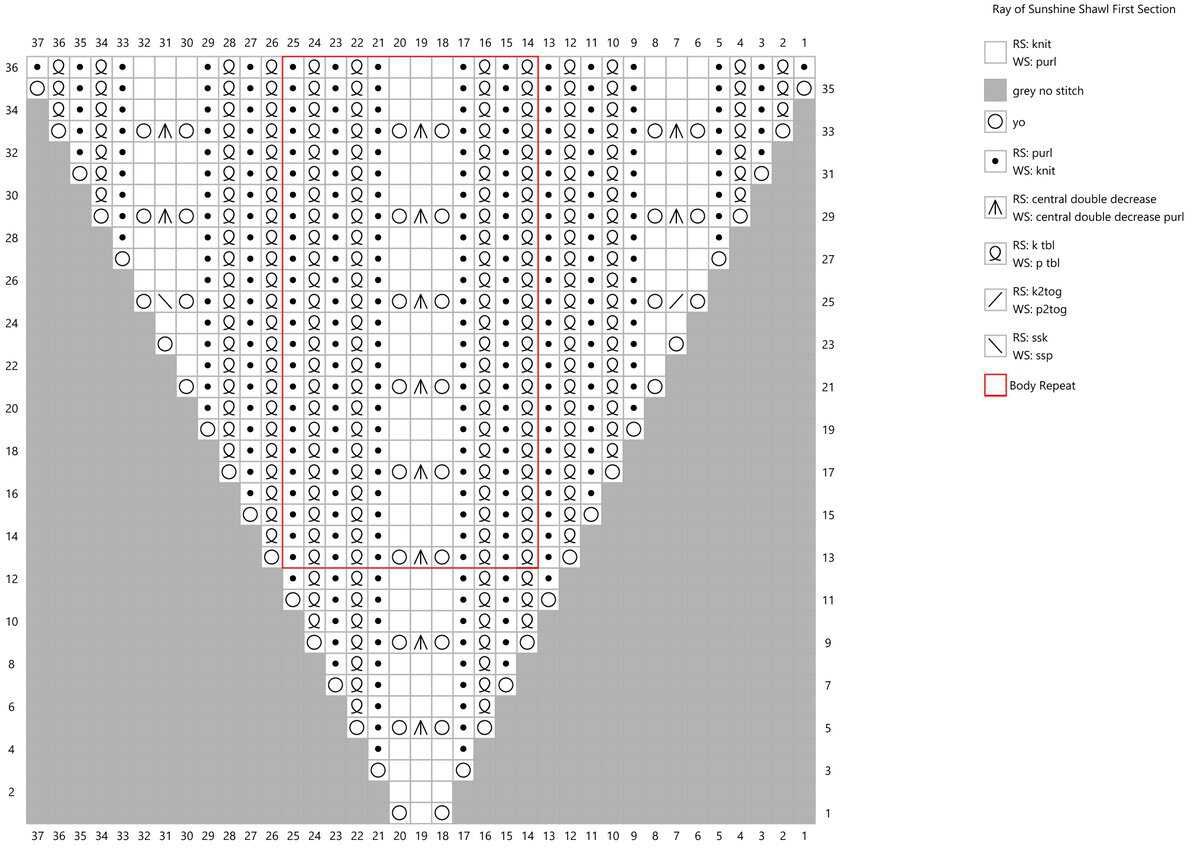
Knit Chart for First Section
Garter Tab Beginning
Cast on 3 stitches and knit 7 rows. With your knitting in your right hand, turn the tab sideways and pick up and knit 3 stitches from the side, then pick up and knit 3 stitches from the
bottom cast on edge (9 stitches total).
First Section Beginning
Remember: The 3 side stitches and center spine stitch are not included. Knit these 3 stitches on every RS row, purl the center spine stitch on WS rows.
The written instructions below are knit twice for each row.
Row 1 (RS): Yo, k1, yo.
Row 2 (WS): Purl.
Row 3: Yo, k3, yo.
Row 4: K1, p3, k1.
Row 5: Yo, p1, yo, cdd, yo, p1, yo.
Row 6: P tbl, k1, p3, k1, ptbl.
Row 7: Yo, ktbl p1, k3, p1, ktbl, yo.
Row 8: K1, ptbl, k1, p3, k1, ptbl, k1.
Row 9: Yo, p1, ktbl, p1, yo, cdd, yo, p1, ktbl, p1, yo.
Row 10: (Ptbl, k1) × 2, p3, (k1, ptbl) × 2.
Row 11: Yo, (ktbl, p1) × 2, k3, (p1, ktbl) × 2, yo.
Row 12: (K1, ptbl) × 2, k1, p3, (k1, ptbl) × 2, k1.
Join The Kindest Community
Join our vibrant community of crafters on Facebook today. Whether you enjoy crafting with others or simply have burning questions, we’ve got you covered – join us now!
First Section Repeats
Row 13: Yo, p1, ((ktbl, p1) × 2, yo, cdd, yo, (p1, ktbl) × 2, p1), yo.
Row 14: P tbl, ((k1, ptbl) × 2, k1, p3, (k1, ptbl) × 2), k1, p tbl.
Row 15: Yo, ktbl, p1, ((ktbl, p1) × 2, k3, (p1, ktbl) × 2, p1), ktbl, yo.
Row 16: K1, p tbl, ((k1, ptbl) × 2, k1, p3, (k1, ptbl) × 2), k1, p tbl, k1.
Row 17: Yo, p1, ktbl, p1, ((ktbl, p1) × 2, yo, cdd, yo, (p1, ktbl) × 2, p1), ktbl, p1, yo.
Row 18: Ptbl, k1, p tbl, ((k1, ptbl) × 2, k1, p3, (k1, ptbl) × 2), (k1, ptbl) × 2.
Row 19: Yo, (ktbl, p1) × 2, ((ktbl, p1) × 2, k3, (p1, ktbl) × 2, p1), ktbl, p1, ktbl, yo.
Row 20: (K1, ptbl) × 2, ((k1, ptbl) × 2, k1, p3, (k1, ptbl) × 2), (k1, ptbl) × 2, k1.
Row 21: Yo, (p1, ktbl) × 2, p1, ((ktbl, p1) × 2, yo, cdd, yo, (p1, ktbl) × 2, p1), (ktbl, p1) × 2, yo.
Row 22: P1, (k1, ptbl) × 2, ((k1, ptbl) × 2, k1, p3, (k1, ptbl) × 2), (k1, ptbl) × 2, k1, p1.
Row 23: Yo, k1, (p1, ktbl) × 2, p1, ((ktbl, p1) × 2, k3, (p1, ktbl) × 2, p1), (ktbl, p1) × 2, k1, yo.
Row 24: P2, (k1, ptbl) × 2, ((k1, ptbl) × 2, k1, p3, (k1, ptbl) × 2), (k1, ptbl) × 2, k1, p2.
Row 25: Yo, k2tog, yo, (p1, ktbl) × 2, p1, ((ktbl, p1) × 2, yo, cdd, yo, (p1, ktbl) × 2, p1), (ktbl, p1) × 2, yo, ssk, yo.
Row 26: P3, (k1, ptbl) × 2, ((k1, ptbl) × 2, k1, p3, (k1, ptbl) × 2), (k1, ptbl) × 2, k1, p3.
Row 27: Yo, k3, (p1, ktbl) × 2, p1, ((ktbl, p1) × 2, k3, (p1, ktbl) × 2, p1), (ktbl, p1) × 2, k3, yo.
Row 28: K1, p3, (k1, ptbl) × 2, ((k1, ptbl) × 2, k1, p3, (k1, ptbl) × 2), (k1, ptbl) × 2, k1, p3, k1.
Row 29: Yo, p1, yo, cdd, yo, (p1, ktbl) × 2, p1, ((ktbl, p1) × 2, yo, cdd, yo, (p1, ktbl) × 2, p1), (ktbl, p1) × 2, yo, cdd, yo, p1, yo.
Row 30: Ptbl, k1, p3, (k1, ptbl) × 2, ((k1, ptbl) × 2, k1, p3, (k1, ptbl) × 2), (k1, ptbl) × 2, k1, p3, k1, p tbl.
Row 31: Yo, ktbl, p1, k3, (p1, ktbl) × 2, p1, ((ktbl, p1) × 2, k3, (p1, ktbl) × 2, p1), (ktbl, p1) × 2, k3, p1, ktbl, yo.
Row 32: K1, p tbl, k1, p3, (k1, ptbl) × 2, ((k1, ptbl) × 2, k1, p3, (k1, ptbl) × 2), (k1, ptbl) × 2, k1, p3, k1, p tbl, k1.
Row 33: Yo, p1, ktbl, p1, yo, cdd, yo, (p1, ktbl) × 2, p1, ((ktbl, p1) × 2, yo, cdd, yo, (p1, ktbl) × 2, p1), (ktbl, p1) × 2, yo, cdd, yo, p1, ktbl, p1, yo.
Row 34: (Ptbl, k1) × 2, p3, (k1, ptbl) × 2, ((k1, ptbl) × 2, k1, p3, (k1, ptbl) × 2), (k1, ptbl) × 2, k1, p3, (k1, ptbl) × 2.
Row 35: Yo, (ktbl, p1) × 2, k3, (p1, ktbl) × 2, p1, ((ktbl, p1) × 2, k3, (p1, ktbl) × 2, p1), (ktbl, p1) × 2, k3, (p1, ktbl) × 2, yo.
Row 36: (K1, ptbl) × 2, k1, p3, (k1, ptbl) × 2, ((k1, ptbl) × 2, k1, p3, (k1, ptbl) × 2), (k1, ptbl) × 2, k1, p3, (k1, ptbl) × 2, k1.
Reminder: Repeat this first section five more times.
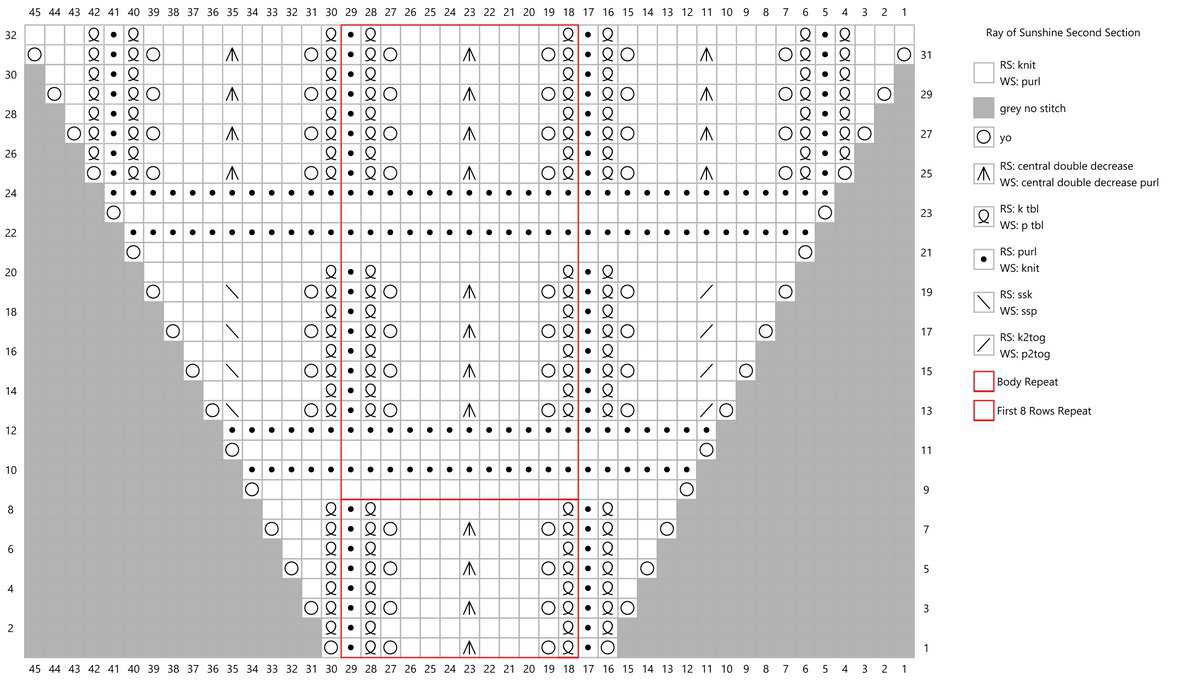
Second Section Chart
Second Section Beginning
Remember: The 3 side stitches and center spine stitch are not included. nit these 3 stitches on every RS row, purl the center spine stitch on WS rows.
The written instructions below are knit twice for each row. Repeats are shown in bold, as the shawl grows, just repeat the stitches outlined, as the shawl grows, just repeat the stitches outlined.
Row 1 (RS): Yo, p1, (ktbl, yo, k3, cdd, k3, yo, ktbl, p1), yo.
Row 2 (WS): Ptbl, (k1, ptbl, p9, ptbl), k1, p tbl.
Row 3: Yo, ktbl, p1, (ktbl, yo, k3, cdd, k3, yo, ktbl, p1), ktbl, yo.
Row 4: P1, ptbl, (k1, ptbl, p9, ptbl), k1, ptbl, p1.
Row 5: Yo, k1, ktbl, p1, (ktbl, yo, k3, cdd, k3, yo, ktbl, p1), ktbl, k1, yo.
Row 6: P2, ptbl, (k1, ptbl, p9, ptbl), k1, ptbl, p2.
Row 7: Yo, k2, ktbl, p1, (ktbl, yo, k3, cdd, k3, yo, ktbl, p1), ktbl, k2, yo.
Row 8: P3, ptbl, (k1, ptbl, p9, ptbl), k1, ptbl, p3.
Second Section Repeats
Repeat this section a total of 2 times. Then repeat rows 9-16 once more or until yarn has run out.
Row 9: Yo, k until next st marker, yo.
Row 10: Knit.
Row 11: Yo, k until next st marker, yo.
Row 12: Knit.
Row 13: Yo, k2tog, k3, yo, ktbl, p1, (ktbl, yo, k3, cdd, k3, yo, ktbl, p1), ktbl, yo, k3, ssk, yo.
Row 14: P6, ptbl, (k1, ptbl, p9, ptbl), k1, ptbl, p6.
Row 15: Yo, k1, k2tog, k3, yo, ktbl, p1, (ktbl, yo, k3, cdd, k3, yo, ktbl, p1), ktbl, yo, k3, ssk, k1, yo.
Row 16: P7, ptbl, (k1, ptbl, p9, ptbl), k1, ptbl, p7.
Row 17: Yo, k2, k2tog, k3, yo, ktbl, p1, (ktbl, yo, k3, cdd, k3, yo, ktbl, p1), ktbl, yo, k3, ssk, k2, yo.
Row 18: P8, ptbl,(k1, ptbl, p9, ptbl), k1, ptbl, p8.
Row 19: Yo, k3, k2tog, k3, yo, ktbl, p1, (ktbl, yo, k3, cdd, k3, yo, ktbl, p1), ktbl, yo, k3, ssk, k3, yo.
Row 20: P9, ptbl, (k1, ptbl, p9, ptbl), k1, ptbl, p9.
Row 21: Yo, k until next st marker, yo. Row 22: Knit. Row 23: Yo, k until next st marker, yo.
Row 24: Knit.
Row 25: Yo, p1, ktbl, yo, k3, cdd, k3, yo, ktbl, p1, (ktbl, yo, k3, cdd, k3, yo, ktbl, p1), ktbl, yo, k3, cdd, k3, yo, ktbl, p1, yo.
Row 26: Ptbl, k1, ptbl, p9, ptbl, (k1, ptbl, p9, ptbl), k1, ptbl, p9, ptbl, k1, p tbl.
Row 27: Yo, ktbl, p1, ktbl, yo, k3, cdd, k3, yo, ktbl, p1, (ktbl, yo, k3, cdd, k3, yo, ktbl, p1), ktbl, yo, k3, cdd, k3, yo, ktbl, p1, ktbl, yo.
Row 28: P1, ptbl, k1, ptbl, p9, ptbl, (k1, ptbl, p9, ptbl), k1, ptbl, p9, ptbl, k1, ptbl, p1.
Row 29: Yo, k1, ktbl, p1, ktbl, yo, k3, cdd, k3, yo, ktbl, p1, (ktbl, yo, k3, cdd, k3, yo, ktbl, p1), ktbl, yo, k3, cdd, k3, yo, ktbl, p1, ktbl, k1, yo.
Row 30: P2, ptbl, k1, ptbl, p9, ptbl, (k1, ptbl, p9, ptbl), k1, ptbl, p9, ptbl, k1, ptbl, p2.
Row 31: Yo, k2, ktbl, p1, ktbl, yo, k3, cdd, k3, yo, ktbl, p1, (ktbl, yo, k3, cdd, k3, yo, ktbl, p1), ktbl, yo, k3, cdd, k3, yo, ktbl, p1, ktbl, k2, yo.
Row 32: P3, ptbl, k1, ptbl, p9, ptbl, (k1, ptbl, p9, ptbl), k1, ptbl, p9, ptbl, k1, ptbl, p3.
Finishing the Knit Shawl
Weave in all loose ends.
When it comes to finishing your shawl, proper blocking is essential to accentuate the lace details and achieve the desired shape. To block lace, gently soak the finished shawl in lukewarm water with a mild detergent, then carefully squeeze out excess water without wringing or twisting the delicate fibers.
Want an easier blocking experience? Get a block combs for getting a clean sharp look.
Place the shawl on a flat surface, foam blocking mats, or on a bed with a towel underneath.
Using blocking pins, aggressively block so there is a medium tension and the lace pattern opens up uniformly.
Unpin when completely dry and enjoy!
Caring for your knit lace shawl is crucial to preserving it for years to come. To maintain its delicate fibers, hand washing in cool water with a gentle detergent is recommended. Avoid harsh agitation and never wring or twist the shawl, as this can damage the delicate lace.
Instead, gently press out excess water and lay the shawl flat to dry on a clean towel or blocking mat. With proper care and attention, your Ray of Sunshine Knit Shawl will remain a cherished accessory, ready to brighten your days for years to come.
I hope you enjoy this pattern and continue to follow along for more. If you are looking to get something on your needles soon I would recommend the Prism Triangle Colorwork Cowl or the Modern Honeycomb Knit Shawl Pattern.
Even though this marks 300 patterns, I’m not done yet! So here’s a glass raised to the next pattern adventures. Cheers to more crafting fun in our future!
Well, That Was Fun! What’s Next?