Wheat Stitch Chickens Crochet Pattern


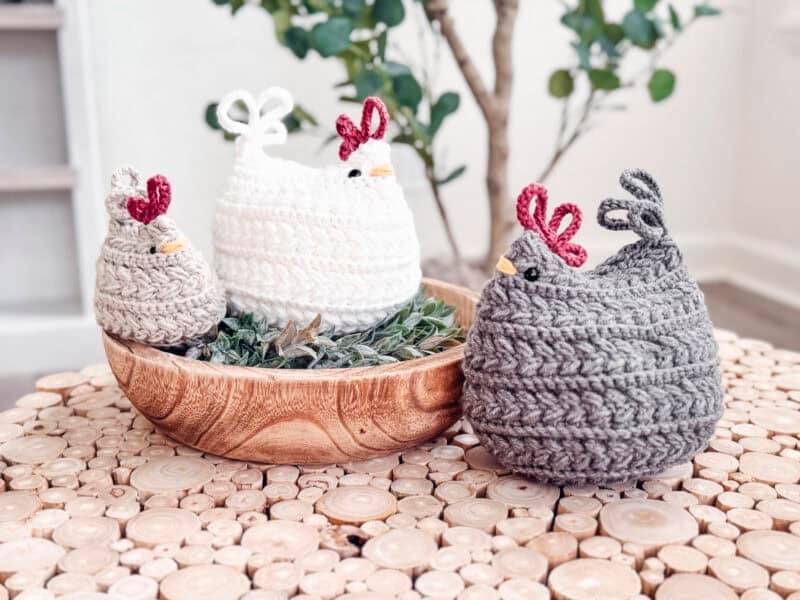
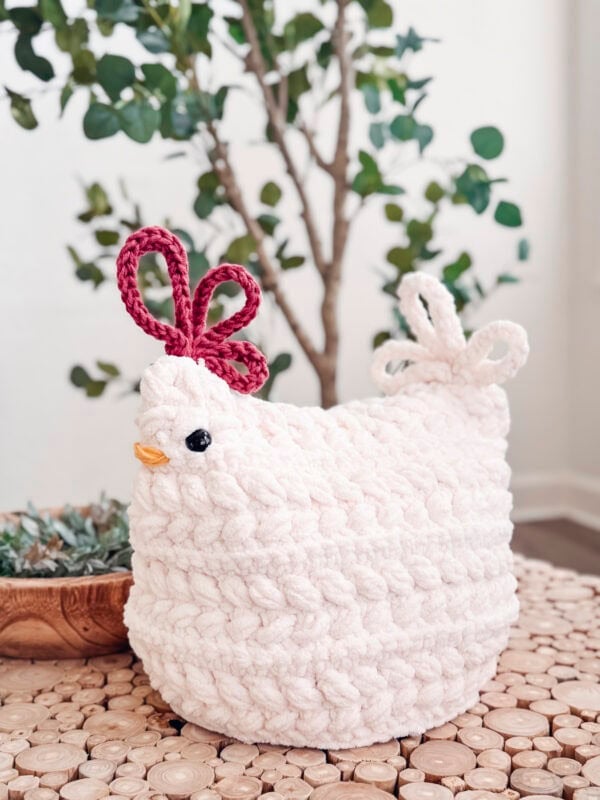
Looking for a project that’s quick, fun, and just a little bit egg-stra addictive? Meet the Wheat Stitch Chickens! These cluckin’ cute little crochet chickens work up in no time and come in two sizes—perfect for making just one or starting your own handmade henhouse. Crocheted in rounds with the beautifully textured wheat stitch, they’re a joy to stitch and even more fun to display, gift, or feather into your decor. Whether you’re using up scraps or picking your favorite colors, this project will surely crack you up with happiness!

Disclosure: This post contains affiliate links. Please read my disclosure for more info.
Feel free to use any yarn you have lying around – gauge isn’t a big deal here! Whether you make just one or find yourself hooked and making a whole coop full, these chickens are sure to bring a smile! If you love cuddly stuffed friends, check out the Be My Bunny Buddy and the Woodland Fox or Adorable Bear Amigurumi patterns!
Crochet Supplies
Yarn
Herrschners Worsted 8
100% Acrylic; 489yds/226g
Yarn Quantities
Will depend on preferred size and yarn/hook.
As written: 80 (210)yds
Yarn Substitutions
Brava Worsted – 100% Premium Acrylic, 218yds/100g
Herrschners Worsted 8 Heathers – 100% Acrylic, 489yds/226g
Dishie – 100% Cotton; 190yds/100g
Remember always to check the gauge and drape when substituting yarns.
Crochet Hook
Size US G+/7 (4.5mm) Crochet Hook or hook to obtain gauge.
Notions
Scissors
Yarn Needle
Removable Stitch Marker
Fiber Fill
Safety Eyes
Poly Craft Pellets
Skill Level
Advanced Beginner
What you’ll love about this pattern.
🩶 Fast and Fun: Whether you have a free afternoon or just need a quick, satisfying project, this chicken works up in no time!
🩶 Flexible Yarn Options: Use any weight yarn you like — perfect for using up scraps and experimenting with colors.
🩶 Beginner-Friendly Techniques: Simple shaping, easy stitching, and minimal sewing make this a great project for all skill levels.
Two Sizes
Small and Large
Abbreviations
blo – back loop only
ch – chain
flo – front loop only
RS – right side
sc – single crochet
sc2tog – single crochet 2 together
sl st – slip stitch
st(s) – stitch(es)
WS – wrong side
Gauge
Not critical for this pattern.
How to Crochet A Gauge Swatch
Working a gauge swatch will let you know if you will have the correct sizing for this pattern. It will also help you practice the stitches used in this project and improve your stitch work for a flawless look.
Are you struggling to match the gauge? Check out the blog post on What is Crochet Gauge and How To Fix It
Construction
The Wheat Stitch Crochet Chicken is a quick and easy amigurumi-style project! First, we’ll make the chicken’s body using the wheat stitch in joined and turned rounds. Then, we’ll crochet the Comb and Tail Feathers. You can add safety eyes if you like (though they aren’t recommended for young children) and stitch a small beak with scrap yarn. Finally, we’ll sew the top closed, attaching the Comb and Feathers as we go. It’s a fast and fun way to use up extra yarn!
A beautiful basket like the Wheat Stitch Nesting Baskets or the Wheat Stitch Bunny Basket (just leave off the bunny bits) is a perfect place for your chickens!
Special Stitches
Puff Stitch: Yarn over and insert your hook into the stitch/space. Yarn over again and pull up a long loop. Yarn over and insert your hook into the same stitch/space. Yarn over again and pull up a long loop (5 loops on the hook). Yarn over and pull through the first 4 loops, yarn over and pull through remaining loops.
Invisible sc2tog: Insert your hook into the front loop of the first st, and then insert into the front loop of the second st (3 loops on the hook). Yarn over and pull through both front loops (2 loops on the hook), yarn over and pull through the remaining loops on the hook.
Pattern Notes
🐔 Warning: Safety eyes are not suitable for children under three years old, as they can pose a choking hazard if they become detached. Adult supervision is recommended. Feel free to embroider the eyes.
🐔 A ch 1 at the beginning of a row is not counted as a stitch.
🐔 Using a stitch marker at the beginning (or end) of the round is recommended.
🐔 Before you dive into your project, take a moment to identify the stitch and row counts for the size Chicken you’re making.
Subscribe & Like
Video Tutorial for the Crochet Chickens
Relax & Crochet
Upgrade to the Printable PDF
Beautifully formatted to print and relax while crocheting. The paid pattern includes:
The Ad-Free PDF can be purchased on Etsy or Ravelry.
Click the box below to unlock this exclusive subscriber content for free. Add your email and create a password. If you are having trouble, reset your password or login to the Grow Portal.
I’m thrilled to share this amazing crochet pattern with you! Please don’t copy, paste, or distribute this pattern. Prefer an ad-free experience? Purchase a digital PDF file for a small fee from one of my online stores. I appreciate your support and readership. You are why I can keep doing what I love and sharing it with others. Thank you from the bottom of my heart.
Written Crochet Pattern Instructions
Rnd 5:
Ch 1, blo 2 sc in first, blo sc in next, *blo 2 sc in next, blo sc in next; repeat from * around, join and turn. | 36 sts
Rnd 6:
Ch 1, blo 2 sc in first, blo sc in the next 2 sts, *blo 2 sc in next, blo sc in the next 2 sts; repeat from * around, join and turn. | 48 sts
Rnds 7-8:
Ch 1, skip the first st, sc in next, work a puff st into the skipped st, *skip the next st, sc in next, work a puff st into the skipped st; repeat from * around, join and turn.
Rnd 9:
Ch 1, blo sc in each st around, join and turn.
Rnd 10:
Ch 1, blo sc2tog, blo sc in the next 2 sts, *blo sc2tog, blo sc in the next 2 sts; repeat from * around, join and turn. | 36 sts
Rnds 11-12:
Ch 1, skip the first st, sc in next, work a puff st into the skipped st, *skip the next st, sc in next, work a puff st into the skipped st; repeat from * around, join and turn.
Rnd 13:
Ch 1, blo sc in each st around, join and turn.
Rnd 14:
Ch 1, blo sc2tog, blo sc in the next st, *blo sc2tog, blo sc in the next st; repeat from * around, join and turn. | 24 sts
Rnds 15-16:
Ch 1, skip the first st, sc in next, work a puff st into the skipped st, *skip the next st, sc in next, work a puff st into the skipped st; repeat from * around, join and turn.
Fasten off, leaving a long tail for seaming later.
Join The Kindest Community
Join our vibrant community of crafters on Facebook today. Whether you enjoy crafting with others or simply have burning questions, we’ve got you covered – join us now!
Large Chicken Body
Rnd 1:
Inside a Magic Ring, sc 12, join and turn. | 12 sts
Rnd 2:
Ch 1, blo 2 sc in each st around, join and turn. | 24 sts
Rnds 3-4:
Ch 1, skip the first st, sc in next, work a puff st into the skipped st, *skip the next st, sc in next, work a puff st into the skipped st; repeat from * around, join and turn.
Rnd 5:
Ch 1, blo 2 sc in first, blo sc in next, *blo 2 sc in next, blo sc in next; repeat from * around, join and turn. | 36 sts
Rnd 6:
Ch 1, blo 2 sc in first, blo sc in the next 2 sts, *blo 2 sc in next, blo sc in the next 2 sts; repeat from * around, join and turn. | 48 sts
Rnds 7-8:
Ch 1, skip the first st, sc in next, work a puff st into the skipped st, *skip the next st, sc in next, work a puff st into the skipped st; repeat from * around, join and turn.
Rnd 9:
Ch 1, blo 2 sc in first, blo sc in the next 3 sts, *blo 2 sc in next, blo sc in the next 3 sts; repeat from * around, join and turn. | 60 sts
Rnd 10:
Ch 1, blo 2 sc in first, blo sc in the next 4 sts, *blo 2 sc in next, blo sc in the next 4 sts; repeat from * around, join and turn. | 72 sts
Rnds 11-12:
Ch 1, skip the first st, sc in next, work a puff st into the skipped st, *skip the next st, sc in next, work a puff st into the skipped st; repeat from * around, join and turn.
Rnds 13-14:
Ch 1, blo sc in each st around, join and turn.
Rnds 15-16:
Ch 1, skip the first st, sc in next, work a puff st into the skipped st, *skip the next st, sc in next, work a puff st into the skipped st; repeat from * around, join and turn.
Rnds 17-20:
Repeat Rnds 13-16.
Rnd 21:
Ch 1, blo sc2tog, blo sc in the next 4 sts, *blo sc2tog, blo sc in the next 4 sts; repeat from * around, join and turn. | 60 sts
Rnd 22:
Ch 1, blo sc in each st around, join and turn.
Rnds 23-24:
Ch 1, skip the first st, sc in next, work a puff st into the skipped st, *skip the next st, sc in next, work a puff st into the skipped st; repeat from * around, join and turn.
Rnd 25:
Ch 1, blo sc2tog, blo sc in the next 3 sts, *blo sc2tog, blo sc in the next 3 sts; repeat from * around, join and turn. | 48 sts
Rnd 26:
Ch 1, blo sc in each st around, join and turn.
Rnds 27-28:
Ch 1, skip the first st, sc in next, work a puff st into the skipped st, *skip the next st, sc in next, work a puff st into the skipped st; repeat from * around, join and turn.
Fasten off, leaving a long tail for seaming later.
Chicken Comb
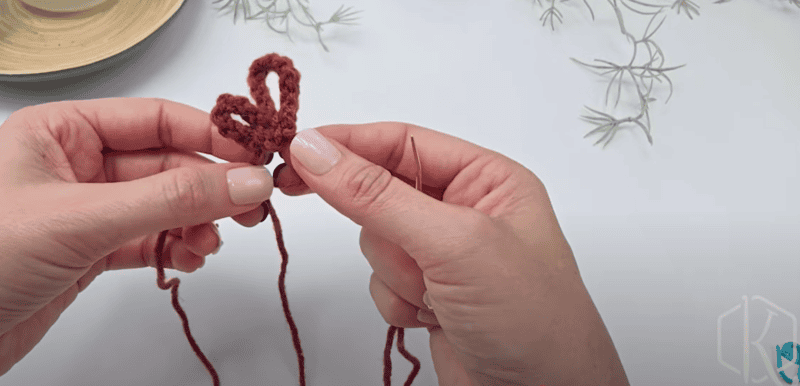
To create the Comb (and Tail Feathers), we will be using a DIY easy i-cord; no special tools are required. Watch this video to learn how to create the i-cord: https://youtu.be/CSDtR_Kv_oA
Using Red Yarn, create 24 i-cord stitches for a Small Chicken and 46 i-cord sts for a Large Chicken.
Your tail end for the i-cord should be about 5 times longer than the end length. This length can be personal preference, so feel free to play around with the number of i-cord chains. For the Small Chicken, it’s approximately 5 inches, and for the Large Chicken, it’s approximately 9 inches.
Fasten off and grab your yarn needle. Place one of the tail ends onto the needle, and then fold your i-cord into two or three loops (I used two loops for the Small Chicken, three for the Large Chicken), the first loop being the largest and the last loop being the smallest.
Weave your yarn needle through the base of all these loops and pull tight. Then, weave back through the base a couple of times and tie the end strings together.
There’s no need to weave in any ends for this, as we can tuck them inside our Chicken Body. Set aside for assembly.
Tail Feathers
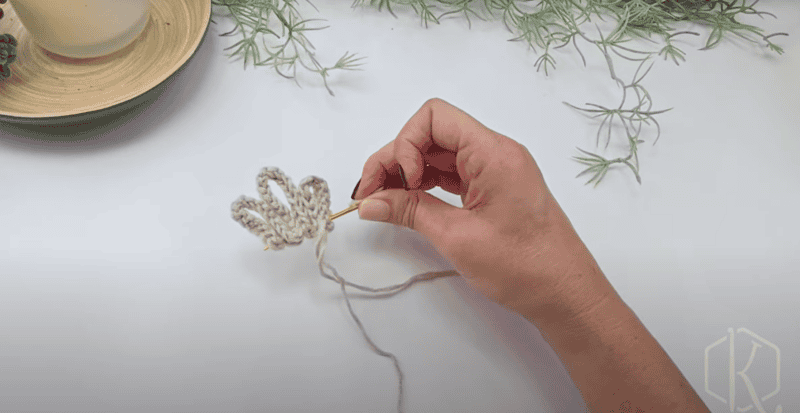
Using White Yarn (or color of choice), create 42 i-cord stitches for a Small Chicken (approx 7 inches) and 68 i-cord sts for a Large Chicken (approx 13 inches).
Fasten off and grab your yarn needle. Place one of the tail ends onto the needle, and then fold your i-cord into three even loops, or make the center loop a little larger.
Weave your yarn needle through the base of all these loops and pull tight. Then, weave back through the base a couple of times and tie the end strings together.
There’s no need to weave in any ends for this, as we can tuck them inside our Chicken Body. Set aside for assembly.
Assembly
Fold the Chicken Body at the top to create two sides that meet.
Place safety eyes at the opposite end of the seam where desired.
Remember that safety eyes are not recommended for children under the age of 3!
With Yellow Yarn, weave a line a few times around between the eyes to make a beak. Tie off or weave in end on the inside.
Using fiber fill or scrap yarn, stuff your chicken, being careful not to overstuff.
The Comb and Tail Feathers will be sewn into place at the same time as the final seam.
With your yarn needle, work through the loop of the first stitch, then through the base of the Tail Feathers (keeping any loose ends on the inside of the chicken), then through the seam of the next stitch.
Continue to work sewing through one stitch on one side to the corresponding stitch on the other side across until the last couple of inches. Insert the Comb into the opening and stitch through the Comb, sandwiching it between the two sides as you continue to close the seam.
Subscribe to my youtube channel
Finishing
Fasten off and weave in all ends. These adorable chickens can be great items to give as a gift or sell at a market.
Crocheted stuffed animals are pure magic! They turn simple yarn and stitches into something full of personality and charm. Whether you’re making a cuddly friend for a little one, a cheerful decoration for your home, or just creating for the joy of it, there’s something so satisfying about seeing a character come to life in your hands.
Projects like the Wheat Stitch Crochet Chicken are especially fun because they’re quick, creative, and a little bit addictive — once you make one, you might not want to stop!
No matter your skill level, crocheting stuffed animals is a wonderful way to add a little extra joy and creativity to your day. To add more texture and dimension to your home, try the Braided Wheat Blanket or the Pumpkin Spice Trio!
Cheers, and happy crocheting!
Well That Was Fun! What’s Next?
📌 PIN THIS POST – Don’t lose this project; save it to your Pinterest crochet board so you can quickly come back to it again.
💌 SHARE – Share your yarn choice, in-progress, or finished projects on Facebook or Instagram and use the hashtag #brianakdesigns
🥂 JOIN – Join the kindest crafters in the Briana K Designs Community Group on Facebook. We love yarny friends!
🔗 RAVELRY LINK -Link and share your project on Ravelry. Having inspirational photos can help crafters.