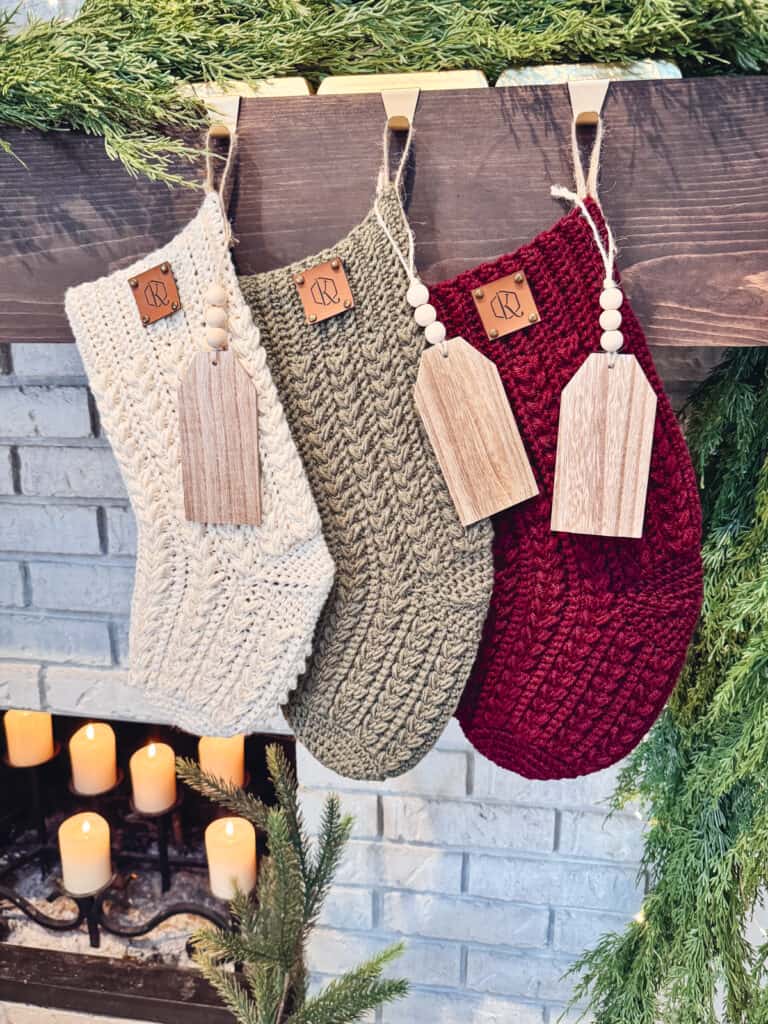


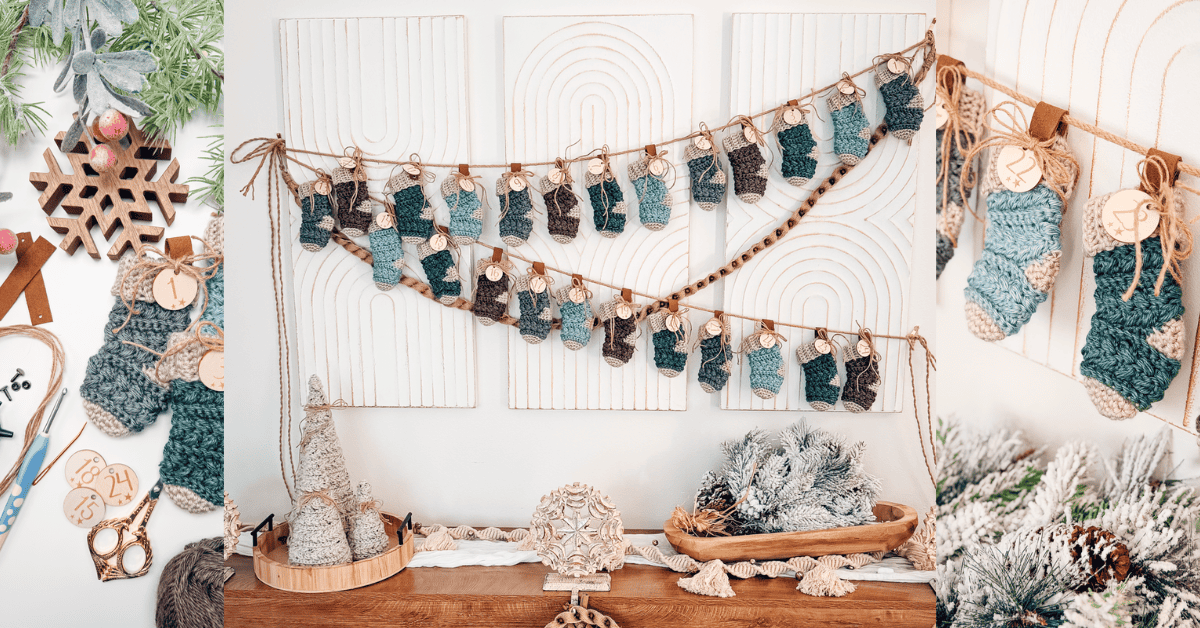
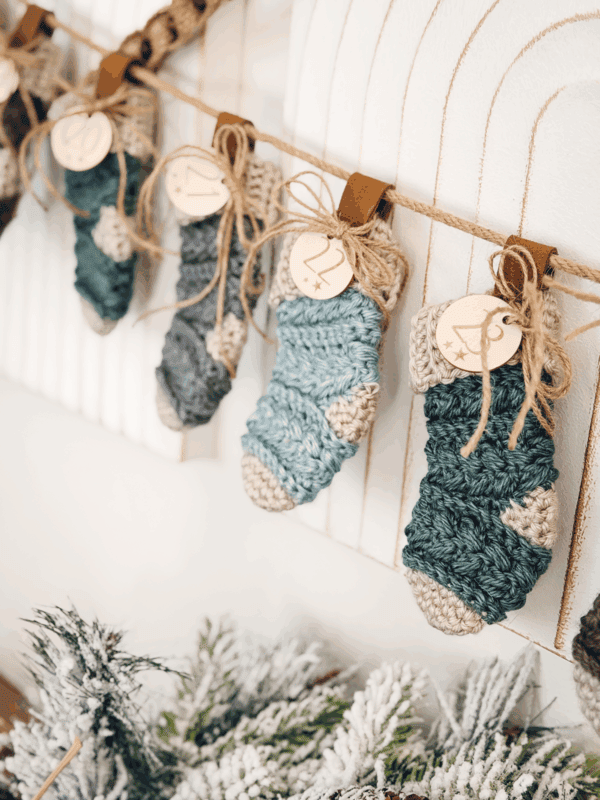
Looking for a quick, festive, and irresistibly cute holiday crochet project? The Wheat Stitch™ Crochet Mini Stocking is the perfect handmade touch for your Christmas décor, gift giving, and holiday crafting. These tiny stockings work up quickly from the toe up, feature my signature Wheat Stitch texture, and add instant cozy charm to any space.
Disclosure: This post contains affiliate links. Please read my disclosure for more info.
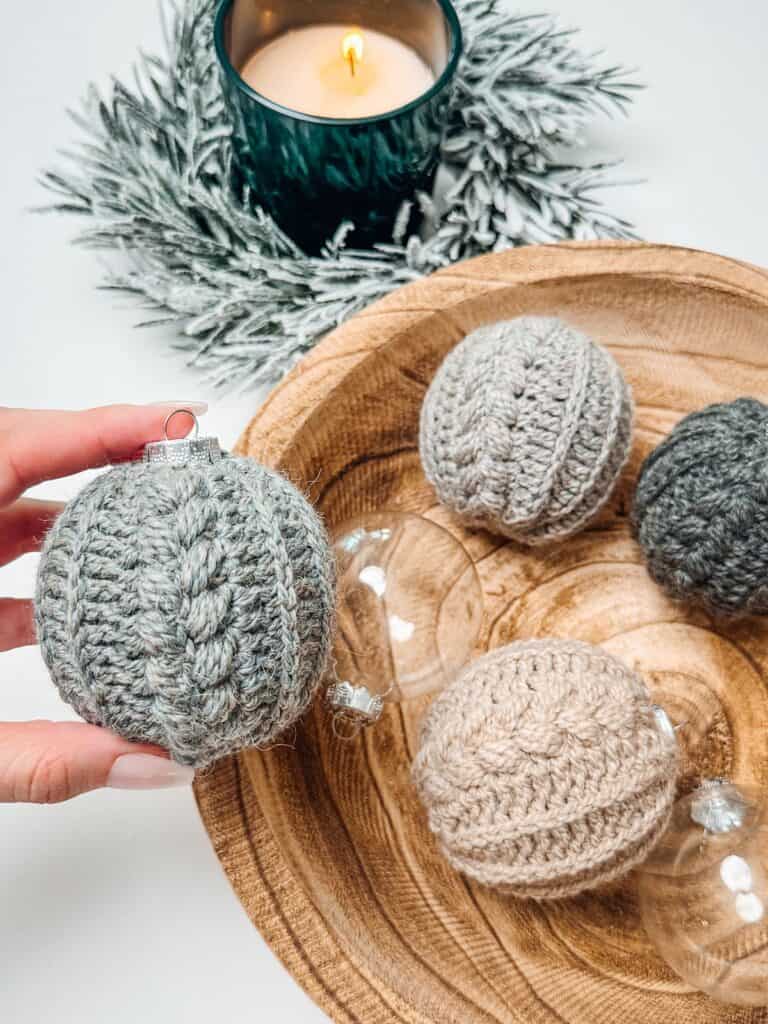
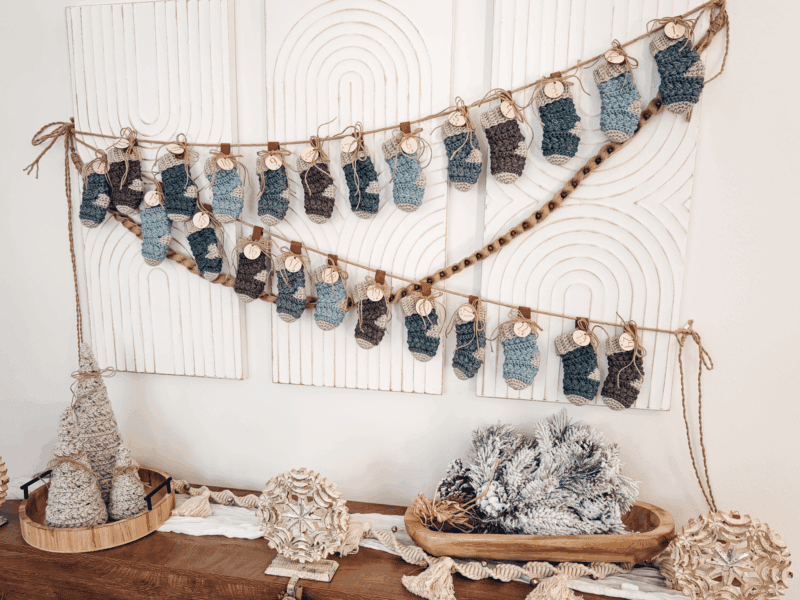
Whether you’re stitching a single mini stocking as a gift card holder or creating a full countdown garland for a DIY Advent calendar, this pattern is designed to be simple, satisfying, and beautifully display-ready. Want to make a coordinating full-size stocking? Try the Wheat Stitch Toe-Up Stocking! And while you’re in a yarny mood, whip up a few Wheat Stitch Pickle Ornaments!
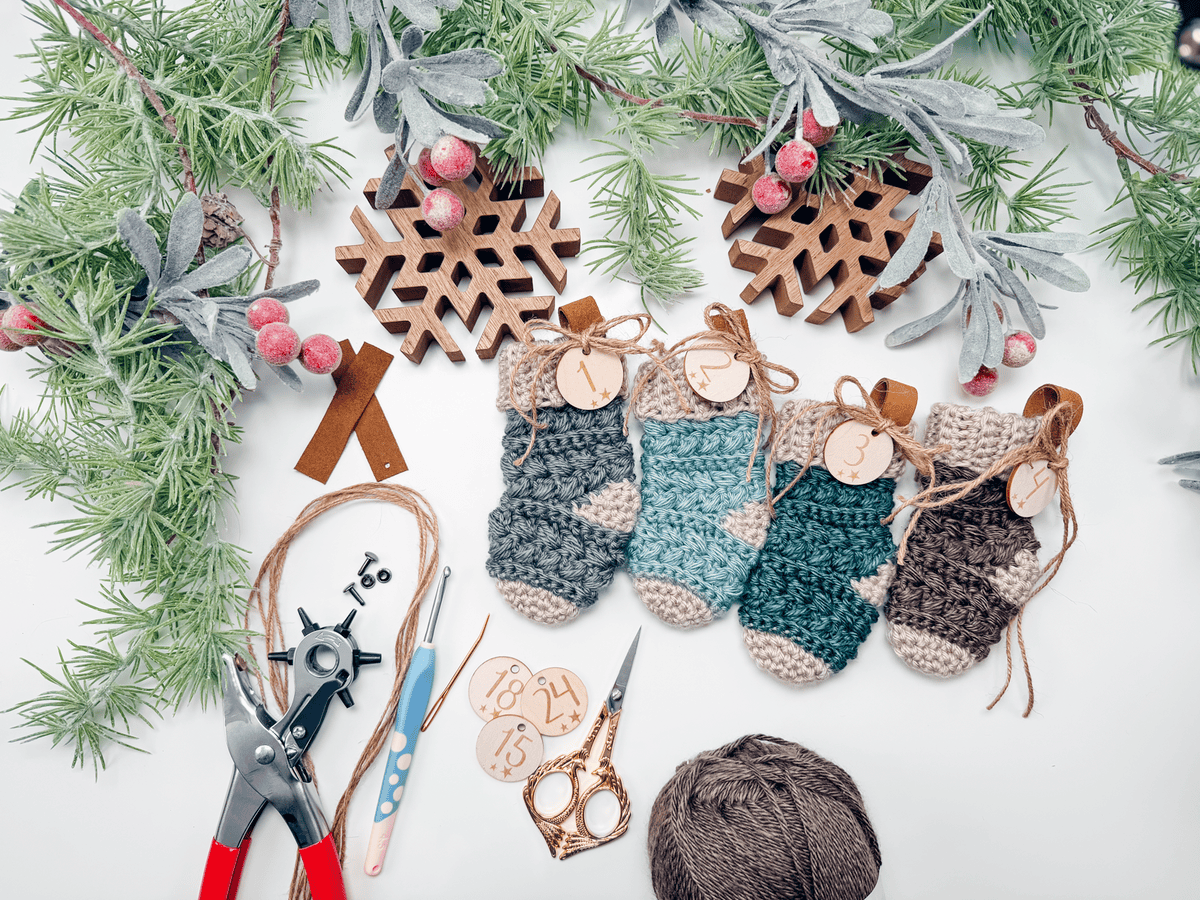
Wheat Stitch Mini Stockings Crochet Supplies
Yarn
Lion Brand Heartland
100% Acrylic, 251yds/142g
Colorways Shown: Tortugas, Mammoth Cave, Rocky Mountains, and Congaree
OR
Herrschners Worsted 8 Sparkle – Shown in Video Tutorial
92% Acrylic/8% Polyester, 489ds/226g
Colorways Shown: White, Victorian Red, and Emerald
Yarn Quantities
50 yds total per mini stocking
(2 or 3 Color yardage will depend on the breakdown of individual colors)
Yarn Substitutions
Mighty Stitch Worsted – 80% Acrylic/20% Superwash Wool, 208yds/100g
Mary Maxim Starlette Sparkle – 98% Acrylic/2% Polyester. 196yds/100g
Brava Tweed – 97% Premium Acrylic/3% Viscose. 218yds.100g
Herrschners Supreme Worsted – 100% Acrylic, 169yds/100g
Remember always to check the gauge and drape when substituting yarns.
Crochet Hook
Size US G+/7 (4.5mm) Crochet Hook or hook to obtain gauge.
Notions
Scissors
Yarn Needle
Removable Stitch Marker
Rivets
Leather Fabric
Twine
Numbered Wooden Tags
Skill Level
Advanced Beginner
What you’ll love about this pattern.
? Works up FAST! Perfect for last-minute gifts and decorations.
? Beautiful Wheat Stitch texture in a tiny package!
? Great stash-buster for leftover yarn!
One Size
Approximately 6″ x 2.75″
Abbreviations
blo – back loop only
ch – chain
RS – right side
sc – single crochet
sc2tog – single crochet 2 together
sl st – slip stitch
st(s) – stitch(es)
WS – wrong side
Gauge
15 sts and 13 rows = 4″ by 4″ in st pattern repeat, not blocked.
How to Crochet A Gauge Swatch
Working a gauge swatch will let you know if you will have the correct sizing for this pattern. It will also help you practice the stitches used in this project and improve your stitch work for a flawless look.
Are you struggling to match the gauge? Check out the blog post on What is Crochet Gauge and How To Fix It
Construction
The Wheat Stitch Mini Stocking is worked from the toe up, giving you a smooth, polished shape from start to finish.
First, crochet the Toe + Foot: You’ll start at the toe and crochet the foot using joined rounds. This helps your mini stocking keep its classic rounded shape.
Next, shape the Heel (As You Go!): No need to attach the heel later — it’s shaped right into the pattern for a clean, seamless finish.
Now, build the Stocking Body: Continue working upward in rounds to showcase the cozy Wheat Stitch™ texture that makes this design stand out.
Almost done – Add the Ribbed Cuff: Finish the top with stretchy ribbing for a polished, traditional stocking look.
Finally, add Finishing Touches! Attach your hanging tab, tie on a twine bow, and add any embellishments you love. If you’re making your mini stockings into a Christmas Countdown, add number tags!
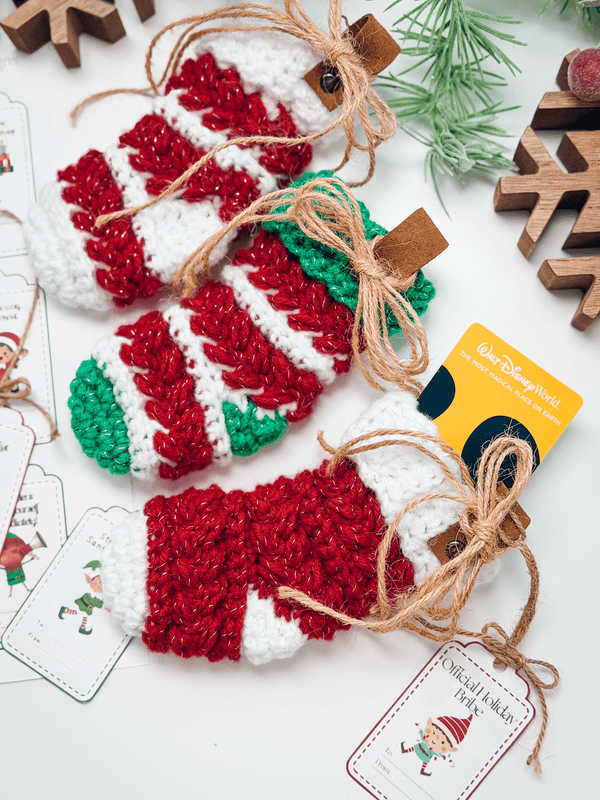
If you love these mini stockings, you’re also going to swoon over the Mini Stocking Gift Card Stocking!
Special Stitches
Puff Stitch: Yarn over and insert your hook into the stitch/space. Yarn over again and pull up a long loop. Yarn over and insert your hook into the same stitch/space. Yarn over again and pull up a long loop (5 loops on the hook). Yarn over and pull through the first 4 loops, yarn over and pull through the remaining loops.
Pattern Notes
- A ch 1 at the beginning of a round/row is not counted as a stitch.
- Using a stitch marker at the beginning of each round is recommended.
- For an in-depth wheat stitch tutorial, visit: https://brianakdesigns.com/how-to-crochet-the-wheat-stitch/
- Do you love to sell your finished crochet projects? That’s great! I hope you make a killing. If you could credit/tag me on social media, I would love to support you with a share. You may not duplicate or share these written patterns in any way. Thank you!
- This Pattern Uses Standard US Terminology.
❄️ FAQs: Wheat Stitch Crochet Mini Stocking
Q: How big is the finished mini stocking?
The stocking, as written with the yarn used, measures approximately 6″ x 2.75″. It’s the perfect size for small treats, ornaments, or a standard gift card.
Q: Is this a beginner-friendly crochet pattern?
Yes! A full tutorial for How to Crochet the Wheat Stitch can be found here: https://brianakdesigns.com/how-to-crochet-the-wheat-stitch/ Once you’re familiar with the stitch, you can whip one of these mini stockings up in no time!
Q: What can I use mini stockings for?
• Gift card holders
• Countdown or Advent garlands
• Christmas tree ornaments
• Mantel décor
• Market prep projects
• Classroom or coworker gifts
Q: Can I sell items made from this pattern?
Absolutely — you may sell finished items with pattern credit given to Briana K Designs.
Subscribe & Like
Video Tutorial for the Wheat Stitch™ Crochet Mini Stocking
Relax & Crochet
Upgrade to the Printable PDF
Beautifully formatted to print and relax while crocheting. The paid pattern includes:
The Ad-Free PDF can be purchased on Etsy or Ravelry.
Click the box below to unlock this exclusive subscriber content for free. Add your email and create a password. If you are having trouble, reset your password or log in to the Grow Portal.
I’m thrilled to share this amazing crochet pattern with you! Please don’t copy, paste, or distribute this pattern. Prefer an ad-free experience? Purchase a digital PDF file for a small fee from one of my online stores. I appreciate your support and readership. You are why I can keep doing what I love and sharing it with others. Thank you from the bottom of my heart.
Written Wheat Stitch Mini Stocking Crochet Pattern Instructions
Stocking Toe
Rnd 1:
With Color of choice for Toe, and working in a Magic Ring, sc 8, do not join and work continuously. | 8 sts
Rnd 2:
*2 sc in first, sc in the next; repeat from * around. | 12 sts
Rnd 3:
*2 sc in first, sc in the next 2; repeat from * around. | 16 sts
Rnd 4:
Join The Kindest Community
Join our vibrant community of crafters on Facebook today. Whether you enjoy crafting with others or simply have burning questions, we’ve got you covered – join us now!
Stocking Foot
Note: Change colors for Stocking Foot if desired. For a striped effect, change to the color of choice for every puff-stitch round.
Rnds 5-6:
Ch 1, blo sc in each st around, join and turn. | 20 sts
Rnds 7-8:
Ch 1, skip the first st, sc in next, work a puff st into the skipped st, *skip the next st, sc in next, work a puff st into the skipped st; repeat from * around, join and turn.
Rnd 9:
Ch 1, blo sc in each st around, join and turn.
For a Heel with a different color, remove hook and place stitch marker to keep the stitches from coming undone; we will come back to this later. With the Heel color of choice, attach to the first st of the next Rnd.
Choosing Colors
When it comes to choosing colors for your Wheat Stitch Crochet Mini Stockings, you truly can’t go wrong. Go bold and festive with classic Christmas hues—think bright reds, deep greens, and sparkling metallics—for a stocking that pops with traditional holiday cheer. Or, if your décor leans soft and cozy, try muted earth tones, gentle neutrals, or wintery pastels for a modern, minimalist vibe. You can even mix and match both styles to create a beautifully curated holiday palette that feels so you. Whether you keep it coordinated or go full merry-and-bright, these tiny stockings look adorable in every color combo.
Heel
Row 1 (RS):
Ch 1, blo sc 8, turn. | 8 sts
Row 2 (WS):
Skip the first st, sc 7, turn. | 7 sts
Row 3:
Skip the first st, sc 6, turn. | 6 sts
Row 4:
Skip the first st, sc 5, turn. | 5 sts
Row 5:
Skip the first st, sc 4, turn. | 4 sts
Note: When making the Heel in a different color from the previous/next rounds of the Stocking Foot/Leg, fasten off Heel color and weave in end. Remove stitch marker and place the loop of the Stocking Foot color back onto the hook.
When making the Heel in the same color as the previous/next rounds of the Stocking Foot/Leg, do not fasten off.
Top Ribbing
Note: If using two or more colors, use Stocking Toe color for the ribbing. This section will be worked as join-as-you-go ribbing and in rows.
Row 1:
With Color of choice (or Toe color), ch 10, in blo sc in second chain from hook and across to body, sl st 2 sts on the body (these do not count as sts), turn. | 9 sts
Row 2:
Skip the two sl sts from the body, blo sc in each st across, turn. | 9 sts
Row 3:
Ch 1, blo sc in each st across, sl st 2 sts on the body, turn.
Repeats: Repeat Rows 2-3 around the top of the stocking body. Join last row to beginning row by slip stitching through blo of first and last row at the same time. Fold cuff over.
Sizing Tip
These Wheat Stitch Crochet Mini Stockings are wonderfully flexible in size, and you can customize them without changing a single stitch count! Simply switch up your yarn weight and hook size. Using lighter yarns with smaller hooks will give you an extra-tiny stocking (perfect for ornaments), while bulkier yarns and larger hooks create a slightly bigger, squishier stocking that’s great for gifting or garlands. It’s the easiest way to size up or down while keeping the pattern quick, simple, and adorable.
Stocking Leg
Rnd 10 for “Elf Style” Stocking with different color Heel – Please see video:
Ch 1, sc2tog twice along the edge of the heel, blo sc 4, sc2tog twice along the edge of the heel, blo sc 12, join and turn.
Rnd 10 for “Santa Style” Stocking with same color Heel – please see video:
Ch 1, sc2tog twice along the edge of the heel, blo sc 12, sc2tog twice along the edge of the heel, blo sc 4, join and turn.
Rnds 11-12:
Ch 1, skip the first st, sc in next, work a puff st into the skipped st, *skip the next st, sc in next, work a puff st into the skipped st; repeat from * around, join and turn.
Rnds 13-14:
Ch 1, blo sc in each st around, join and turn.
Rnds 15-18:
Repeat Rnds 11-14.
Subscribe to my youtube channel
Finishing
Weave in all remaining ends.
Using some ribbon and rivets, attach a tab to the top of the stocking for hanging. Other options include crocheting a tab or using leather and a hole punch, as shown in the video.
You could also make an i-cord hanging loop: https://brianakdesigns.com/how-to-crochet-an-i-cord/
And now your mini stocking is all set to shine! Use it as a sweet gift card holder, with a printable gift tag (found in the full PDF) for an extra personal touch.
You can also stitch up a whole set and create your own advent calendar! Attach a numbered tag to the body or cuff of each stocking, then hang them along a rope, display them on a festive branch, or tuck them around the tree for a cozy holiday countdown.
The Wheat Stitch Crochet Mini Stocking is a fast, festive project that adds instant handmade charm to your holidays. Whether you’re crafting a stocking set, decorating your home, or gifting something sweet and personal, this mini stocking is the perfect holiday make. Grab your yarn, queue up a cozy playlist, and enjoy stitching this tiny treasure!
Want to add more wheat stitch texture to your holiday decor?
❤️ Festive Wheat Stitch Stocking
Cheers, and happy crocheting!
Well, That Was Fun! What’s Next?