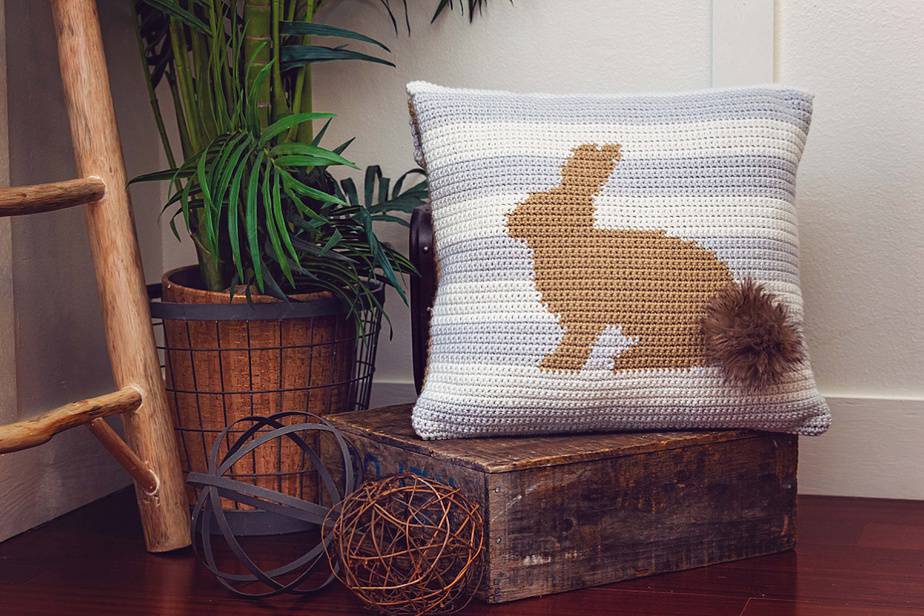
Who is excited about spring to come? I know I am whipping up this cute Fluffy Bunny Crochet Pillow. This free crochet pattern promises not only a fun and rewarding crafting experience but also the opportunity to add a touch of coziness and personality to your living space. Whether you’re a crochet enthusiast or a beginner eager to explore the world of soft and cuddly creations, join us as we create some crochet colorwork with this adorable bunny pillow together. Get ready to add some cute home decor with warmth and charm, one stitch at a time! And you might also enjoy the Be My Bunny Crochet Pattern or the Bunny Easter Basket Crochet Pattern.
Disclosure: This post contains affiliate links. Please read my disclosure for more info.
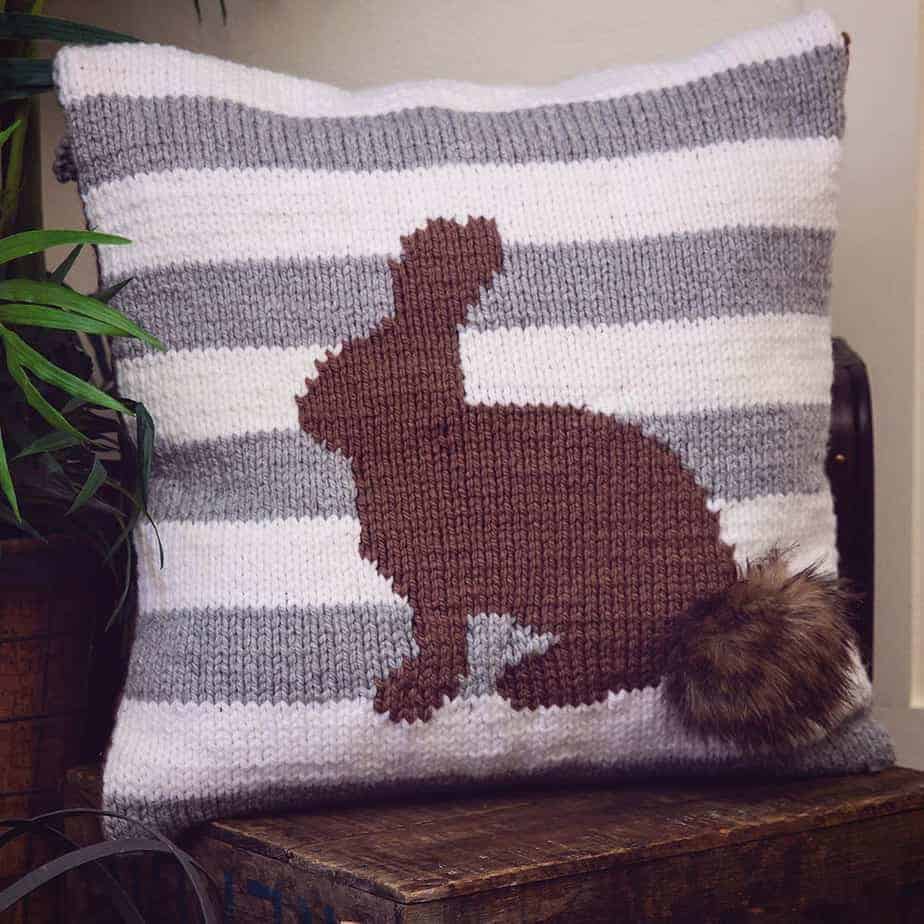
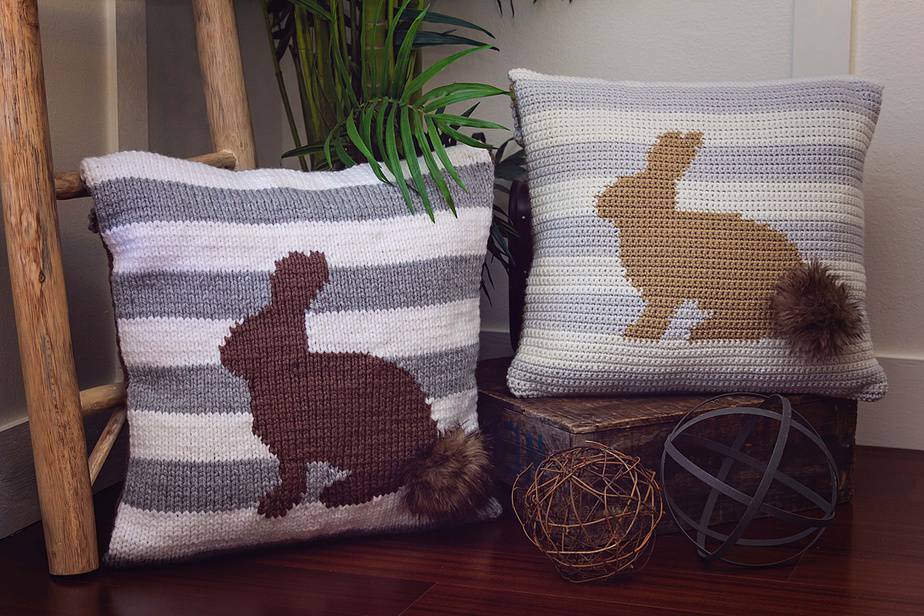
Looking for the Knit Version? Get the Fluffy Bunny Knit Pillow Cover
The Fluffy Bunny Pillow Cover is a great home decor addition for spring, but really could be used all year round. I think it would be really cute in a baby nursery or kid bedroom too.
I hope you really enjoy not only working up this pattern but adding beautiful hand made decor to your home. I love being able to bring you awesome crochet content, will you please help keep this possible? Pinning this post, sharing with friends, and favoriting on Ravelry is a great way to say thanks.
Are you ready to jump right in and crochet? Before you get started, take a moment to hop on over to learn more about crochet colorwork. Learn about the different methods in crochet color-work and also get a freebie! The printable Sheep Yarn Bobbins are super helpful and also cute. You can even cut them out on a cutting machine!
Fluffy Bunny Crochet Pillow Supplies
Crochet Hook:
Crochet Hook 5 mm (H), or hook to match gauge.
Notions:
1 inch (2.5 cm) Buttons (5 needed)
Yarn Needle
Scissors
18×18 inch pillow
Faux Fur Fabric to create a 4 or 5 inch circle OR a PomPom
Yarn:
Red Heart With Love in the following colorways:
• Eggshell (white) 1 skein
• Light Taupe (brown) 1 skein
• Light Grey 1 skein
Yardage:
680 yards total (622 meters)
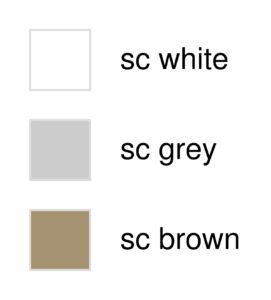
Abbreviations/Stitches:
- ch- Chain
- RS- Right Side
- sc- Single Crochet
- sl st- Slip Stitch
- sts- Stitches
- WS- Wrong Side
Gauge:
15 single crochet sts x 16 rows = 4 x 4 inches (10 cm x 10 cm)
Measurements/Sizes:
19 inches (48 cm) wide by 18 inches (46 cm) tall
Skill Level:
Easy/Advanced Beginner
Fluffy Bunny Crochet Pillow Notes
Please note, matching gauge both horizontal and vertical can be difficult. Extra rows can be added at the top if needed so it is more important to match the stitch gauge versus the row gauge. This pattern also has some ease to fit over a pillow.
This pattern is worked in rows and in two pieces. The front panel will also work a button hole flap to secure the top of the crochet pillow. The front and the back panels will be slip stitched together once completed.
After the end of each row turn and ch 1. The ch 1 does not count as a stitch.
Since there is a wrong side and a right side to the pillow panels, I used a combination of intarsia and carrying yarn across the back for the color work. Experiment and see what works best for you.
There is a free tutorial on how to make the Faux Fur Pompom.
What you’ll love about this pillow pattern.
Relax & Crochet
Upgrade to the Printable PDF
Beautifully formatted to print and relax while crocheting. The paid pattern includes:
The Fluffy Bunny Crochet Pillow Pattern can be purchased on Etsy or Ravelry.
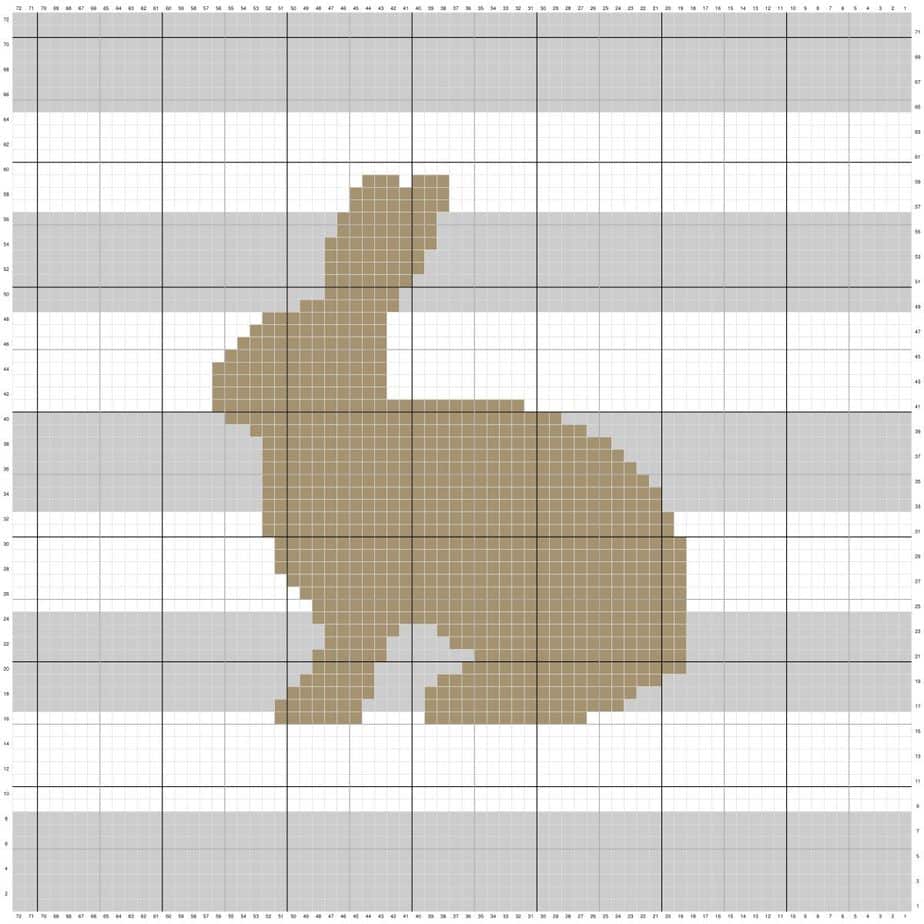
Fluffy Bunny Crochet Pillow Chart Instructions
Click the box below to unlock this exclusive subscriber content for free. Add your email and create a password. If you are having trouble, reset your password or log in to the Grow Portal.
I’m thrilled to share this amazing crochet pattern with you! Please don’t copy, paste, or distribute this pattern. Prefer an ad-free experience? Purchase a digital PDF file for a small fee from one of my online stores. I appreciate your support and readership. You are why I can keep doing what I love and sharing it with others. Thank you from the bottom of my heart.
Fluffy Bunny Crochet Pillow Instructions
To begin: With Grey, chain 73 and start the first row in the second chain from hook.
After the end of each row turn and ch 1. The ch 1 does not count as a stitch.
← Row 1 : (sc grey) x 72
→ Row 2 : (sc grey) x 72
← Row 3 : (sc grey) x 72
→ Row 4 : (sc grey) x 72
← Row 5 : (sc grey) x 72
→ Row 6 : (sc grey) x 72
← Row 7 : (sc grey) x 72
→ Row 8 : (sc grey) x 72
← Row 9 : (sc white) x 72
→ Row 10 : (sc white) x 72
← Row 11 : (sc white) x 72
→ Row 12 : (sc white) x 72
← Row 13 : (sc white) x 72
→ Row 14 : (sc white) x 72
← Row 15 : (sc white) x 72
→ Row 16 : (sc white) x 21, (sc brown) x 7, (sc white) x 5, (sc brown) x 13, (sc white) x 26
← Row 17 : (sc grey) x 23, (sc brown) x 16, (sc grey) x 5, (sc brown) x 7, (sc grey) x 21
→ Row 18 : (sc grey) x 22, (sc brown) x 7, (sc grey) x 4, (sc brown) x 17, (sc grey) x 22
← Row 19 : (sc grey) x 20, (sc brown) x 18, (sc grey) x 5, (sc brown) x 6, (sc grey) x 23
→ Row 20 : (sc grey) x 24, (sc brown) x 5, (sc grey) x 7, (sc brown) x 18, (sc grey) x 18
← Row 21 : (sc grey) x 18, (sc brown) x 17, (sc grey) x 7, (sc brown) x 6, (sc grey) x 24
→ Row 22 : (sc grey) x 25, (sc brown) x 5, (sc grey) x 5, (sc brown) x 19, (sc grey) x 18
← Row 23 : (sc grey) x 18, (sc brown) x 20, (sc grey) x 3, (sc brown) x 6, (sc grey) x 25
→ Row 24 : (sc grey) x 24, (sc brown) x 30, (sc grey) x 18
← Row 25 : (sc white) x 18, (sc brown) x 30, (sc white) x 24
→ Row 26 : (sc white) x 23, (sc brown) x 31, (sc white) x 18
← Row 27 : (sc white) x 18, (sc brown) x 32, (sc white) x 22
→ Row 28 : (sc white) x 21, (sc brown) x 33, (sc white) x 18
← Row 29 : (sc white) x 18, (sc brown) x 33, (sc white) x 21
→ Row 30 : (sc white) x 21, (sc brown) x 33, (sc white) x 18
← Row 31 : (sc white) x 19, (sc brown) x 33, (sc white) x 20
→ Row 32 : (sc white) x 20, (sc brown) x 33, (sc white) x 19
← Row 33 : (sc grey) x 20, (sc brown) x 32, (sc grey) x 20
→ Row 34 : (sc grey) x 20, (sc brown) x 32, (sc grey) x 20
← Row 35 : (sc grey) x 21, (sc brown) x 31, (sc grey) x 20
→ Row 36 : (sc grey) x 20, (sc brown) x 30, (sc grey) x 22
← Row 37 : (sc grey) x 23, (sc brown) x 29, (sc grey) x 20
→ Row 38 : (sc grey) x 20, (sc brown) x 28, (sc grey) x 24
← Row 39 : (sc grey) x 26, (sc brown) x 27, (sc grey) x 19
→ Row 40 : (sc grey) x 17, (sc brown) x 27, (sc grey) x 28
← Row 41 : (sc white) x 31, (sc brown) x 25, (sc white) x 16
→ Row 42 : (sc white) x 16, (sc brown) x 14, (sc white) x 42
← Row 43 : (sc white) x 42, (sc brown) x 14, (sc white) x 16
→ Row 44 : (sc white) x 16, (sc brown) x 14, (sc white) x 42
← Row 45 : (sc white) x 42, (sc brown) x 13, (sc white) x 17
→ Row 46 : (sc white) x 18, (sc brown) x 12, (sc white) x 42
← Row 47 : (sc white) x 42, (sc brown) x 11, (sc white) x 19
→ Row 48 : (sc white) x 20, (sc brown) x 10, (sc white) x 42
← Row 49 : (sc grey) x 41, (sc brown) x 8, (sc grey) x 23
→ Row 50 : (sc grey) x 25, (sc brown) x 6, (sc grey) x 41
← Row 51 : (sc grey) x 40, (sc brown) x 7, (sc grey) x 25
→ Row 52 : (sc grey) x 25, (sc brown) x 8, (sc grey) x 39
← Row 53 : (sc grey) x 39, (sc brown) x 8, (sc grey) x 25
→ Row 54 : (sc grey) x 25, (sc brown) x 9, (sc grey) x 38
← Row 55 : (sc grey) x 38, (sc brown) x 8, (sc grey) x 26
→ Row 56 : (sc grey) x 26, (sc brown) x 8, (sc grey) x 38
← Row 57 : (sc white) x 37, (sc brown) x 8, (sc white) x 27
→ Row 58 : (sc white) x 27, (sc brown) x 8, (sc white) x 37
Join The Kindest Community
Join our vibrant community of crafters on Facebook today. Whether you enjoy crafting with others or simply have burning questions, we’ve got you covered – join us now!
← Row 59 : (sc white) x 37, (sc brown) x 3, sc white, (sc brown) x 3, (sc white) x 28
→ Row 60 : (sc white) x 72
← Row 61 : (sc white) x 72
→ Row 62 : (sc white) x 72
← Row 63 : (sc white) x 72
→ Row 64 : (sc white) x 72
← Row 65 : (sc grey) x 72
→ Row 66 : (sc grey) x 72
← Row 67 : (sc grey) x 72
→ Row 68 : (sc grey) x 72
← Row 69 : (sc grey) x 72
→ Row 70 : (sc grey) x 72
← Row 71 : (sc grey) x 72
→ Row 72 : (sc grey) x 72
To Finish Front Panel:
-Continue to sc Rows 73-80 in white.
-Continue to sc Rows 80-86 in grey.
-Button Row 87: ch 1, sc 2, *ch 3, skip 3, sc 13: repeat from * until last 3 stitches, sc in last 3, turn
-Continue to sc Rows 88-91 in white.
-Fasten off and weave in ends.
Fluffy Bunny Crochet Pillow Back Panel:
-With brown, chain 73 and start the first row in the second chain from hook.
-Single crochet a total of 72 rows to create the back panel.
-Fasten off and weave in ends.
Attaching Fluffy Bunny Crochet Pillow Panels Together:
Place the front and back panels together with the wrong sides facing. Using either green or white yarn, slip stitch from the top of one side of the pillow (where the panels meet, not over the flap), around the bottom, and up the other side. I found by slip stitching with a tight tension really makes some crisp edges, but you do not want to pucker. Fasten off and weave in ends. Flip pillow so the right side is facing out and the seams are on the inside.
Attaching Buttons:
With the back panel facing, fold front panel down over the top of the back panel and with stitch markers mark the row where each button will be placed. Using a yarn needle and green yarn, sew each button in place.
Create a Faux Fur Pompom to attach for the fluffy bunny tail! Use the 4 or 5 inch template and easy instructions.
Place a 18×18 pillow inside the cover and enjoy!
The best thing about a removable crochet pillow is the easy maintenance. Removable covers simplify the cleaning process. Instead of washing the entire crocheted item, you can simply remove the cover and launder it separately. This makes it convenient to keep your crochet creations fresh and clean.
Plust the seasonal home decor allows you to tailor your crochet covers to the seasons adds a festive touch to your home. Swap out light, airy covers for spring and summer, and opt for warmer, cozier options in the fall and winter, effortlessly adapting your decor to the changing seasons, such as with the Crochet Nutmeg Simple Home Decor or the Cheers Crochet Pillow Pattern. I hope you enjoy this crochet pillow for all it’s many uses. Happy crocheting!
Well, That Was Fun! What’s Next?


I’m left handed should I be going in the opposite direction because the bunny is not coming out correctly???
Your bunny will be mirrored when doing it left hand but it will still be pretty 🙂
Such a cute design! I might make one for my home!
Thank you for the lovely pattern