


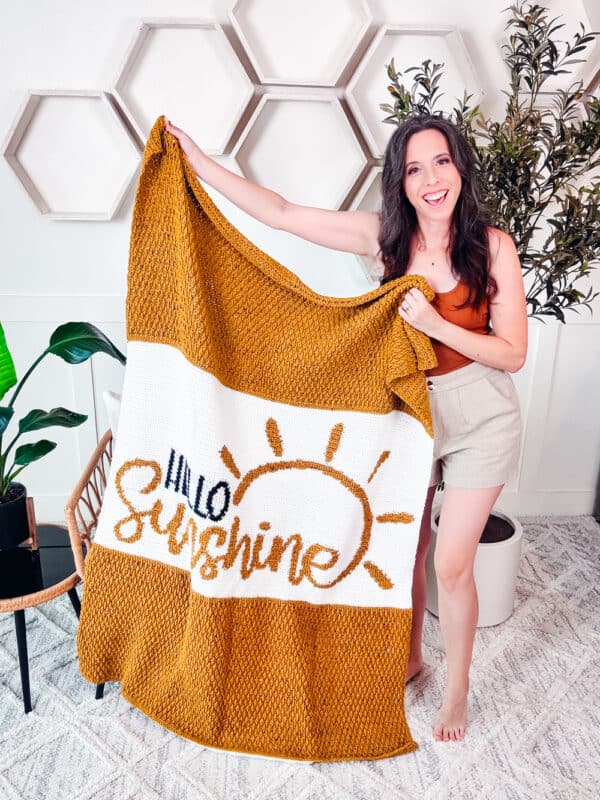
The Hello Sunshine Crochet Pillow Blanket is a cheerful and happy piece of home decor, perfect for a nursery or any room in your home!
So…is it a pillow or a blanket? IT’S BOTH!

Disclosure: This post contains affiliate links. Please read my disclosure for more info.
The blanket is worked in three sections—the first and last sections are made in the Alpine Stitch, and sandwiched between the two is a gorgeous colorwork section with a sunshiny greeting.
To make the blanket into a pillow, simply add the colorwork pillow panel to the back of the blanket, fold it up, tuck it inside, and HOORAY! It’s a pillow! This pattern includes right and left-hand instructions.

Crochet Supplies
Yarn
Crochet.com Brava Worsted
100% Premium Acrylic, 218yds/100g
In White & Asphalt
Crochet.com Brava Tweed
97% Premium Acrylic, 3% Viscose, 218yds/100g
In Goldenrod
Yarn Quantities
Total Yards: 2860
White: 900yds/5 Skeins
Goldenrod: 1925yds/9 Skeins
Asphalt: 35yds/1 Skein
Yarn Substitutions
Red Heart Super Saver – 100% Acrylic, 364yds/5 oz
Mary Maxim Starlette – 100% Ultra Soft Acrylic, 180yds/100g
Bernat Super Value – 100% Acrylic, 440yds/7 oz
Caron Simply Soft – 100% Acrylic, 315yds/5 oz
Remember always to check the gauge and drape when substituting yarns.
Crochet Hook
Size US I (5.5mm) Crochet Hook or hook to obtain gauge.
Notions
Scissors
Yarn Needle
Removable Stitch Marker
Faux Leather Snap
Skill Level
Intermediate
What you’ll love about this cheerful pillow blanket pattern.
? 2 Easy Seams – This crochet bag is made as one flat rectangle, then folded and finished with only two seams.
? Simple Stitch Repeat – The texture of this bag is made with simple crochet stitches in a simple repeat, so it’s perfect for an evening of Netflix and Crochet!
? Customizable – Add your own personal flair to this cute bag by using colorful buttons and snaps, or even adding tassels to the corners.
One Size
40 inches wide by 64 inches long.
Abbreviations
blo – back loop only
ch – chain
dc – double crochet
Fpdc – front post double crochet (see notes)
RS – right side
sc – single crochet
sl st – slip stitch
st(s) – stitch(es)
Stsc – stacked single crochet
WS – wrong side
Gauge
15 sts x 15 rows= 4×4” in single crochet.
15 sts x 11 rows= 4×4” in Alpine stitch.
How to Crochet A Gauge Swatch
Working a gauge swatch will let you know if you will have the correct sizing for this pattern. It will also help you practice the stitches used in this project and improve your stitch work for a flawless look.
Are you struggling to match the gauge? Check out the blog post on What is Crochet Gauge and How To Fix It
Construction
The Hello Sunshine Pillow Blanket is made in three sections! The Alpine Stitch blocks add a squishy texture to the single crochet colorwork middle section. While an intermediate project, this blanket (and pillow!) are perfect for an adventurous beginner!
Love the textured look of the Alpine Stitch as much as me? Check out the Alpine Stitch Textureed Blanket or the Totally Textured Blanket.
Special Stitches
Stacked Single Crochet (Stsc): Do NOT chain, insert hook into next stitch, yo, pull up a loop, yo and pull through both loops, insert hook in the vertical bar below, yo, pull up a loop, yo and pull through both loops on the hook.
Pattern Notes
- This Hello Sunshine Pillow Blanket is worked in rows and in two pieces. Once completed, the pillow panel and the blanket will be stitched together. Then, this crochet piece can be folded up and used as a home decor pillow or unfolded as a throw blanket.
- After the end of each row in the colorwork section, turn and ch 1. The ch 1 does not count as a stitch.
- Since the blanket has a wrong side and a right side, and the pillow panel is reversible, I used a combination of intarsia and carrying yarn across the back for the color work. Experiment and see what works best for you.
- Please visit https://brianakdesigns.com/ways-to-colorwork-in-crochet/ for a full tutorial on colorwork, as well as a FREE Sheep Yarn Bobbin Printable to assist you with this project. No one loves tangles.
- Tip for Alpine stitch height: When working the front post double crochet stitches, we will need to adjust to create more height so the fabric lays flat. You may have to change hook sizes between the Alpine stitch and colorwork sections to keep them the same width.
- Yarn over and insert hook from front to back to front around the post of the next stitch, yarn over and pull up the loops to the height of the current row (this is where the adjustment is important, it must be pulled up higher than a regular post stitch), yarn over and pull through two loops, yarn over and pull through the remaining loops on the hook.
- When reading the blanket colorwork chart, start at the bottom right of the chart for right-handed crocheters, and from bottom left for left-handed crocheters.
- For the colorwork section, Color A (White) will be abbreviated as (A), and color B (Yellow) as (B), and Color C (Black) will be abbreviated as (C).
Example: (B) x 3 = with Color B crochet the next 3 stitches
Video Tutorial for Folding the Hello Sunshine Pillow Blanket

Relax & Crochet
Upgrade to the Printable PDF
Beautifully formatted to print and relax while crocheting. The paid pattern includes:
The Ad-Free PDF can be purchased on Etsy or Ravelry.
Add your email in the box below to unlock this pattern to view on the blog for free. I’m thrilled to share this amazing crochet pattern with you! Please don’t copy, paste, or distribute this pattern. Prefer an ad-free experience? Purchase a digital PDF file for a small fee from one of my online stores. I appreciate your support and readership. You are why I can keep doing what I love and sharing it with others. Thank you from the bottom of my heart.
Printable Version
This pattern is free to read here on the blog. The ad-free printable PDF is available in the Briana K Designs shop on Etsy and Ravelry.
brianakdesigns.com
Written Crochet Pattern Instructions
Join The Kindest Community
Join our vibrant community of crafters on Facebook today. Whether you enjoy crafting with others or simply have burning questions, we’ve got you covered – join us now!
Blanket Alpine Stitch Section
For a video and tutorial on how to create the Alpine Stitch, visit: https://brianakdesigns.com/alpine-stitch-crochet-blanket-pattern/
Use Brava Tweed Goldenrod yarn.
Row 1:
Ch the desired number of stitches for the size of blanket (see previous page), sc in first st and in each st across, turn. (As an alternative, this row can be done as a foundation single crochet).
Row 2:
Stsc in first, dc in each stitch across, turn.
Row 3:
Sc in each st across, turn.
Row 4:
Stsc in the first st, Fpdc around the dc st from the previous dc row, dc in next st; repeat from * to * until the last st, dc in last, turn.
Special Note: When working the front post double crochet stitch, be sure to bring the stitch up to the height of your row before doing the last yarn over.
Row 5:
Sc in each st across, turn.
Row 6:
Stsc in the first st, dc in next st, Fpdc around the dc st from the previous dc row; repeat from * to * until the last st, dc in last, turn.
Row 7:
Sc in each st across, turn.
Alpine Stitch First Section Repeats:
Repeat Rows 4-7 twelve more times for 55 total rows. This section measures about 20 inches tall.
Style
If you wanted to make this project as a gift for a special baby shower, you could pair this with some Teton Baskets (which are easily sized and perfect for changing tables) and a set of coordinating washcloths (using the Alpine Stitch Tutorial).
Section Title
If u
Puff st

Tip/Quick Note
- Did you know that our tension can vary depending on our mood? To ensure that our blanket turns out just right, let’s make sure we maintain consistent sizing. A quick tip is to check the gauge every 10-20 rows and make any necessary adjustments.
Blanket Colorwork – Right-Handed
← Rows 1 [RS]- 5:
(A) x 150
→ Row 6 [WS]:
(A) x 10, (B) x 6, (A) x 16, (B) x 3, (A) x 115
Row 7 [RS]:
(A) x 114, (B) x 5, (A) x 14, (B) x 8, (A) x 9
Row 8:
(A) x 8, (B) x 3, (A) x 3, (B) x 4, (A) x 13, (B) x 5, (A) x 11, (B) x 3, (A) x 6, (B) x 3, (A) x 37, (B) x 3, (A) x 51
Row 9:
(A) x 50, (B) x 5, (A) x 20, (B) x 1, (A) x 13, (B) x 6, (A) x 4, (B) x 5, (A) x 10, (B) x 5, (A) x 12, (B) x 4, (A) x 5, (B) x 3, (A) x 7
Row 10:
(A) x 7, (B) x 3, (A) x 6, (B) x 3, (A) x 11, (B) x 7, (A) x 9, (B) x 5, (A) x 3, (B) x 3, (A) x 1, (B) x 4, (A) x 10, (B) x 4, (A) x 18, (B) x 6, (A) x 6, (B) x 9, (A) x 22, (B) x 4, (A) x 9
Row 11:
(A) x 8, (B) x 6, (A) x 19, (B) x 13, (A) x 3, (B) x 3, (A) x 1, (B) x 3, (A) x 17, (B) x 5, (A) x 10, (B) x 3, (A) x 2, (B) x 3, (A) x 2, (B) x 6, (A) x 9, (B) x 2, (A) x 1, (B) x 4, (A) x 11, (B) x 3, (A) x 6, (B) x 3, (A) x 7
Row 12:
(A) x 7, (B) x 3, (A) x 6, (B) x 3, (A) x 11, (B) x 4, (A) x 1, (B) x 2, (A) x 9, (B) x 3, (A) x 1, (B) x 2, (A) x 2, (B) x 3, (A) x 2, (B) x 3, (A) x 9, (B) x 6, (A) x 17, (B) x 3, (A) x 2, (B) x 2, (A) x 2, (B) x 4, (A) x 6, (B) x 6, (A) x 16, (B) x 7, (A) x 8
Row 13:
(A) x 9, (B) x 7, (A) x 14, (B) x 5, (A) x 9, (B) x 4, (A) x 1, (B) x 2, (A) x 2, (B) x 3, (A) x 5, (B) x 3, (A) x 8, (B) x 3, (A) x 1, (B) x 3, (A) x 9, (B) x 3, (A) x 2, (B) x 2, (A) x 3, (B) x 2, (A) x 1, (B) x 3, (A) x 5, (B) x 2, (A) x 1, (B) x 2, (A) x 3, (B) x 3, (A) x 3, (B) x 2, (A) x 6, (B) x 3, (A) x 6, (B) x 2, (A) x 8
Row 14:
(A) x 8, (B) x 3, (A) x 5, (B) x 3, (A) x 4, (B) x 6, (A) x 1, (B) x 3, (A) x 3, (B) x 2, (A) x 1, (B) x 2, (A) x 5, (B) x 3, (A) x 1, (B) x 2, (A) x 3, (B) x 6, (A) x 3, (B) x 1, (A) x 6, (B) x 3, (A) x 2, (B) x 2, (A) x 1, (B) x 4, (A) x 3, (B) x 3, (A) x 5, (B) x 3, (A) x 2, (B) x 6, (A) x 11, (B) x 5, (A) x 12, (B) x 7, (A) x 10
Row 15:
(A) x 11, (B) x 7, (A) x 10, (B) x 5, (A) x 13, (B) x 5, (A) x 2, (B) x 3, (A) x 5, (B) x 4, (A) x 1, (B) x 8, (A) x 2, (B) x 3, (A) x 5, (B) x 3, (A) x 2, (B) x 5, (A) x 3, (B) x 3, (A) x 1, (B) x 3, (A) x 5, (B) x 5, (A) x 3, (B) x 3, (A) x 1, (B) x 2, (A) x 2, (B) x 3, (A) x 3, (B) x 3, (A) x 4, (B) x 3, (A) x 9
Row 16:
(A) x 10, (B) x 3, (A) x 3, (B) x 3, (A) x 3, (B) x 3, (A) x 3, (B) x 5, (A) x 3, (B) x 5, (A) x 5, (B) x 3, (A) x 2, (B) x 2, (A) x 3, (B) x 4, (A) x 3, (B) x 4, (A) x 4, (B) x 3, (A) x 2, (B) x 5, (A) x 1, (B) x 2, (A) x 1, (B) x 4, (A) x 5, (B) x 3, (A) x 3, (B) x 4, (A) x 14, (B) x 5, (A) x 8, (B) x 7, (A) x 12
Row 17:
(A) x 13, (B) x 6, (A) x 8, (B) x 4, (A) x 15, (B) x 4, (A) x 3, (B) x 3, (A) x 5, (B) x 6, (A) x 3, (B) x 3, (A) x 2, (B) x 4, (A) x 4, (B) x 4, (A) x 2, (B) x 5, (A) x 3, (B) x 2, (A) x 2, (B) x 3, (A) x 4, (B) x 5, (A) x 4, (B) x 5, (A) x 3, (B) x 4, (A) x 3, (B) x 3, (A) x 1, (B) x 3, (A) x 11
Row 18:
(A) x 12, (B) x 6, (A) x 3, (B) x 3, (A) x 4, (B) x 5, (A) x 4, (B) x 5, (A) x 4, (B) x 3, (A) x 2, (B) x 3, (A) x 1, (B) x 3, (A) x 1, (B) x 3, (A) x 1, (B) x 4, (A) x 4, (B) x 4, (A) x 2, (B) x 3, (A) x 3, (B) x 7, (A) x 4, (B) x 3, (A) x 2, (B) x 4, (A) x 17, (B) x 4, (A) x 6, (B) x 6, (A) x 14
Row 19:
(A) x 15, (B) x 6, (A) x 4, (B) x 4, (A) x 18, (B) x 4, (A) x 2, (B) x 3, (A) x 4, (B) x 6, (A) x 4, (B) x 3, (A) x 2, (B) x 4, (A) x 4, (B) x 7, (A) x 3, (B) x 5, (A) x 3, (B) x 3, (A) x 4, (B) x 5, (A) x 3, (B) x 5, (A) x 5, (B) x 3, (A) x 4, (B) x 4, (A) x 13
Row 20:
(A) x 13, (B) x 6, (A) x 2, (B) x 3, (A) x 5, (B) x 5, (A) x 3, (B) x 5, (A) x 4, (B) x 3, (A) x 3, (B) x 4, (A) x 5, (B) x 6, (A) x 4, (B) x 4, (A) x 2, (B) x 3, (A) x 4, (B) x 6, (A) x 4, (B) x 3, (A) x 2, (B) x 11, (A) x 11, (B) x 4, (A) x 3, (B) x 6, (A) x 16
Row 21:
(A) x 17, (B) x 5, (A) x 2, (B) x 4, (A) x 11, (B) x 12, (A) x 2, (B) x 3, (A) x 4, (B) x 5, (A) x 5, (B) x 3, (A) x 2, (B) x 4, (A) x 3, (B) x 5, (A) x 8, (B) x 3, (A) x 3, (B) x 3, (A) x 3, (B) x 6, (A) x 3, (B) x 4, (A) x 6, (B) x 8, (A) x 1, (B) x 3, (A) x 12
Row 22:
(A) x 11, (B) x 3, (A) x 4, (B) x 6, (A) x 6, (B) x 4, (A) x 3, (B) x 3, (A) x 1, (B) x 2, (A) x 3, (B) x 3, (A) x 3, (B) x 3, (A) x 8, (B) x 5, (A) x 3, (B) x 4, (A) x 2, (B) x 3, (A) x 5, (B) x 5, (A) x 4, (B) x 3, (A) x 2, (B) x 4, (A) x 5, (B) x 4, (A) x 10, (B) x 4, (A) x 3, (B) x 2, (A) x 19
Row 23:
(A) x 23, (B) x 4, (A) x 10, (B) x 4, (A) x 5, (B) x 5, (A) x 2, (B) x 3, (A) x 3, (B) x 6, (A) x 4, (B) x 4, (A) x 2, (B) x 3, (A) x 3, (B) x 6, (A) x 8, (B) x 4, (A) x 2, (B) x 3, (A) x 3, (B) x 2, (A) x 1, (B) x 3, (A) x 3, (B) x 4, (A) x 5, (B) x 5, (A) x 7, (B) x 4, (A) x 9
Row 24:
(A) x 8, (B) x 4, (A) x 9, (B) x 4, (A) x 6, (B) x 3, (A) x 3, (B) x 3, (A) x 2, (B) x 2, (A) x 2, (B) x 3, (A) x 2, (B) x 4, (A) x 3, (B) x 2, (A) x 3, (B) x 3, (A) x 1, (B) x 2, (A) x 3, (B) x 3, (A) x 2, (B) x 4, (A) x 4, (B) x 6, (A) x 3, (B) x 3, (A) x 3, (B) x 4, (A) x 6, (B) x 3, (A) x 10, (B) x 4, (A) x 23
Row 25:
(A) x 23, (B) x 4, (A) x 9, (B) x 4, (A) x 6, (B) x 4, (A) x 2, (B) x 4, (A) x 3, (B) x 6, (A) x 4, (B) x 4, (A) x 2, (B) x 3, (A) x 2, (B) x 3, (A) x 1, (B) x 3, (A) x 2, (B) x 3, (A) x 3, (B) x 4, (A) x 2, (B) x 3, (A) x 2, (B) x 2, (A) x 1, (B) x 4, (A) x 3, (B) x 3, (A) x 6, (B) x 4, (A) x 11, (B) x 3, (A) x 7
Row 26:
(A) x 6, (B) x 3, (A) x 12, (B) x 4, (A) x 6, (B) x 3, (A) x 3, (B) x 4, (A) x 1, (B) x 2, (A) x 2, (B) x 3, (A) x 2, (B) x 4, (A) x 3, (B) x 3, (A) x 2, (B) x 3, (A) x 2, (B) x 2, (A) x 2, (B) x 3, (A) x 2, (B) x 4, (A) x 4, (B) x 4, (A) x 1, (B) x 2, (A) x 2, (B) x 4, (A) x 2, (B) x 5, (A) x 6, (B) x 3, (A) x 10, (B) x 4, (A) x 22
Row 27:
(A) x 22, (B) x 4, (A) x 10, (B) x 3, (A) x 6, (B) x 4, (A) x 3, (B) x 3, (A) x 3, (B) x 2, (A) x 1, (B) x 4, (A) x 4, (B) x 3, (A) x 3, (B) x 3, (A) x 1, (B) x 3, (A) x 2, (B) x 3, (A) x 2, (B) x 3, (A) x 3, (B) x 4, (A) x 2, (B) x 3, (A) x 1, (B) x 2, (A) x 2, (B) x 3, (A) x 4, (B) x 3, (A) x 6, (B) x 3, (A) x 14, (B) x 3, (A) x 5
Row 28:
(A) x 5, (B) x 3, (A) x 14, (B) x 2, (A) x 7, (B) x 4, (A) x 3, (B) x 3, (A) x 2, (B) x 2, (A) x 1, (B) x 3, (A) x 3, (B) x 3, (A) x 3, (B) x 3, (A) x 2, (B) x 3, (A) x 3, (B) x 6, (A) x 3, (B) x 3, (A) x 4, (B) x 4, (A) x 2, (B) x 2, (A) x 2, (B) x 3, (A) x 3, (B) x 5, (A) x 5, (B) x 3, (A) x 10, (B) x 5, (A) x 21
Row 29:
(A) x 21, (B) x 4, (A) x 12, (B) x 3, (A) x 3, (B) x 5, (A) x 5, (B) x 2, (A) x 2, (B) x 2, (A) x 2, (B) x 4, (A) x 4, (B) x 3, (A) x 4, (B) x 4, (A) x 4, (B) x 3, (A) x 2, (B) x 3, (A) x 2, (B) x 4, (A) x 3, (B) x 5, (A) x 4, (B) x 2, (A) x 3, (B) x 4, (A) x 24, (B) x 3, (A) x 4
Row 30:
(A) x 4, (B) x 3, (A) x 7, (B) x 4, (A) x 14, (B) x 2, (A) x 10, (B) x 4, (A) x 5, (B) x 8, (A) x 2, (B) x 3, (A) x 5, (B) x 2, (A) x 5, (B) x 3, (A) x 5, (B) x 2, (A) x 4, (B) x 5, (A) x 6, (B) x 10, (A) x 12, (B) x 4, (A) x 21
Row 31:
(A) x 21, (B) x 4, (A) x 14, (B) x 7, (A) x 7, (B) x 5, (A) x 26, (B) x 3, (A) x 2, (B) x 8, (A) x 6, (B) x 2, (A) x 26, (B) x 4, (A) x 9, (B) x 3, (A) x 3
Row 32:
(A) x 3, (B) x 3, (A) x 10, (B) x 4, (A) x 35, (B) x 4, (A) x 4, (B) x 4, (A) x 27, (B) x 2, (A) x 29, (B) x 4, (A) x 21
Row 33:
(A) x 21, (B) x 4, (A) x 43, (B) x 3, (A) x 12, (B) x 4, (A) x 42, (B) x 4, (A) x 11, (B) x 3, (A) x 3
Row 34:
(A) x 3, (B) x 3, (A) x 11, (B) x 4, (A) x 42, (B) x 4, (A) x 11, (B) x 5, (A) x 42, (B) x 4, (A) x 21
Row 35:
(A) x 21, (B) x 4, (A) x 42, (B) x 5, (A) x 11, (B) x 3, (A) x 7, (C) x 3, (A) x 2, (C) x 6, (A) x 1, (C) x 6, (A) x 1, (C) x 5, (A) x 2, (C) x 2, (A) x 3, (C) x 2, (A) x 3, (B) x 3, (A) x 12, (B) x 3, (A) x 3
Row 36:
(A) x 3, (B) x 4, (A) x 11, (B) x 4, (A) x 2, (C) x 2, (A) x 3, (C) x 2, (A) x 2, (C) x 5, (A) x 1, (C) x 6, (A) x 1, (C) x 6, (A) x 1, (C) x 5, (A) x 6, (B) x 3, (A) x 12, (B) x 3, (A) x 43, (B) x 4, (A) x 21
Row 37:
(A) x 21, (B) x 4, (A) x 58, (B) x 3, (A) x 6, (C) x 2, (A) x 1, (C) x 2, (A) x 5, (C) x 2, (A) x 5, (C) x 2, (A) x 4, (C) x 2, (A) x 2, (C) x 2, (A) x 3, (C) x 2, (A) x 2, (B) x 4, (A) x 11, (B) x 3, (A) x 4
Row 38:
(A) x 4, (B) x 3, (A) x 12, (B) x 3, (A) x 2, (C) x 2, (A) x 3, (C) x 2, (A) x 2, (C) x 2, (A) x 4, (C) x 2, (A) x 5, (C) x 2, (A) x 4, (C) x 2, (A) x 3, (C) x 2, (A) x 66, (B) x 4, (A) x 21
Row 39:
(A) x 21, (B) x 4, (A) x 66, (C) x 2, (A) x 3, (C) x 2, (A) x 4, (C) x 2, (A) x 5, (C) x 2, (A) x 1, (C) x 5, (A) x 2, (C) x 7, (A) x 2, (B) x 3, (A) x 11, (B) x 3, (A) x 5
Row 40:
(A) x 5, (B) x 4, (A) x 10, (B) x 3, (A) x 2, (C) x 2, (A) x 3, (C) x 2, (A) x 2, (C) x 5, (A) x 1, (C) x 2, (A) x 5, (C) x 2, (A) x 3, (C) x 3, (A) x 3, (C) x 3, (A) x 65, (B) x 4, (A) x 21
Row 41:
(A) x 21, (B) x 4, (A) x 65, (C) x 2, (A) x 5, (C) x 2, (A) x 3, (C) x 2, (A) x 5, (C) x 2, (A) x 4, (C) x 2, (A) x 2, (C) x 2, (A) x 3, (C) x 2, (A) x 2, (B) x 3, (A) x 10, (B) x 3, (A) x 6
Row 42:
(A) x 6, (B) x 4, (A) x 8, (B) x 3, (A) x 3, (C) x 2, (A) x 3, (C) x 2, (A) x 2, (C) x 2, (A) x 4, (C) x 2, (A) x 5, (C) x 2, (A) x 3, (C) x 2, (A) x 5, (C) x 2, (A) x 65, (B) x 4, (A) x 3, (B) x 3, (A) x 15
Row 43:
(A) x 10, (B) x 9, (A) x 2, (B) x 4, (A) x 59, (B) x 3, (A) x 3, (C) x 2, (A) x 5, (C) x 2, (A) x 3, (C) x 2, (A) x 5, (C) x 2, (A) x 4, (C) x 2, (A) x 2, (C) x 2, (A) x 3, (C) x 2, (A) x 3, (B) x 4, (A) x 4, (B) x 6, (A) x 7
Row 44:
(A) x 9, (B) x 11, (A) x 4, (C) x 2, (A) x 3, (C) x 2, (A) x 2, (C) x 2, (A) x 4, (C) x 2, (A) x 5, (C) x 2, (A) x 3, (C) x 2, (A) x 5, (C) x 2, (A) x 2, (B) x 4, (A) x 58, (B) x 5, (A) x 2, (B) x 13, (A) x 6
Row 45:
(A) x 4, (B) x 14, (A) x 3, (B) x 5, (A) x 57, (B) x 5, (A) x 2, (C) x 2, (A) x 5, (C) x 2, (A) x 3, (C) x 2, (A) x 5, (C) x 2, (A) x 4, (C) x 2, (A) x 2, (C) x 2, (A) x 3, (C) x 2, (A) x 5, (B) x 9, (A) x 10
Row 46:
(A) x 24, (C) x 2, (A) x 3, (C) x 2, (A) x 2, (C) x 2, (A) x 4, (C) x 2, (A) x 5, (C) x 2, (A) x 3, (C) x 2, (A) x 5, (C) x 2, (A) x 2, (B) x 5, (A) x 57, (B) x 4, (A) x 6, (B) x 13, (A) x 3
Row 47:
(A) x 3, (B) x 10, (A) x 9, (B) x 5, (A) x 55, (B) x 6, (A) x 2, (C) x 2, (A) x 5, (C) x 2, (A) x 3, (C) x 2, (A) x 5, (C) x 2, (A) x 4, (C) x 2, (A) x 2, (C) x 2, (A) x 3, (C) x 2, (A) x 24
Row 48:
(A) x 24, (C) x 2, (A) x 3, (C) x 2, (A) x 2, (C) x 2, (A) x 4, (C) x 2, (A) x 5, (C) x 2, (A) x 3, (C) x 3, (A) x 3, (C) x 3, (A) x 3, (B) x 5, (A) x 55, (B) x 4, (A) x 13, (B) x 6, (A) x 4
Row 49:
(A) x 23, (B) x 5, (A) x 53, (B) x 6, (A) x 4, (C) x 2, (A) x 3, (C) x 2, (A) x 4, (C) x 2, (A) x 5, (C) x 2, (A) x 4, (C) x 2, (A) x 2, (C) x 2, (A) x 3, (C) x 2, (A) x 24
Row 50:
(A) x 24, (C) x 2, (A) x 3, (C) x 2, (A) x 2, (C) x 2, (A) x 4, (C) x 2, (A) x 5, (C) x 2, (A) x 4, (C) x 2, (A) x 3, (C) x 2, (A) x 5, (B) x 5, (A) x 53, (B) x 4, (A) x 24
Row 51:
(A) x 24, (B) x 5, (A) x 51, (B) x 6, (A) x 6, (C) x 2, (A) x 1, (C) x 2, (A) x 5, (C) x 2, (A) x 5, (C) x 2, (A) x 4, (C) x 2, (A) x 2, (C) x 2, (A) x 3, (C) x 2, (A) x 24
Row 52:
(A) x 24, (C) x 2, (A) x 3, (C) x 2, (A) x 2, (C) x 5, (A) x 1, (C) x 2, (A) x 5, (C) x 2, (A) x 5, (C) x 5, (A) x 7, (B) x 6, (A) x 50, (B) x 4, (A) x 25
Row 53:
(A) x 26, (B) x 4, (A) x 49, (B) x 5, (A) x 9, (C) x 3, (A) x 6, (C) x 2, (A) x 5, (C) x 2, (A) x 1, (C) x 5, (A) x 2, (C) x 2, (A) x 3, (C) x 2, (A) x 24
Row 54:
(A) x 67, (B) x 5, (A) x 47, (B) x 5, (A) x 26
Row 57:
(A) x 29, (B) x 5, (A) x 41, (B) x 6, (A) x 4, (B) x 5, (A) x 60
Row 58:
(A) x 58, (B) x 6, (A) x 6, (B) x 6, (A) x 38, (B) x 6, (A) x 30
Row 59:
(A) x 31, (B) x 6, (A) x 35, (B) x 6, (A) x 9, (B) x 6, (A) x 57
Row 60:
(A) x 55, (B) x 7, (A) x 11, (B) x 7, (A) x 31, (B) x 7, (A) x 32
Row 61:
(A) x 33, (B) x 8, (A) x 27, (B) x 8, (A) x 13, (B) x 7, (A) x 54
Row 62:
(A) x 53, (B) x 7, (A) x 16, (B) x 8, (A) x 23, (B) x 8, (A) x 35
Row 63:
(A) x 28, (B) x 3, (A) x 5, (B) x 10, (A) x 17, (B) x 10, (A) x 18, (B) x 7, (A) x 52
Row 64:
(A) x 52, (B) x 7, (A) x 20, (B) x 13, (A) x 7, (B) x 13, (A) x 6, (B) x 5, (A) x 27
Row 65:
(A) x 26, (B) x 5, (A) x 9, (B) x 28, (A) x 24, (B) x 7, (A) x 51
Row 66:
(A) x 52, (B) x 4, (A) x 29, (B) x 22, (A) x 12, (B) x 6, (A) x 25
Row 67:
(A) x 24, (B) x 6, (A) x 17, (B) x 15, (A) x 33, (B) x 2, (A) x 53
Row 68:
(A) x 79, (B) x 3, (A) x 39, (B) x 6, (A) x 23
Row 69:
(A) x 22, (B) x 6, (A) x 40, (B) x 4, (A) x 78
Row 70:
(A) x 78, (B) x 4, (A) x 17, (B) x 2, (A) x 22, (B) x 6, (A) x 21
Row 71:
(A) x 20, (B) x 6, (A) x 22, (B) x 4, (A) x 16, (B) x 5, (A) x 77
Row 72:
(A) x 76, (B) x 5, (A) x 17, (B) x 4, (A) x 23, (B) x 6, (A) x 19
Row 73:
(A) x 19, (B) x 5, (A) x 24, (B) x 4, (A) x 17, (B) x 5, (A) x 76
Row 74:
(A) x 75, (B) x 6, (A) x 17, (B) x 4, (A) x 25, (B) x 4, (A) x 19
Row 75:
(A) x 47, (B) x 5, (A) x 18, (B) x 5, (A) x 75
Row 76:
(A) x 74, (B) x 6, (A) x 18, (B) x 5, (A) x 47
Row 77:
(A) x 47, (B) x 5, (A) x 19, (B) x 5, (A) x 74
Row 78:
(A) x 73, (B) x 6, (A) x 19, (B) x 5, (A) x 47
Row 79:
(A) x 47, (B) x 5, (A) x 19, (B) x 6, (A) x 73
Row 80:
(A) x 73, (B) x 5, (A) x 20, (B) x 5, (A) x 47
Row 81:
(A) x 47, (B) x 5, (A) x 20, (B) x 5, (A) x 73
Row 82:
(A) x 73, (B) x 4, (A) x 21, (B) x 5, (A) x 47
Row 83:
(A) x 47, (B) x 5, (A) x 22, (B) x 2, (A) x 74
Row 84:
(A) x 99, (B) x 4, (A) x 47
Row 85:
(A) x 47, (B) x 4, (A) x 99
Row 86:
(A) x 100, (B) x 2, (A) x 48
Rows 87 – 91:
(A) x 150
Blanket Colorwork – Left-Handed
→ Rows 1 [WS] – 5:
(A) x 150
← Row 6 [RS]:
(A) x 115, (B) x 3, (A) x 16, (B) x 6, (A) x 10
Row 7:
(A) x 9, (B) x 8, (A) x 14, (B) x 5, (A) x 114
Row 8:
(A) x 51, (B) x 3, (A) x 37, (B) x 3, (A) x 6, (B) x 3, (A) x 11, (B) x 5, (A) x 13, (B) x 4, (A) x 3, (B) x 3, (A) x 8
Row 9:
(A) x 7, (B) x 3, (A) x 5, (B) x 4, (A) x 12, (B) x 5, (A) x 10, (B) x 5, (A) x 4, (B) x 6, (A) x 13, (B) x 1, (A) x 20, (B) x 5, (A) x 50
Row 10:
(A) x 9, (B) x 4, (A) x 22, (B) x 9, (A) x 6, (B) x 6, (A) x 18, (B) x 4, (A) x 10, (B) x 4, (A) x 1, (B) x 3, (A) x 3, (B) x 5, (A) x 9, (B) x 7, (A) x 11, (B) x 3, (A) x 6, (B) x 3, (A) x 7
Row 11:
(A) x 7, (B) x 3, (A) x 6, (B) x 3, (A) x 11, (B) x 4, (A) x 1, (B) x 2, (A) x 9, (B) x 6, (A) x 2, (B) x 3, (A) x 2, (B) x 3, (A) x 10, (B) x 5, (A) x 17, (B) x 3, (A) x 1, (B) x 3, (A) x 3, (B) x 13, (A) x 19, (B) x 6, (A) x 8
Row 12:
(A) x 8, (B) x 7, (A) x 16, (B) x 6, (A) x 6, (B) x 4, (A) x 2, (B) x 2, (A) x 2, (B) x 3, (A) x 17, (B) x 6, (A) x 9, (B) x 3, (A) x 2, (B) x 3, (A) x 2, (B) x 2, (A) x 1, (B) x 3, (A) x 9, (B) x 2, (A) x 1, (B) x 4, (A) x 11, (B) x 3, (A) x 6, (B) x 3, (A) x 7
Row 13:
(A) x 8, (B) x 2, (A) x 6, (B) x 3, (A) x 6, (B) x 2, (A) x 3, (B) x 3, (A) x 3, (B) x 2, (A) x 1, (B) x 2, (A) x 5, (B) x 3, (A) x 1, (B) x 2, (A) x 3, (B) x 2, (A) x 2, (B) x 3, (A) x 9, (B) x 3, (A) x 1, (B) x 3, (A) x 8, (B) x 3, (A) x 5, (B) x 3, (A) x 2, (B) x 2, (A) x 1, (B) x 4, (A) x 9, (B) x 5, (A) x 14, (B) x 7, (A) x 9
Row 14:
(A) x 10, (B) x 7, (A) x 12, (B) x 5, (A) x 11, (B) x 6, (A) x 2, (B) x 3, (A) x 5, (B) x 3, (A) x 3, (B) x 4, (A) x 1, (B) x 2, (A) x 2, (B) x 3, (A) x 6, (B) x 1, (A) x 3, (B) x 6, (A) x 3, (B) x 2, (A) x 1, (B) x 3, (A) x 5, (B) x 2, (A) x 1, (B) x 2, (A) x 3, (B) x 3, (A) x 1, (B) x 6, (A) x 4, (B) x 3, (A) x 5, (B) x 3, (A) x 8
Row 15:
(A) x 9, (B) x 3, (A) x 4, (B) x 3, (A) x 3, (B) x 3, (A) x 2, (B) x 2, (A) x 1, (B) x 3, (A) x 3, (B) x 5, (A) x 5, (B) x 3, (A) x 1, (B) x 3, (A) x 3, (B) x 5, (A) x 2, (B) x 3, (A) x 5, (B) x 3, (A) x 2, (B) x 8, (A) x 1, (B) x 4, (A) x 5, (B) x 3, (A) x 2, (B) x 5, (A) x 13, (B) x 5, (A) x 10, (B) x 7, (A) x 11
Row 16:
(A) x 12, (B) x 7, (A) x 8, (B) x 5, (A) x 14, (B) x 4, (A) x 3, (B) x 3, (A) x 5, (B) x 4, (A) x 1, (B) x 2, (A) x 1, (B) x 5, (A) x 2, (B) x 3, (A) x 4, (B) x 4, (A) x 3, (B) x 4, (A) x 3, (B) x 2, (A) x 2, (B) x 3, (A) x 5, (B) x 5, (A) x 3, (B) x 5, (A) x 3, (B) x 3, (A) x 3, (B) x 3, (A) x 3, (B) x 3, (A) x 10
Row 17:
(A) x 11, (B) x 3, (A) x 1, (B) x 3, (A) x 3, (B) x 4, (A) x 3, (B) x 5, (A) x 4, (B) x 5, (A) x 4, (B) x 3, (A) x 2, (B) x 2, (A) x 3, (B) x 5, (A) x 2, (B) x 4, (A) x 4, (B) x 4, (A) x 2, (B) x 3, (A) x 3, (B) x 6, (A) x 5, (B) x 3, (A) x 3, (B) x 4, (A) x 15, (B) x 4, (A) x 8, (B) x 6, (A) x 13
Row 18:
(A) x 14, (B) x 6, (A) x 6, (B) x 4, (A) x 17, (B) x 4, (A) x 2, (B) x 3, (A) x 4, (B) x 7, (A) x 3, (B) x 3, (A) x 2, (B) x 4, (A) x 4, (B) x 4, (A) x 1, (B) x 3, (A) x 1, (B) x 3, (A) x 1, (B) x 3, (A) x 2, (B) x 3, (A) x 4, (B) x 5, (A) x 4, (B) x 5, (A) x 4, (B) x 3, (A) x 3, (B) x 6, (A) x 12
Row 19:
(A) x 13, (B) x 4, (A) x 4, (B) x 3, (A) x 5, (B) x 5, (A) x 3, (B) x 5, (A) x 4, (B) x 3, (A) x 3, (B) x 5, (A) x 3, (B) x 7, (A) x 4, (B) x 4, (A) x 2, (B) x 3, (A) x 4, (B) x 6, (A) x 4, (B) x 3, (A) x 2, (B) x 4, (A) x 18, (B) x 4, (A) x 4, (B) x 6, (A) x 15
Row 20:
(A) x 16, (B) x 6, (A) x 3, (B) x 4, (A) x 11, (B) x 11, (A) x 2, (B) x 3, (A) x 4, (B) x 6, (A) x 4, (B) x 3, (A) x 2, (B) x 4, (A) x 4, (B) x 6, (A) x 5, (B) x 4, (A) x 3, (B) x 3, (A) x 4, (B) x 5, (A) x 3, (B) x 5, (A) x 5, (B) x 3, (A) x 2, (B) x 6, (A) x 13
Row 21:
(A) x 12, (B) x 3, (A) x 1, (B) x 8, (A) x 6, (B) x 4, (A) x 3, (B) x 6, (A) x 3, (B) x 3, (A) x 3, (B) x 3, (A) x 8, (B) x 5, (A) x 3, (B) x 4, (A) x 2, (B) x 3, (A) x 5, (B) x 5, (A) x 4, (B) x 3, (A) x 2, (B) x 12, (A) x 11, (B) x 4, (A) x 2, (B) x 5, (A) x 17
Row 22:
(A) x 19, (B) x 2, (A) x 3, (B) x 4, (A) x 10, (B) x 4, (A) x 5, (B) x 4, (A) x 2, (B) x 3, (A) x 4, (B) x 5, (A) x 5, (B) x 3, (A) x 2, (B) x 4, (A) x 3, (B) x 5, (A) x 8, (B) x 3, (A) x 3, (B) x 3, (A) x 3, (B) x 2, (A) x 1, (B) x 3, (A) x 3, (B) x 4, (A) x 6, (B) x 6, (A) x 4, (B) x 3, (A) x 11
Row 23:
(A) x 9, (B) x 4, (A) x 7, (B) x 5, (A) x 5, (B) x 4, (A) x 3, (B) x 3, (A) x 1, (B) x 2, (A) x 3, (B) x 3, (A) x 2, (B) x 4, (A) x 8, (B) x 6, (A) x 3, (B) x 3, (A) x 2, (B) x 4, (A) x 4, (B) x 6, (A) x 3, (B) x 3, (A) x 2, (B) x 5, (A) x 5, (B) x 4, (A) x 10, (B) x 4, (A) x 23
Row 24:
(A) x 23, (B) x 4, (A) x 10, (B) x 3, (A) x 6, (B) x 4, (A) x 3, (B) x 3, (A) x 3, (B) x 6, (A) x 4, (B) x 4, (A) x 2, (B) x 3, (A) x 3, (B) x 2, (A) x 1, (B) x 3, (A) x 3, (B) x 2, (A) x 3, (B) x 4, (A) x 2, (B) x 3, (A) x 2, (B) x 2, (A) x 2, (B) x 3, (A) x 3, (B) x 3, (A) x 6, (B) x 4, (A) x 9, (B) x 4, (A) x 8
Row 25:
(A) x 7, (B) x 3, (A) x 11, (B) x 4, (A) x 6, (B) x 3, (A) x 3, (B) x 4, (A) x 1, (B) x 2, (A) x 2, (B) x 3, (A) x 2, (B) x 4, (A) x 3, (B) x 3, (A) x 2, (B) x 3, (A) x 1, (B) x 3, (A) x 2, (B) x 3, (A) x 2, (B) x 4, (A) x 4, (B) x 6, (A) x 3, (B) x 4, (A) x 2, (B) x 4, (A) x 6, (B) x 4, (A) x 9, (B) x 4, (A) x 23
Row 26:
(A) x 22, (B) x 4, (A) x 10, (B) x 3, (A) x 6, (B) x 5, (A) x 2, (B) x 4, (A) x 2, (B) x 2, (A) x 1, (B) x 4, (A) x 4, (B) x 4, (A) x 2, (B) x 3, (A) x 2, (B) x 2, (A) x 2, (B) x 3, (A) x 2, (B) x 3, (A) x 3, (B) x 4, (A) x 2, (B) x 3, (A) x 2, (B) x 2, (A) x 1, (B) x 4, (A) x 3, (B) x 3, (A) x 6, (B) x 4, (A) x 12, (B) x 3, (A) x 6
Row 27:
(A) x 5, (B) x 3, (A) x 14, (B) x 3, (A) x 6, (B) x 3, (A) x 4, (B) x 3, (A) x 2, (B) x 2, (A) x 1, (B) x 3, (A) x 2, (B) x 4, (A) x 3, (B) x 3, (A) x 2, (B) x 3, (A) x 2, (B) x 3, (A) x 1, (B) x 3, (A) x 3, (B) x 3, (A) x 4, (B) x 4, (A) x 1, (B) x 2, (A) x 3, (B) x 3, (A) x 3, (B) x 4, (A) x 6, (B) x 3, (A) x 10, (B) x 4, (A) x 22
Row 28:
(A) x 21, (B) x 5, (A) x 10, (B) x 3, (A) x 5, (B) x 5, (A) x 3, (B) x 3, (A) x 2, (B) x 2, (A) x 2, (B) x 4, (A) x 4, (B) x 3, (A) x 3, (B) x 6, (A) x 3, (B) x 3, (A) x 2, (B) x 3, (A) x 3, (B) x 3, (A) x 3, (B) x 3, (A) x 1, (B) x 2, (A) x 2, (B) x 3, (A) x 3, (B) x 4, (A) x 7, (B) x 2, (A) x 14, (B) x 3, (A) x 5
Row 29:
(A) x 4, (B) x 3, (A) x 24, (B) x 4, (A) x 3, (B) x 2, (A) x 4, (B) x 5, (A) x 3, (B) x 4, (A) x 2, (B) x 3, (A) x 2, (B) x 3, (A) x 4, (B) x 4, (A) x 4, (B) x 3, (A) x 4, (B) x 4, (A) x 2, (B) x 2, (A) x 2, (B) x 2, (A) x 5, (B) x 5, (A) x 3, (B) x 3, (A) x 12, (B) x 4, (A) x 21
Row 30:
(A) x 21, (B) x 4, (A) x 12, (B) x 10, (A) x 6, (B) x 5, (A) x 4, (B) x 2, (A) x 5, (B) x 3, (A) x 5, (B) x 2, (A) x 5, (B) x 3, (A) x 2, (B) x 8, (A) x 5, (B) x 4, (A) x 10, (B) x 2, (A) x 14, (B) x 4, (A) x 7, (B) x 3, (A) x 4
Row 31:
(A) x 3, (B) x 3, (A) x 9, (B) x 4, (A) x 26, (B) x 2, (A) x 6, (B) x 8, (A) x 2, (B) x 3, (A) x 26, (B) x 5, (A) x 7, (B) x 7, (A) x 14, (B) x 4, (A) x 21
Row 32:
(A) x 21, (B) x 4, (A) x 29, (B) x 2, (A) x 27, (B) x 4, (A) x 4, (B) x 4, (A) x 35, (B) x 4, (A) x 10, (B) x 3, (A) x 3
Row 33:
(A) x 3, (B) x 3, (A) x 11, (B) x 4, (A) x 42, (B) x 4, (A) x 12, (B) x 3, (A) x 43, (B) x 4, (A) x 21
Row 34:
(A) x 21, (B) x 4, (A) x 42, (B) x 5, (A) x 11, (B) x 4, (A) x 42, (B) x 4, (A) x 11, (B) x 3, (A) x 3
Row 35:
(A) x 3, (B) x 3, (A) x 12, (B) x 3, (A) x 3, (C) x 2, (A) x 3, (C) x 2, (A) x 2, (C) x 5, (A) x 1, (C) x 6, (A) x 1, (C) x 6, (A) x 2, (C) x 3, (A) x 7, (B) x 3, (A) x 11, (B) x 5, (A) x 42, (B) x 4, (A) x 21
Row 36:
(A) x 21, (B) x 4, (A) x 43, (B) x 3, (A) x 12, (B) x 3, (A) x 6, (C) x 5, (A) x 1, (C) x 6, (A) x 1, (C) x 6, (A) x 1, (C) x 5, (A) x 2, (C) x 2, (A) x 3, (C) x 2, (A) x 2, (B) x 4, (A) x 11, (B) x 4, (A) x 3
Row 37:
(A) x 4, (B) x 3, (A) x 11, (B) x 4, (A) x 2, (C) x 2, (A) x 3, (C) x 2, (A) x 2, (C) x 2, (A) x 4, (C) x 2, (A) x 5, (C) x 2, (A) x 5, (C) x 2, (A) x 1, (C) x 2, (A) x 6, (B) x 3, (A) x 58, (B) x 4, (A) x 21
Row 38:
(A) x 21, (B) x 4, (A) x 66, (C) x 2, (A) x 3, (C) x 2, (A) x 4, (C) x 2, (A) x 5, (C) x 2, (A) x 4, (C) x 2, (A) x 2, (C) x 2, (A) x 3, (C) x 2, (A) x 2, (B) x 3, (A) x 12, (B) x 3, (A) x 4
Row 39:
(A) x 5, (B) x 3, (A) x 11, (B) x 3, (A) x 2, (C) x 7, (A) x 2, (C) x 5, (A) x 1, (C) x 2, (A) x 5, (C) x 2, (A) x 4, (C) x 2, (A) x 3, (C) x 2, (A) x 66, (B) x 4, (A) x 21
Row 40:
(A) x 21, (B) x 4, (A) x 65, (C) x 3, (A) x 3, (C) x 3, (A) x 3, (C) x 2, (A) x 5, (C) x 2, (A) x 1, (C) x 5, (A) x 2, (C) x 2, (A) x 3, (C) x 2, (A) x 2, (B) x 3, (A) x 10, (B) x 4, (A) x 5
Row 41:
(A) x 6, (B) x 3, (A) x 10, (B) x 3, (A) x 2, (C) x 2, (A) x 3, (C) x 2, (A) x 2, (C) x 2, (A) x 4, (C) x 2, (A) x 5, (C) x 2, (A) x 3, (C) x 2, (A) x 5, (C) x 2, (A) x 65, (B) x 4, (A) x 21
Row 42:
(A) x 15, (B) x 3, (A) x 3, (B) x 4, (A) x 65, (C) x 2, (A) x 5, (C) x 2, (A) x 3, (C) x 2, (A) x 5, (C) x 2, (A) x 4, (C) x 2, (A) x 2, (C) x 2, (A) x 3, (C) x 2, (A) x 3, (B) x 3, (A) x 8, (B) x 4, (A) x 6
Row 43:
(A) x 7, (B) x 6, (A) x 4, (B) x 4, (A) x 3, (C) x 2, (A) x 3, (C) x 2, (A) x 2, (C) x 2, (A) x 4, (C) x 2, (A) x 5, (C) x 2, (A) x 3, (C) x 2, (A) x 5, (C) x 2, (A) x 3, (B) x 3, (A) x 59, (B) x 4, (A) x 2, (B) x 9, (A) x 10
Row 44:
(A) x 6, (B) x 13, (A) x 2, (B) x 5, (A) x 58, (B) x 4, (A) x 2, (C) x 2, (A) x 5, (C) x 2, (A) x 3, (C) x 2, (A) x 5, (C) x 2, (A) x 4, (C) x 2, (A) x 2, (C) x 2, (A) x 3, (C) x 2, (A) x 4, (B) x 11, (A) x 9
Row 45:
(A) x 10, (B) x 9, (A) x 5, (C) x 2, (A) x 3, (C) x 2, (A) x 2, (C) x 2, (A) x 4, (C) x 2, (A) x 5, (C) x 2, (A) x 3, (C) x 2, (A) x 5, (C) x 2, (A) x 2, (B) x 5, (A) x 57, (B) x 5, (A) x 3, (B) x 14, (A) x 4
Row 46:
(A) x 3, (B) x 13, (A) x 6, (B) x 4, (A) x 57, (B) x 5, (A) x 2, (C) x 2, (A) x 5, (C) x 2, (A) x 3, (C) x 2, (A) x 5, (C) x 2, (A) x 4, (C) x 2, (A) x 2, (C) x 2, (A) x 3, (C) x 2, (A) x 24
Row 47:
(A) x 24, (C) x 2, (A) x 3, (C) x 2, (A) x 2, (C) x 2, (A) x 4, (C) x 2, (A) x 5, (C) x 2, (A) x 3, (C) x 2, (A) x 5, (C) x 2, (A) x 2, (B) x 6, (A) x 55, (B) x 5, (A) x 9, (B) x 10, (A) x 3
Row 48:
(A) x 4, (B) x 6, (A) x 13, (B) x 4, (A) x 55, (B) x 5, (A) x 3, (C) x 3, (A) x 3, (C) x 3, (A) x 3, (C) x 2, (A) x 5, (C) x 2, (A) x 4, (C) x 2, (A) x 2, (C) x 2, (A) x 3, (C) x 2, (A) x 24
Row 49:
(A) x 24, (C) x 2, (A) x 3, (C) x 2, (A) x 2, (C) x 2, (A) x 4, (C) x 2, (A) x 5, (C) x 2, (A) x 4, (C) x 2, (A) x 3, (C) x 2, (A) x 4, (B) x 6, (A) x 53, (B) x 5, (A) x 23
Row 50:
(A) x 24, (B) x 4, (A) x 53, (B) x 5, (A) x 5, (C) x 2, (A) x 3, (C) x 2, (A) x 4, (C) x 2, (A) x 5, (C) x 2, (A) x 4, (C) x 2, (A) x 2, (C) x 2, (A) x 3, (C) x 2, (A) x 24
Row 51:
(A) x 24, (C) x 2, (A) x 3, (C) x 2, (A) x 2, (C) x 2, (A) x 4, (C) x 2, (A) x 5, (C) x 2, (A) x 5, (C) x 2, (A) x 1, (C) x 2, (A) x 6, (B) x 6, (A) x 51, (B) x 5, (A) x 24
Row 52:
(A) x 25, (B) x 4, (A) x 50, (B) x 6, (A) x 7, (C) x 5, (A) x 5, (C) x 2, (A) x 5, (C) x 2, (A) x 1, (C) x 5, (A) x 2, (C) x 2, (A) x 3, (C) x 2, (A) x 24
Row 53:
(A) x 24, (C) x 2, (A) x 3, (C) x 2, (A) x 2, (C) x 5, (A) x 1, (C) x 2, (A) x 5, (C) x 2, (A) x 6, (C) x 3, (A) x 9, (B) x 5, (A) x 49, (B) x 4, (A) x 26
Row 54:
(A) x 26, (B) x 5, (A) x 47, (B) x 5, (A) x 67
Row 55:
(A) x 63, (B) x 2, (A) x 2, (B) x 6, (A) x 45, (B) x 5, (A) x 27
Row 56:
(A) x 28, (B) x 5, (A) x 43, (B) x 6, (A) x 3, (B) x 4, (A) x 61
Row 57:
(A) x 60, (B) x 5, (A) x 4, (B) x 6, (A) x 41, (B) x 5, (A) x 29
Row 58:
(A) x 30, (B) x 6, (A) x 38, (B) x 6, (A) x 6, (B) x 6, (A) x 58
Row 59:
(A) x 57, (B) x 6, (A) x 9, (B) x 6, (A) x 35, (B) x 6, (A) x 31
Row 60:
(A) x 32, (B) x 7, (A) x 31, (B) x 7, (A) x 11, (B) x 7, (A) x 55
Row 61:
(A) x 54, (B) x 7, (A) x 13, (B) x 8, (A) x 27, (B) x 8, (A) x 33
Row 62:
(A) x 35, (B) x 8, (A) x 23, (B) x 8, (A) x 16, (B) x 7, (A) x 53
Row 63:
(A) x 52, (B) x 7, (A) x 18, (B) x 10, (A) x 17, (B) x 10, (A) x 5, (B) x 3, (A) x 28
Row 64:
(A) x 27, (B) x 5, (A) x 6, (B) x 13, (A) x 7, (B) x 13, (A) x 20, (B) x 7, (A) x 52
Row 65:
(A) x 51, (B) x 7, (A) x 24, (B) x 28, (A) x 9, (B) x 5, (A) x 26
Row 66:
(A) x 25, (B) x 6, (A) x 12, (B) x 22, (A) x 29, (B) x 4, (A) x 52
Row 67:
(A) x 53, (B) x 2, (A) x 33, (B) x 15, (A) x 17, (B) x 6, (A) x 24
Row 68:
(A) x 23, (B) x 6, (A) x 39, (B) x 3, (A) x 79
Row 69:
(A) x 78, (B) x 4, (A) x 40, (B) x 6, (A) x 22
Row 70:
(A) x 21, (B) x 6, (A) x 22, (B) x 2, (A) x 17, (B) x 4, (A) x 78
Row 71:
(A) x 77, (B) x 5, (A) x 16, (B) x 4, (A) x 22, (B) x 6, (A) x 20
Row 72:
(A) x 19, (B) x 6, (A) x 23, (B) x 4, (A) x 17, (B) x 5, (A) x 76
Row 73:
(A) x 76, (B) x 5, (A) x 17, (B) x 4, (A) x 24, (B) x 5, (A) x 19
Row 74:
(A) x 19, (B) x 4, (A) x 25, (B) x 4, (A) x 17, (B) x 6, (A) x 75
Row 75:
(A) x 75, (B) x 5, (A) x 18, (B) x 5, (A) x 47
Row 76:
(A) x 47, (B) x 5, (A) x 18, (B) x 6, (A) x 74
Row 77:
(A) x 74, (B) x 5, (A) x 19, (B) x 5, (A) x 47
Row 78:
(A) x 47, (B) x 5, (A) x 19, (B) x 6, (A) x 73
Row 79:
(A) x 73, (B) x 6, (A) x 19, (B) x 5, (A) x 47
Row 80:
(A) x 47, (B) x 5, (A) x 20, (B) x 5, (A) x 73
Row 81:
(A) x 73, (B) x 5, (A) x 20, (B) x 5, (A) x 47
Row 82:
(A) x 47, (B) x 5, (A) x 21, (B) x 4, (A) x 73
Row 83:
(A) x 74, (B) x 2, (A) x 22, (B) x 5, (A) x 47
Row 84:
(A) x 47, (B) x 4, (A) x 99
Row 85:
(A) x 99, (B) x 4, (A) x 47
Row 86:
(A) x 48, (B) x 2, (A) x 100
Rows 87-90:
(A) x 150
Alpine Stitch Section
Repeat instructions from the first Alpine Stitch Section.
Joining the Pillow Panel
With a yarn needle and white yarn, place the pocket on the center bottom of the blanket. The wrong side of the blanket will be facing you.
Attach the pocket to the blanket using whipstitch or your preferred seaming method, leaving the top part of the pocket panel open.
Now, you can watch the video below to learn how to quickly transform your blanket into a pillow for storage and decorating.
Weave in all ends, wash, and enjoy!
Keep your blanket folded into the pillow panel to protect it, or keep it in a cool, dark closet when not in use as a cover or throw. Avoid storing your handmade items in basements and attics where humidity and temperatures fluctuate and in plastic bags that can trap moisture. Instead, store your handmade blankets and garments in breathable cotton bags or storage bins. Now that you know how to store your blanket, why not use your leftover yarn and make a coordinating Easy Cuff-to-Cuff Child Sweater and a pair of The Cutest Cuffed Baby Pants ever!
Cheers, and happy crocheting!
Hook down? Not so fast…
I’d Love to See Yours!
You made something beautiful. Here’s how to keep it, show it off, and inspire the next maker.

What should you make next?
Keep the hook movingReaders Are Loving

 Granny Stitch Blanket
 Blossom Granny
 Willow Mesh Bag
 Petal Chevron Blanket