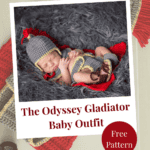
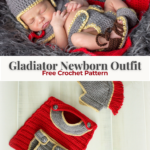
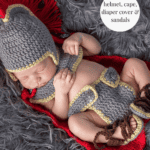
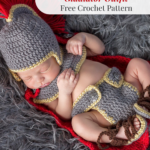
I designed this gladiator crochet baby outfit back in 2014. My son was a toddler, and I made a tiny Spartan set because it made me laugh. It’s been in my shop ever since — twelve years.
On July 16, Bit of Whimsy‘s finished piece using my pattern of it showed up on the TODAY show, in a basket, being handed to Anne Hathaway.
Disclosure: This post contains affiliate links. Please read my disclosure for more info.
What Happened on TODAY
Anne Hathaway was on with Tom Holland to talk about The Odyssey. Craig Melvin brought out a basket and told her it wasn’t something she’d find in stores. She teared up before she’d even lifted anything out of it.
“This is, when the child comes out, we want the child ready for battle,” Melvin said. “It is a Trojan outfit, custom-designed for the baby.”
She held up the diaper cover. “Is that a little diaper? Who is talented enough to make all this?”
Then, the line that’s been quoted everywhere since: “This is appropriately epic. Thank you so much. This is amazing.”
Tom Holland, sitting next to her, said he knew where to come when he has his own.
Where the Pattern Came From
The set was made by Bit of Whimsy Crochet, and she deserves every bit of the credit she’s getting. Every stitch in that basket is hers. Her work is why Hathaway teared up instead of politely smiling.
What hasn’t made it into the coverage is what she made it from.
She made it from my gladiator crochet baby outfit pattern. I published it in 2014 as the Greek/Roman/Spartan Newborn Outfit, and she’s been making it in her shop for years. Melvin called it custom-designed, which is generous, and also not quite right. It’s a 2014 pattern that a very good maker executed beautifully.
I’m not correcting anyone. I’m telling you because it’s the part I find genuinely funny. A pattern I wrote in a spare room in 2014 got handed to Anne Hathaway on live television, and nobody in the room knew where it came from.
That’s the thing about patterns. You write them, you put them out, and then they go off and have lives you don’t hear about. Most of the time, you never find out. Occasionally, you find out on national television.
Why You’ll Love This Pattern
Five pieces that read as a full costume from across a room, and not one of them is complicated on its own.
- It photographs. This was built as a newborn photo prop, and the shapes are exaggerated on purpose so they read in the picture rather than disappearing into a blanket.
- It’s worsted weight and any brand. No specialty yarn, no dye lot hunting. Whatever is in your stash in grey, red, brown, and gold will work.
- The pieces are small. The helmet, the cuff, and the sandals are an evening each. You can put this down for a week and pick it back up without losing your place.
- It buttons instead of pulling on. The neck cuff attaches to the cape with buttons, which matters a lot when the model is a newborn who did not consent to any of this.
Before You Hook: Gladiator Crochet Pattern Details
🧶 Yarn Used: Any worsted weight yarn
⚖️ Yarn Weight: Worsted, medium
🧵 Featured Stitch: Single and double crochet
🪝 Hook Size: US H (5.0mm) Crochet Hook, or hook to obtain gauge – used throughout unless toerwise noted; F (3.75mm) for sandals only
📏 Sizes: Newborn
🩷🩷🤍🤍 Difficulty level: Advanced Beginner/Intermediate
🕐 Approx Crochet Time: 8+ hours total – 5 seprate pieces.
🏷️ Project Type: A five-piece newborn photo prop set with a helmet, cape, neck cuff, diaper cover, and sandals, worked in separate pieces and assembled.
Save for Later • Get a Summary • Pick Up Where You Left Off
It’s Crochet, Not Knit
Half the coverage is calling it knitting. It isn’t.
Not a complaint. Having your work described incorrectly on national television is a very good problem to have. But since we’re here: crochet uses one hook, knitting uses two needles, and they build fabric in completely different ways. Knitting works a whole row of live loops at once. Crochet finishes each stitch before moving on to the next, which is why you can walk away in the middle of a project without your work unraveling into a puddle.
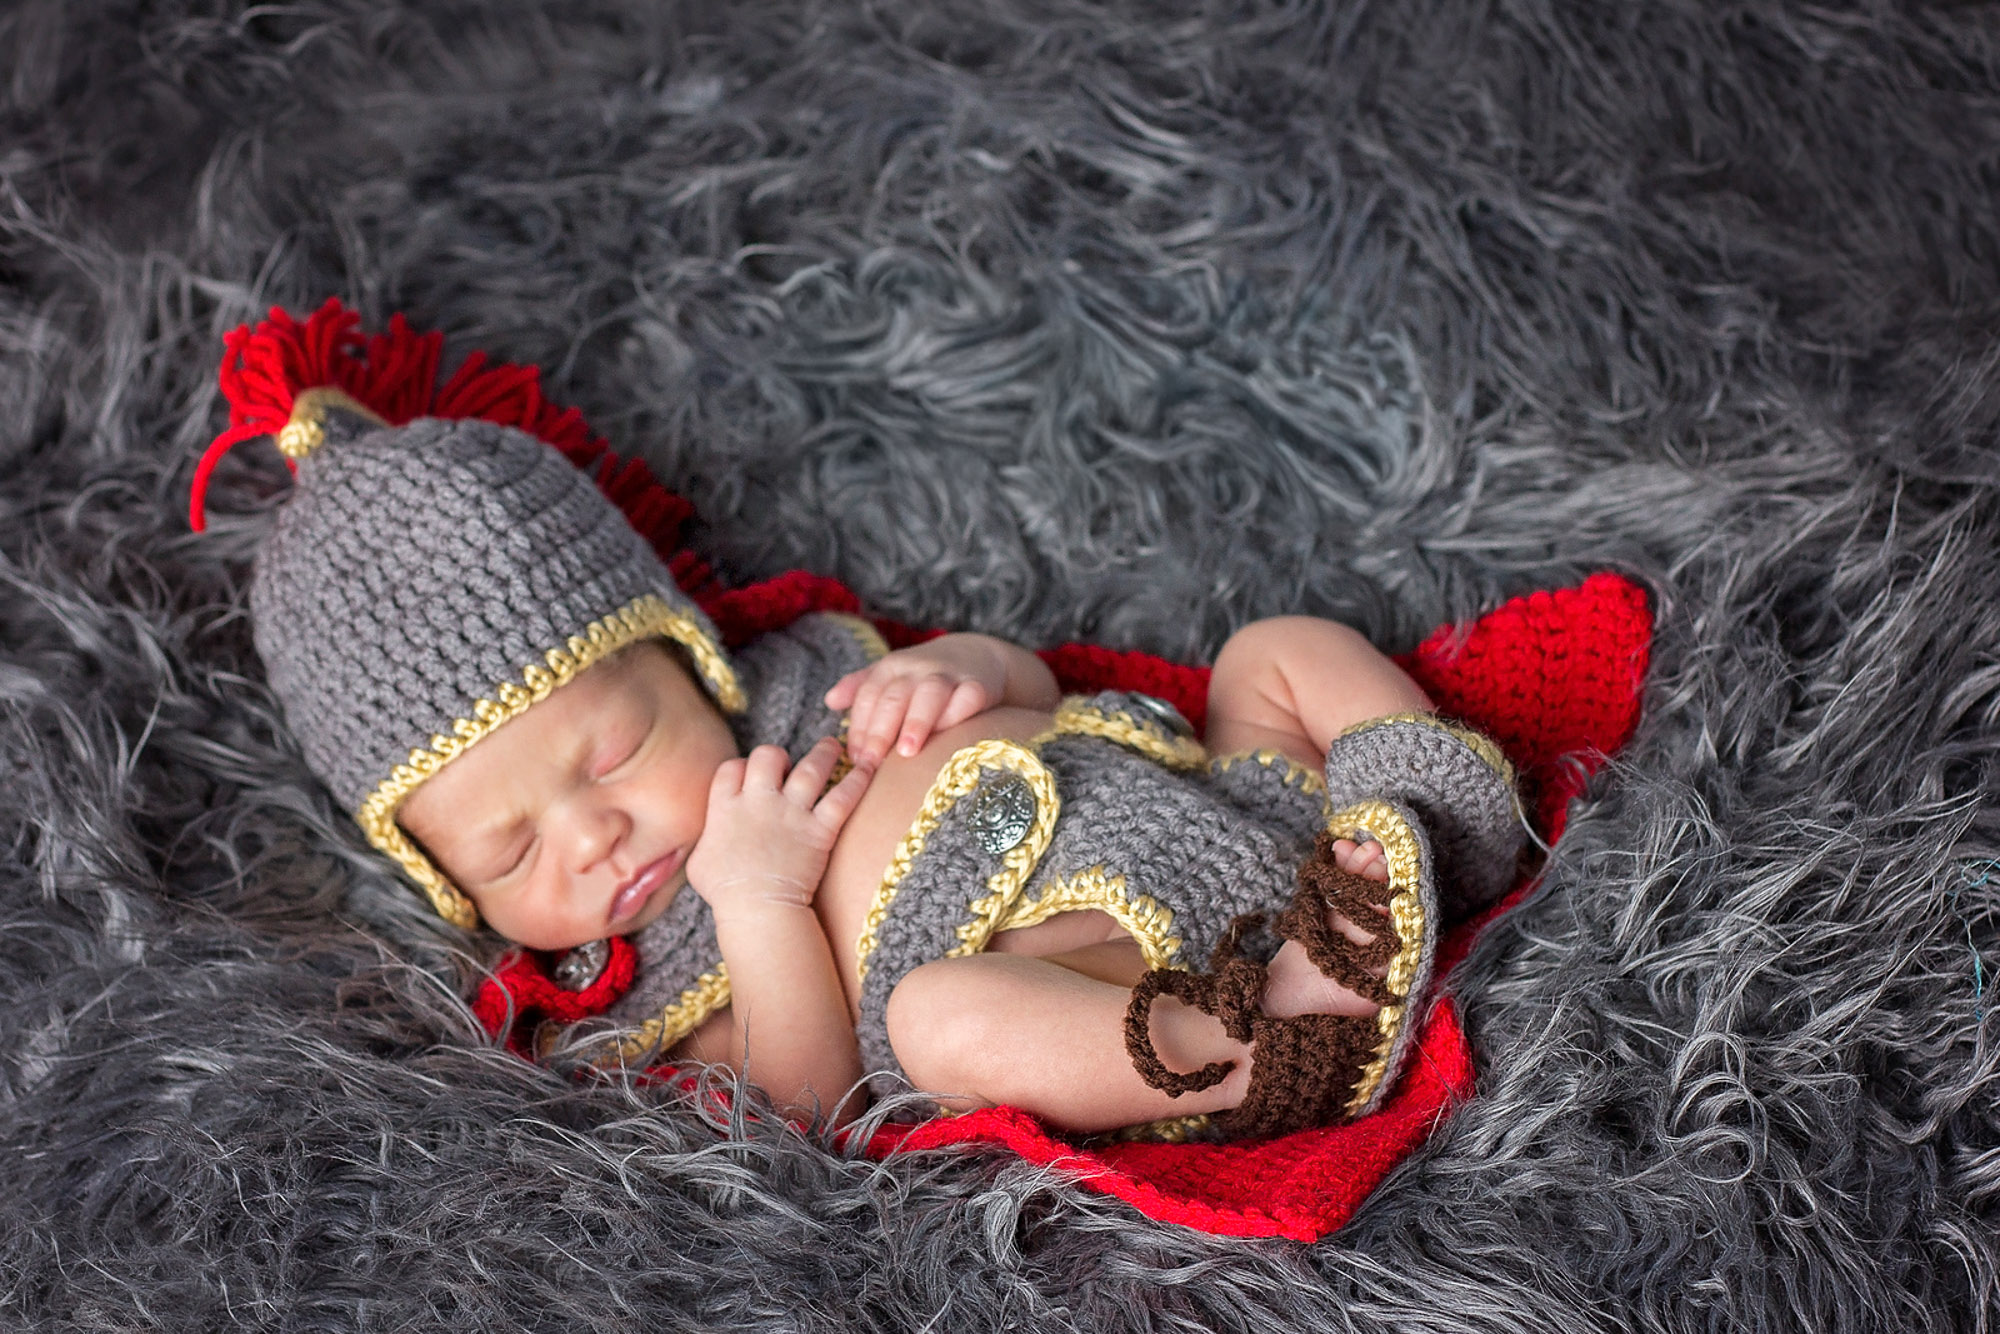
You can see it in the helmet. That dense, slightly bumpy texture with the visible little V’s stacked in rows is double crochet, and it’s structural in a way knit fabric usually isn’t. It’s what lets a helmet that small hold its shape instead of flopping. Same with the diaper cover. The ribbing that made everyone say “is that a little diaper” is worked in front- and back-loop only, a crochet technique with no real knit equivalent.
So: crochet. One hook. If you learned from a grandmother who called everything knitting, you’re in good company, and she was probably crocheting too.
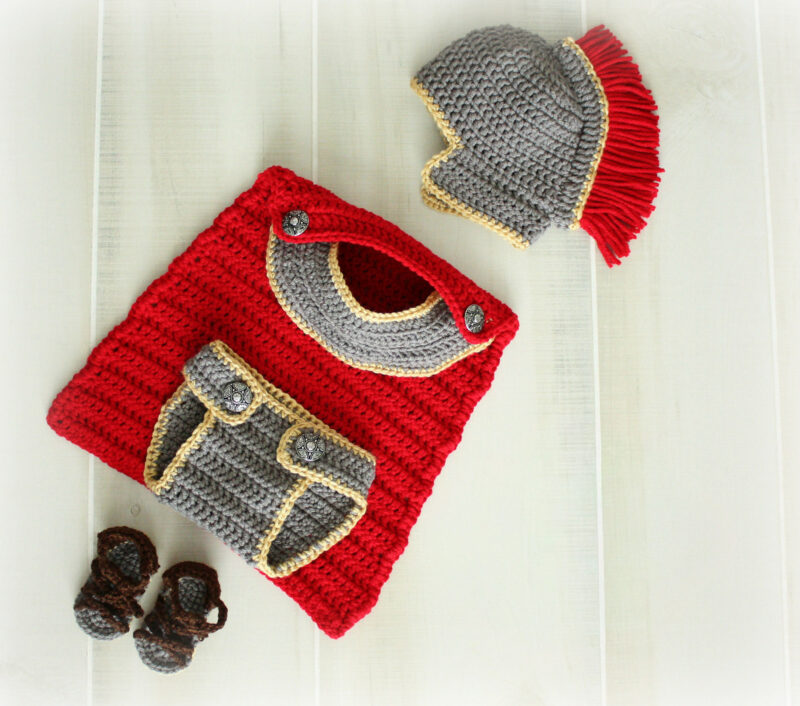
Odyssey Gladiator Pattern Supplies
Yarn
Any Worsted Weight Acrylic
Sample uses:
Red Heart With Love (Pewter, Holly Berry)
Red Heart Super Saver (Chocolate)
Caron Simply Soft (Autumn Maize)
Yarn Quantities
Grey: 105-125 yds
Red: 95-115 yds
Gold: 30-40 yds
Brown: 20-30 yds
Crochet Hook
Size US H (5.0mm) Crochet Hook or hook to obtain gauge; used throughout unless otherwise noted.
F (3.75mm) for sandals only.
Notions
Scissors
Yarn Needle
Removable Stitch Marker
4 buttons, 23 mm (approx. 7/8″)
Be sure to check out the full pattern tips below
Yarn Substitutions
These are the worsteds I actually reach for. Any of them will work here, and all four colors are available in each.
Herrschners Worsted 8 (100% Acrylic, 364yds/226g, #4 Worsted Weight)
Mary Maxim Maximum Value (100% Acrylic, 474yds/227g, #4 Worsted Weight)
Herrschners Supreme Worsted (100% Acrylic, 169yds/100g, #4 Worsted Weight).
Crochet.com Brava Worsted (100% Acrylic, 218yds/100g, #4 Worsted Weight).
Remember always to check the gauge and drape when substituting yarns.
Skill Level
Advanced Beginner/Intermediate
Sizing & Finished Measurements
| Piece | Measurement |
| Helmet circumference | approx. 13¼” |
| Helmet height (crown to edge) | approx. 6″ |
| Cape width at neck | approx. 8½” |
| Cape width at hem | approx. 12½” |
| Cape length | approx. 16¾” |
| Neck cuff length | approx. 8½” |
| Diaper cover waist (front panel) | approx. 14″ |
| Sandal sole length | approx. 3½” |
Abbreviations
blo – back loop only
ch – chain
dc – double crochet
dc2tog – double crochet 2 stitches together
flo – front loop only
hdc – half double crochet
MC – Magic Circle
Rnd – round
RS/WS – Right Side/Wrong Side
sc – single crochet
sc2tog – single crochet 2 stitches together
sl st – slip stitch
st(s) – stitch(es)
Stsc – stacked single crochet
Gauge
13 dc and 6.5 rows = 4″ x 4″ using the 5.0 mm (H) hook.
Tips
How to Crochet A Gauge Swatch
- Working a gauge swatch will let you know if you will have the correct sizing for this pattern. It will also help you practice the stitches used in this project and improve your stitch work for a flawless look.
- Are you struggling to match the gauge? Check out the blog post on What is Crochet Gauge and How To Fix It
Special Stitches Used in This Pattern
Stsc (Stacked Single Crochet): Insert hook into the first st, yo and pull up a loop, yo and pull through both loops on hook (one sc made). Insert hook into the vertical bar at the left side of the sc just made, yo and pull up a loop, yo and pull through both loops on hook. Counts as 1 dc.
Place a stitch marker in the Stsc to mark the first st of the row.
Tutorial: https://brianakdesigns.com/stacked-single-crochet/

Important Pattern Notes
How the Odyssey Gladiator Set is Made
Five pieces, worked separately, assembled at the end. Nothing here is worked in one clever seamless go, and that’s on purpose. Small pieces mean you can finish one in an evening and put the project down without losing your place.
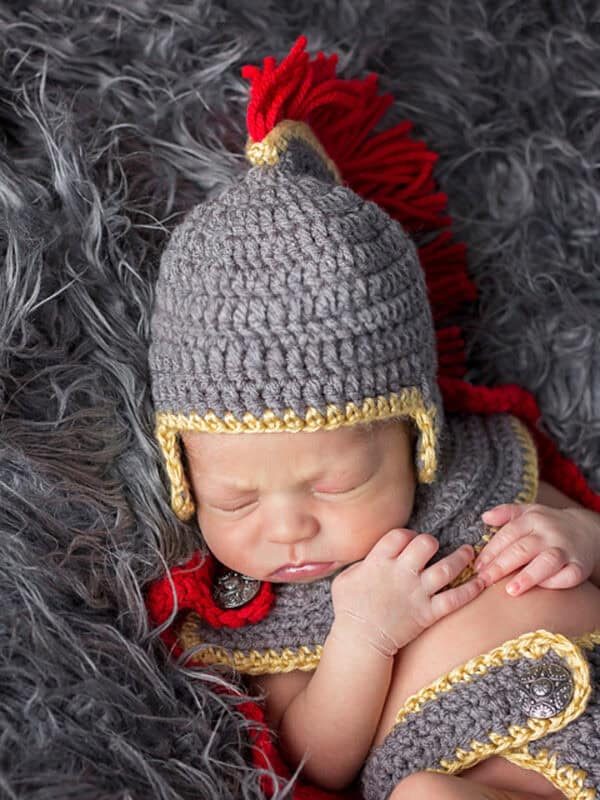
The helmet. The red mane is individually knotted strands, not a crocheted strip. Every single one is a lark’s head knot tied through the base by hand, and I alternate three strands, then two, three, then two, all the way down. Three every time is too bulky. Two every time looks thin. It took me a few tries to land on that.
The cape. The piece Hathaway pulled out first, which tracks, because it’s the one that reads as a costume from across a room. It’s worked flat from the neck down with increases every four rows, so it widens as it goes. Simple rows, and the shaping does the work.
The neck cuff. Buttons to the cape at both top corners. This is the piece that makes the set look finished rather than homemade, and it’s the one people skip. Don’t skip it.
The diaper cover. The one she held up when she asked who made it. It’s the fiddliest piece in the set, and if you’re going to lose your patience anywhere, it’s here.
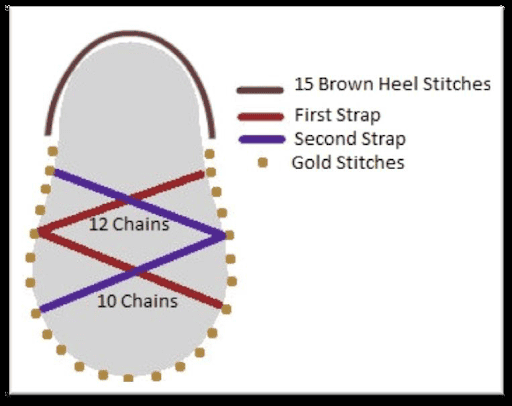
The sandals. Worked on a smaller hook than everything else, which is the thing I’d tell you before you start. Grab the F hook, not the H. The straps are chains slip stitched across the sole in a crisscross, and there’s a diagram in the pattern because describing it in words is a nightmare.
Odyssey Gladiator Baby Outfit FAQs
Is this the exact outfit Anne Hathaway was given on TODAY?
Yes, with one clarification. The set in the basket was made by Bit of Whimsy Crochet, and it’s her work, her yarn, and her hours. What she used was my pattern, the Greek/Roman/Spartan Newborn Outfit, which I published in 2014, and she’s been making in her shop for years. So if you make this pattern, you’ll end up with the same set. It won’t be the same object, and that distinction matters, because the thing that made Hathaway tear up was somebody’s handmade work, not a PDF.
Is it crochet or knitting?
Crochet. Several outlets have called it knit, which is an easy mistake if you don’t do either. Crochet uses one hook and finishes each stitch before moving on. Knitting uses two needles and holds a whole row of live loops at once. The fabric looks different as a result, and you can see it clearly in the helmet, where the stacked V-shapes of double crochet do the structural work that keeps a newborn-sized cap from collapsing.
Can I sell the finished set?
Yes. You’re welcome to sell anything you make from my patterns, and a link back to my shop when you list or share it is appreciated. What you can’t do is copy, share, resell, or redistribute the pattern itself, and you can’t use my pattern photos to advertise your own listing. That’s the whole rule, and Bit of Whimsy is a good example of it working exactly the way it should.
Do I need to match the gauge?
Yes, more than usual. Gauge is 13 dc and 6.5 rows over 4 inches with the 5.0 mm hook. A newborn set has no ease built into it, so there’s nowhere for a size difference to hide. If your helmet runs an inch big, it doesn’t sit right, and it shows in every photo. Work a swatch, and if you’re off, change your hook rather than trying to crochet tighter or looser than is natural for you.
What’s a stacked single crochet, and can I just chain 2 instead?
You can, and I’d rather you didn’t. The stacked single crochet is two single crochets worked on top of each other, standing in for the turning chain at the start of every dc row and round. A chain 2 leaves a gap. Multiply that by the cape’s 28 rows, and you get 28 little holes running down the edge. The Stsc is a solid stitch, so the edge closes up. It takes about five minutes to learn, and you’ll use it forever after.
How long does the full set take?
Around 8 to 12 hours for all five pieces, depending on how fast you work and how much of it you do while watching something. The pieces are small, so it doesn’t feel like 12 hours. The helmet, neck cuff, and sandals are an evening each. The cape is 28 rows of straight double crochet and goes fast. The slow parts are the mane fringe, which is 58 individually knotted strands, and the assembly.
Can I make this for a girl?
Yes, and I do. Swap the red for pink, cut your fringe strands longer, and don’t trim them after they’re knotted on. You end up with a long flowing mane instead of a cropped Roman crest, and it reads completely differently. Same pattern, no changes to the stitch counts.
What if I can’t find the exact yarns?
Use whatever worsted weight is in your stash. This is a photo prop set for a newborn who will wear it for about eleven minutes, so it doesn’t need to be soft against skin for hours or survive fifty washes. Any acrylic worsted in grey, red, brown, and gold will get you there. The only thing that matters is that all four colors are the same weight, so your gauge stays consistent across the pieces.
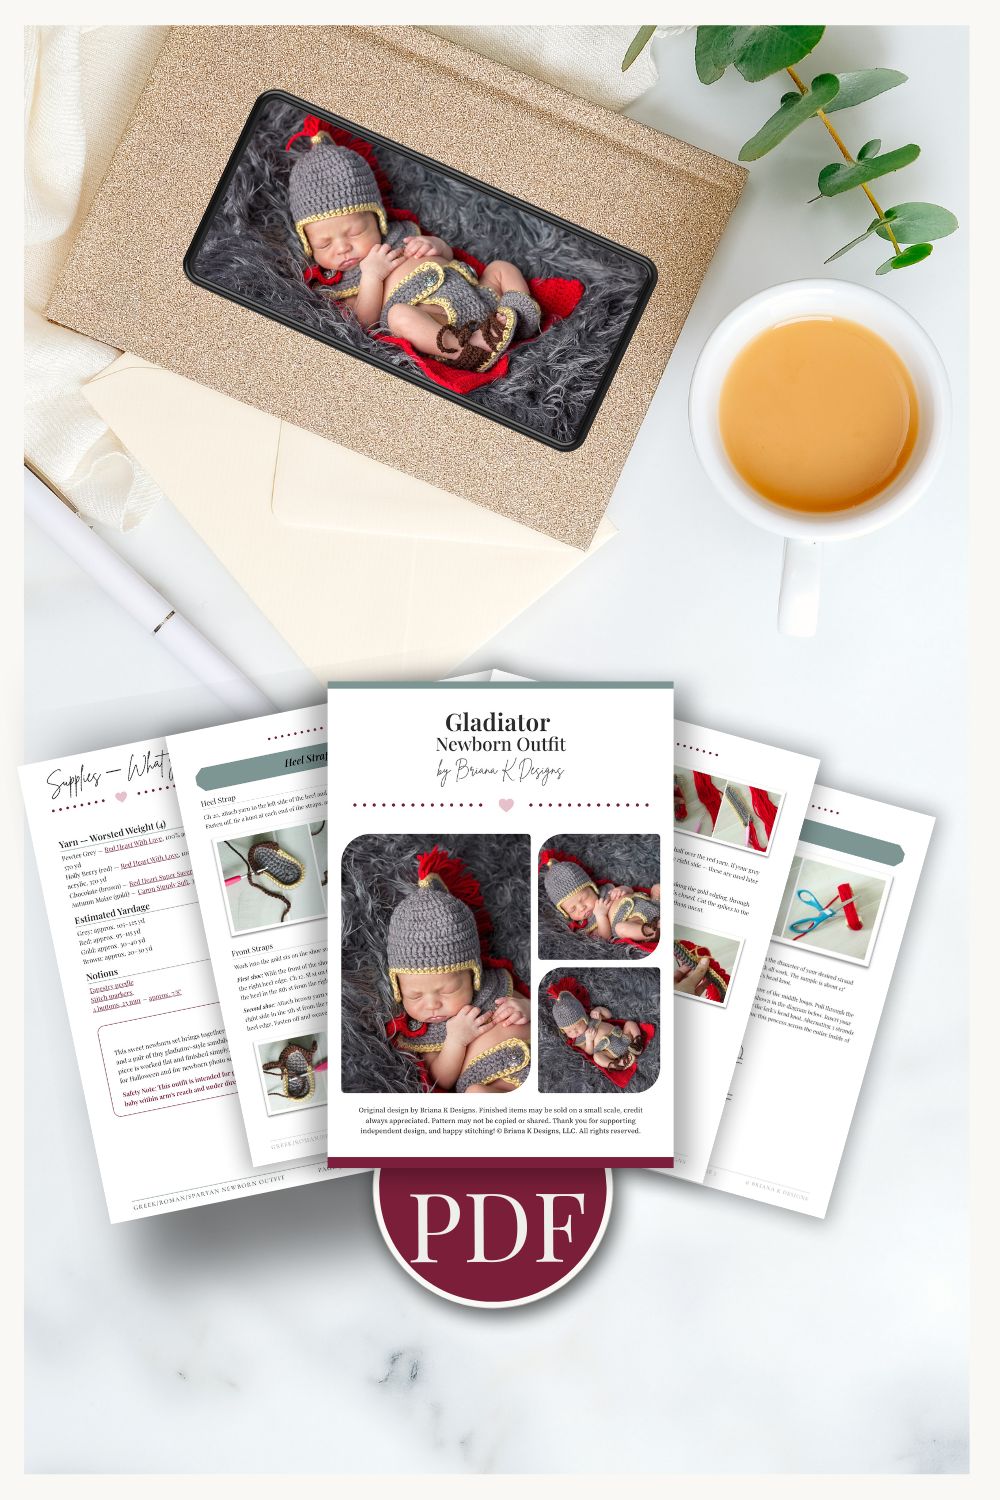
Relax & Crochet with NO Ads
Upgrade to the Printable PDF
Beautifully formatted to print and take with you anywhere. The paid pattern includes:
Add your email in the box below to unlock this pattern to view on the blog for free. I’m thrilled to share this amazing crochet pattern with you! Please don’t copy, paste, or distribute this pattern. Prefer an ad-free experience? Purchase a digital PDF file for a small fee from one of my online stores. I appreciate your support and readership. You are why I can keep doing what I love and sharing it with others. Thank you from the bottom of my heart.
Printable Version
This pattern is free to read here on the blog. The ad-free printable PDF is available in the Briana K Designs shop on Etsy and Ravelry.
brianakdesigns.com
Newborn Odyssey Gladiator Outfit Written Pattern
Rnds 5–9: Stsc in the first st, dc in each remaining st around, join. | 44 sts
Row 10: If you have a seam you would like to hide, fasten off and weave in ends. Count over 14 sts from your seam and re-attach yarn. Stsc in the first st, dc in same st, dc in next 26 sts, 2 dc in last st, turn. | 30 sts
Row 11: Stsc in the first st, dc in same st, dc in next 28 sts, 2 dc in last st, turn. | 32 sts
Row 12: Stsc in the first st, dc in same st, dc in next 30 sts, 2 dc in last st. | 34 sts
Finishing Round: Attach gold yarn and sc around the opening of the helmet. Fasten off and weave in ends.
Helmet Spike
With grey yarn:
Rnd 1: Ch 25, Stsc in the first ch from hook, dc in next 23 ch. Work 3 dc in the last ch, then work around the other side: dc in next 23 ch, 2 dc in last ch (this is also where your Stsc sits on the round). Sl st to join and change to gold yarn. | 52 sts
Rnd 2: Sc in each st around, join and fasten off, leaving a long tail for assembly. | 52 sts
Fringe
Cut approx. 58 strands of red yarn. Wrap the yarn around an object with the diameter of your desired strand length, then cut once — a phone, a coffee mug, or a child’s building block all work. The sample is about 12″ wrapped the long way. You need enough length to comfortably tie a lark’s head knot.
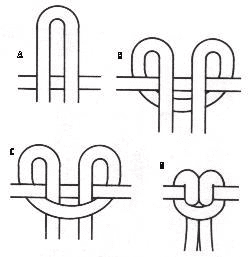
With the wrong side of the spike base facing you, insert your hook into one of the middle loops. Pull through the middle of 3 strands of red yarn and complete a lark’s head knot. Insert your hook into the next middle loop, pull through 2 strands, and complete the lark’s head knot. Alternating 3 strands and then 2 keeps the spike from becoming too bulky or too thin. Continue across the entire inside of the spike.
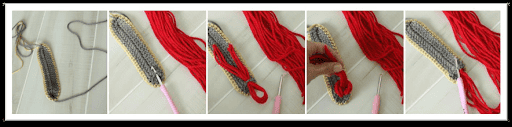
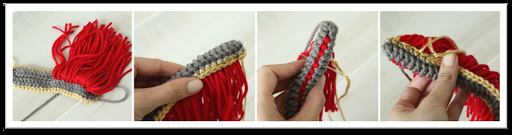
Once the red yarn is attached, fold the grey spike base in half over the red yarn. If your grey strands are hanging out from the wrong side of the spike base, pull them to the right side — these are used later to attach the spike to the helmet.
Using your tapestry needle and gold yarn, stitch the spike base closed by sewing along the gold edging, through the spike base to the other side. Continue all the way down the spike base until it is closed.
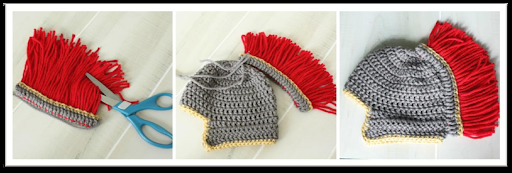
Cut the spikes to the desired length. For a girl, substitute pink for red, use longer strands, and leave them uncut.
Attaching the Spike to the Helmet
Lay the helmet flat with the face opening facing you and identify the center line running from the crown (the magic circle) down the back to the edging. This is your seam line.
Position the folded spike base along that center line, with the gold edge of the spike base sitting against the helmet and the fringe standing up. The front tip of the spike base should sit just behind the crown; the back of the spike base should reach the bottom edging.
Using the grey strands you pulled to the right side, thread your tapestry needle and sew the spike base to the helmet, working down the center line. Take a stitch through the edging of the spike base and into the helmet fabric, spacing your stitches every st or two so the spike sits upright and does not lean to either side. Continue until the entire base is secured from crown to edging. Fasten off and weave the ends into the inside of the helmet.
Join The Kindest Community
Join our vibrant community of crafters on Facebook today. Whether you enjoy crafting with others or simply have burning questions, we’ve got you covered – join us now!
Cape
Turn at the end of each row.
With red yarn:
Row 1: Ch 28, Stsc in the first ch from hook, dc in each remaining ch across. | 28 sts
Rows 2–3: Stsc in the first st, dc in each remaining st across. | 28 sts
Row 4: Stsc in the first st, dc in same st, dc in next 26 sts, 2 dc in last st. | 30 sts
Rows 5–7: Stsc in the first st, dc in each remaining st across. | 30 sts
Row 8: Stsc in the first st, dc in same st, dc in next 28 sts, 2 dc in last st. | 32 sts
Rows 9–11: Stsc in the first st, dc in each remaining st across. | 32 sts
Row 12: Stsc in the first st, dc in same st, dc in next 30 sts, 2 dc in last st. | 34 sts
Rows 13–15: Stsc in the first st, dc in each remaining st across. | 34 sts
Row 16: Stsc in the first st, dc in same st, dc in next 32 sts, 2 dc in last st. | 36 sts
Rows 17–19: Stsc in the first st, dc in each remaining st across. | 36 sts
Row 20: Stsc in the first st, dc in same st, dc in next 34 sts, 2 dc in last st. | 38 sts
Rows 21–23: Stsc in the first st, dc in each remaining st across. | 38 sts
Row 24: Stsc in the first st, dc in same st, dc in next 36 sts, 2 dc in last st. | 40 sts
Edging: Sc around the entire cape, adding 2 extra sc at each corner. Fasten off and weave in ends.
Ends on Row 28 with 42 sts.
Neck Cuff
Turn at the end of each row.
With grey yarn:
Row 1: Ch 28, stsc in first ch, hdc in each remaining st ch across. | 28 sts
Row 2: Ch 1, working in flo, [2 hdc in first st, hdc in next 6 sts] across. | 32 sts
Row 3: Ch 1, working in blo, [2 hdc in first st, hdc in next 7 sts] across. | 36 sts
Row 4: Ch 1, working in flo, [2 hdc in first st, hdc in next 8 sts] across. Change to gold yarn. | 40 sts
Edging: Sc around the neck cuff, adding 2 extra sts at each corner. Fasten off. Use the ends to sew a button to each side of the neck cuff. The buttons pass directly through the dc fabric at the top corners of the cape — no buttonholes are worked. Button the neck cuff to the cape through those corners.
Ends on Row 4 with 40 sts.
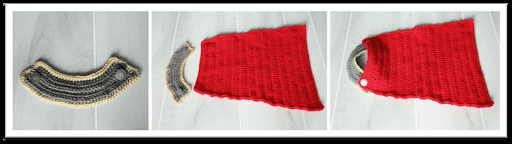
Diaper Cover
Turn at the end of each row.
With grey yarn:
Row 1: Ch 47, sc in 2nd ch from hook and in each ch across, turn. | 46 sts
Row 2: Stsc in the first st, dc in each remaining st across, turn. | 46 sts
Row 3: Ch 1, sc in each st across, turn. | 46 sts
Row 4: Ch 1, sl st in first 12 sts, Stsc in next st, dc in the next 23 sts, turn. | 24 sts (not counting the sl sts)
Row 5: Ch 1, sc in each st across, turn. | 24 sts
Row 6: Stsc in the first st, dc in each remaining st across, turn. | 24 sts
Row 7: Ch 1, sc in each st across, turn. | 24 sts
Row 8: Stsc in the first st, dc2tog over next 2 sts, dc in next 18 sts, dc2tog, dc in last, turn. | 22 sts
Row 9: Ch 1, sc in each st across, turn. | 22 sts
Row 10: Stsc in the first st, dc2tog over next 2 sts, dc in next 16 sts, dc2tog, dc in last, turn. | 20 sts
Row 11: Ch 1, sc in each st across, turn. | 20 sts
Row 12: Stsc in the first st, dc2tog over next 2 sts, dc in next 14 sts, dc2tog, dc in last, turn. | 18 sts
Row 13: Ch 1, sc2tog, sc in next 14 sts, sc2tog, turn. | 16 sts
Row 14: Stsc in the first st, dc2tog over next 2 sts, dc in next 10 sts, dc2tog, dc in last, turn. | 14 sts
Row 15: Ch 1, sc2tog, sc in next 10 sts, sc2tog, turn. | 12 sts
Row 16: Stsc in the first st, dc in each remaining st across, turn. | 12 sts
Row 17: Ch 1, sc in each st across, turn. | 12 sts
Rows 18–23: Repeat Rows 16 and 17 three more times. | 12 sts
Row 24: Stsc in the first st, dc in same st, dc in next 10 sts, 2 dc in last st, turn. | 14 sts
Row 25: Ch 1, sc in each st across, turn. | 14 sts
Row 26: Stsc in the first st, dc in same st, dc in next 12 sts, 2 dc in last st. Change to gold yarn. | 16 sts
Edging: Sc evenly around the diaper cover, adding 2 sts at each corner. Join with the first st and fasten off. Weave in ends. Attach 2 buttons to the front of the diaper cover. The buttons pass directly through the dc fabric, no buttonholes are worked.
Ends on Row 26 with 16 sts.
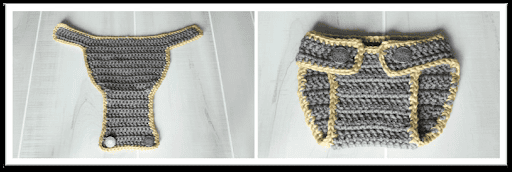
Shoe Sole (make 2)
Worked in continuous rounds. Use a stitch marker if needed.
With grey yarn and the 3.75 mm (F) hook:
Rnd 1: Ch 9, 2 sc in 2nd ch from hook, sc in next 4 ch, hdc in next 2 ch, 8 hdc in the last ch, then work around the other side: hdc in next 2 ch, sc in next 4 ch, 2 sc in the last ch. | 24 sts
Rnd 2: 2 sc in each of the first 2 sts, sc in next 7 sts, 2 sc in each of the next 6 sts, sc in next 7 sts, 2 sc in each of the last 2 sts. | 34 sts
Rnd 3: Sc in first 2 sts, 2 sc in next st, sc in next 10 sts, 2 sc in each of the next 2 sts, sc in next 4 sts, 2 sc in each of the next 2 sts, sc in next 10 sts, 2 sc in next st, sc in last 2 sts. Change to gold yarn. | 40 sts
Rnd 4: Working in flo, sc in each st around. Fasten off and weave in ends. | 40 sts
Heel
Turn at the end of each row.
With brown yarn and the 3.75 mm (F) hook:
Row 1: With the sole right side up and the heel end (the narrow, rounded end) facing you, attach brown yarn to the gold Rnd 4 of the sole. Working through both loops of the gold sts of Rnd 4, hdc in the 15 sts centered across the back of the heel. Turn. | 15 sts
Row 2: Ch 1, hdc in each st across, turn. | 15 sts
Row 3: Ch 1, hdc in each st across. Fasten off and weave in ends. | 15 sts
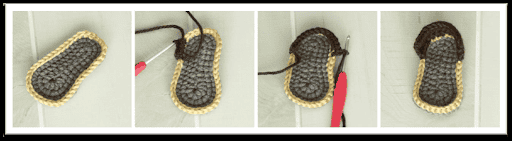
Heel Strap
Ch 20, attach yarn to the left side of the heel and sc 15 across the top of the heel (the 15 hdc sts of Row 3), ch 20. Fasten off, tie a knot at each end of the straps, and trim the extra yarn.
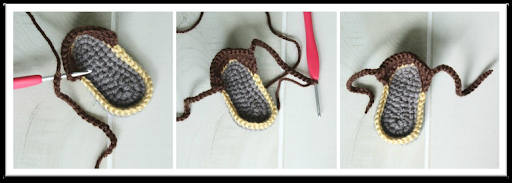
Front Straps
Work into the gold sts on the shoe sole. Refer to the photos and diagram.
First shoe: With the front of the shoe facing you, attach brown yarn with a sl st to the right side in the 2nd st from the right heel edge. Ch 12. Sl st on the left side of the shoe in the 5th st from the left heel edge. Ch 10. Sl st on the right side of the heel in the 8th st from the right heel edge. Fasten off and weave in ends. (To weave in ends, move the yarn through the shoe to the bottom of the sole and weave in underneath.)
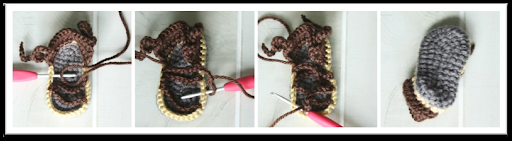
Second shoe: Attach brown yarn with a sl st to the left side in the 2nd st from the left heel edge. Ch 12. Sl st on the right side of the shoe in the 5th st from the right heel edge. Ch 10. Sl st on the left side of the shoe in the 8th st from the left heel edge. Fasten off and weave in ends.
The full pattern is free right here on the blog, ads and all, keeping it that way. If you would like a cleaner experience, you can grab the ad-free PDF: on Etsy, or on Ravelry.
If you’d rather have the finished set than make it yourself, Bit of Whimsy Crochet makes them in her shop. She’s the one who made the set in the basket.
Please feel free to sell any of the items you make from this pattern. Do not copy, distribute, share, or sell the pattern as your own. If you have come across this pattern without paying for it or receiving it directly from one of my selling sites, then it is stolen. You may not use the images contained in this pattern to sell or advertise your product. If you share, advertise, or sell your finished product, please link back to my shop.
More Crochet Patterns You’ll Love
If you came here for the Hathaway story and stayed for the crochet, the top 10 crochet baby outfit patterns roundup is where I’d send you next. And to these, too:
🥂 Cheers, and happy crocheting!
Hook down? Not so fast…
I’d Love to See Yours!
You made something beautiful. Here’s how to keep it, show it off, and inspire the next maker.

What should you make next?
Keep the hook movingReaders Are Loving
 Willow Mesh Bag
 Crochet Book Cover
 Tunisian Simple
 Witch Hat