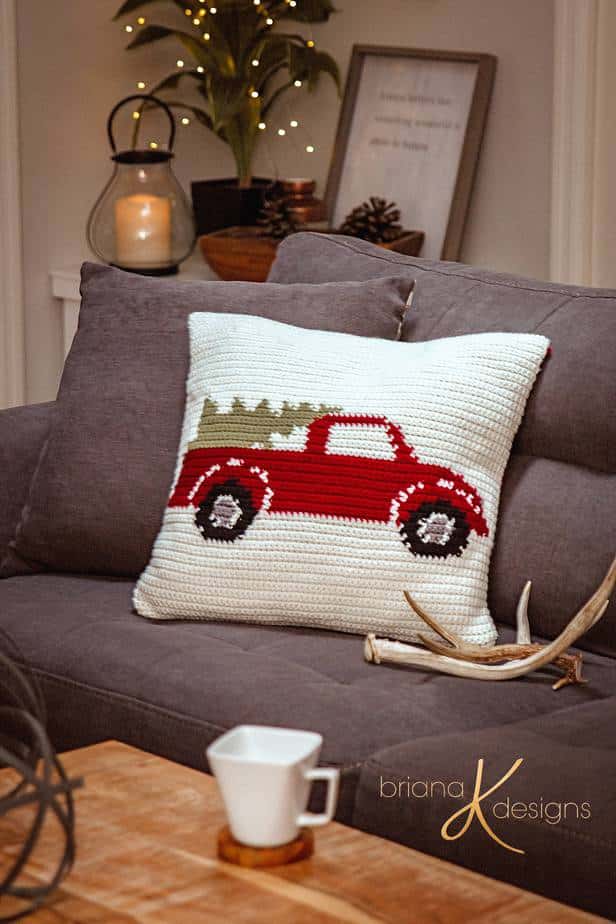
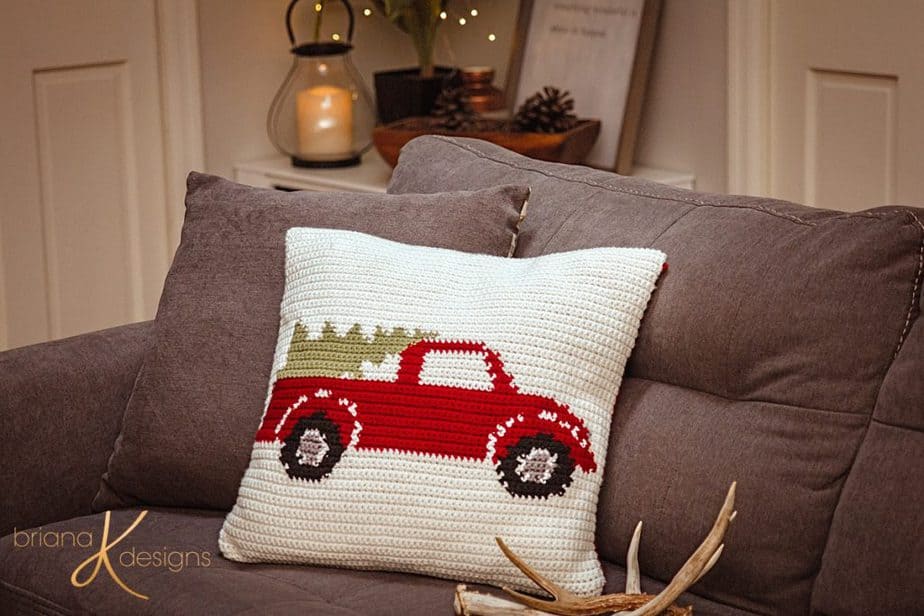
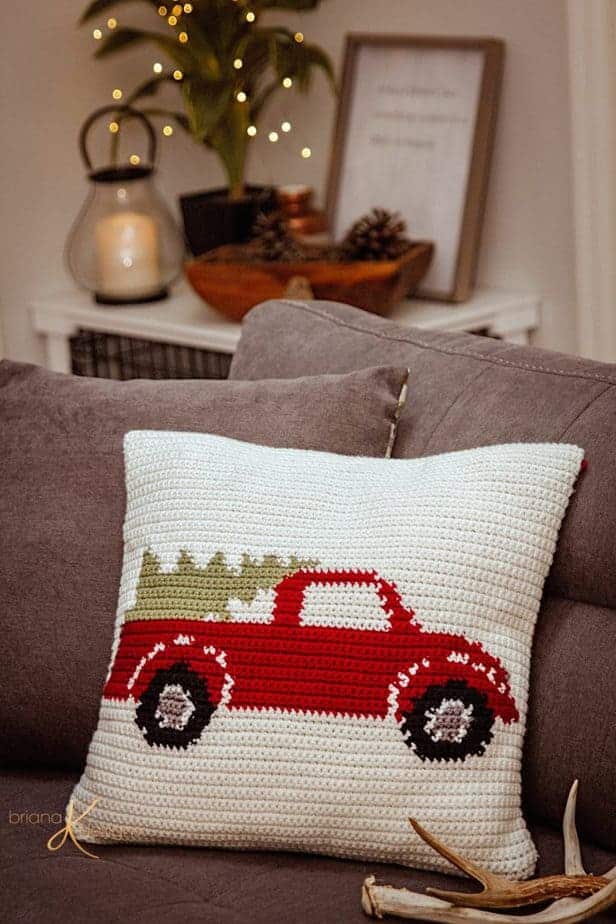
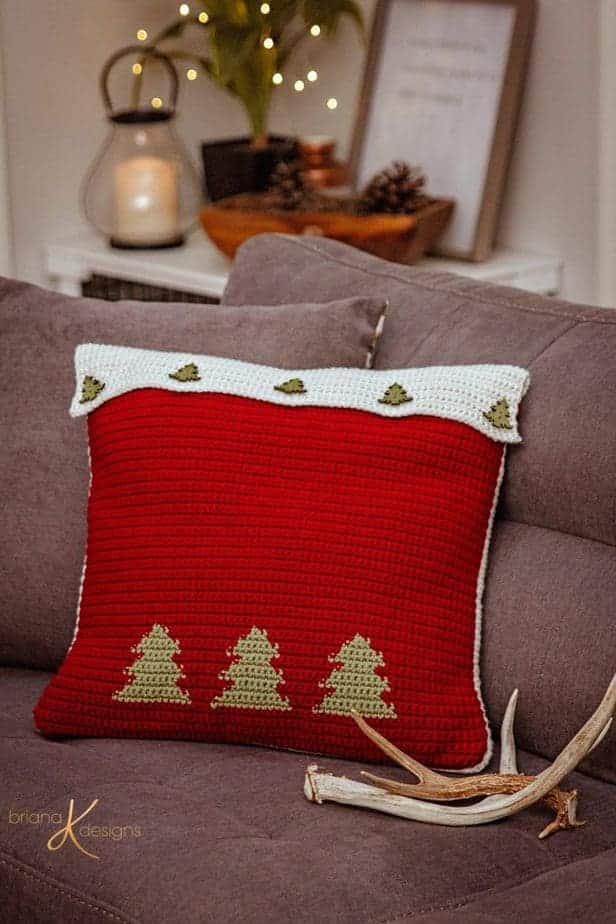
Don’t you just love the iconic holiday decor? Who can resist a farmhouse style pillow cheerily displayed on the sofa? The Farmhouse Truck Crochet Pillow just gives off all the holiday smile feel goods. (The Thankful Crochet Table Runner is a similar example for Thanksgiving / Fall.)
Disclosure: This post contains affiliate links. Please read my disclosure for more info.
And there is also a special cross stitch bonus at the bottom of this post. If you enjoy embroidery and would like to work this up as a cross stitch home decor, the charts are below.
Looking for the Knit Version?
If you love your knitting needles, check out the Farmhouse Truck Knit Pillow Pattern.
One of my favorite holiday traditions is decorating sugar cookies. Especially now that I have little ones there is something magical about the smells of sugar, sprinkles & love in the room. One of my boys favorite cookie cutters is the truck. It’s not only fun to eat but to also play with. So the second I had this pillow whipped up they were so excited to have it on the couch. Holiday decor can bring a house warmth and holiday cheer.
I hope you really enjoy not only working up this pattern but adding beautiful hand made decor to your home. I love being able to bring you awesome crochet content, will you please help keep this possible? Pinning this post, sharing with friends, and favoriting on Ravelry is a great way to say thanks.
Are you ready to jump right in and crochet? Before you get started, take a moment to hop on over to learn Ways to Colorwork in Crochet. Learn about the different ways to do crochet color-work but also for a freebie!
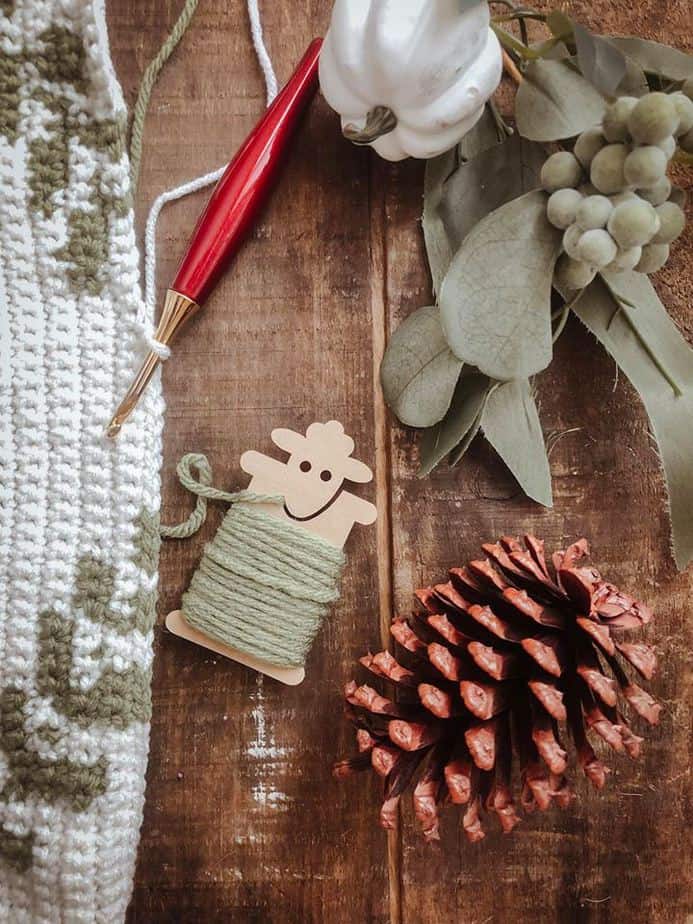
The printable Sheep Yarn Bobbins are super helpful and also cute. You can even cut them out on a cutting machine!
Craft An Easy Granny Square Snowflake Blanket With This Free Pattern
Free Colorwork Holiday Stocking Pattern to Create Your Own Style
Farmhouse Truck Crochet Pillow Supplies
Crochet Hook:
Crochet Hook 5 mm (H), or hook to obtain gauge
Notions:
1 inch (2.5 cm) Buttons (5 needed)
Yarn Needle
Scissors
18×18 inch pillow (link below)
Yarn:
Red Heart With Love in the following colorways: (affiliate link)
Eggshell (white) 1 skein
Lettuce (green) 1 skein
Pewter (grey) small amount
Holly Berry (red) 1 skein
Black small amount
Yardage:
680 yards total (622 meters)
Abbreviations/Stitches:
ch – chain
sc – single crochet
Gauge:
15 single crochet sts x 16 rows = 4 x 4 inches (10 cm x 10 cm)
Measurements/Sizes:
19 inches (48 cm) wide by 18 inches (46 cm) tall
Skill Level:
Advanced Beginner
Farmhouse Truck Crochet Pillow Notes
Gauge: 15 single crochet sts x 16 rows = 4 x 4 inches (10 cm x 10 cm) *Please note, matching gauge both horizontal and vertical can be difficult. Extra rows can be added at the top if needed so it is more important to match the stitch gauge versus the row gauge. This pattern also has some ease to fit over a pillow.*
Finished measurements: 19 inches (48 cm) wide by 18 inches (46 cm) tall
This pattern is worked in rows and in two pieces. The front panel will also work a button hole flap to secure the top of the crochet pillow. The front and the back panels will be slip stitched together once completed.
After the end of each row turn and ch 1. The ch 1 does not count as a stitch.
Since there is a wrong side and a right side to the pillow panels, I used a combination of intarsia and carrying yarn across the back for the color work. Experiment and see what works best for you.
Colorwork Chart Instructions
Click the box below to unlock this exclusive subscriber content for free. Add your email and create a password. If you are having trouble, reset your password or log in to the Grow Portal.
I’m thrilled to share this amazing crochet pattern with you! Please don’t copy, paste, or distribute this pattern. Prefer an ad-free experience? Purchase a digital PDF file for a small fee from one of my online stores. I appreciate your support and readership. You are why I can keep doing what I love and sharing it with others. Thank you from the bottom of my heart.
To begin chain 73 and start the first row in the second chain from hook.
After the end of each row turn and ch 1. The ch 1 does not count as a stitch.
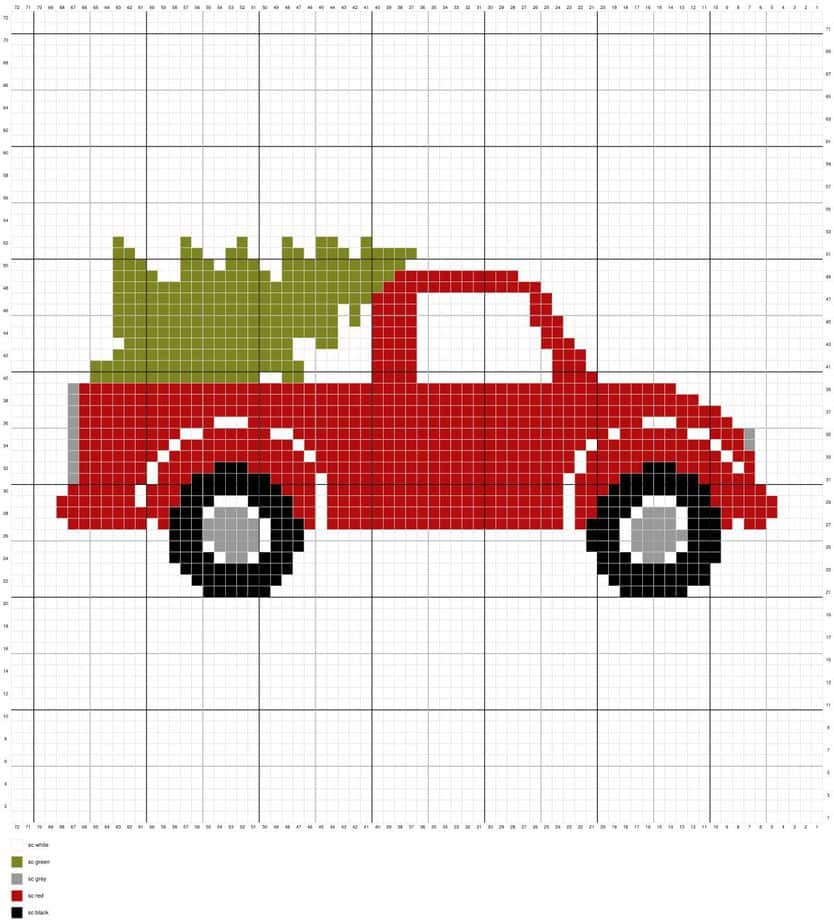
Farmhouse Truck Crochet Pillow Written Instructions
← Row 1 : (sc white) x 72
→ Row 2 : (sc white) x 72
Row 3 through 20: (sc white) x 72
← Row 21 : (sc white) x 12, (sc black) x 6, (sc white) x 31, (sc black) x 6, (sc white) x 17
→ Row 22 : (sc white) x 16, (sc black) x 8, (sc white) x 29, (sc black) x 9, (sc white) x 10
← Row 23 : (sc white) x 10, (sc black) x 10, (sc white) x 27, (sc black) x 10, (sc white) x 15
→ Row 24 : (sc white) x 14, (sc black) x 4, sc white, (sc grey) x 2, sc white, (sc black) x 3, (sc white) x 27, (sc black) x 3, sc white, (sc grey) x 2, sc white, (sc black) x 4, (sc white) x 9
← Row 25 : (sc white) x 9, (sc black) x 3, sc white, (sc grey) x 4, sc white, (sc black) x 3, (sc white) x 25, (sc black) x 3, sc white, (sc grey) x 4, sc white, (sc black) x 3, (sc white) x 14
→ Row 26 : (sc white) x 14, (sc black) x 3, (sc grey) x 5, sc white, (sc black) x 3, (sc white) x 25, (sc black) x 3, sc white, (sc grey) x 5, (sc black) x 3, (sc white) x 9
← Row 27 : (sc white) x 5, (sc red) x 2, sc white, sc red, (sc black) x 3, sc white, (sc grey) x 4, sc white, (sc black) x 3, sc red, sc white, (sc red) x 21, sc white, sc red, (sc black) x 3, sc white, (sc grey) x 5, (sc black) x 3, sc red, sc white, (sc red) x 7, (sc white) x 5
→ Row 28 : (sc white) x 4, (sc red) x 10, (sc black) x 3, sc white, (sc grey) x 3, sc white, (sc black) x 3, (sc red) x 2, sc white, (sc red) x 21, sc white, (sc red) x 2, (sc black) x 3, sc white, (sc grey) x 3, sc white, (sc black) x 3, (sc red) x 5, (sc white) x 4
← Row 29 : (sc white) x 4, (sc red) x 6, (sc black) x 3, (sc white) x 3, (sc black) x 4, (sc red) x 2, sc white, (sc red) x 21, sc white, (sc red) x 2, (sc black) x 4, (sc white) x 3, (sc black) x 3, (sc red) x 3, sc white, (sc red) x 7, (sc white) x 4
→ Row 30 : (sc white) x 5, (sc red) x 6, sc white, (sc red) x 3, (sc black) x 9, (sc red) x 3, sc white, (sc red) x 21, sc white, (sc red) x 3, (sc black) x 9, (sc red) x 5, (sc white) x 5
← Row 31 : (sc white) x 6, (sc red) x 5, (sc black) x 7, (sc red) x 4, sc white, (sc red) x 21, sc white, (sc red) x 4, (sc black) x 7, (sc red) x 3, sc white, (sc red) x 6, sc grey, (sc white) x 5
→ Row 32 : (sc white) x 5, sc grey, (sc red) x 6, sc white, (sc red) x 5, (sc black) x 3, (sc red) x 29, sc white, (sc red) x 5, (sc black) x 3, (sc red) x 5, sc white, sc red, (sc white) x 6
← Row 33 : (sc white) x 6, (sc red) x 2, sc white, (sc red) x 12, sc white, (sc red) x 23, sc white, (sc red) x 12, sc white, (sc red) x 7, sc grey, (sc white) x 5
→ Row 34 : (sc white) x 5, sc grey, (sc red) x 8, sc white, (sc red) x 10, sc white, (sc red) x 25, sc white, (sc red) x 10, sc white, (sc red) x 2, sc grey, (sc white) x 6
← Row 35 : (sc white) x 6, sc grey, (sc red) x 3, (sc white) x 2, (sc red) x 6, sc white, (sc red) x 28, (sc white) x 2, (sc red) x 6, (sc white) x 2, (sc red) x 9, sc grey, (sc white) x 5
→ Row 36 : (sc white) x 5, sc grey, (sc red) x 12, (sc white) x 3, (sc red) x 35, (sc white) x 3, (sc red) x 5, (sc white) x 8
← Row 37 : (sc white) x 9, (sc red) x 57, sc grey, (sc white) x 5
→ Row 38 : (sc white) x 5, sc grey, (sc red) x 55, (sc white) x 11
← Row 39 : (sc white) x 13, (sc red) x 53, sc grey, (sc white) x 5
→ Row 40 : (sc white) x 7, (sc green) x 15, (sc white) x 2, (sc green) x 2, (sc white) x 6, (sc red) x 4, (sc white) x 12, (sc red) x 4, (sc white) x 20
← Row 41 : (sc white) x 21, (sc red) x 3, (sc white) x 12, (sc red) x 4, (sc white) x 6, (sc green) x 19, (sc white) x 7
→ Row 42 : (sc white) x 9, (sc green) x 16, (sc white) x 7, (sc red) x 4, (sc white) x 12, (sc red) x 3, (sc white) x 21
← Row 43 : (sc white) x 22, (sc red) x 3, (sc white) x 11, (sc red) x 4, (sc white) x 3, (sc green) x 2, (sc white) x 2, (sc green) x 15, (sc white) x 10
→ Row 44 : (sc white) x 9, (sc green) x 20, (sc white) x 3, (sc red) x 4, (sc white) x 11, (sc red) x 2, (sc white) x 23
← Row 45 : (sc white) x 23, (sc red) x 3, (sc white) x 10, (sc red) x 4, sc white, sc green, sc white, (sc green) x 20, (sc white) x 9
→ Row 46 : (sc white) x 9, (sc green) x 20, sc white, sc green, sc white, (sc red) x 4, (sc white) x 10, (sc red) x 2, (sc white) x 24
← Row 47 : (sc white) x 24, (sc red) x 2, (sc white) x 10, (sc red) x 4, (sc green) x 23, (sc white) x 9
→ Row 48 : (sc white) x 9, (sc green) x 24, (sc red) x 14, (sc white) x 25
← Row 49 : (sc white) x 27, (sc red) x 11, (sc green) x 10, sc white, (sc green) x 8, (sc white) x 2, (sc green) x 4, (sc white) x 9
→ Row 50 : (sc white) x 9, (sc green) x 3, (sc white) x 3, (sc green) x 3, sc white, (sc green) x 3, (sc white) x 2, (sc green) x 11, (sc white) x 37
← Row 51 : (sc white) x 36, (sc green) x 5, sc white, (sc green) x 3, sc white, (sc green) x 2, (sc white) x 3, (sc green) x 2, (sc white) x 2, (sc green) x 2, (sc white) x 4, (sc green) x 2, (sc white) x 9
→ Row 52 : (sc white) x 9, sc green, (sc white) x 5, sc green, (sc white) x 4, sc green, (sc white) x 3, sc green, (sc white) x 2, (sc green) x 2, (sc white) x 2, sc green, (sc white) x 40
Row 53 through 72: (sc white) x 72
To Finish Front Panel:
-Continue to sc crochet 15 more rows in white.
-Button row: ch 1, sc 2, *ch 3, skip 3, sc 13: repeat from * until last 3 stitches, sc in last 3, turn
-Continue to singe crochet 3 more rows with white.
-Fasten off and weave in ends.
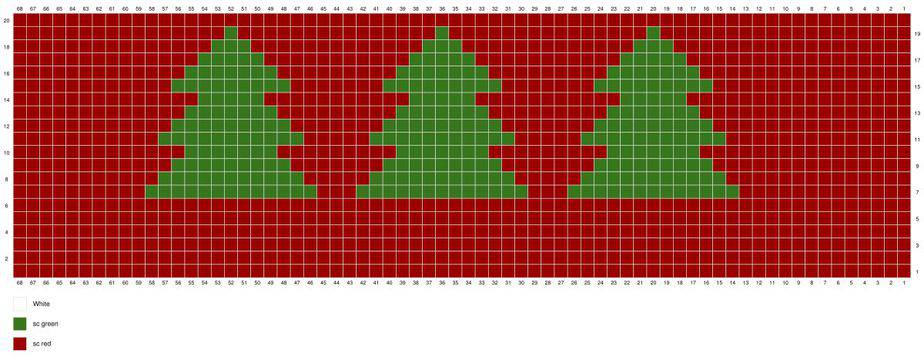
Farmhouse Truck Crochet Pillow Back Panel (visual chart above):
–To begin chain 73 and start the first row in the second chain from hook.
After the end of each row turn and ch 1. The ch 1 does not count as a stitch.
← Row 1 : (sc red) x 72
→ Row 2 : (sc red) x 72
Row 3 through 6: (sc red) x 72
← Row 7 : (sc red) x 15, (sc green) x 13, (sc red) x 3, (sc green) x 13, (sc red) x 3, (sc green) x 13, (sc red) x 12
→ Row 8 : (sc red) x 13, (sc green) x 11, (sc red) x 5, (sc green) x 11, (sc red) x 5, (sc green) x 11, (sc red) x 16
← Row 9 : (sc red) x 17, (sc green) x 9, (sc red) x 7, (sc green) x 9, (sc red) x 7, (sc green) x 9, (sc red) x 14
→ Row 10 : (sc red) x 15, (sc green) x 7, (sc red) x 9, (sc green) x 7, (sc red) x 9, (sc green) x 7, (sc red) x 18
← Row 11 : (sc red) x 16, (sc green) x 11, (sc red) x 5, (sc green) x 11, (sc red) x 5, (sc green) x 11, (sc red) x 13
→ Row 12 : (sc red) x 14, (sc green) x 9, (sc red) x 7, (sc green) x 9, (sc red) x 7, (sc green) x 9, (sc red) x 17
← Row 13 : (sc red) x 18, (sc green) x 7, (sc red) x 9, (sc green) x 7, (sc red) x 9, (sc green) x 7, (sc red) x 15
→ Row 14 : (sc red) x 16, (sc green) x 5, (sc red) x 11, (sc green) x 5, (sc red) x 11, (sc green) x 5, (sc red) x 19
← Row 15 : (sc red) x 17, (sc green) x 9, (sc red) x 7, (sc green) x 9, (sc red) x 7, (sc green) x 9, (sc red) x 14
→ Row 16 : (sc red) x 15, (sc green) x 7, (sc red) x 9, (sc green) x 7, (sc red) x 9, (sc green) x 7, (sc red) x 18
← Row 17 : (sc red) x 19, (sc green) x 5, (sc red) x 11, (sc green) x 5, (sc red) x 11, (sc green) x 5, (sc red) x 16
→ Row 18 : (sc red) x 17, (sc green) x 3, (sc red) x 13, (sc green) x 3, (sc red) x 13, (sc green) x 3, (sc red) x 20
← Row 19 : (sc red) x 21, sc green, (sc red) x 15, sc green, (sc red) x 15, sc green, (sc red) x 18
→ Row 20 : (sc red) x 72
Row 22-72: (sc red) x 72
-Fasten off and weave in ends.
Attaching Panels Together:
Place the front and back panels together with wrong sides facing. Using either green or white yarn, slip stitch from top of one side of pillow (where the panels meet, not over the flap), around the bottom, and up the other side. I found by slip stitching with a tight tension really makes some crisp edges, but you do not want puckering. Fasten off and weave in ends. Flip pillow so the right side is facing out and the seams are on the inside.
Attaching Buttons:
With the back panel facing, fold front panel down over the top of the back panel and with stitch markers mark the row where each button will be placed. Using a yarn needle and green yarn, sew each button in place.
Place a 18×18 pillow inside the cover and enjoy!
Well, That Was Fun! What’s Next?


Thank you for sharing this awesome pattern! I’m not seeing the graphs for the crocheted Truck Pillow. Are they still available? Thank you!
Thank you for catching this! I’ve been slowly updating each blog post to a new format and I have to redo them almost from scratch. I missed putting that in there but it should be back now. Thanks!
is beautiful Thank
Thank you so much for this pattern. I have made 8 since January….my girls will be excited when they receive these for Christmas! So will two of my neighbors.
OH my gosh that’s so awesome! I have more fun pillows coming soon too.
My gauge is too big even though I went down a hook size. My pillow would be 22 inches wide. I would love to make this, but I don’t know what to do to get the right gauge. Any suggestions?
Perhaps leave off a few stitches on each side, and a few rows top and bottom if necessary?
Awesome pattern, please design more. Thank You
just found this,I love it,am going to give it a try,thank you soooo much for this pattern,and mostly for the written part also !!!!
I love, love, love this one. Mine is almost finished. Will you PLEASE create another one to match?
I like that you added sonyou which way ti you’re going when working. 🙂
Where did you get your wooden tree buttons at? I love your pattern!
I found some on Amazon
Thank you. I really like this pillow.