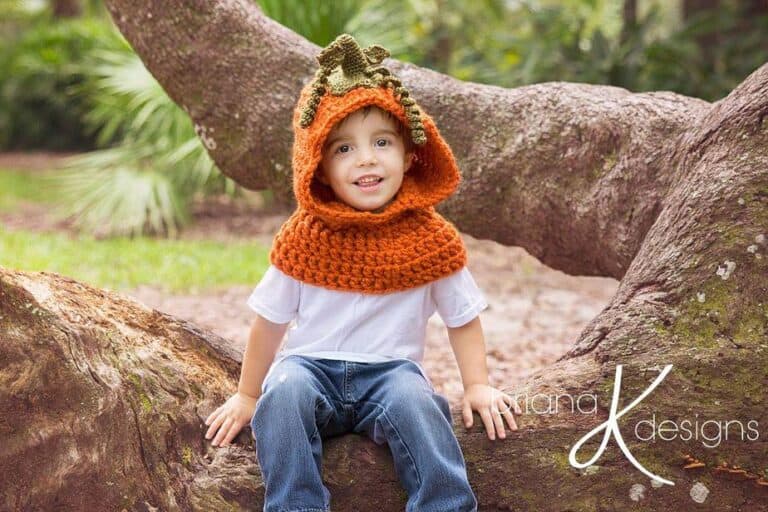
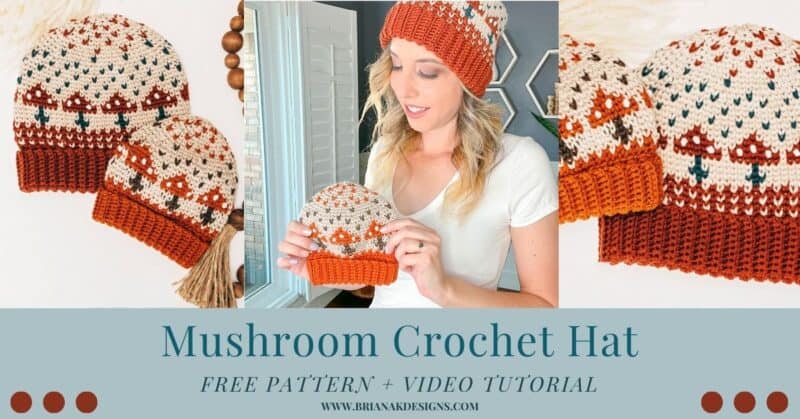
You’ll love this mushroom hat crochet pattern if you’re looking for a cute and easy crochet pattern! This sweet hat is perfect for advanced beginners who want to step into colorwork and works up quickly. It’s also great for baby shower gifts or as part of a Halloween costume. So grab your yarn, and let’s get started!
Disclosure: This post contains affiliate links. Please read my disclosure for more info.
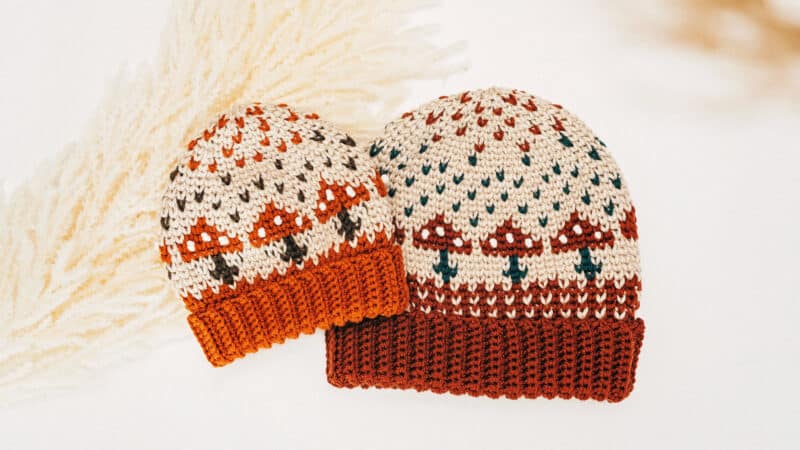
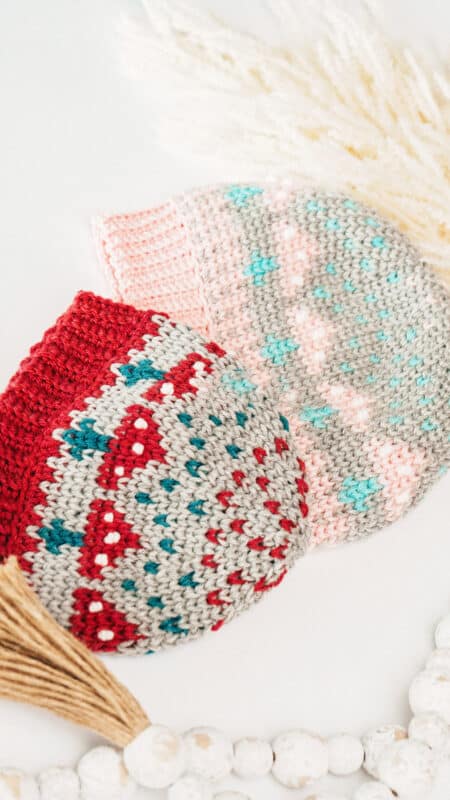
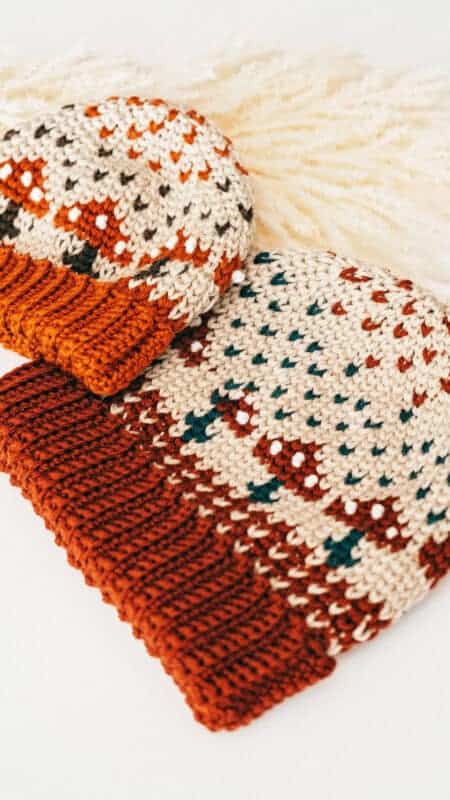
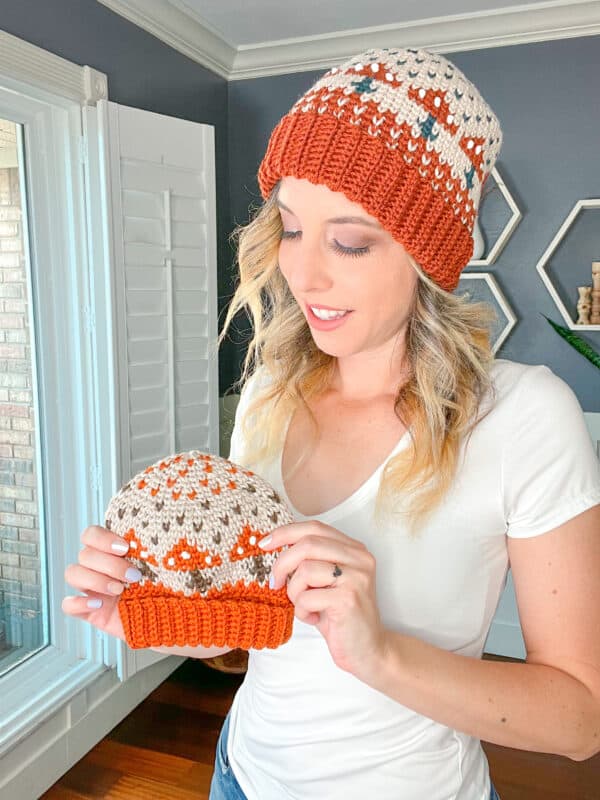
If you’re looking for a cute and unique crochet hat pattern, look no further than this Mushroom Hat!
The Mushroom Hat is perfect if you’re looking for a cozy and unique crochet hat pattern. Featuring vibrant colorwork in your favorite colors, this mushroom hat is sure to turn heads.
Plus, with our how-to directions and a crochet chart, you can quickly master how to crochet colorwork to work up the perfect mushroom-themed beanie.
You’ll also learn how to carry your yarn when working color patterns with multiple colors. So don’t miss out on introducing the cutest mushroom hat into your fall and winter wardrobe.
What are the benefits of crocheting a hat from the bottom up?
Crocheting a hat from the bottom up is an efficient technique that allows you to have a custom fit. It also helps you keep track of the number of stitches and rows throughout the project, so you can make sure the final product looks uniform and neat.
Finally, this technique gives you the advantage of trying on your hat throughout the process, so you can make any adjustments to ensure it looks perfect! After creating the brim ribbing and the first round, you will know if it’s the right side for your head. Try it out and see if it’s the correct hat size circumference for you. There isn’t just a one-size mushroom crochet pattern; it’s made in 4 different head sizes.
What to wear with the adorable mushroom hat?
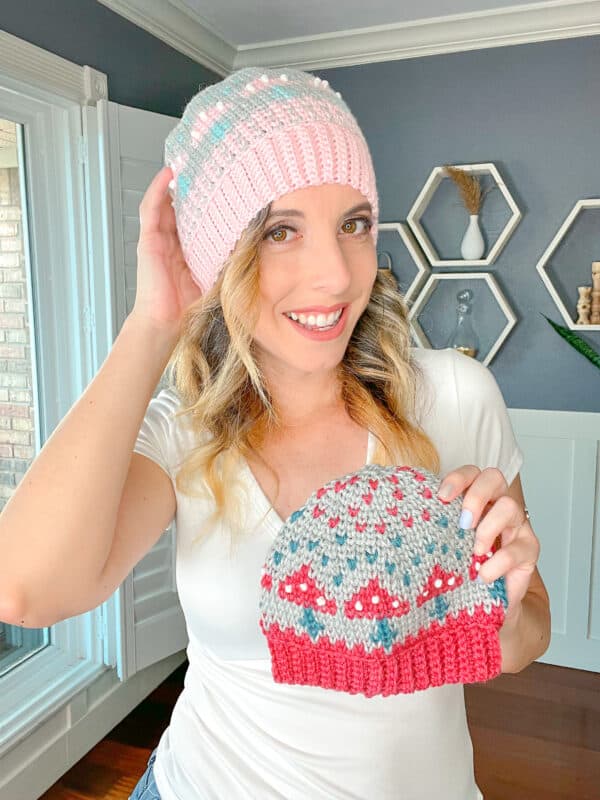
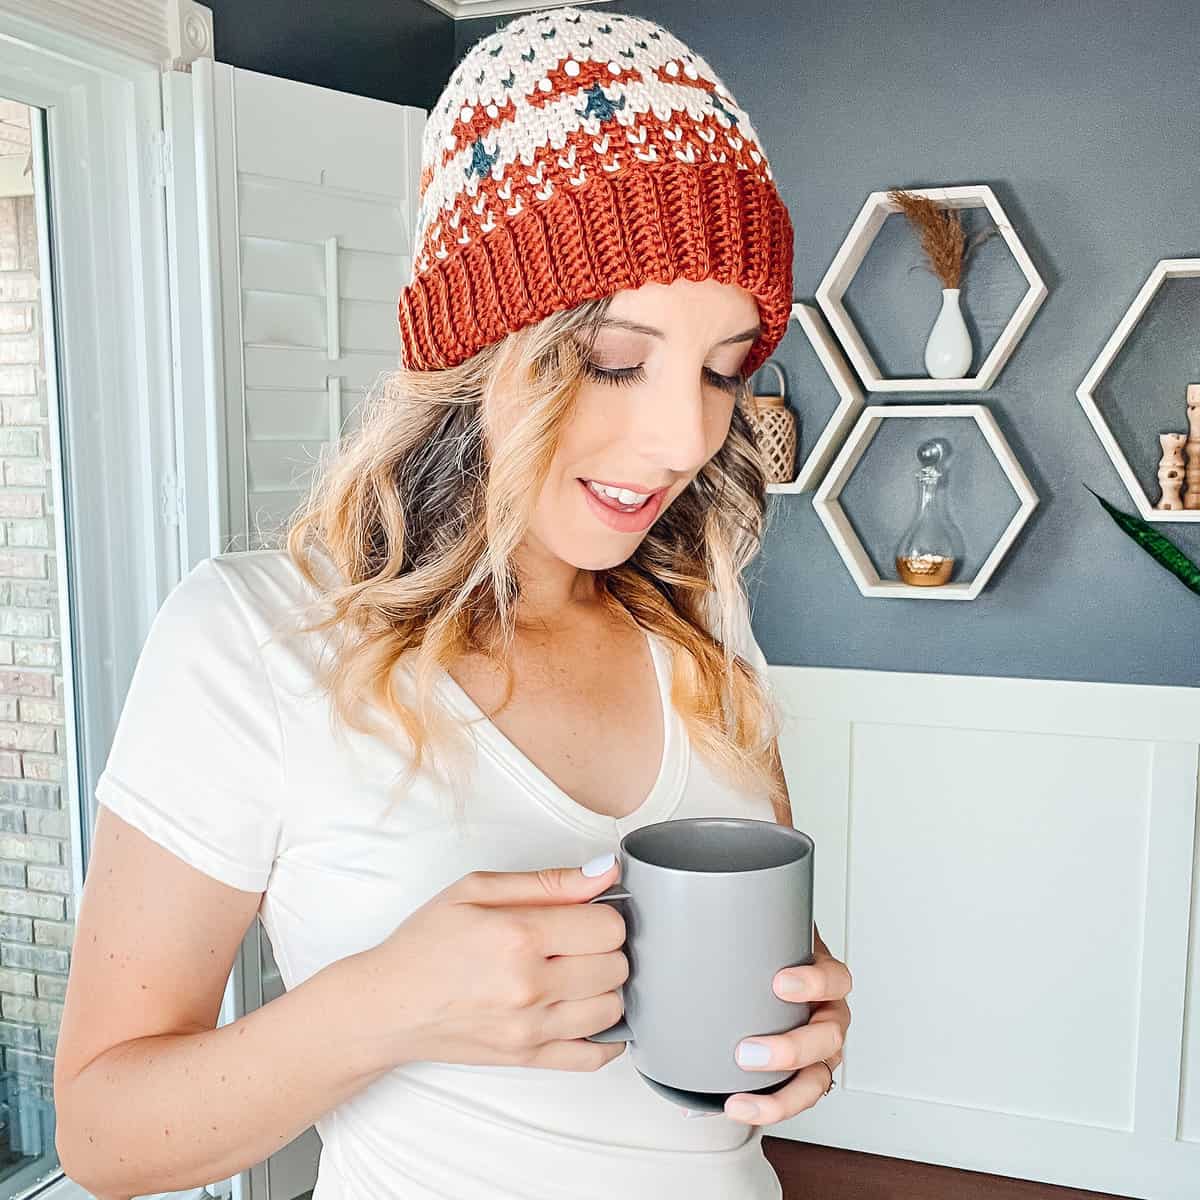
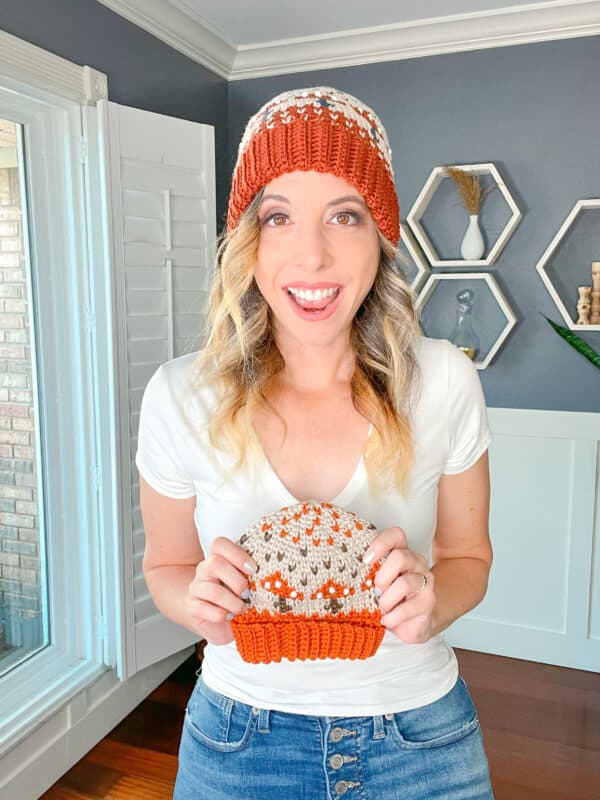
This mushroom hat is so cute and unique that it can be dressed for any occasion. Whether you’re going on woodland hikes or afternoon coffee dates, if there is a chill in the air, this mushroom hat will add fun and flair to your look. It pairs perfectly with jeans and a blouse or a dress. You can also wear the mushroom hat with leggings and a light jacket. No matter the occasion, this toadstool style mushroom hat will look great!
What is Fair Isle Crochet?
Fair Isle crochet is a type of colorwork crochet that uses two or more colors with distinct patterns. This crochet technique can construct intricate and colorful designs, such as flowers and other shapes. This type of crochet typically includes carrying the non-working yarn across the back of your work when changing colors, which gives the finished product an extra layer to keep you cozy.
Now that you know you want to crochet a Mushroom Hat let’s talk about how to crochet colorwork. If you have never crocheted colorwork before, don’t worry. This pattern has a video tutorial to help you through each step, mainly if you haven’t ever used the split single crochet (ssc) stitch before. I’ll walk you through each of the simple stitches and techniques.
The yarn will be carried along the back in the fair isle style when crocheting the colorwork. Try not to have color for more than three stitches so your floats aren’t too long. You can catch/trap the yarn behind a stitch to keep the floats consistent.
To read more about crochet colorwork, please visit Tips for Successful Colorwork in Crochet.
How is the mushroom hat crochet pattern constructed?
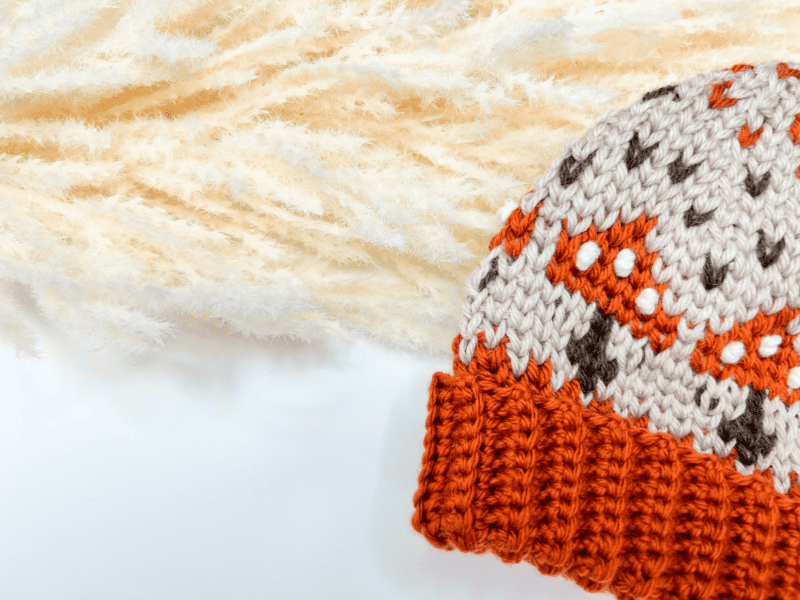
The Mushroom Beanie Hat is worked in rounds from bottom-up, in fair isle crochet. This is the same construction as the Forest Brooks Crochet Beanie Hat.
First, a single crochet ribbing is worked in rows and joined. Then the colorwork portion of the hat is worked in split single crochet and decreased at the top. The pompom at the top of the hat is optional.
Since this hat is worked continuously, a ch-1 at the beginning of each round is unnecessary. However, placing a stitch marker on the first stitch is helpful, moving it up with each subsequent round.
And each size comes with not only written crochet instructions but charts as well. Want to color in your own crochet charts with your very own color mushroom choices? If you purchase the pdf download, it comes with printable charts to color in the corresponding letter. That way, you can visualize your crochet mushroom hat.
Where Is The Best Place To Get Color Inspiration?
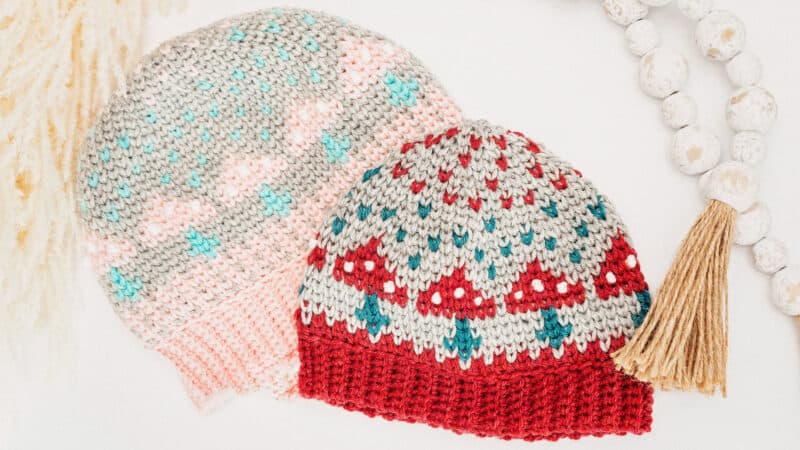
When it comes to working with color, the sky is the limit. There are countless mushroom hat combinations of colors and textures that you can use to produce something genuinely unique.
One great place to start is Pinterest. The platform offers endless inspiration by simply searching for color palettes. Other places to find crochet color inspiration are from nature or perhaps our favorite tones we use in home decor.
There are lots of DK-weight yarns that you can use as a substitute in this pattern, but I love the number of colors in the WeCrochet Swish Palette. So I’ve made a little color inspiration board for you to enjoy below.
Materials Needed for the Crochet Mushroom Hat
Now that you have all the information to start your Mushroom Hat project, grab your yarn and favorite tools, and let’s get crocheting! Enjoy making your own unique mushroom hats with this free crochet pattern!
SUPPLIES & NOTIONS
Recommended Hook Size G (4.0mm) & H (5.0mm) – or size to meet gauge, you may need to change hook sizes smaller or bigger depending on your crochet tension.
Removable crochet stitch markers
Needle to weave in ends and make french knots.
Scissors
Faux Fur pompom (optional)
YARN & YARDAGE
WeCrochet Swish DK
(100% Fine Superwash Merino Wool).
Color A: 2 balls – Allspice
Color B: 1 ball – Nutmeg Heather
Color C: 1 ball – Rainforest Heather
Small Amount of white yarn.
Total Yards: 160 (210, 260, 280)
Suggested Yarn Substitute:
GAUGE
13 sts and 15 rows = 4 inches in Split Single Crochet using a larger hook, blocked.
20 sts and 16 rows = 4 inches in Single Crochet through back loop only, blocked.
Not sure what gauge is? Check out this blog post: What Is Crochet Gauge and How To Fix It
HAT MEASUREMENTS
Baby (Child, Adult S/M, Adult L/XL).
Brim Circumference: 13½ (15¾, 18, 20¼) inches, finished item, relaxed.
Stretches comfortably to fit head circumference 16-17 (18-19, 20-21, 22-23) inches.
ABBREVIATIONS
ch – chain
rnd- round
sc – single crochet
ssc – split single crochet
ssc2tog – split single crochet 2 together
sl st – slip stitch
st(s) – stitch(es)
Hat Pattern Notes
This pattern is made in US crochet terms.
Special Crochet Stitches:
Split Single Crochet (ssc): Insert hook between the legs of the stitch (on the back of work the hook should be under the horizontal bar and between the upside-down ‘V’ shape as well), yarn over, pull up a loop to the height of a single crochet, yarn over, pull through both loops on hook. Tip: Keep a loose tension, so the stitches are easily worked. https://brianakdesigns.com/split-single-crochet-round-flat/
The hat might have a stiff look if your split single crochet stitches are too tight. And the stitches will be harder to work into if the golden loop (the second loop on the hook) isn’t pulled up high enough. You want your mushroom colorwork to be pretty, so keep a looser tension. Be sure to watch the crochet video tutorial for more information.
How to read the colorwork sections:
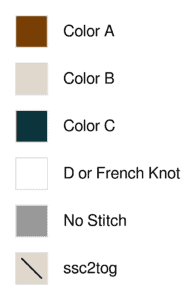
In the colorwork section Color A will be abbreviated as (A), and Color B as (B).
Example: (ssc B) x 9 = with Color B ssc the next 9 stitches
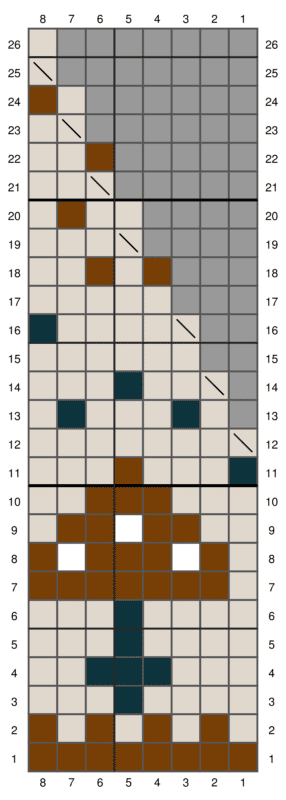
The chart will be worked from right to left for each round and repeated until the end of the round for the mushroom pattern.
Mushroom Hat Crochet Pattern Video

Purchase the Ad-Free PDF on Etsy or Ravelry.
Click the box below to unlock this exclusive subscriber content for free. Add your email and create a password. If you are having trouble, reset your password or log in to the Grow Portal.
I’m thrilled to share this amazing crochet pattern with you! Please don’t copy, paste, or distribute this pattern. Prefer an ad-free experience? Purchase a digital PDF file for a small fee from one of my online stores. I appreciate your support and readership. You are why I can keep doing what I love and sharing it with others. Thank you from the bottom of my heart.
Ribbed Brim for the Mushroom Hat Crochet Pattern
With Color A and a smaller crochet hook, ch 17 (19, 21, 23).
Row 1 (WS):
Sc in the second ch from hook and each ch to end, turn. 16 (18, 20, 22) sts.
Adult S/M and Adult L/XL Crochet Hat Pattern
Row 2 (RS):
Ch 1 (not counted as a st here and throughout), sc 1 in the blo of each st to end, turn. 16 (18, 20, 22) sts
Rep Row 2:
for a total of 56 (64, 72, 80) rows.
Fold the band in half with WS together. ch 1, sl st ends of the band together working through blo of the last row and loops from the first row. This will join the mushroom hat band to work in the round.
Crochet Mushroom Hat Band measures approximately 13½ (15¾, 18, 20¼)” in circumference and 3¼ (3½, 4, 4½)” tall. Change to a larger crochet hook.
Set Up Rnd:
Ch 1, sl st around one edge of the band, placing one sl st in the end of each row. Do not turn and do not join. Place removable marker in first sl st to mark the beginning of the rnd. 54 (63, 72, 81) sts.
When working the remaining of mushroom hat pattern in split single crochet stitches, be sure to be conscious of your crochet tension so that the hat doesn’t have a firm feel and you achieve a great drape.
Mushroom Hat Chart – Adult S/M and Adult L/XL Crochet Pattern Only
The paid ad-free downloadable pdf has a blank graph where you can color in your own yarn options.
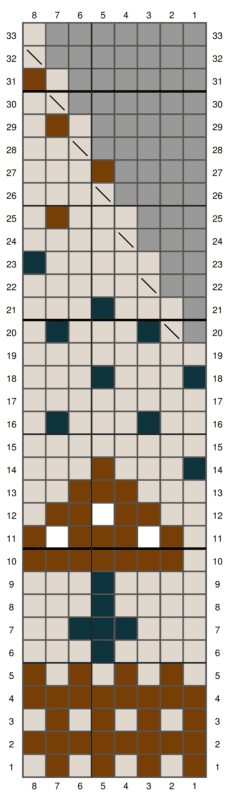

Work colorwork from the mushroom crochet pattern chart or the following directions. Repeat each round instructions until the end of the round. All of the sts will be worked in ssc. Enjoy watching the adorable mushroom hat pattern work up across your stitches.
Rnd 1:
[(A) x 1, (B) x 1] repeat around
Rnd 2:
(A) x 8
Rnd 3:
Repeat Rnd 1
Rnd 4:
(A) x 8
Rnd 5:
[(B) x 1, (A) x 1] repeat around
Rnd 6:
(B) x 4, (C) x 1, (B) x 3
Rnd 7:
(B) x 3, (C) x 3, (B) x 2
Rnd 8:
(B) x 4, (C) x 1, (B) x 3
Rnd 9:
(B) x 4, (C) x 1, (B) x 3
Rnd 10:
(B) x 1, (A) x 7
Rnd 11:
(B) x 1, (A) x 1, (D) x 1, (A) x 3, (D) x 1, (A) x 1
Rnd 12:
(B) x 2, (A) x 2, (D) x 1, (A) x 2, (B) x 1
Rnd 13:
(B) x 3, (A) x 3, (B) x 2
Rnd 14:
(C) x 1, (B) x 3, (A) x 1, (B) x 3
Rnd 15:
(B) x 8
Rnd 16:
(B) x 2, (C) x 1, (B) x 3, (C) x 1, (B) x 1
Rnd 17:
(B) x 8
Rnd 18:
(C) x 1, (B) x 3, (C) x 1, (B) x 3
Rnd 19:
(B) x 8
Rnd 20:
(ssc2tog) x 1, (C) x 1, (B) x 3, (C) x 1, (B) x 1
Rnd 21:
(B) x 3, (C) x 1, (B) x 3
Rnd 22:
(ssc2tog) x 1, (B) x 5
Rnd 23:
(B) x 5, (C) x 1
Rnd 24:
(ssc2tog) x 1, (B) x 4
Rnd 25:
(B) x 3, (A) x 1, (B) x 1
Rnd 26:
(ssc2tog) x 1, (B) x 3
Rnd 27:
(A) x 1, (B) x 3
Rnd 28:
(ssc2tog) x 1, (B) x 2
Rnd 29:
(B) x 1, (A) x 1, (B) x 1
Rnd 30:
(ssc2tog) x 1, (B) x 1
Rnd 31:
(B) x 1, (A) x 1
Rnd 32:
(ssc2tog) x 1
Rnd 33:
(B) x
Mushroom Hat – Baby and Child Crochet Pattern
Work colorwork pattern from the chart or from the directions that follow. Repeat each round instructions until the end of the round. All of the sts will be worked in ssc.
Rnd 1:
(A) x 8
Rnd 2:
[(B) x 1, (A) x 1] repeat around
Rnd 3:
(B) x 4, (C) x 1, (B) x 3
Rnd 4:
(B) x 3, (C) x 3, (B) x 2
Rnd 5:
(B) x 4, (C) x 1, (B) x 3
Rnd 6:
(B) x 4, (C) x 1, (B) x 3
Rnd 7:
(B) x 1, (A) x 7
Rnd 8:
(B) x 1, (A) x 1, (D) x 1, (A) x 3, (D) x 1, (A) x 1
Rnd 9:
(B) x 2, (A) x 2, (D) x 1, (A) x 2, (B) x 1
Rnd 10:
(B) x 3, (A) x 3, (B) x 2
Rnd 11:
(C) x 1, (B) x 3, (A) x 1, (B) x 3
Rnd 12:
(ssc2tog) x 1, (B) x 7
Rnd 13:
(B) x 1, (C) x 1, (B) x 3, (C) x 1, (B) x 1
Rnd 14:
(ssc2tog) x 1, (B) x 2, (C) x 1, (B) x 3
Rnd 15:
(B) x 6
Rnd 16:
(ssc2tog) x 1, (B) x 4, (C) x 1
Rnd 17:
(B) x 5
Rnd 18:
[(A) x 1, (B) x 1] x 2, (B) x 1
Rnd 19:
(ssc2tog) x 1, (B) x 3
Rnd 20:
(B) x 2, (A) x 1, (B) x 1
Rnd 21:
(ssc2tog) x 1, (B) x 2
Rnd 22:
(A) x 1, (B) x 2
Rnd 23:
(ssc2tog) x 1, (B) x 1
Rnd 24:
(B) x 1, (A) x 1
Rnd 25:
(ssc2tog) x 1
Rnd 26:
(B) x 1
Mushroom Hat Chart – Baby and Child Crochet Pattern
Finishing the Adorable Mushroom Hat for All Sizes
Fasten off. Use a yarn tail to sew and close the hole at the top of the mushroom hat. Weave in any ends for the mushroom hat.
Grab your sewing needle and attach a pompom to the top of the mushroom hat if desired.
Optional Embroidered Mushroom Dots
If you didn’t use the color D (white) in the colorwork portion of the pattern, then you can use the white yarn for french knots. Why craft French knots? They are a great way to add texture and detail to your amanita mushroom cap hat.
How to construct a french knot.
Using the white yarn, create french knots for the spotted dots on each mushroom. To make french knots, wrap the yarn around your yarn needle three to four times (depending on how large you want your knots). Then insert the yarn needle back through the fabric just off center of where you came up with the thread, and pull the loop of yarn through.
This video tutorial below will walk you through creating a french knot, which really adds a pop to the mushrooms.
I hope you enjoyed making this crochet mushroom pattern as much as I did. It’s super fun to crochet with an advanced look. This crochet mushroom hat pattern is a perfect addition, and with the stitch adjustments, the size fits the entire family.
Can a beginner crocheter do this pattern? That’s entirely up to you and your comfort zone, I’m a ‘go for it’ kinda designer, especially with a video tutorial. I hope to have more crochet mushroom patterns soon!
Well, That Was Fun! What’s Next?