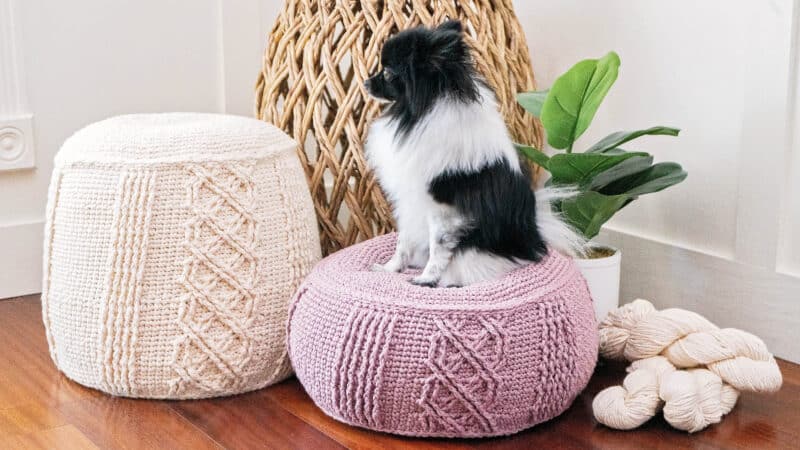
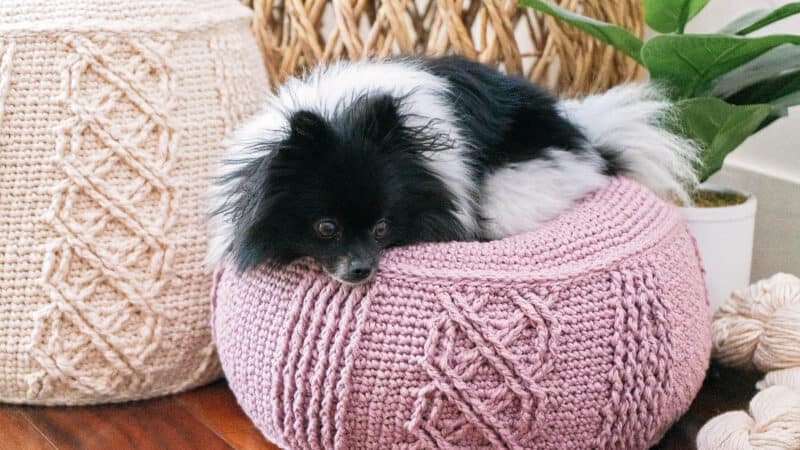
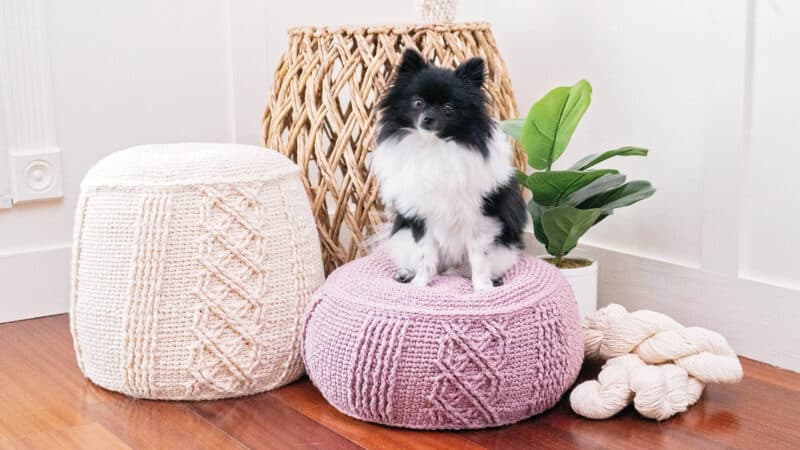
Crochet Cable Floor Pouf Pattern

Creating luxurious home decor starts with the Cable Crochet Floor Pouf Pattern. What better way to kick up your feet than in style. You can also set a tray on the floor pouf and use it as a side table. This is a fun pattern that works up quickly with WeCrochet Billow bulky yarn.
If you want to learn more about the Infinity Crochet Cable Method, head on over to the Infinity Crochet Cables blog post and even practice a free swatch of the infinity symbol. You have to check it out, it's very cool.
And what's extra special is this poof can double as storage! I will walk you through instructions on how to hand stitch a zipper so it can be opened and closed. Need somewhere to put all those stuffed animals? This crochet pattern has got you covered.
Love this look of cables? Check out these cable patterns:
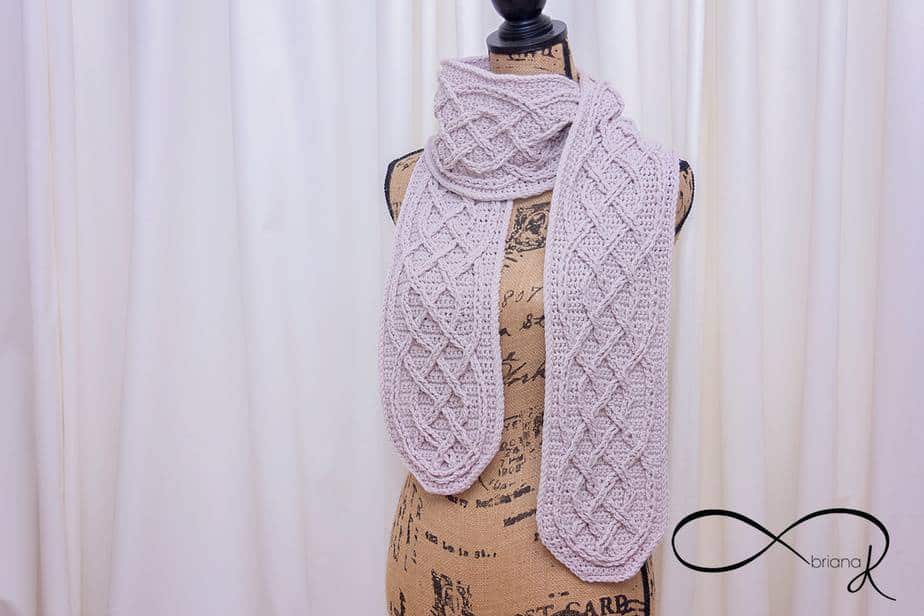
Infinity Crochet Cable Scarf Pattern
Infinity Zen Cable Cocoon Crochet Pattern
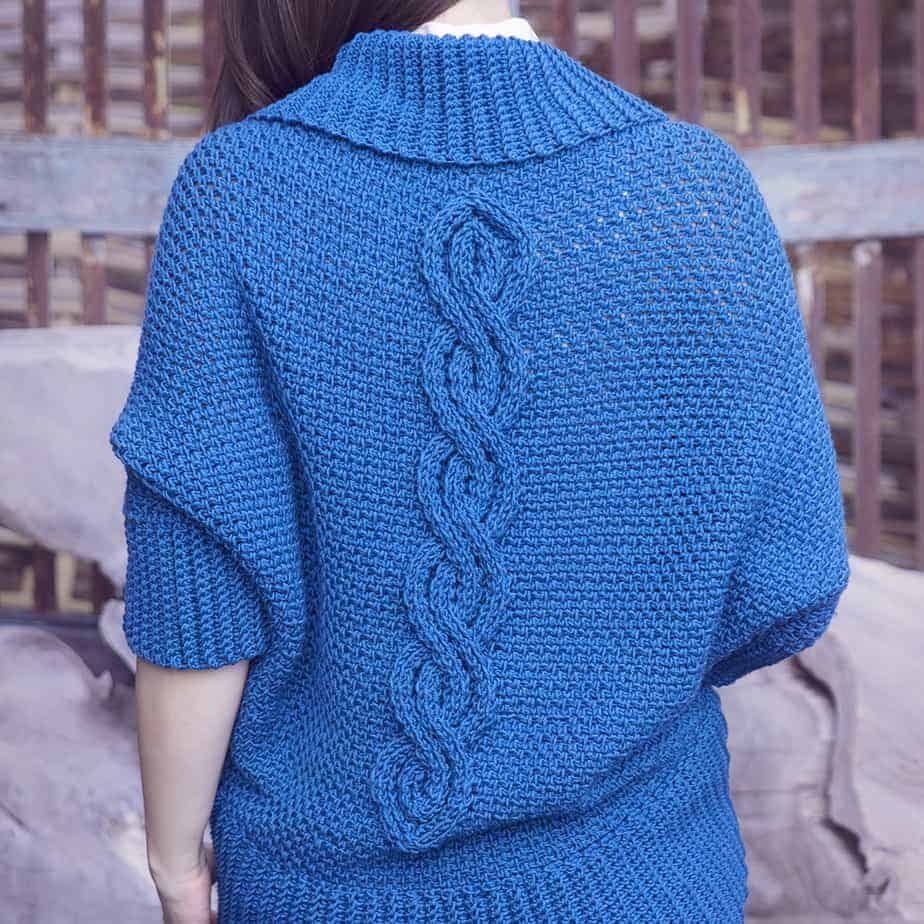
Valencia Infinity Cable Crochet Sweater
Starlette Crochet Cable Poncho Pattern
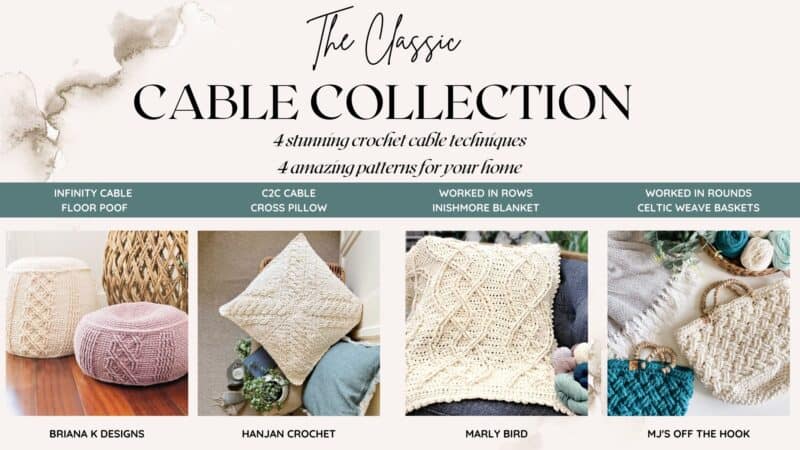
Classic Cable Crochet Collection
I've teamed up with my favorite designer friends to bring you a one-of-a-kind event! Come join me, Marly Bird, MJ's Off The Hook Designs, and HanJan Crochet and explore 4 different styles of crochet cables.
Have you ever?:
Been afraid of Cables?
Wanted to try crochet cables but not sure where to start?
Not sure if you can do it?
We've got you covered!
This is the perfect time to jump on in and explore crochet cables with 4 unique patterns. And every design has a video tutorial to guide you through the essential steps.
So what are you waiting for? Go grab the Classic Cable Crochet Collection Today!
Our Crochet Along has started so join on in! Come to the Briana K Designs Facebook Community and start posting your yarn choices and progress. Click below to do a little blog hopping to check out the incredible designs done by my friends:
Cable Crochet Pillow Pattern by HanJanCrochet
Celtic Weave Nesting Basket by MJ's Off The Hook Designs
Inishmore Cable Blanket by Marly Bird
Enter the Giveaway!
a Rafflecopter giveawayCable Crochet Floor Pouf Supplies:


Crochet Hook:
6.0mm (J hook), or hook to obtain gauge
Notions:
Removable stitch markers if needed
Yarn needle to weave in ends
Scissors
Bean Bag Pellets (optional)
20' Zipper (optional) with Sewing Needle & Thread
Yarn:
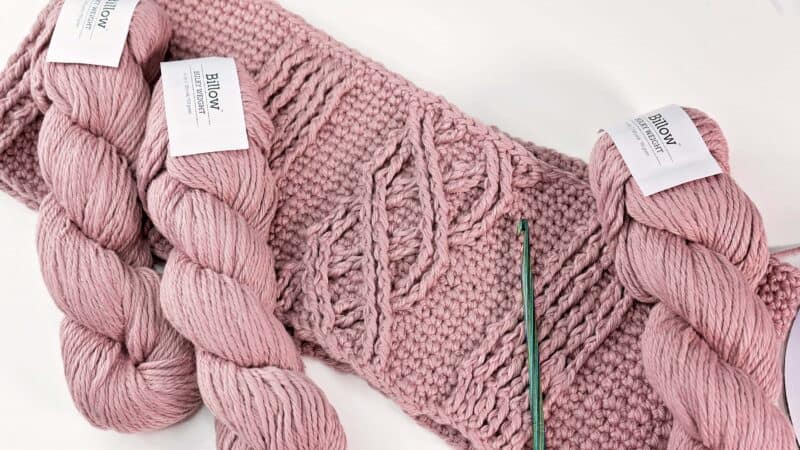
WeCrochet Billow
100% Pima Cotton, 120yds/100g Colorways in images: Natural Billow and Ice Lily
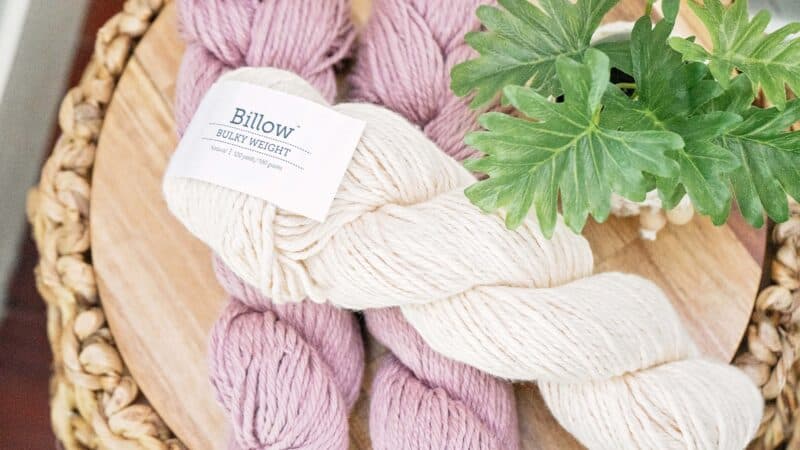
Yardage:
Tall Pouf (800yds/732m) - 7 Hanks
Short Pouf (460yds/421m)- 4 Hanks
Abbreviations/Stitches:
blo - back loop only
ch - chain
FFdc - front float double crochet
FFtr - front float trebl crochet
rnd - round
sc - single crochet
ssc - split
sl st - slip stitch
st(s) - stitch(es)
Special Stitches:
The biggest difference between a front float post stitch and a regular cable post stitch is the stitch behind the post stitch will also be worked to make it ‘float’ on the front. Starting on round 8, all post stitches will be worked around the post stitches from three rows below
Front Float Post Treble Crochet (FFtr)
Yo two times, insert hook from front-to back-to-front around post of indicated st (or next available floating st, if no st is indicated) and pull up a loop, [yo and draw through 2 loops] 3 times.
Front Float Post Double Crochet (FFdc)
Yo, insert hook from front-to back-to-front around post of indicated st (or next available floating st, if no st is indicated) and pull up a loop, [yo and draw through 2 loops] twice.
Gauge:
10 sts x 16 rows = 4x4 inches in single crochet.
It is more important to have a tight stitch than matching gauge.
Skill Level:
Intermediate
Size:
Width: 16" for both sizes Height: 7" for short, 12 inches or tall, stuffed.
Height is adjustable by working more or fewer repeat rounds.
Construction:
The cable floor pouf is worked in separate pieces and in the round: the top & bottom, and the pouf body. The three pieces are then joined by slip stitching, and a zipper is placed for opening and closing the pouf.
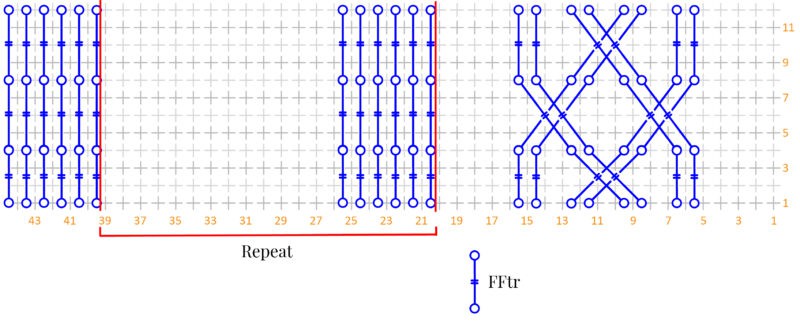
Infinity Cable FLoor Pouf Chart
Cable Crochet Floor Pouf Video Tutorial:
Bottom & Top Circles
Make 2
Rnd 1: In magic ring, sc 10, do not join and use a stitch marker to keep track of the beginning of each round. (10 sts)
Rnd 2: 2 sc in each stitch around. (20 sts)
Rnd 3: For this round and every odd round of this section, sc in each stitch around.
Rnd 4: 2 sc in first, sc in next, *2 sc in next, sc in next*: repeat from * to * around. (30 sts)
Rnd 6: 2 sc in first, sc in next 2 sts, *2 sc in next, sc in next 2*: repeat from * to * around. (40 sts)
Rnd 8: 2 sc in first, sc in next 3 sts, *2 sc in next, sc in next 3*: repeat from * to * around. (50 sts)
Rnd 10: 2 sc in first, sc in next 4 sts, *2 sc in next, sc in next 4*: repeat from * to * around. (60 sts)
Rnd 12: 2 sc in first, sc in next 5 sts, *2 sc in next, sc in next 5*: repeat from * to * around. (70 sts)
Rnd 14: 2 sc in first, sc in next 6 sts, *2 sc in next, sc in next 6*: repeat from * to * around. (80 sts)
Rnd 16: 2 sc in first, sc in next 7 sts, *2 sc in next, sc in next 7*: repeat from * to * around. (90 sts)
Rnd 18: 2 sc in first, sc in next 8 sts, *2 sc in next, sc in next 8*: repeat from * to * around. (100 sts)
Rnd 20: 2 sc in first, sc in next 9 sts, *2 sc in next, sc in next 9*: repeat from * to * around. (110 sts)
Rnd 22: 2 sc in first, sc in next 10 sts, *2 sc in next, sc in next 9*: repeat from * to * around. (120 sts)
Rnd 23: Sc in each stitch around.
Pouf Body with Cables
Ch 120. This will be worked continuously, use a stitch marker at the beginning of each round to keep track of the beginning of the round.
Rnd 1-3: Working in the round, sc in each stitch around. (120 sc sts)
Rnd 4: Sc 5, (FFtr around loop from first round, sc 1) twice, sc 1, (skip 3 and FFtr around loop from first round, sc 1) twice, sc 1, (working over the previous FFsts go back 3 and FFtr around loop from first round, sc 1) twice, sc 1, (FFtr around loop from first round sc 1) twice, sc 4, * (FFtr around loop from first round, sc 1) five times, FFtr around loop from first round, sc 14*; repeat from * to * unit the last 5 sts, (FFtr 1 around loop from first round, sc 1) five times, FFtr 1 around loop from first round. (120 sc sts, 44 FFsts)
Rnd 5-7: Sc in each sc stitch around, skipping all FFsts. (120 sc sts)
Rnd 8: Sc 5, [(skip 3 and FFtr 1, sc 1) twice, sc 1, working over the previous FF sts (FFtr 1, sc 1) twice, sc 1] twice, sc 4, *(FFtr 1, sc 1) five times, FFtr 1 around loop from first round, sc 14*; repeat from * to * unit the last 5 sts, (FFtr 1, sc 1) five times, FFtr 1. (120 sc sts, 44 FFsts)
Rnd 9-11: Sc in each sc stitch around, skipping all FFsts (120 sc sts)
Rnd 12: Sc 5, (FFtr 1, sc 1) twice, sc 1, skip next 2 FFsts, (FFtr 1, sc 1) twice, sc 1, working over the previously skipped FFsts, (FFtr 1, sc 1) twice, sc 1, FFtr 1, sc 1) twice, sc 4, *(FFtr 1, sc 1) five times, FFtr 1 around loop from first round, sc 14*; repeat from * to * unit the last 5 sts, (FFtr 1, sc 1) five times, FFtr 1. (120 sc sts, 44 FFsts)
Repeats: For tall pouf, repeat rounds 5-12 three more times, then repeat round 5-8 one more time.
For short pouf, repeat rounds 5-12 one more time, then repeat round 5-8 one more time.
All sizes: Sc in each stitch around, skipping all FFsts. Do not fasten off, go to assembly.
Infinity Floor Pouf Assembly
Joining the Top:
The right sides will be facing when joining.
To join one of the circles to the pouf body, slip stitch through the back loop only of the pouf body and the flo of the pouf circle. Once slip stitches around, fasten off and weave in end.
Joining the Bottom with a Zipper:
Join by slip stitches the same way as above but leave an opening for a zipper, fasten off and weave in ends.
Using a sewing needle and thread, stitch the zipper inside the opening. It's helpful to pin the zipper into place before sewing it to the pouf.


CROCHET & TAG
I hope you have enjoyed making the Cable Crochet Floor Pouf Pattern!
If you have made this, please share it on social media. Above all, I love to see the projects created with my patterns and also share your beautiful work.
Please use #brianakdesigns or @brianakdesigns
It is much appreciated and adored!