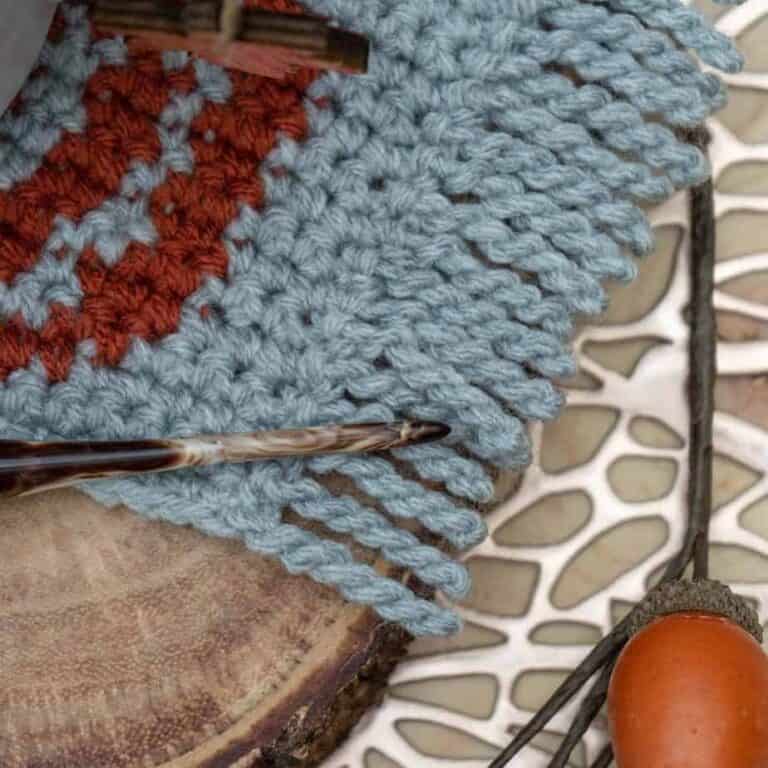


I came to mosaic crochet completely sideways. I was deep in a colorwork spiral. You know the kind where you keep bookmarking patterns and buying yarn and somehow never actually start anything, and these geometric swatches kept showing up everywhere I looked. Naturally, inspiration struck, so I finally grabbed some worsted-weight yarn in two colors I had kicking around in my stash and told myself it would just be a small practice piece. No pressure.
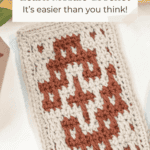
And just like that, I rediscovered Mosaic Crochet and found I really enjoyed it! That small practice piece turned into the mug rug pattern you’ll find below, and I genuinely had so much fun making it. More fun than I’d had crocheting in a while. And that surprised me, because mosaic crochet had always looked complicated to me — all that colorwork, all those charts, all those X’s lined up in a grid. But here’s the thing nobody tells you until you’re already doing it: you only work with one color at a time. That’s it. The chart looks complex, but your hook never has to be.

If you can single crochet, double crochet, and chain, you can do mosaic crochet. You don’t need to be an advanced crocheter — you just need to be comfortable with those basics and willing to follow a chart. I’m going to walk you through everything: what mosaic crochet actually is, the two different ways to work it, how to read the chart, what yarn works best, and then a free mug rug pattern to put it all into practice. Let’s go.
Disclosure: This post contains affiliate links. Please read my disclosure for more info.
What is Mosaic Crochet?
Mosaic crochet is a colorwork technique that creates intricate geometric patterns using just two colors. But here’s the part that makes it manageable: you only work with one color at a time. You alternate colors every two rows, carrying the unused color up the side of your work as you go. The color changes occur at the ends of rows, not in the middle, which keeps it accessible even for newer crocheters.
The technique has roots in mosaic knitting, which was popularized by designer Barbara G. Walker in the 1970s. Crocheters eventually adapted the concept, and it’s been growing steadily ever since, especially for blankets, home decor, and accessories, where the bold geometric look really lands. The result looks like something complicated was happening, but the actual stitch count is simple: single crochet, double crochet, and chains. That’s really the whole toolkit.
What makes mosaic crochet look so striking is the way the longer stitches (worked into rows below rather than the current row) create a raised, layered effect. When you look at a finished mosaic piece, you see blocks of color that appear to weave over and under each other. You’re not actually weaving. You’re just dropping your double crochets down a row or two, and the visual effect does the rest.
There are two main ways to work mosaic crochet—Overlay and Inset—and they produce slightly different results. I’ll walk you through both below so you know what to look for when you come across patterns in the wild.
Overlay Vs. Inset Mosaic Crochet: What’s the Difference?
When you start searching for mosaic crochet patterns, you’ll run into two terms pretty quickly: overlay mosaic and inset mosaic (also called interlocking mosaic). They produce a similar visual effect, but they’re worked differently, and each has its tradeoffs. Here’s how to tell them apart.
Overlay Mosaic Crochet
In overlay mosaic crochet, you work each row from right to left on the right (front) side of the piece only. At the end of each row, you fasten off and rejoin the next color at the beginning. This means you’re always looking at the right side, which makes it easier to see your pattern forming as you go.
The double crochet stitches in overlay mosaic sit on top of the fabric, literally overlaying the rows below them. This gives the finished piece a bolder, more raised texture. The tradeoff is ends—because you’re fastening off every row, you end up with a lot of them to weave in when you’re done. Many crocheters handle this by working the ends into a border at the finish.
Inset Mosaic Crochet (My Preferred Method)
Inset mosaic crochet, also called interlocking mosaic, works two rows per color before switching colors. You turn your work at the end of each row, so you’re working both a right-side row and a wrong-side row in the same color before you pick up the next one. This means the unused yarn just gets carried up the side of your work. No cutting, no rejoining.
The result is a flatter, cleaner fabric with far fewer ends to deal with. The back of the work looks tidy. If you’re making something like a blanket or a pillow cover where both sides might get seen, inset mosaic gives you a much cleaner finish. It’s also, honestly, just less annoying to make—that’s my real reason for preferring it.
|
Overlay Mosaic |
Inset/Interlocking Mosaic |
|
|---|---|---|
|
Work Direction |
Right side only, right to left |
Both sides, turn at end of each row |
|
Color Switching |
Fasten off + rejoin every row |
Carry yarn up the side |
|
Yarn Ends |
Many (one per row change) |
Minimal |
|
Texture |
Raised, bolder, more 3D |
Flatter, cleaner |
|
Back of Work |
More visible floats |
Tidy, cleaner finish |
|
Better For |
Bold statement pieces, beginners who prefer visual feedback |
Blankets, home decor, anything seen from both sides |
A quick note if you’re making something for a baby or small child: If you use the inset method and work the double crochet stitches in front of the chain spaces rather than around them, you’ll get small loops on the back of the work. Those can be a snag or entanglement risk for little ones. For baby items, either work around the chain stitches instead, or choose a project where the back stays tucked away.
How to Read a Mosaic Crochet Chart
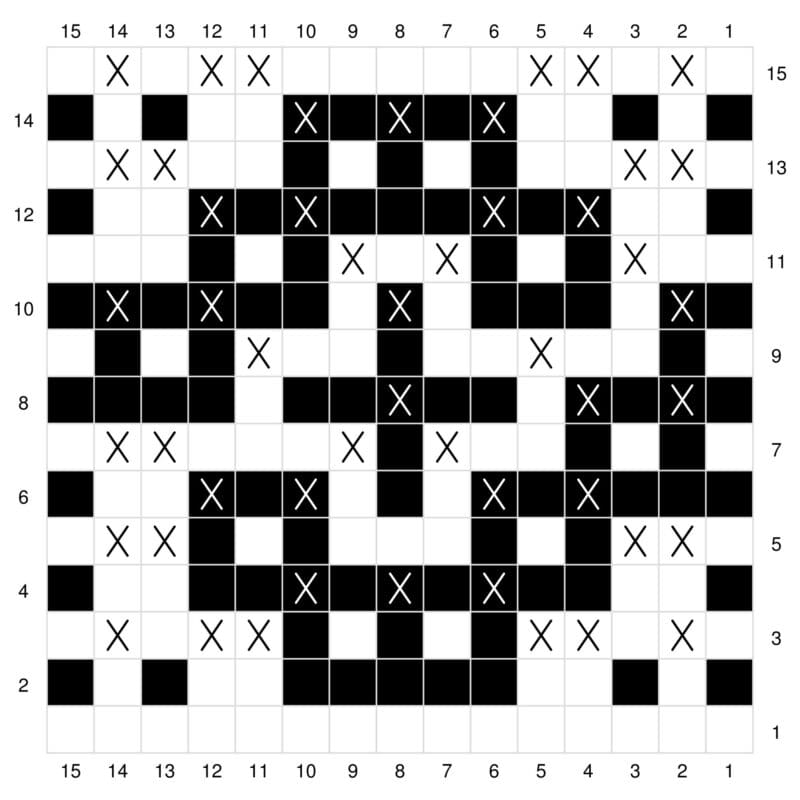
Mosaic crochet charts can look intimidating at first—a grid of colored squares and X marks that doesn’t immediately make visual sense. But once you understand the logic, they’re actually very straightforward. Here’s what you need to know before you look at the mug rug chart below.
The Basic Rules
Every row on a mosaic chart represents two actual rows of crochet—a right-side (RS) row and a wrong-side (WS) row, both worked in the same color. The row numbers on the chart tell you which color to use for those two rows. In most patterns, odd-numbered rows are worked in your main color (MC) and even-numbered rows in your contrast color (CC), though always check the specific pattern.
The squares in the chart grid show you what stitches to make. A plain square means you work a regular single crochet in the current row. A square with an X means you work a mosaic double crochet — a double crochet worked into the stitch two rows below the current row rather than into the current row. That’s the stitch that creates the color overlap and gives mosaic crochet its distinctive look.
The Color Logic
Here’s the part that trips people up: the colors you see in the center of the chart are a preview of what the finished fabric will look like, not instructions for what color yarn to use on that square. You work the entire row in one color — the color shown on the side of the chart for that row number. The colors inside the grid show where each color will visually land once all the rows are stacked.
So if you’re on a Main Color row and you hit a square that shows the Contrast Color in the grid: don’t switch yarn. Keep working in MC. The contrast color is already built into the fabric from a previous row; you’re just overlaying stitches on top of it.
Reading Direction
Most mosaic crochet charts are read from the bottom up (Row 1 is at the bottom) and right to left for right-side rows. If you’re working in the inset/interlocking method, you’ll turn your work and come back across in the opposite direction for the wrong-side row before switching colors.
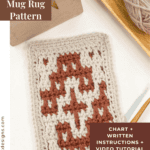
For the mug rug pattern in this post, I’ve included both the chart and full written row-by-row instructions, so if charts feel confusing at first, you can follow the written version and use the chart as a visual reference. They’ll both get you to the same place.
Best Yarn for Mosaic Crochet (And What to Avoid)
Yarn choice makes a real difference with mosaic crochet. The whole point of the technique is that crisp geometric pattern, and if your yarn is fighting you, the pattern gets muddy. Here’s what works and what doesn’t.
What to Look For
Smooth, ply-spun yarns are your best friend for mosaic crochet. You want a yarn with good stitch definition, meaning the individual stitches sit clearly distinct from each other rather than blending together. Wool and wool blends are great for this because they have natural spring that helps stitches hold their shape. Cotton and cotton blends also work well, especially for home decor items like the mug rug below. Acrylic is totally fine as long as it’s smooth and not too fuzzy.
Worsted weight (size 4) is the easiest weight to learn on. The stitches are big enough to see clearly, it works up fast, and you can check your chart tracking without squinting. Once you’re comfortable with the technique, you can absolutely scale up to bulky or down to DK — but for a first project, worsted is where I’d start.
For two contrasting colors that will make the pattern pop, go for high contrast. Light and dark, or two colors that read very differently next to each other. The more similar your two colors are in value (light vs. dark), the less the pattern shows up. I love a classic cream and navy, or a warm terracotta against a natural off-white.
What to Avoid
- Variegated or self-striping yarn for one of your colors: the color changes can compete with your mosaic pattern and muddy the look
- Fuzzy or halo yarns (like mohair or boucle): the texture hides the stitch definition, and the pattern disappears
- Fingering-weight for your first project: the stitches are small, and it takes forever; save it for once you know the technique
- Very dark colors for both MC and CC: the pattern won’t show if there’s no contrast between them
Mosaic Crochet FAQS
Still have questions? Here are the ones I get asked most often about mosaic crochet.
🧶 Is mosaic crochet hard for beginners?
Mosaic crochet is genuinely beginner-friendly as long as you’re already comfortable with single crochet, double crochet, and basic chaining. It shouldn’t be your very first crochet project — you want those foundational stitches to feel automatic before you add chart-reading on top of them. But if you’ve got a few finished projects under your belt and you’re looking for something that feels more advanced without actually being advanced, mosaic crochet is a perfect next step. The mug rug pattern in this post is exactly that — a quick, low-stakes project designed to get you comfortable with the technique before you tackle a bigger one.
🧶 What’s the difference between mosaic crochet and tapestry crochet?
Both techniques create colorwork patterns, but they work very differently. In tapestry crochet, you carry both yarn colors across every row simultaneously and crochet over whichever color you’re not using. This creates a dense, solid fabric—great for bags and items that need structure. Mosaic crochet uses only one color per row, with no carrying across. Instead, the color effect is created by dropping stitches down into rows below. The result is lighter and more drapey than tapestry crochet, and many people find it easier to learn because you’re never managing two yarns at once.
🧶 What stitches do I need to know before trying mosaic crochet?
The short list: single crochet (sc), double crochet (dc), and chaining (ch). That’s genuinely it for most mosaic patterns, including the one in this post. The ‘mosaic double crochet’ (mdc or sometimes written as mtr or tr3d depending on the pattern) is a variation of the standard double crochet — instead of inserting your hook into the current row, you insert it into a stitch two rows below. If you can work a regular double crochet, you can work a mosaic double crochet. It just takes a moment to find the right stitch to anchor into.
🧶 What yarn is best for mosaic crochet?
Smooth, ply-spun worsted-weight yarn is the easiest to start with. You need good stitch definition, meaning individual stitches sit clearly apart, so the mosaic pattern reads cleanly. Wool and wool blends are excellent for stitch definition, and cotton works really well for home decor projects. Avoid fuzzy or halo yarns, as their texture obscures the pattern. And make sure your two colors have strong contrast: light vs. dark, or two colors that read very differently next to each other. A high-contrast color combo is what makes mosaic crochet look as striking as it does.
🧶 Do I need to cut my yarn after every row in mosaic crochet?
It depends on which method you use. In overlay mosaic crochet, yes — you fasten off and rejoin at the start of every row, which means a lot of ends to weave in at the end. In inset (interlocking) mosaic crochet, you don’t cut at all. You work two rows in one color (a right-side row and a wrong-side row), then simply drop that yarn and pick up the next color, carrying the unused yarn up the side of your work. This is my preferred method and one of the main reasons I recommend it for beginners — fewer ends means less finishing work, and honestly, less frustration.
🧶 How do I read a mosaic crochet chart?
The chart is a grid that maps your stitches color-by-color, row-by-row. Each square represents one stitch. Plain squares mean single crochet in the current row. Squares marked with an X mean mosaic double crochet — worked two rows below rather than into the current row. The color inside each square shows what the finished fabric will look like at that position, not what color yarn you should use for that square. You always work the entire row in the color shown on the chart’s side (usually labeled by row number). Read rows from the bottom of the chart upward, and right to left for right-side rows. I’ve included detailed written instructions alongside the chart below—follow them if the chart feels confusing at first, and use it as a visual check once you get going.
🧶 Can I design my own mosaic crochet pattern?
Yes, and it’s actually more accessible than designing other types of colorwork. Because mosaic crochet works on a simple grid (each square is one stitch, and you’re limited to two colors per project with no mid-row color changes), you can sketch out a pattern on graph paper or use a digital grid tool. The main rule to keep in mind: any X’s (mosaic double crochets) in a given row need to correspond to a chain space from the previous pass in that same color — two rows back. Most mosaic designs are also symmetrical, which simplifies the planning. For a first design attempt, a simple stripe with a geometric repeat is a great starting point.
Let’s Practice Mosaic Crochet!
What you will need:
Crochet Hook:
H (5.0mm)
See some of my favorite crochet hooks here: Best Crochet Hooks.
Yarn:
Lion Brand Color Theory, worsted weight #4 yarn (100% Acrylic,246yds/100g in two colors
Yarn Substitutes:
Herrschners Worsted 8 Yarn – 100% Acrylic, 489yds/226g
Mary Maxim Maximum Value – 100% Acrylic, 474yds/227g
Brava Worsted – 100% Premium Acrylic, 218yds/100g
Lion Brand Pound of Love – 100% Acrylic, 1,020yds/454g
Notions:
Removable Stitch Marker
Scissors
Yarn Needle to weave in ends
Video Tutorial

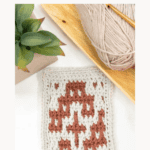
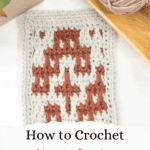
Mosaic Mug Rug Pattern Chart and Written Instructions

Join The Kindest Community
Join our vibrant community of crafters on Facebook today. Whether you enjoy crafting with others or simply have burning questions, we’ve got you covered – join us now!
Row 1:
With MC, ch 16, sc in 2nd ch from hook and in each stitch across, turn. 15 sc
Row 2:
Ch 1, sc in each across.
Row 3:
With CC, ch 1, sc 1, ch 1, skip 1, sc 1, ch 2, skip 2, sc 5, ch 2, skip 2, sc 1, ch 1, skip 1, sc in last, turn.
Row 4:
Ch 1, sc 1, ch 1, skip ch sp, sc 1, ch 2, skip ch-2 sp, sc 5, ch 2, skip 2 chain sps, sc 1, ch 1, skip ch sp, sc in last, turn.
Row 5:
With MC, ch 1, sc 1, mdc 1, sc 1, mdc 2, (ch 1, skip 1, sc 1) twice, ch 1, skip 1, mdc 2, sc 1, mdc 1, sc in last, turn.
Row 6:
Ch 1, sc 5, (ch 1, skip ch sp, sc 1) twice, ch 1, skip ch sp, sc in last 5, turn.
Row 7:
With CC, ch 1, sc 1, ch 2, skip 2, sc 2, (mdc 1, sc 1) three times, sc 1, ch 2, skip 2, sc in last, turn.
Row 8:
Ch 1, sc 1, ch 2, skip ch sp, sc 9, ch 2, skip ch-2 sp, sc in last, turn.
Row 9:
With MC, ch 1, sc 1, mdc 2, ch 1, skip 1, sc 1, ch 1, skip 1, sc 3, ch 1, skip 1, sc 1, ch 1, skip 1, mdc 2, sc in last, turn.
Row 10:
Ch 1, sc 3, ch 1, skip ch sp, sc 1, ch 1, skip ch sp, sc 3, ch 1, skip ch sp, sc 1, ch 1, skip ch sp, sc 3, turn.
Row 11:
With CC, ch 1, sc 3, mdc 1, sc 1, mdc 1, ch 1, skip 1, sc 1, ch 1, skip 1, mdc 1, sc 1, mdc 1, ch 2, skip 2, sc in last, turn.
Row 12:
Ch 1, sc 1, ch 2, skip ch sp, sc 3, ch 1, skip ch sp, sc 1, ch 1, skip ch sp, sc in last 6, turn.
Row 13:
With MC, ch 1, sc 1, ch 1, skip 1, sc 1, ch 1, skip 1, sc 2, mdc 1, ch 1, skip 1, mdc 1, sc 3, mdc 2, sc in last, turn.
Row 14:
Ch 1, sc 7, ch 1, skip ch sp, sc 3, ch 1, skip ch sp, sc 1, ch 1, skip ch sp, sc in last, turn.
Row 15:
With CC, ch 1, (sc 1, mdc 1) twice, ch 1, skip 1, sc 2, mdc 1, sc 2, ch 1, skip 1, sc in last 4, turn.
Row 16:
Ch 1, sc 4, ch 1, skip ch sp, sc 5, ch 1, skip ch sp, sc in last 4, turn.
Row 17:
With MC, ch 1, sc 1, ch 1, skip 1, sc 2, mdc 1, sc 2, ch 1, skip 1, sc 2, mdc 1, ch 1, skip 1, sc 1, ch 1, skip 1, sc in last, turn.
Row 18:
Ch 1, sc 1, ch 1, skip ch sp, sc 1, ch 1, skip ch sp, sc 3, ch 1, skip ch sp, sc 5, ch 1, skip ch sp, sc in last, turn.
Row 19:
With CC, ch 1, sc 1, mdc 1, ch 1, skip 1, sc 3, ch 1, skip 1, mdc 1, ch 1, skip 1, sc 2, mdc 1, sc 1, mdc 1, sc 1, turn.
Row 20:
Ch 1, sc 6, ch 1, skip ch sp, sc 1, ch 1, skip ch sp, sc 3, ch 1, skip ch sp, sc in last 2, turn.
Row 21:
With MC, ch 1, sc 2, mdc 1, ch 1, skip 1, sc 1, ch 1, skip 1, mdc 1, sc 1, mdc 1, ch 1, skip 1, sc 1, ch 1, skip 1, sc in last 3, turn.
Row 22:
Repeat Row 10.
Row 23:
With CC, ch 1, sc 1, ch 2, skip 2, mdc 1, sc 1, mdc 1, sc 3, mdc 1, sc 1, mdc 1, ch 2, skip 2, sc in last, turn.
Row 24:
Repeat Row 8.
Row 25:
With MC, ch 1, sc 1, mdc 2, sc 2, (ch 1, skip 1, sc 1) twice, ch 1, skip 1, sc 2, mdc 2, sc 1 in last, turn.
Row 26:
Repeat Row 6.
Row 27:
With CC, ch 1, sc 1, ch 1, skip 1, sc 1, ch 2, skip 2, (mdc 1, sc 1) twice, mdc 1, ch 2, skip 2, sc 1, ch 1, skip 1, sc in last, turn.
Row 28:
Repeat Row 4.
Row 29:
With MC, ch 1, sc 1, mdc 1, sc 1, mdc 2, sc 5, mdc 2, sc 1, mdc 1, sc in last, turn.
Row 30:
Ch 1, sc in each st across, turn.

Mosaic Mug Rug Edging
Rnd 1 (RS):
Sl st evenly around the edge of the mug rug (on corners, work a sl st, ch 1, sl st), join.
Rnd 2:
Working in the blo of the slip stitches, sc in each stitch around, on the corners (sc 1, ch 1, sc 1) in the previous chain sp, join.
Finishing
Weave in all ends and block, if necessary.
For more on blocking your crochet work, see this post: How to Block Crochet.
More Mosaic Crochet Patterns to Try
If this mug rug has you hooked on the technique (absolutely intended), here are some of my other mosaic crochet patterns to try next. Each one builds on the same foundational skills—once you’ve got mosaic down, the whole family of patterns opens up.
Pattern |
What It Is |
|
A flowing-wave pattern blanket is one of the most popular mosaic projects I’ve published. Stunning in two-tone neutrals. |
|
|
A full-size throw blanket with a gorgeous star-like motif repeat. Also has a coordinating cardigan pattern. |
|
|
A free inset mosaic blanket with a lotus motif repeat that’s as relaxing to make as it looks on the couch. |
|
|
A free blanket pattern with a cactus motif — great for anyone who wants that southwest-inspired look. |
|
|
A brimmed hat using mosaic crochet — proof that the technique works just as well for wearables as it does for home decor. |
Ready to Try Mosaic Crochet?
Mosaic crochet is one of those techniques that genuinely changes how you look at colorwork. Once you understand that you’re only ever holding one color at a time, and that the chart is just a map — not a mystery — it stops feeling intimidating and starts feeling like a superpower. You can take any two colors from your stash, follow a grid, and end up with something that looks like it took way more skill than it did. That’s a good deal.
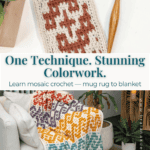
Start small if you need to. The mug rug in this post exists for exactly that reason — a quick, low-stakes project that gets the technique into your hands before you commit to a full blanket. But if you’re already feeling confident after reading through this, go ahead and jump straight to one of the bigger patterns in the list above. The technique is the same whether you’re making a 6-inch square or a king-size throw.
Cheers, and happy crocheting!
Well, That Was Fun! What’s Next?
Well, That Was Fun! What’s Next?