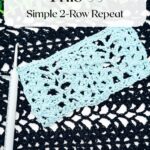


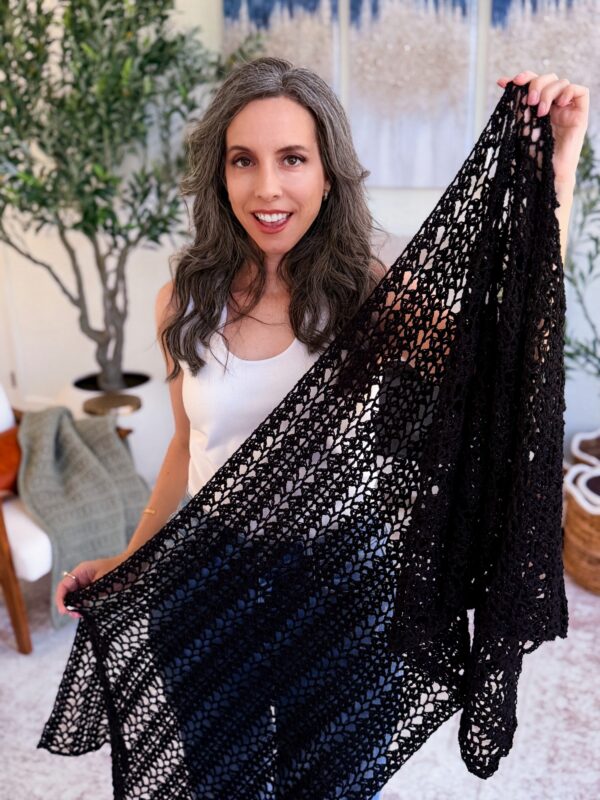
If you’re looking for a crochet stitch that’s light, lacy, and incredibly easy to memorize, the Willow Mesh Stitch might just become your new favorite.
This beginner-friendly stitch pattern uses a simple 2-row repeat to create a soft, openwork fabric with beautiful drape, perfect for wraps, shawls, scarves, and lightweight garments. Whether you’re in the mood for a relaxing project or want something that looks more advanced than it actually is (we love that 👀), this stitch delivers.
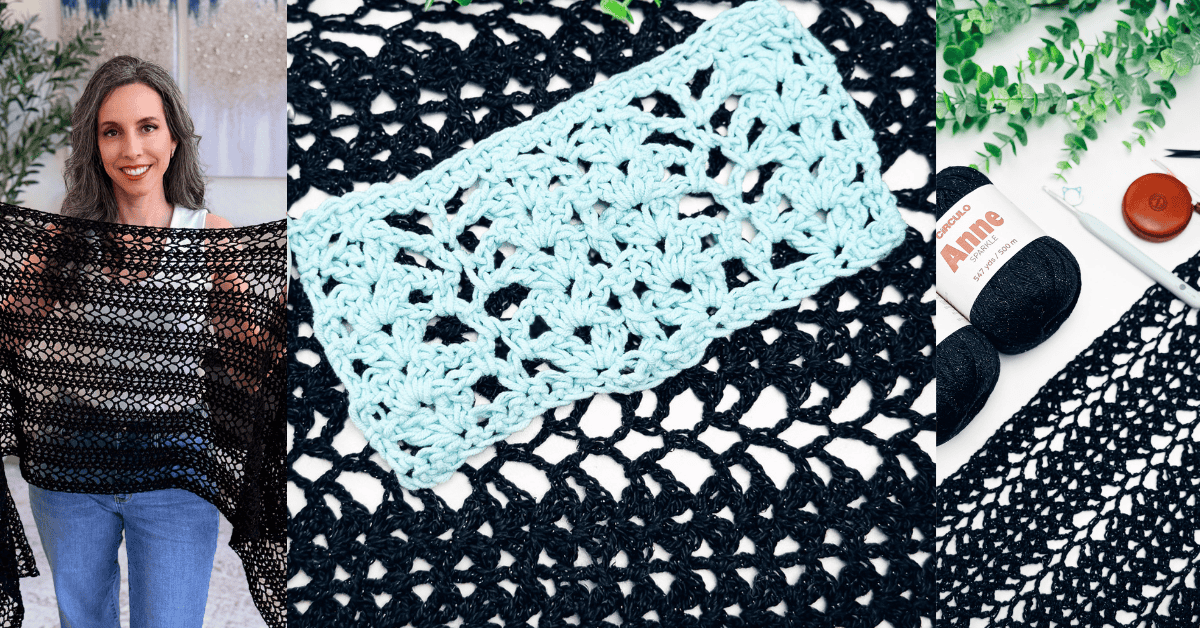
In this tutorial, you’ll learn exactly how to crochet the Willow Mesh Stitch step by step, along with tips for adjusting your size, choosing yarn, and getting that gorgeous, flowy finish. If you’re ready to use this stitch in a project, the Willow Mesh Wrap is perfect, as is the Willow Mesh Market Bag!!
Love learning new stitches? Check out the Petal Loop Stitch tutorial and the Clean SC tutorial!
Disclosure: This post contains affiliate links. Please read my disclosure for more info.
What you’ll love about the Willow Mesh Stitch.

Willow Mesh Crochet Stitch Supplies
Yarn
The sample pattern (Willow Mesh Crochet Wrap):
Circulo Anne Sparkle (in Black)
95.7% Mercerized Brazilian Virgin Cotton/4.3% Metallic Fiber Blend, 575yds/147g
This stitch tutorial + video:
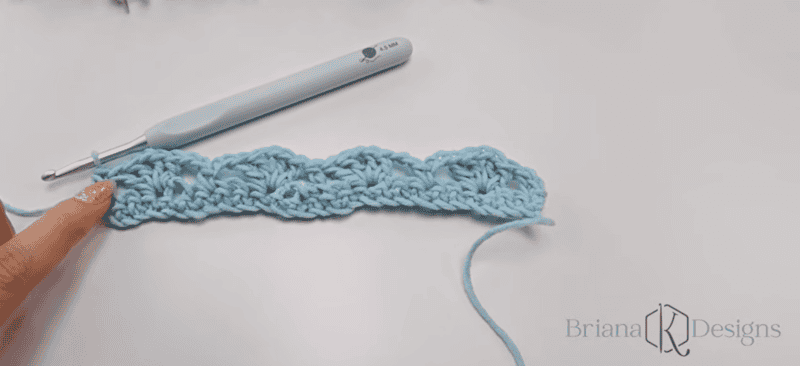
Herrchners Cottage Cotton (in Tame Teal)
60% Cotton/40% Acrylic blend, 207yds / 100g
Yarn Quantities
Will depend on the project. This tutorial will only need a small amount.
Yarn Substitutions
Will vary based on the project chosen.
Remember always to check the gauge and drape when substituting yarns.
Crochet Hook
Size US G+/7 (4.5mm) Crochet Hook or hook to obtain gauge.
Notions
Scissors
Yarn Needle
Cat Removable Stitch Marker
Blocking Mat
Blocking Pins
Skill Level
Sizing
This tutorial walks you through making a small-gauge swatch. The actual size of your project will depend on the pattern you choose.
Abbreviations
bpdc – back post double crochet
ch – chain
dc – double crochet
sc – single crochet
st(s) – stitch(es)
Stsc – Stacked Single Crochet
Gauge
Not critical for this tutorial.
How to Crochet A Gauge Swatch
Working a gauge swatch will let you know if you will have the correct sizing for this pattern. It will also help you practice the stitches used in this project and improve your stitch work for a flawless look.
Are you struggling to match the gauge? Check out the blog post on What is Crochet Gauge and How To Fix It
Construction
The Willow Mesh Stitch is worked flat in rows and built on a repeatable stitch pattern that alternates every two rows. This creates a balanced, open mesh design with a mix of chain spaces, double crochet stitches, and textured elements that give the fabric structure without heaviness.
The stitch pattern is based on a multiple of 12 + 1, making it easy to adjust your starting chain to suit any project size. Simply add or subtract chains in increments of 12 to make your piece wider or narrower.
As you work, the pattern creates a repeating sequence of:
- Open chain spaces for that airy feel
- Clustered stitches for visual interest
- Gentle structure that helps the fabric hold its shape
Light blocking is recommended to open up the lace and enhance the stitch definition, giving your finished piece a polished, professional look.
If you love lacy and light wraps, take a look at the Fisherman’s Wharf Shawl, the On the Bias Suzette Shawl, and the Boho Pineapple Wrap!
Special Stitches
Stacked Single Crochet (Stsc): Do NOT chain, insert hook into next stitch, yo, pull up a loop, yo and pull through both loops, insert hook in the vertical bar below, yo, pull up a loop, yo and pull through both loops on the hook.
Back Post Double Crochet (BPdc): Yo, insert hook from back to front to back around the post of the indicated st, yo, pull up a loop (3 loops on hook), yo, pull through 2 loops, yo, pull through remaining 2 loops.
Pattern Notes
- This pattern substitutes a traditional chain 2 on the edges for a Stacked Single Crochet.
A ch 1 at the beginning of a single crochet row is unnecessary. - For helpful hints about blocking, visit this post: https://brianakdesigns.com/all-about-blocking-your-crochet-projects-the-secret-to-a-professional-finish/
- This Pattern Uses Standard US Terminology. I use affiliate links and follow GPSR Compliance: privacy & disclosure.
❓ FAQs
Is the Willow Mesh Stitch beginner-friendly?
Yes! This stitch uses basic crochet stitches and a simple 2-row repeat, making it great for beginners who are ready to try something new.
What can I make with the Willow Mesh Stitch?
This stitch is perfect for:
- Crochet wraps and shawls
- Lightweight scarves
- Summer tops and layering pieces
- Decorative home items like table runners
What yarn works best for this stitch?
You can use any yarn weight, but lighter yarns like fingering or sport weight will create a more open, lacy look. Heavier yarns will produce a denser, cozier fabric.
Does gauge matter for this stitch?
Gauge is not critical unless you’re making a fitted project. For wraps and scarves, you can easily adjust size by adding or removing repeats.
How do I make the stitch look more defined?
Blocking is key! Lightly blocking your finished piece will open up the lace and enhance the overall drape and stitch definition.
What is blocking?
Blocking can take your finished piece from “just off the hook” to polished and professional. It’s one of those steps that feels optional until you see the difference, and then you never go back. Check out this post for all the information you need: All About Blocking.
Subscribe & Like
Click the box below to unlock this exclusive subscriber content for free. Add your email and create a password. If you are having trouble, reset your password or log in to the Grow Portal.
I’m thrilled to share this amazing crochet pattern with you! Please don’t copy, paste, or distribute this pattern. Prefer an ad-free experience? Purchase a digital PDF file for a small fee from one of my online stores. I appreciate your support and readership. You are why I can keep doing what I love and sharing it with others. Thank you from the bottom of my heart.
Willow Mesh Stitch Written Crochet Pattern Instructions
Note: As we start building the rows of the Willow Mesh Stitch, you will notice that each row begins with a stacked single crochet – this stitch (video tutorial HERE) replaces a traditional ch 3 or double crochet. Because of this, we do NOT need to begin each row with a ch 1.
Row 1:
Stsc in first (mark this stitch to keep track of the top of this beginning stitch of the row), *skip 2 sts, (2dc, ch 1, 2dc) in next, ch 2, skip 2 sts, sc in next, ch 2, skip 2 sts, (2dc, ch 1, 2dc) in next, skip 2 sts, bpdc in next; repeat from * to last st, dc in last, turn. | 33 sts including chains
To break this down a bit step-by-step:
Step 1: Stsc (first stitch of the row).
Step 2: Skip 2 sts; (2dc, ch 1, 2dc) in the next stitch (ALL of those sts go in the same stitch); ch 2.
Step 3: Skip 2 sts; sc in the next st; ch 2.
Step 4: Skip 2 sts; (2dc, ch 1, 2dc) in the next stitch.
Step 5: Skip 2 sts, bpdc around the next stitch.
Step 6: Skip 2 sts, (2dc, ch 1, 2dc) in the next stitch; ch 2.
Step 7: Skip 2 sts; sc in the next st; ch 2.
Step 8: Skip 2 sts; (2dc, ch 1, 2dc) in the next stitch.
Step 9: Skip 2 sts, dc in the last stitch.
Step 10: Turn.
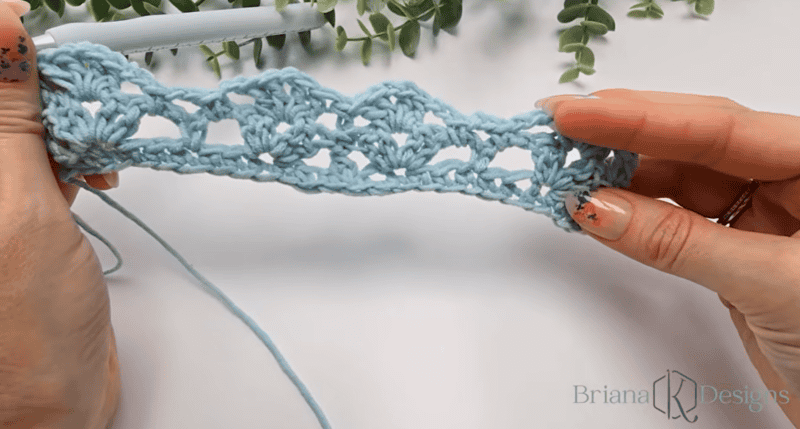
You should have 33 TOTAL stitches (including your chains), and your Row 1 should look like this:
Row 2:
Stsc in first (mark this stitch to keep track of the top of this beginning stitch of the row), *(2dc, ch 1, 2dc) in the next ch-1 space, [ch 2, sc in the next ch-2 space] twice, ch 2, (2dc, ch 1, 2dc) in the next ch-1 space, bpdc in next; repeat from * to last st, dc in last, turn. | 39 sts including chains
To break this down:
Step 1: Stsc (first stitch of the row).
Step 2: Skip 2 sts; (2dc, ch 1, 2dc) in the ch-1 space (the space between the 2dc groups from Row 1); ch 2.
Step 3: Skip 2 sts; sc in the next ch-2 sp; ch 2; sc into the next ch-2 sp; ch 2.
Step 4: Skip 2 sts; (2dc, ch 1, 2dc) in the ch-1 sp from the previous row.
Step 5: Skip 2 sts, bpdc around the next stitch (the bpdc from the previous row).
Step 6: Skip 2 sts; (2dc, ch 1, 2dc) in the next ch-1 space; ch 2.
Step 7: Skip 2 sts; sc in the next ch-2 sp; ch 2; sc into the next ch-2 sp; ch 2.
Step 8: Skip 2 sts; (2dc, ch 1, 2dc) in the next ch-1 sp from the previous row.
Step 9: Skip 2 sts, dc in the last stitch.
Step 10: Turn.
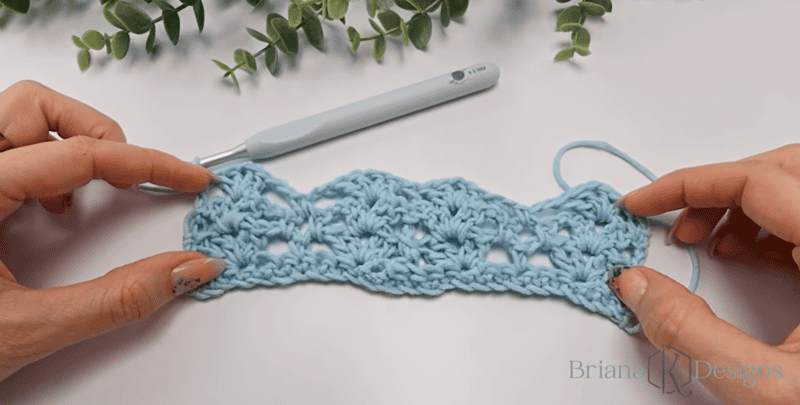
You should have 39 TOTAL stitches (including your chains), and your Row 2 should look like this:
Row 3:
Stsc in first, *(2dc, ch 1, 2dc) in the next ch-1 space, ch 2, skip the first ch-2 space and sc in the next ch-2 space, ch 2, skip the ch 2 space, (2dc, ch 1, 2dc) in the next ch-1 space, bpdc in next; repeat from * to last st, dc in last, turn. | 33 sts including chains
This row is a repeat of what you did for Row 1. The only difference is that now we’re working into the established “lace” stitches (the open spaces created by the chains).
Here’s what your piece should look like after Row 3 (TOTAL st count should be the same as Row 1):
Join The Kindest Community
Join our vibrant community of crafters on Facebook today. Whether you enjoy crafting with others or simply have burning questions, we’ve got you covered – join us now!
Rows 4-11 (or desired length):
Repeat Rows 2-3.
Now, to even things out a bit for a nice, straight edge when you’ve reached your desired length, you’ll do 2 more rows. The first is a simple sc and chain row, and the final row is simply sc.
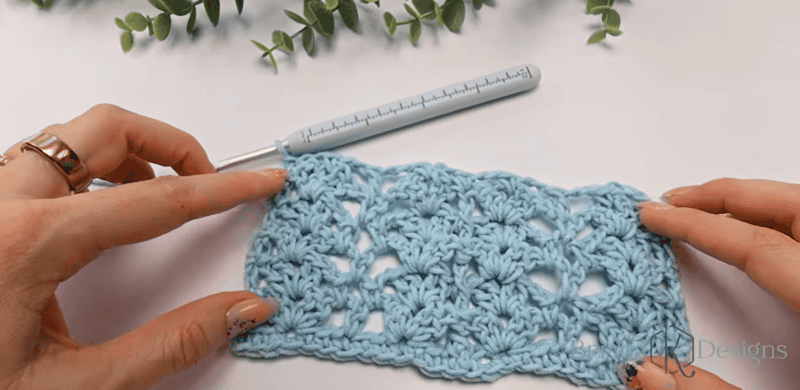
Row 12 (or the next row in your desired length):
Note: I don’t ch 1 before my beginning sc st of a row – I just don’t think it’s necessary, and it adds extra bulk to the edge. If you prefer to, feel free to do so.
Sc in first, *ch 2, sc in the next ch-1 space, ch 2, dc in the next, ch 2, sc in the next ch-1 space, ch 2, sc in the next; repeat from * across; turn.
Here’s what that row looks like. See how we’re starting to straighten out?
Row 13 (or the final row of your project):
Sc in first, sc in each st (including the chs) across, fasten off.
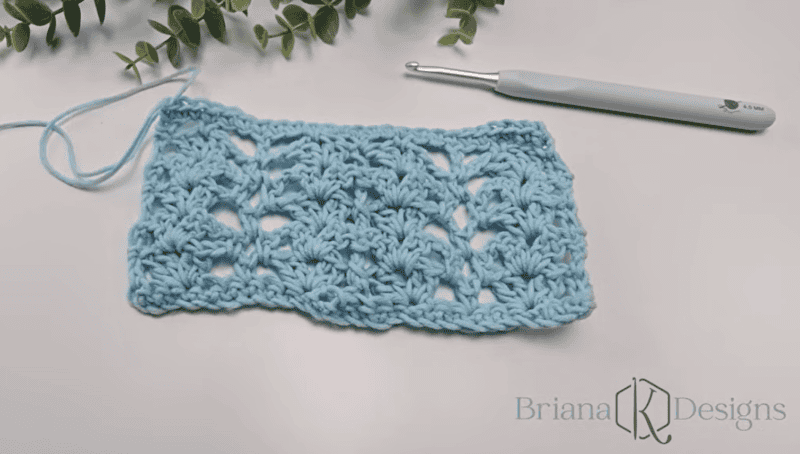
All done! Just fasten off and get ready to finish your piece like the crochet magician you are!
Finishing
Weave in all ends, and prepare to block!
I know, I know. Blocking doesn’t sound fun, but this lace stitch needs to be blocked. As you can see in the image above, the stitches are kind of scrunched together. They’re not open, and the lace doesn’t look defined or drapey. This is why we need to block!
Blocking isn’t hard! To learn all about blocking and how it levels up your projects, check out this post: All About Blocking.
The Willow Mesh Stitch is the perfect combination of ease, relaxation, and beautiful wearability, making it a go-to choice for crochet projects you’ll actually use and love. Whether you’re creating a lightweight wrap, experimenting with new textures, or simply looking for a stitch you can settle into and enjoy, this one is a must-try. And once you get started, don’t be surprised if you find yourself coming back to it again and again… It’s that kind of stitch.
Cheers, and happy crocheting!
Well, That Was Fun! What’s Next?