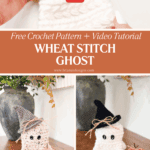

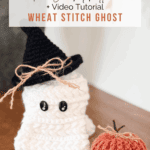
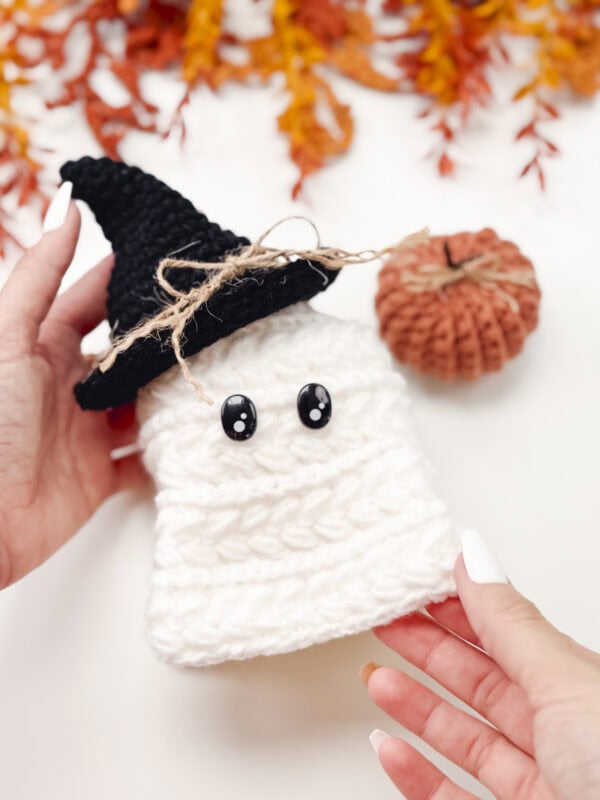
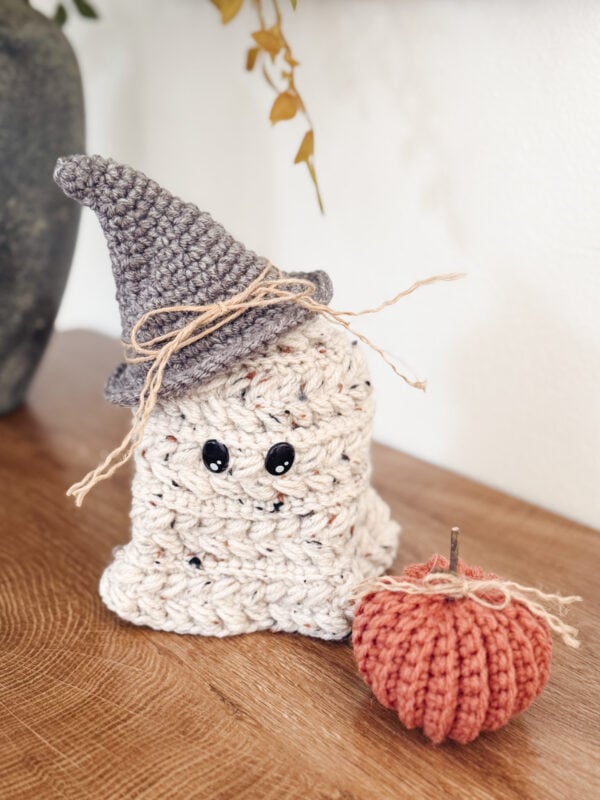
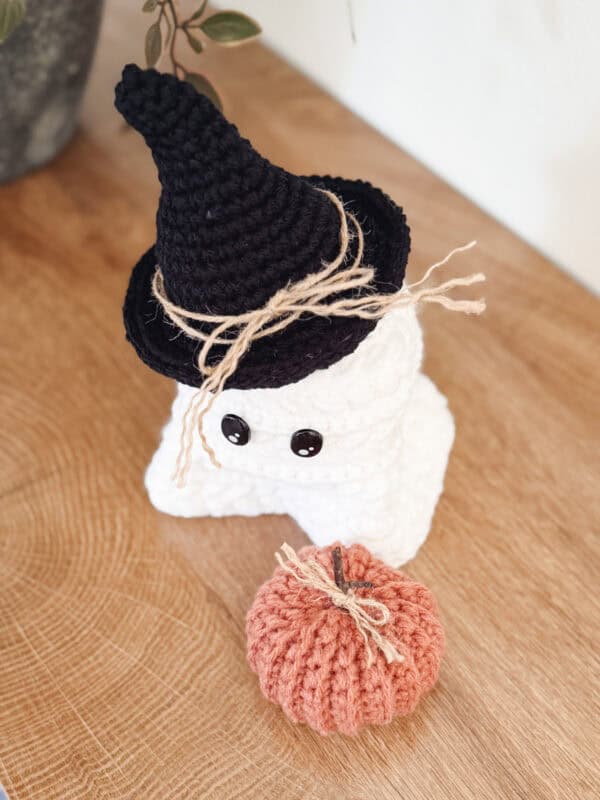
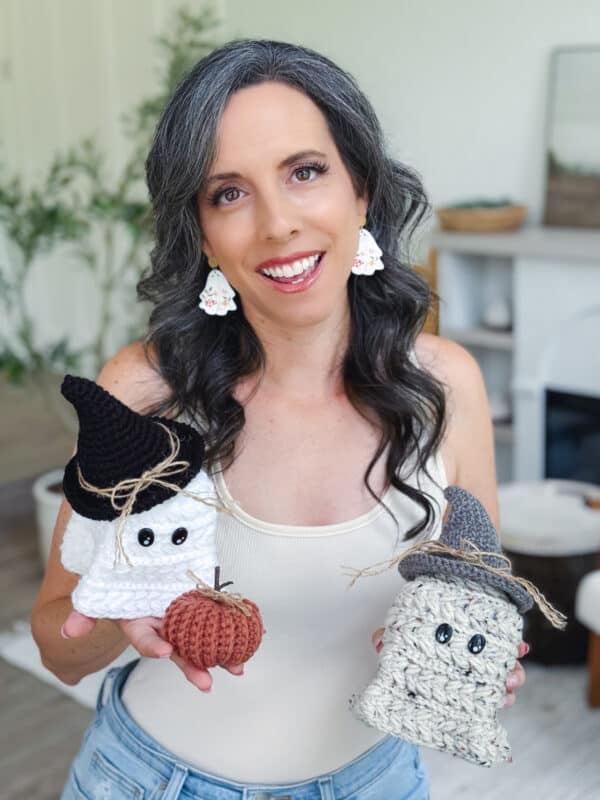
Looking for a spook-tacular free crochet pattern that’s quick, cute, and perfect for decorating this Halloween? Meet the Wheat Stitch Crochet Ghost Amigurumi — an easy Halloween amigurumi project that’s so simple, it’s scary! Whether you’re a seasoned crocheter or just learning how to make amigurumi, this little ghost will lift your spirits and add handmade magic to your spooky décor.
Disclosure: This post contains affiliate links. Please read my disclosure for more info.
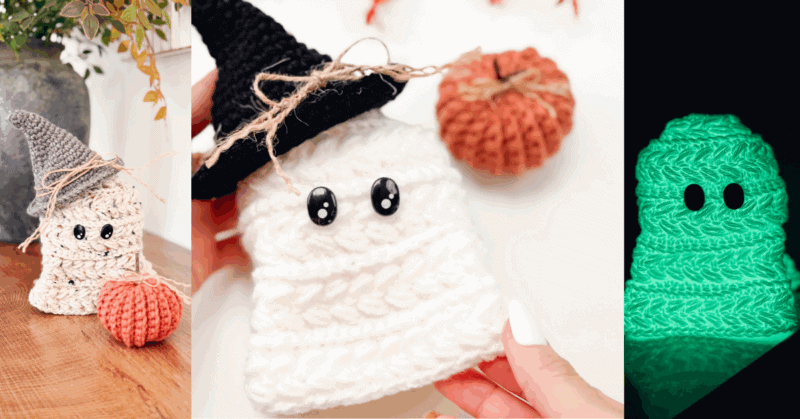
Worked in the round from the top down with my signature wheat stitch, you can make your ghost bottomless for sneaky fairy lights or treats, or stuff it for a huggable haunting buddy. And because no stylish ghost leaves the house without accessories, this pattern also includes a wickedly cute witch hat and a plump pumpkin for the ultimate Halloween vibes.
This free amigurumi pattern is the perfect weekend make for decorating, gifting, or adding a bit of handmade magic to your spooky season. Add some Wheat Stitch Pumpkins, Diamond Granny Pumpkins, or Cinderella’s Pumpkin to add even more texture and whimsy!
Wheat Stitch Ghost Crochet Supplies
Yarn
Herrschners Worsted 8
100% Acrylic, 489yds/226g
Shown in White, Black, and Clay
*You can also purchase smaller quantities of some colors with the:
Herrschners Worsted 3
100% Acrylic, 183yds/85g
Yarn Quantities
Ghost: 110 yds
Hat: 35 yds
Pumpkin: 25 yds
Yarn Substitutions
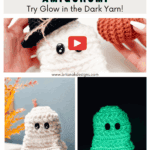
Lion Brand DIY Glow – 100% Polyester, 79yds/60g
Brava Worsted – 100% Premium Acrylic, 218yds/100g
Herrschners My Ami – 55% Acrylic/45% Cotton Blend, 120yds/50g
Red Heart Super Saver Flecks – 96% Acrylic/4% Other Fibers, 236yds/141g
Remember always to check the gauge and drape when substituting yarns.
Crochet Hook
Size US G (4.0mm) Crochet Hook or hook to obtain gauge.
Notions
Scissors
Yarn Needle
Removable Stitch Marker
Fiberfill
Safety Eyes
String for Tags
Skill Level
Advanced Beginner
What you’ll love about this pattern.
? Beginner-Friendly – If you can work in the round, you can make this ghost.
? Two Finishing Options – Open-bottom for lights & treats, or closed & stuffed for a plush ghost.
? Wheat Stitch Texture – Adds a unique, knit-like look that makes your ghost stand out from the crowd.
? Quick Project – Perfect for last-minute Halloween décor or gifting.
? Adorable Accessories – Includes a witch hat & pumpkin for extra spooky style.
One Size
Using suggested yarn, Ghost is approximately 8″ x 5.5″ (Pumpkin is approx 3″ x 2″)
Abbreviations
blo – back loop only
ch – chain
flo – front loop only
RS – right side
sc – single crochet
sc2tog – single crochet two together
sl st – slip stitch
st(s) – stitch(es)
WS – wrong side
Gauge
Not critical for this pattern.
How to Crochet A Gauge Swatch
When making a project with a required gauge, working a gauge swatch will let you know if you will have the correct sizing for this pattern. It will also help you practice the stitches used in this project and improve your stitch work for a flawless look.
Are you struggling to match the gauge? Check out the blog post on What is Crochet Gauge and How To Fix It.
Construction
Here’s how to crochet a ghost using the wheat stitch, step by step:
- Ghost Body – Crocheted in the round from the top down using the wheat stitch for a textured finish.
- Finishing Options – Either leave the bottom open for treats or lights, or close it and stuff for a plush version.
- Witch Hat – Worked in the round from the top down with a slightly flared brim.
- Pumpkin – Crocheted in rows, seamed, and shaped into a plump little accent piece.
- Assembly & Details – Attach accessories, add any optional embellishments, and your ghost is ready to haunt (in the cutest way possible).
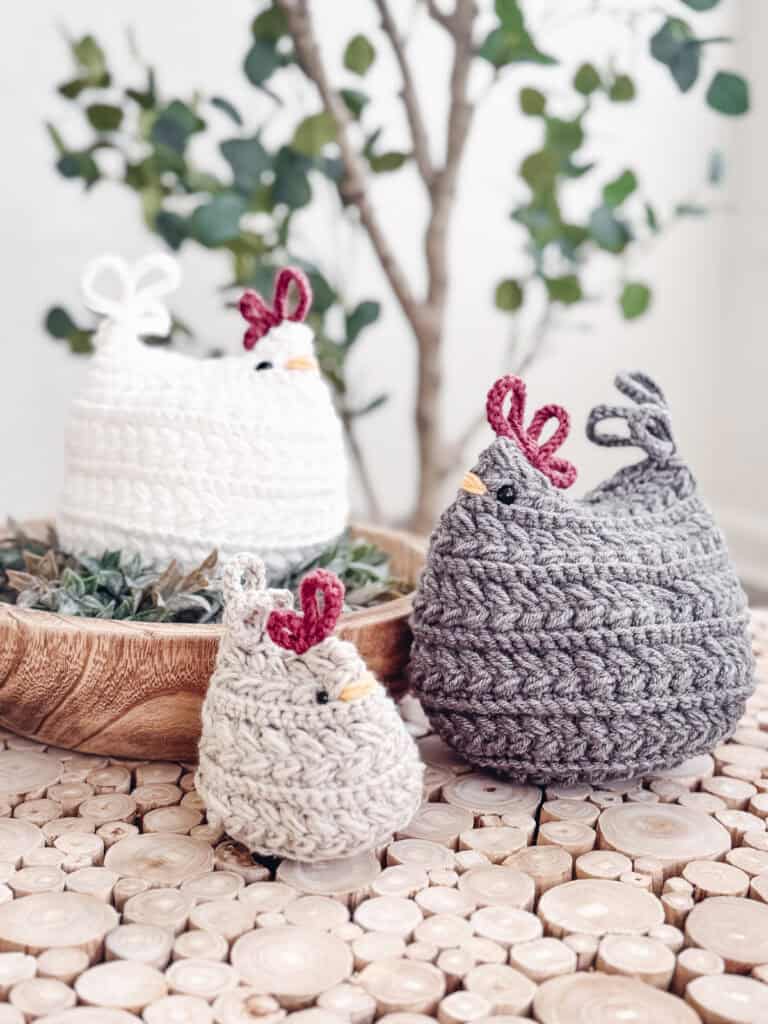
Try making some Wheat Stitch Nesting Baskets or a Braided Wheat Blanket for more wonderfully wheat flair.
Want FREE Printables?
Join the Free Crafters Library as an active email subscriber!
Special Stitches
Puff Stitch: Yarn over and insert your hook into the stitch/space. Yarn over again and pull up a long loop. Yarn over and insert your hook into the same stitch/space. Yarn over again and pull up a long loop (5 loops on the hook). Yarn over and pull through the first 4 loops, yarn over and pull through remaining loops.
Pattern Notes
- Warning: Safety eyes are not suitable for children under three years old, as they can pose a choking hazard if they become detached. Adult supervision is recommended. Feel free to embroider the eyes.
- A ch 1 at the beginning of a row is not counted as a stitch.
- Using a stitch marker at the beginning (or end) of the round is recommended.
- Invisible Join: Cut the yarn, leaving a 6-8 inch tail. Using your yarn needle, insert the needle under both loops of the second stitch of the round. Pull the yarn through gently, then insert the needle back into the center of the last stitch you made, going straight down through the middle (where the yarn exited).
- This Pattern Uses Standard US Terminology. I use affiliate links and follow GPSR Compliance: privacy & disclosure policy here.
Subscribe & Like
FAQ – There’s nothing scary about this pattern (except for how much fun it is!)
Q: What skill level is this pattern?
A: This pattern is great for confident beginners who know how to work in the round.
Q: How long does it take to make?
A: Most crocheters can complete the ghost, hat, and pumpkin in under 3 hours.
Q: What yarn works best?
A: Any yarn! As written, this ghost is worked with a worsted-weight acrylic yarn. But you can use any yarn you prefer!
Q: Can I make it bigger or smaller?
A: Yes! Adjust your yarn weight and hook size to scale your ghost up or down.
Q: Can I sell finished items made from this pattern?
A: Absolutely! Just credit the original pattern link when listing online.
Video Tutorial for the Wheat Stitch Ghost
Relax & Crochet
Upgrade to the Printable PDF
Beautifully formatted to print and relax while crocheting. The paid pattern includes:
The Ad-Free PDF can be purchased on Etsy or Ravelry.
Click the box below to unlock this exclusive subscriber content for free. Add your email and create a password. If you are having trouble, reset your password or log in to the Grow Portal.
I’m thrilled to share this amazing crochet pattern with you! Please don’t copy, paste, or distribute this pattern. Prefer an ad-free experience? Purchase a digital PDF file for a small fee from one of my online stores. I appreciate your support and readership. You are why I can keep doing what I love and sharing it with others. Thank you from the bottom of my heart.
Step-by-Step Written Crochet Pattern Instructions for the Wheat Stitch Ghost
1. Ghost Body
Rnd 1 (WS):
Rnd 14:
Ch 1, blo sc in each st around, join and turn.
Rnds 15-16:
Repeat Rnds 3-4.
Rnd 17:
Ch 1, 2 blo sc in first, blo sc in the next 4 sts, *blo 2 sc in next, blo sc in the next 4 sts; repeat from * around, join and turn. | 72 sts
Rnd 18:
Ch 1, blo sc in each st around, join and turn.
Rnds 19-20:
Repeat Rnds 3-4. Fasten off.
If not stuffing and leaving the bottom open, place safety eyes (or embroider with black yarn) between Rnds 10-11, approx 4-5 sts apart, or as desired.
Join The Kindest Community
Join our vibrant community of crafters on Facebook today. Whether you enjoy crafting with others or simply have burning questions, we’ve got you covered – join us now!
How To Crochet A Ghost Video Part 2
2. Ghost Base
Rnd 1:
Ch 1, inside a Magic Ring sc 6, do not join and work continuously. | 6 sts
Rnd 2:
2 sc in each st around. | 12 sts
Rnd 3:
*2 sc in next, sc in next; repeat from * around. | 18 sts
Rnd 4:
*2 sc in next, sc in next 2; repeat from * around. | 24 sts
Rnd 5:
*2 sc in next, sc in next 3; repeat from * around. | 30 sts
Rnd 6:
*2 sc in next, sc in next 4; repeat from * around. | 36 sts
3. Ghost Base
Working into the unused stitches from Round 17:
Insert your hook through the back loop only (BLO) of the base and the corresponding unworked loop from Round 17. Slip stitch through both layers for the next 9 stitches.
Then:
Insert your hook into the next BLO stitch of Round 17 (do not work into the base for this step). Skip the next 4 stitches, then insert your hook into the following stitch. Yarn over and slip stitch the loops together.
Repeat from * to * around, stuffing the ghost and placing eyes as you go. Be sure to add the stuffing before the opening is completely closed. See below for placement of eyes.
Place the safety eyes (or embroider eyes using black yarn) between Rnds 10 and 11, approximately 4–5 stitches apart, or to your preference.
Fasten off and weave in the remaining end.
4. Pumpkin
With Orange (Clay) Yarn.
Row 1 (WS):
Ch 13, sl st in the 2nd ch from the hook, sc 10, sl st in last, turn. | 12 sts
Row 2 (RS):
Ch 1, blo sl st in the first st, blo sc in the next 10, blo sl st in last, turn.
Rows 3-40:
Ch 1, blo sl st in the first st, sc in the next 10, sl st in last, turn.
Joining and Stuffing:
With the wrong side facing out, slip stitch Row 1 to the current row by working through the blo of the current row and the blo loop from the first row.
Fasten off leaving a long tail. Flip the fabric so the right side is facing out.
Using the long tail and your yarn needle, loop through each point (every two rows) of the pumpkin all the way around. Pull closed and weave in end.
Stuff the pumpkin with fiberfill (don’t overstuff), and keep stuffing as we begin to close the top.
Using your yarn needle, attach a strand of yarn to the top of the pumpkin, loop through each point (every two rows) of the pumpkin all the way around, and cinch the top opening closed around the stem/stick.
How To Crochet A Ghost Video Part 3
5. Witch Hat
Rnd 1:
Inside a Magic Ring sc 4, do not join and work in the round continuously. | 4 sts
Rnd 2:
2 sc in first, sc in next 3. | 5 sts
Rnd 3:
2 sc in first, sc in next 4. | 6 sts
Rnd 4:
2 sc in first, sc in next 5. | 7 sts
Rnd 5:
2 sc in first, sc in next 6. | 8 sts
Rnd 6:
2 sc in first, sc in next 7. | 9 sts
Rnd 7:
2 sc in first, sc in next 8. | 10 sts
Rnd 8:
2 sc in first, sc in next 4, 2 sc in next, sc in next 4. | 12 sts
Rnd 9:
2 sc in first, sc in next 5, 2 sc in next, sc in next 5. | 14 sts
Rnd 10:
2 sc in first, sc in next 6, 2 sc in next, sc in next 6. | 16 sts
Rnd 11:
2 sc in first, sc in next 3, *2 sc in next, sc in next 3; repeat from * around. | 20 sts
Rnd 12:
2 sc in first, sc in next 4, *2 sc in next, sc in next 4; repeat from * around. | 24 sts
Rnd 13:
Sc in each st around.
Rnd 14:
2 sc in first, sc in next 3, *2 sc in next, sc in next 3; repeat from * around. | 30 sts
Rnd 15:
Sc in each st around.
Rnd 16:
2 sc in first, sc in next 4, *2 sc in next, sc in next 4; repeat from * around. | 36 sts
Rnds 17-18:
Sc in each st around.
Rnd 19:
2 flo sc in first, flo sc in next 3, *2 flo sc in next, flo sc in next 3; repeat from * around. | 45 sts
Rnd 20:
Sc in the first 2 sts, *2 sc in next, sc in next 4; repeat from * around until the last 3 sts, 2 sc in next, sc in the last 2 sts. | 54 sts
Rnd 21:
Blo sl st in each st around, fasten off, and use an invisible join.
Use either a ribbon or twine to tie a bow around the base of the hat if desired. To attach the hat to the ghost permanently, sew a few stitches through the brim of the hat and the desired location on the top of the ghost.
Glow Up Tips!
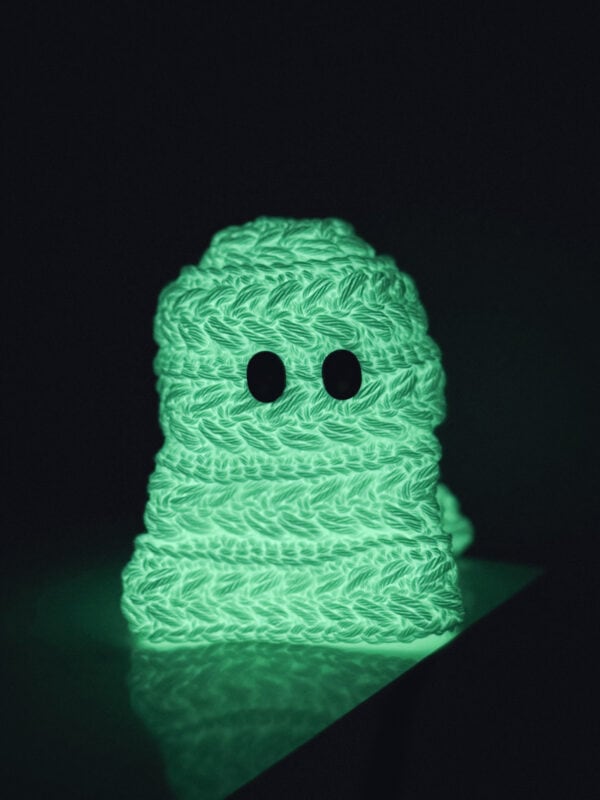
This free ghost pattern was written for worsted-weight yarn, but you can use any yarn you’d like! Make your ghost extra spook-tacular by using glow-in-the-dark yarn, perfect for a friendly fright when the lights go out!
6. Finishing The Ghost
Subscribe to my youtube channel
Fasten off, weave in all ends, and enjoy your spooktacular new friend!
The Wheat Stitch Crochet Ghost Amigurumi is more than just a Halloween decoration — it’s a quick, fun, and versatile project that you can whip up for parties, gifts, or simply to add a little handmade magic to your home. With the option to customize size, finishing style, and colors, every ghost you make can have its own unique personality.
Looking for more Halloween crochet ideas? Check out these designs!
Well, That Was Fun! What’s Next?