Cable & Herringbone Free Baby Bonnet Knit Pattern Collection
In this knit bonnet pattern pack, different textures, like cable stitches and the herringbone stitch, are explored with three different needle sizes. We will also be learning to pick up stitches along the edge of a cable design. Each bonnet has a unique look that is beautiful in any newborn photo session. And if you love knitting for a newborn, you might also enjoy the Blooming Knit Romper & Bonnet Pattern or the Newborn Baby Knit Bunny Free Pattern.
So here is the Newborn Bonnet Knit Pattern Pack Three information below. And if you love making knitted bonnets, check out A Collection of 15 Bonnet Knitting Patterns Free.

Where To Purchase My Ad-Free Downloadable PDF's:
Get all 15 Knit Bonnet Patterns in an E-book

Supplies for the Free Baby Bonnet Knit Pattern Collection:
Knitting Needles:
7 (4.5mm), 8 (5.0mm), and 15 (10mm) needles and can be knitted on Straight Needles, Circular Needles (min 28-inch cord), or DPN’s
Notions:
Stitch Marker
Sewing Needle
Scissors
Cable Needle
Row Counter if needed
Yarn:
Malabrigo Rios Worsted Weight Yarn
Shown in Playa Colorway
Yarn Substitute:
WeCrochet Heatherly Worsted
80% Acrylic, 20% Merino Wool
Abbreviations/Stitches:
CO- cast on
k- knit
k2tog- knit two stitches together
kf&b- knit front and back of stitch
k3tog- knit three stitches together
k1tbl- knit one through the back loop
p2tog- purl two stiches together
p1tbl- Purl one through the back loop
LC- Left Cross (defined below)
p- purl
pf&b- purl front and back of stitch
pm- place marker
RC- Right Cross (defined below)
skpo- slip one knitwise, knit, pass slip stitch over
sk2po- slip one knitwise, knit two together, pass slip stitch over
yo- yarn over
yf- yarn forward
yb- yarn back
Gauge:
4 inches x 4 inches
Bonnet 7: 17 stitches by 21 rows in stockinette
Bonnet 8: 18 stitches by 23 rows in stockinette
Bonnet 9: 19 stitches by 15 rows in pattern
Measurements/Sizes:
All bonnets are an average of 5 ½ inches deep x 5 ½ inches high when blocked; bonnet should only be worn with supervision due to the yarn ties.
Skill Level:
Easy/Intermediate
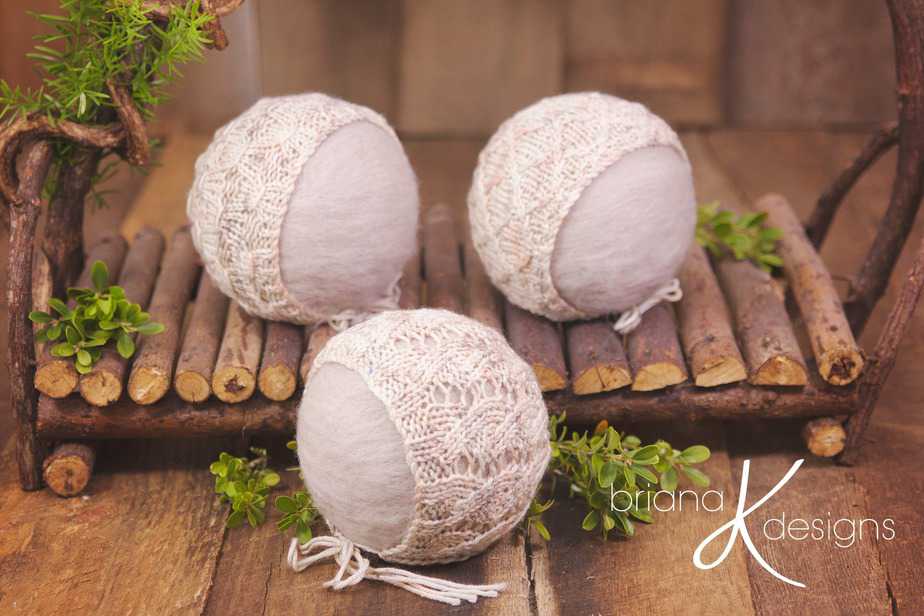
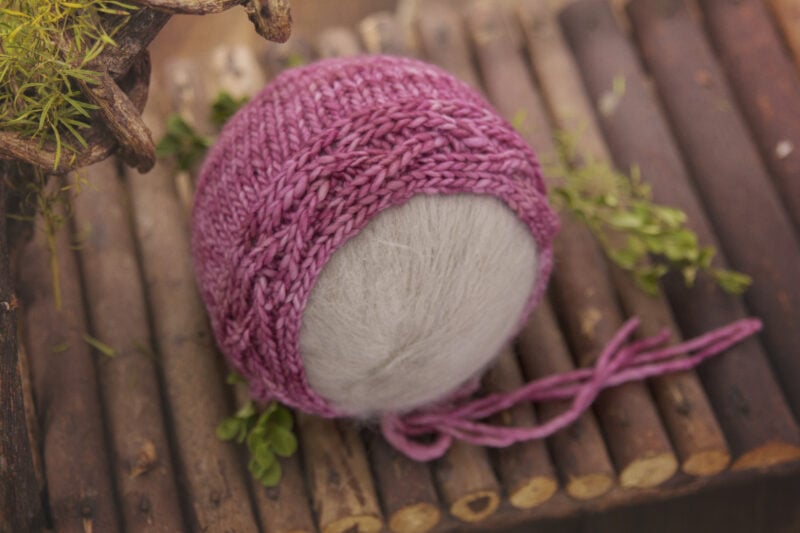
Knitted Bonnet Using The Purse Stitch
Ready to add a touch of elegance to your knitting? Look no further than the Purse Lace Stitch! This one-row repeat is easy to master and creates a beautiful, reversible fabric with a subtle stretch.
The vertical lines give it a classic look, and the combination of purl stitches, yarn overs, and decreases is nothing short of magical.
Plus, it's perfect for a gender-neutral newborn knit baby bonnet - talk about versatile! Give it a try and watch your knitting skills soar.
Newborn Bonnet with Knit Purse Stitch Instructions
Gauge is 17 stitches by 21 rows in stockinette = 4 x 4 inches
7.5mm Knitting Needle
Row 1: Long Tail or Cable Cast On 46 sts.
Row 2: p1, *yo, p2tog; repeat * until last stitch, p1. 46 sts
Rows 3-30: Repeat row 2. 46 sts
Finishing in the Round with Purse Knit Stitch Pattern
Rnd 31: Join and work in the round; p1, *yo, p2tog; repeat until last, leave last unworked (will be worked on next round). 45 sts
Rnd 32: p2tog, *yo, p2tog; repeat * around. 45 sts
Rnd 33: p1, *p2tog, (yo, p2tog) three times; repeat until last 3, p2tog, p1. 38 sts
Rnd 34: p1, *p2tog, (yo, p2tog) twice; repeat * until last, p1. 38 sts
Rnd 35: p1, *p2tog, (yo, p2tog) twice; repeat * until last, p1. 32 sts
Rnd 36: p1, *p2tog, yo, p2tog; repeat until last 3, yo, p2tog, p1. 24 sts
Rnd 37: p1, *p2tog, yo, p2tog; repeat until last 4, p2tog twice. 18 sts
Rnd 38: p2tog around. 9 sts
Fasten off yarn, using a yarn needle weave through final 9 stitches to close opening. Weave in ends.
Finishing in the Round in NO Pattern
Rnd 31: Join and work in the round; k2tog, knit around.45 sts
Rnd 32: *k2tog, k7; repeat * around. 40 sts
Rnd 33: *k2tog, k6; repeat * around. 35 sts
Rnd 34: *k2tog, k5; repeat * around. 30 sts
Rnd 35: *k2tog, k4; repeat * around. 25 sts
Rnd 36: *k2tog, k3; repeat * around. 20 sts
Rnd 37: *k2tog, k2; repeat * around. 15 sts
Rnd 38: *k2tog, k1; repeat * around. 10 sts
Fasten off yarn, using a yarn needle weave through final 10 stitches to close opening. Weave in ends.
Finishing Flat in Purse Stitch Pattern
Row 31: k1, *yo, k2tog; repeat until last 3, yo, k3tog. 45 sts
Row 32: p2tog, *yo, p2tog; repeat * around. 45 sts
Row 33: k1, *(yo, k2tog twice) three times; repeat until last 3, k1, k2tog. 38 sts
Row 34: p1, *p2tog, (yo, p2tog) twice; repeat * until last, p1. 38 sts
Row 35: k1, *(yo, k2tog twice) twice; repeat * until last, k1. 32 sts
Row 36: p1, *p2tog, yo, p2tog; repeat until last 3, yo, p2tog, p1. 24 sts
Row 37: k1, *k2tog, yo, k2tog; repeat until last 4, k2tog twice. 18 sts
Row 38: p2tog around. 9 sts
Fasten off yarn, using a yarn needle weave through final 10 stitches to close opening. Seam bonnet to row 31, weave in ends.
Finishing Flat NO Pattern
Row 31: p2tog, purl across.45 sts
Row 32: *k2tog, k7; repeat * across. 40 sts
Row 33: *p6, p2tog; repeat * across. 35 sts
Row 34: *k2tog, k5; repeat * across. 30 sts
Row 35: *p4, p2tog; repeat * across. 25 sts
Row 36: *k2tog, k3; repeat * across. 20 sts
Row 37: *p2, p2tog; repeat * across. 15 sts
Row 38: *k2tog, k1; repeat * across. 10 sts
Fasten off yarn, using a yarn needle weave through final 10 stitches to close opening. Seam bonnet to row 31, weave in ends.
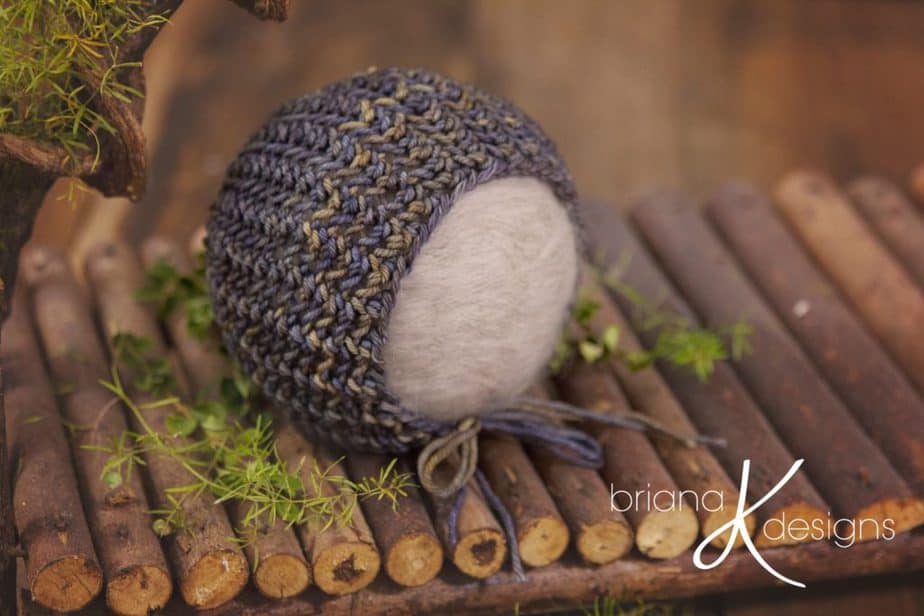
Cable Trim Knit Newborn Bonnet Hat Pattern
Transform your little one into a fashion icon with a trendy twist! Add a touch of flair to your newborn's bonnet with a charming cable trim that's sure to turn heads.
Elevate their style game and keep them cozy and cute in this eye-catching accessory. Don't settle for a plain old hat when you can give your baby the gift of style with a cable-trimmed bonnet!
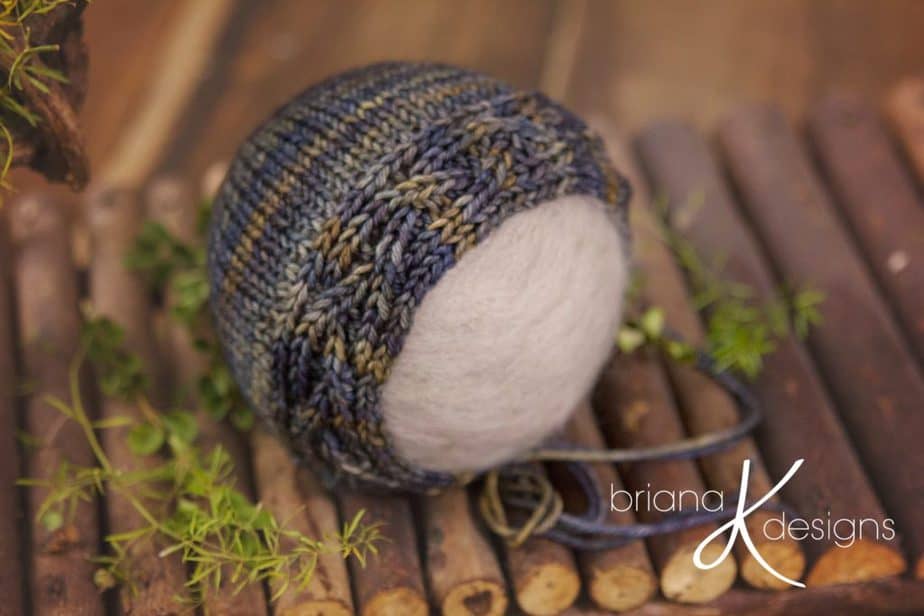
Knitting The Front Cable Trim of the Newborn Bonnet
Gauge is 18 stitches by 23 rows in stockinette = 4 x 4 inches
8 (5.0mm) Knitting Needle
Row 1: Long Tail or Cable Cast On 13 sts.
Row 2: p2, k1, (p1, k2) twice, p1, k1, p1, p1tbl. 13 sts
Row 3: k1tbl, k1, p1, (k1, p2) twice, k1, p1, k2. 13 sts
Row 4: Repeat Row 2. 13 sts
Row 5: k1tbl, (k1, p1) twice, slip 3 stitches to cable needle and hold in front, p1, k1, p1, then from cable needle p1, k1, p1, knit last 2. 13 sts
Row 6: Repeat Row 2. 13 sts
Row 7: Repeat row 3. 13 sts
Row 8: Repeat Row 2. 13 sts
Row 9: k1tbl, k1, slip 3 stitches to cable needle and hold in back, p1, k1, p1, (p1, k1, p1) from cable needle, p1, k1, p1, knit last 2. 13 sts
Rows 10-65: Repeat rows 2-9 six more times. 13 sts
Rows 66-67: Repeat rows 2-3 one more time. 13 sts
Row 68: Bind off knitwise. 13 sts

Front Cable Newborn Bonnet Body
Row 1: With right side of front cable facing, pick up and knit 48 stitches along one edge. 48 sts
Row 2: Purl. 48 sts
Row 3: Knit. 48 sts
Rows 4-5: Repeat rows 2-3 of bonnet body until bonnet measures 4 ½ inches from the front cable edge and continue on to finishing either in the round or flat. 48 sts
Finishing the Cable Bonnet in the Round
Rnd 1: Join and work in the round; *k2tog, k14; repeat * around.45 sts
Rnd 2: *k2tog, k7; repeat * around. 40 sts
Rnd 3: *k2tog, k6; repeat * around. 35 sts
Rnd 4: *k2tog, k5; repeat * around. 30 sts
Rnd 5: *k2tog, k4; repeat * around. 25 sts
Rnd 6: *k2tog, k3; repeat * around. 20 sts
Rnd 7: *k2tog, k2; repeat * around. 15 sts
Rnd 8: *k2tog, k1; repeat * around. 10 sts
Fasten off yarn, using a yarn needle weave through final 10 stitches to close opening. Weave in ends.
Finishing Cable Bonnet Flat
Row 1: *p2tog, p14; repeat * across.45 sts
Row 2: *k2tog, k7; repeat * across. 40 sts
Row 3: *p6, p2tog; repeat * across. 35 sts
Row 4: *k2tog, k5; repeat * across. 30 sts
Row 5: *p4, p2tog; repeat * across. 25 sts
Row 6: *k2tog, k3; repeat * across. 20 sts
Row 7: *p2, p2tog; repeat * across. 15 sts
Row 8: *k2tog, k1; repeat * across. 10 sts
Fasten off yarn, using a yarn needle weave through final 10 stitches to close opening. Seam bonnet to row 1 of finishing flat, weave in ends.
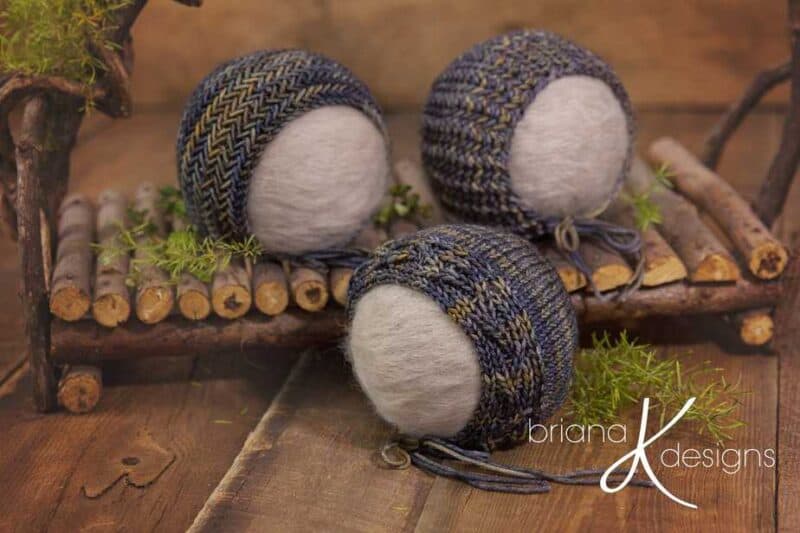
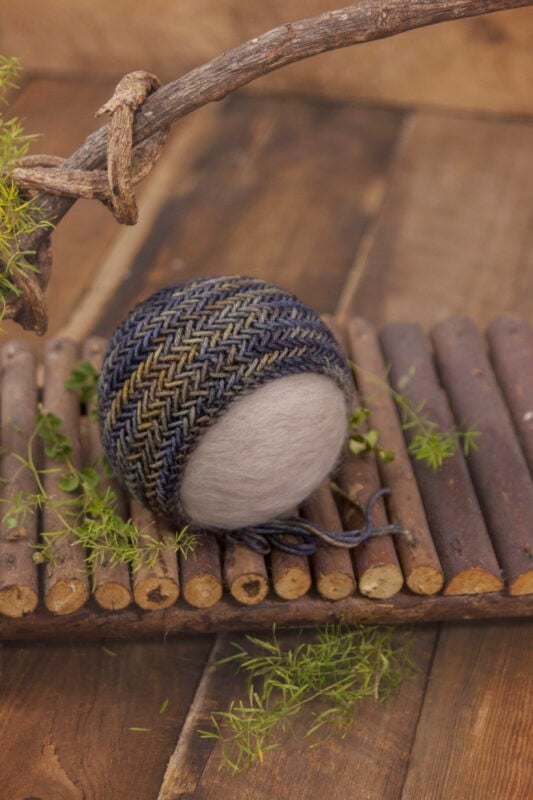
Herringbone Knit Newborn Bonnet Pattern
Looking to add some pizzazz to your knitting? The herringbone stitch is just the ticket! This horizontal cable knit pattern resembles the scales of a fish and creates a beautifully thick, textured fabric.
Though it may look intimidating, fear not! It's a simple stitch that uses basic knit stitches. Just give yourself extra wiggle room with your needles to avoid the stitch becoming too tight.
The result is a strong and sturdy weave that's perfect for home decor projects like pillows and rugs. So why not dive in and create something genuinely fin-tastic? Get ready to reel in some compliments on your stunning creation! (puns intended lol)
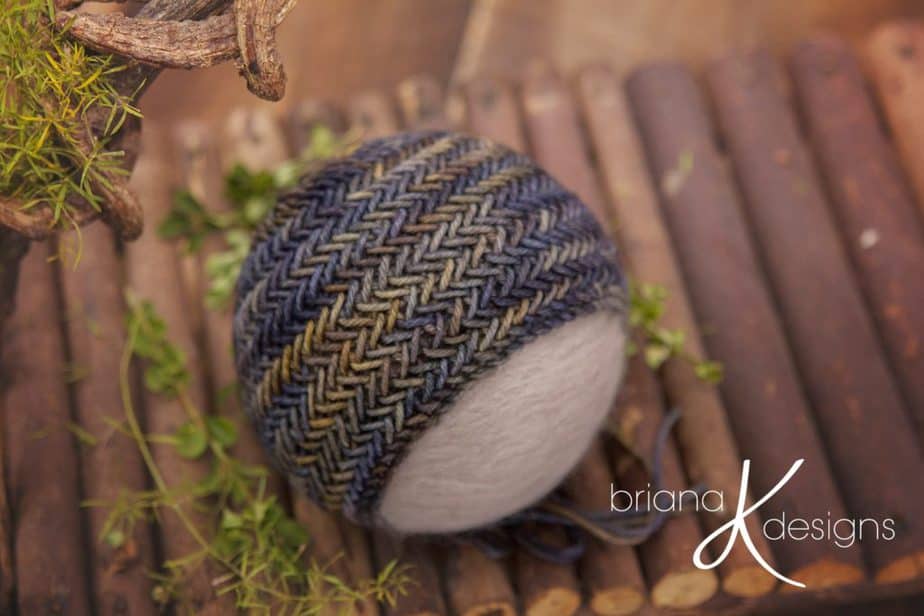
Herringbone Knit Stitch Bonnet Written Instructions
Gauge is 19 stitches by 15 rows in stockinette = 4 x 4 inches
15 (10mm) Knitting Needles
Row 1: Long Tail or Cable Cast On 50 sts.
Quick & helpful video for the Herringbone Knit Stitch: https://youtu.be/RcqJZPq5DNg
Row 2: k2tog tbl (through the back loops) dropping only the first loop off the needle, *k2tog tbl (remaining stitches and next stitch) again dropping only the first loop off the needle, repeat * until last, k1tbl. 50 sts
Row 3: P2tog dropping only the first loops off left needle, *p2tog (remaining stitch and next stitch) again dropping only the first loop of the needle, repeat * until last, p1. 50 sts
Rows 4-15: Repeat rows 2-3 seven more times. 50 sts
Finishing in the Round in Herringbone Stitch Pattern
Rnd 16: *k3tog tbl dropping the first 2 loops off the needle, (k2tog tbl dropping only the first loop off the needle) three times; repeat * until last 4, (k2tog tbl dropping the first loop off the needle) three times, ktbl for last. 40 sts
Rnd 17: Join and work in the round, *k3tog tbl dropping the first 2 loops off the needle, (k2tog tbl dropping only the first loop off the needle) two times; repeat * until last 4, k3tog tbl dropping the first 2 loops off the needle, k2tog tbl dropping the first loop off the needle, ktbl for last. 30 sts
Rnd 18: *k3tog tbl dropping the first 2 loops off the needle, k2tog tbl dropping only the first loop off the needle; repeat * until last 3, k3tog tbl dropping the first 2 loops off the needle, ktbl for last. 20 sts
Rnd 19: *k3tog tbl dropping the first 2 loops off the needle; repeat * until last 2, k2tog. 10 sts
Fasten off yarn, using a yarn needle weave through final 10 stitches to close opening. Weave in ends.

Finishing in the Round NO Pattern
Rnd 16: *k2tog, k3; repeat * around. 40 sts
Rnd 17: Join and work in the round, *k2tog, k2; repeat * around. 30 sts
Rnd 18: *k2tog, k1; repeat * around. 20 sts
Rnd 19: *k2tog; repeat * around. 10 sts
Fasten off yarn, using a yarn needle weave through final 10 stitches to close opening. Weave in ends.

Finishing Flat in Herringbone Stitch Pattern
Row 16: *p3tog dropping the first 2 loops off the needle, (p2tog dropping only the first loop off the needle) three times; repeat * until last 4, (p2tog dropping the first loop off the needle) three times, purl for last. 40 sts
Row 17: *k3tog tbl dropping the first 2 loops off the needle, (k2tog tbl dropping only the first loop off the needle) two times; repeat * until last 4, k3tog tbl dropping the first 2 loops off the needle, k2tog tbl dropping the first loop off the needle, ktlb for last. 30 sts
Row 18: *p3tog dropping the first 2 loops off the needle, p2tog dropping only the first loop off the needle; repeat * until last 3, p3tog dropping the first 2 loops off the needle, purl for last. 20 sts
Row 19: *k3tog tbl dropping the first 2 loops off the needle; repeat * until last 2, k2tog tbl. 10 sts
Fasten off yarn, using a yarn needle weave through final 10 stitches to close opening. Seam bonnet to row 16, weave in ends.
Finishing Flat NO Pattern
Row 16: *p2tog, p3; repeat * across. 40
Row 17: *k2, k2tog; repeat * across. 30
Row 18: *p2tog, p1; repeat * across. 20
Row 19: *k2tog; repeat * across. 10
Fasten off yarn, using a yarn needle weave through final 10 stitches to close opening. Seam bonnet to row 16, weave in ends.
Finishing the newborn bonnet ties.
For each strap of the bonnet to tie around the neck, you can use strands of yarn to create ties or crochet a chain for the steps.
Another option could also be an i-cord tie. These baby bonnets with ties should always be worn under supervision.