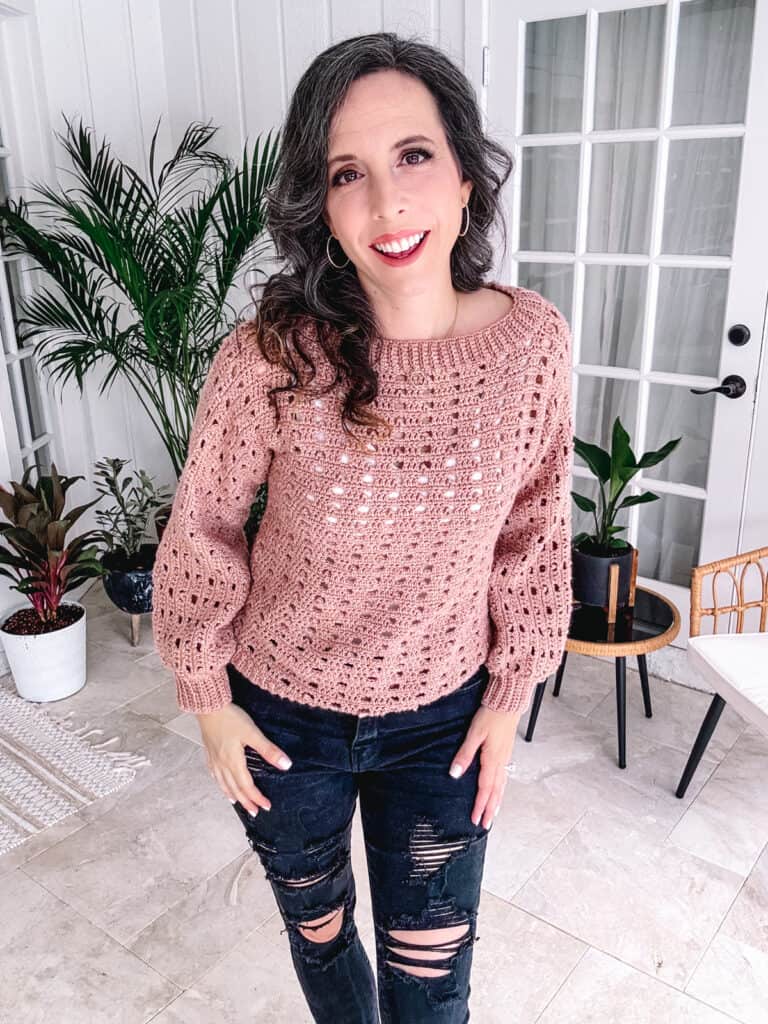
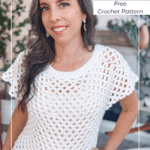
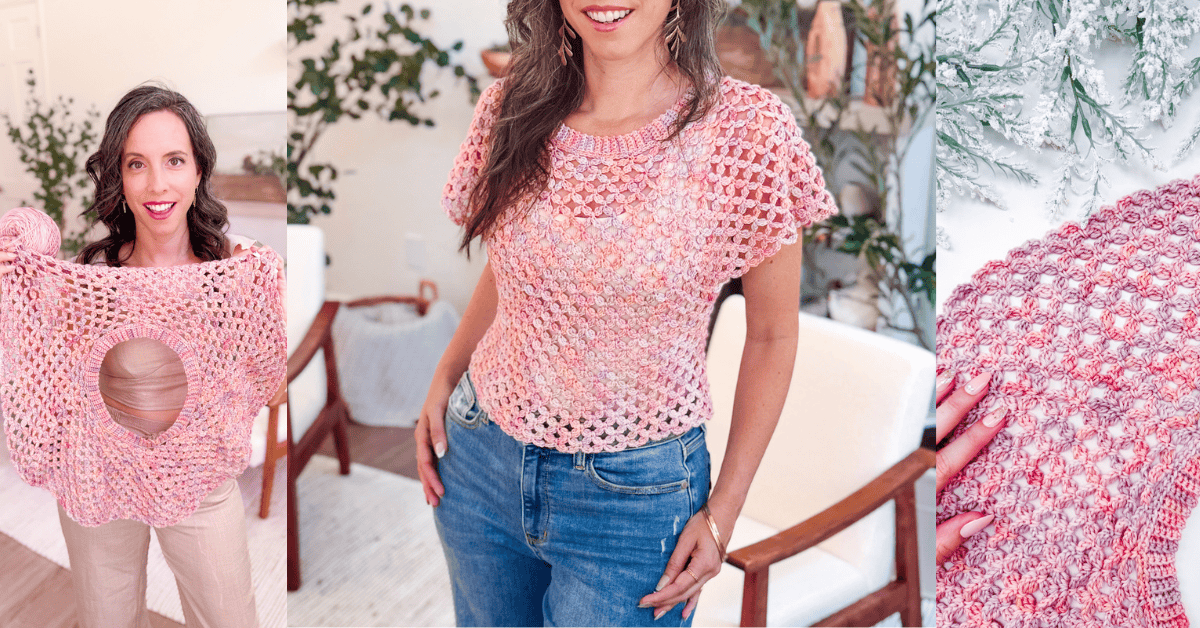
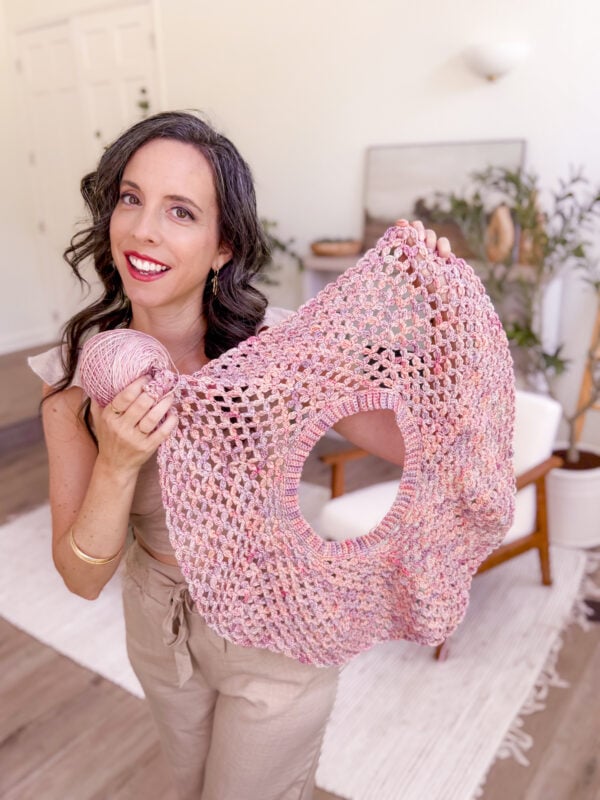
I had fully intended this to be a quick summer project. A few skeins of Malabrigo Arroyo, a couple of evenings, done. And then I tried it on after the yoke and couldn’t put it down. There’s something about working a lace top from the top down where you can actually see it becoming a real garment as you go — and this one surprised me at every stage.
The stitch that makes the Circle Leaf Lace Summer Top is the Circle Leaf Stitch, and if you’ve never tried it before, I have a full tutorial that walks you through it step by step. It looks intricate, but once you get the rhythm of the cluster repeat, it moves fast, which is saying something for a lace garment in sport weight.
Disclosure: This post contains affiliate links. Please read my disclosure for more info.
Like many of my garment patterns, this one runs XS through 5X, and the seamless top-down construction means you can try it on before you’ve even split for the sleeves. No seams, no guessing on fit, no ripping back an entire garment to fix something at the hem.
If you love the look of the Circle Leaf Stitch, make sure to try out the Circle Leaf Water Bottle Holder and the Circle Leaf Plastic Bag Holder! The Circle Leaf Lace Cardigan is also stunning!
Circle Leaf Summer Top Supplies — Yarn, Hook & Notions
Yarn
Colorful Top:
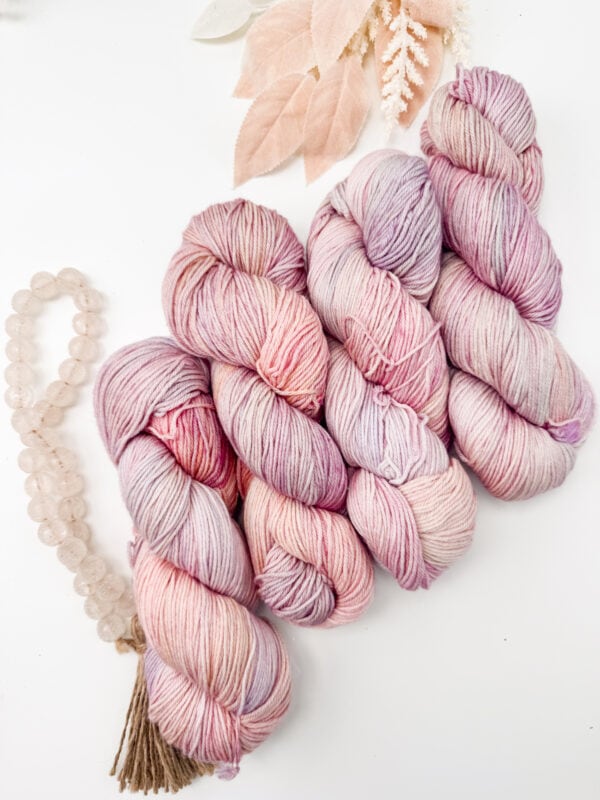
Malabrigo Arroyo
100% Superwash Merino Wool, 335yds/100g
Colorway: Rosalina
White Top:
Comfy Cotton Sport
75% Pima Cotton, 25% Acrylic, 136yds/50g
Yarn Quantities
670 (745, 820, 895, 969) (1043, 1118, 1192, 1229) yds
This includes the yardage for the bottom ribbing; omitting the ribbing will reduce the yardage.
2 (3, 3, 3, 3) (4, 4, 4, 4) hanks of Malabrigo
5 (6, 7, 7, 8) (8, 9, 9, 10) skeins for Comfy Sport
Yarn Substitutions
Cascade 220 Yarn – 100% Pure Peruvian Highland Wool, 220yds/100g
Cotton vs. Wool for a Lace Crochet Top— What’s the Difference?
Both the Malabrigo Arroyo (superwash merino wool) and the WeCrochet Comfy Sport (cotton-acrylic blend) work beautifully in this pattern, but they behave differently and give you a different finished look.
Malabrigo Arroyo gives you incredible stitch definition — the Circle Leaf clusters really pop with the way the plied wool holds its shape. The drape is soft and has a little more body, so the top holds its silhouette well. Because it’s superwash merino, it’s also machine-washable on gentle, which is a real bonus for a garment you’ll wear all summer. The color depth from the hand-dyeing is something cotton just can’t replicate.
WeCrochet Comfy Sport (cotton-acrylic blend) gives you a lighter, cooler hand that’s especially nice in hot weather. Cotton has less elasticity than wool, so the finished top drapes a little more softly — some people love this, others prefer the slightly more structured look of the wool version. Cotton typically needs wet blocking rather than steam, and it takes longer to dry, but the final result is crisp and clean.
Bottom line: if you want rich color and crisp stitch definition, go with a wool or wool-blend sport weight. If you want something cooler and more relaxed to the touch, go with cotton or a cotton blend. Either way, always check your gauge — cotton can run slightly larger than wool at the same hook size.
Remember always to check the gauge and drape when substituting yarns.
Crochet Hook
Size US E (3.5mm) & G (4.0mm) Crochet Hook or hook to obtain gauge.
Notions
Scissors
Yarn Needle
Removable Stitch Marker
Skill Level
Why crochet friends love this summer top
♥️ Seamless Top-Down Construction – No seaming needed, and easy to try on as you go.
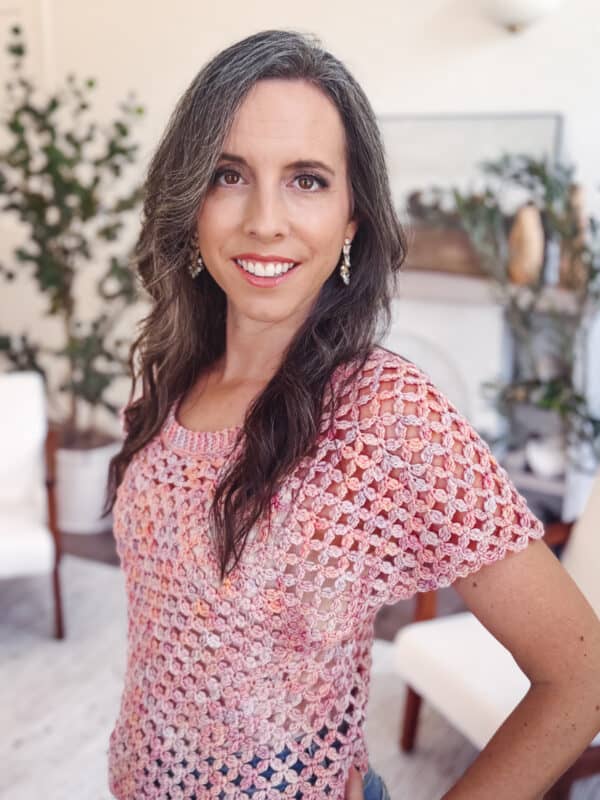
♥️ Lacy Yet Comfortable – Features the textured and airy Circle Leaf Stitch for a light and breathable finish.
♥️ Size-Inclusive Fit – Pattern includes sizes from XS to 5X, with a relaxed, fluttery silhouette that flatters every body.
How to Style a Crochet Lace Summer Top
One of the questions I get most with lace garments is “but what do I wear underneath it?” — and it’s a fair one. The Circle Leaf Stitch has a beautiful openwork pattern, so it works best layered over something. A simple bralette or a fitted cami underneath keeps it wearable while still letting the lace do its thing. For a more covered look, a fitted bodysuit is great because it stays tucked no matter how you move.
For bottoms, I love this top with high-waisted wide-leg pants for a flowy, relaxed look — very beach-day-that-turned-into-dinner. It also works well with high-waisted denim shorts if you’re going for something more casual. Because the silhouette is relaxed and the hem hits around the hip (depending on your size), it pairs naturally with anything that creates a visual waist underneath.
If you’re in a warmer climate (Florida girl here — I know the feeling), this top breathes beautifully. The openwork construction means air can actually move through it, which makes a real difference when it’s 90 degrees and you still want to look put together. Throw it over your swimsuit for a beach-to-lunch transition, or wear it over a slip dress for something a little more dressed up.
Want to complete the whole Circle Leaf look? The Circle Leaf Market Bag was basically designed to go with this top — same stitch, same airy feel, perfect for a farmers market or a beach day.
Sizes
XS (S, M, L, 1X) (2X, 3X, 4X, 5X)
Finished Bust Measurement:
32 (36, 40, 44, 48) (52, 56, 60, 64)”
Abbreviations
blo – back loop only
ch – chain
sc – single crochet
sl st – slip stitch
st(s) – stitch(es)
Stdc – Stacked double crochet
Stsc – Stacked single crochet
tr – treble crochet
yo – yarn over
WS – wrong side
Gauge
8 sts and 8 rows = 4” in circle leaf stitch pattern, unblocked with 4mm hook
How to Crochet A Gauge Swatch
Working a gauge swatch will let you know if you will have the correct sizing for this pattern. It will also help you practice the stitches used in this project and improve your stitch work for a flawless look.
Are you struggling to match the gauge? Check out the blog post on What is Crochet Gauge and How To Fix It
Construction
The free Circle Leaf Crochet Summer Top pattern is worked seamlessly from the top down, starting with a neat neck ribbing that’s joined in the round. From there, you’ll work a shaped yoke with increases to create a comfortable fit through the shoulders and chest. Stitches are then separated for the flutter sleeves and main body, which is crocheted in the round. Finish with an optional ribbed hem for a clean, polished edge.
For more gorgeous summer tops, check out the Granny Summer Top or Dress, the Braided Wheat Easy Summer Top, and the Key Largo Top!
Special Stitches
Stacked Single Crochet (Stsc): Do NOT chain, insert hook into next stitch, yo, pull up a loop, yo and pull through both loops, insert hook in the vertical bar below, yo, pull up a loop, yo and pull through both loops on the hook.
Stacked Double Crochet (Stdc): Do NOT chain, insert hook into next stitch, yo, pull up a loop, yo and pull through both loops, [insert hook in the vertical bar below, yo, pull up a loop, yo and pull through both loops on the hook] twice.
Stacked Cluster (St cluster): *Ch 3, [yo and insert your hook into the 3rd ch from the hook, yo and pull up a loop, yo and pull through two loops] twice, you and pull through all the loops on the hook; repeat from * one more time. (You can find details on this stitch here: How to Crochet the Circle Leaf Stitch)
How to Choose Your Size
Crochet garments work a little differently than ready-to-wear sizing, so let me walk you through it. Start by measuring your full bust (the widest part, tape parallel to the floor) and compare it to the finished bust measurements in the pattern — not your usual clothing size.
This top is designed with positive ease, meaning the finished garment is intended to be larger than your actual bust measurement. That’s what gives it the relaxed, breezy silhouette. Here’s a quick guide for choosing:
For a relaxed, flowy fit (most common): choose a size with 2–4″ of positive ease
For a drapier, more oversized look: choose a size with 4–6″ of ease
For a closer, more fitted look: choose a size with 0–2″ of ease
Example: if your bust measures 38″, a size M has a finished bust of 40″ — that’s 2″ of ease, which gives a nice, relaxed fit. Sizing up to L (44″ finished) gives a looser, more flowing silhouette.
If you’re between sizes or have a fuller bust, I’d recommend going up a size and using the adjustment guidance in the pattern to shift the sleeve placement slightly toward the back — there are notes on exactly how to do this in the “How to Adjust Sizing for a Larger Bust” section of the written pattern.
Circle Leaf Lace Summer Top FAQs
🧶 Is this crochet top pattern good for beginners?
This pattern is listed as Advanced Beginner, which means it’s not a first-ever project, but it’s also not as complicated as it might look. If you’re comfortable with single crochet, slip stitches, and working in the round, you have the skills you need. The Circle Leaf Stitch is a repeating pattern that gets easier with every round — most people find their rhythm within the first two or three repeats. I’d recommend swatching the stitch before you start the full pattern so it feels familiar when you hit the yoke. Not sure where you fall on the skill scale? Check out my crochet skill levels guide.
🧶 How do I crochet a lace summer top like this one?
This top is worked seamlessly from the top down, starting with a neck ribbing that joins in the round. From there, you work a shaped yoke with increases to build the shoulder and chest fit, then separate the stitches for the flutter sleeves and main body. The body is worked in the round in the established Circle Leaf Stitch pattern until you reach your desired length, with an optional ribbed hem at the bottom. The full written pattern — and a complete step-by-step video tutorial — are both in this post.
🧶 How do I adjust the length of this crochet top?
The body is worked in the round after the yoke, so you can add or subtract rounds as needed to achieve the desired length. The pattern gives you reference points — 20 rounds for 10″, 24 rounds for 12″, 28 rounds for 14″ — but you’re not locked in. Try the top on as you go (the seamless construction makes this easy) and stop when it hits the spot. Just account for extra yardage if you’re going longer than the pattern specifies.
🧶 Can I make this top without the ribbed hem?
Yes — the ribbed hem is completely optional. The pattern is written with the ribbing as a finishing option, and the top looks polished either way. If you skip it, finish your last round of Circle Leaf Stitch, then work one or two rounds of single crochet around the bottom edge to give it a clean finish. This is also a good option if you’re running low on yarn.
🧶 How do I wash a crochet lace top?
It depends on your yarn. If you used Malabrigo Arroyo (superwash merino), you can machine wash on a gentle cold cycle — just lay it flat to dry. Never put a handmade crochet garment in the dryer. If you used WeCrochet Comfy Sport or another cotton blend, hand washing in cool water is best to preserve the lace structure. Gently squeeze out the water (don’t wring), then block it flat to dry. Blocking after washing actually helps the lace stay open, and the silhouette stay true — your top will look better after washing if you give it a quick re-block.
🧶 What yarn substitutions work for this pattern?
Any sport-weight yarn with good stitch definition will work. The key things to look for: a smooth, plied construction (not fuzzy or fluffy — it’ll obscure the lace), and a weight that gives you the same gauge (8 sts and 8 rows = 4″ in Circle Leaf Stitch with a 4.0mm hook). The Cascade 220 listed in the pattern is a great wool option. Cotton blends, bamboo-cotton, and mercerized cotton are all good alternatives for a cooler hand. Always swatch first — cotton, especially, can run slightly larger than wool at the same hook size, and sizing matters in a fitted garment.
Pattern Notes
- This pattern replaces the traditional chain 2 at the edges with a Stacked Single Crochet.
A ch 1 at the beginning of a single crochet row is not necessary. - Using a stitch marker at the beginning of each row is recommended.
- The instructions and stitch counts are given for the smallest size, with the larger sizes in brackets ( ). Before you dive into your project, take a moment to identify the stitch and row counts that match the size you’re making. By highlighting or marking them, you’ll save time and effort later on. Trust us, this small step will make a big difference in your crochet journey!
- Established Stitch Pattern: Sc around the center of the St Cluster, St Cluster.
Subscribe & Like
Video Tutorial for the Circle Leaf Lace Crochet Summer Top
Relax & Crochet
Upgrade to the Printable PDF
Beautifully formatted to print and relax while crocheting. The paid pattern includes:
The Ad-Free PDF can be purchased on Etsy or Ravelry.
Click the box below to unlock this exclusive subscriber content for free. Add your email and create a password. If you are having trouble, reset your password or log in to the Grow Portal.
I’m thrilled to share this amazing crochet pattern with you! Please don’t copy, paste, or distribute this pattern. Prefer an ad-free experience? Purchase a digital PDF file for a small fee from one of my online stores. I appreciate your support and readership. You are why I can keep doing what I love and sharing it with others. Thank you from the bottom of my heart.
Written Step-by-Step Crochet Pattern Instructions
Neck Ribbing
With a 3.5mm hook.
Row 1:
Ch 6, sc in the 2nd ch from hook and across, turn. | 5 sts
Join The Kindest Community
Join our vibrant community of crafters on Facebook today. Whether you enjoy crafting with others or simply have burning questions, we’ve got you covered – join us now!
Yoke
Rnd 1:
Sc in first, St Cluster 1, skip 5 sts, *sc in next, St Cluster 1, skip 5 sts; repeat from * around, join to the first st in the rnd with a sl st. | 24 St Clusters + 24 sc sts
Rnd 2:
Sl st to the middle of the St Cluster (Tip: try working sl st on the back of the St Cluster), *sc around the center of the St Cluster, St Cluster, sc in the next sc st, St Cluster, [sc around the center of the next St Cluster, St Cluster] two times; repeat from * around and join. | 32 St Clusters + 32 sc sts
Rnd 3:
Sl st to the middle of the St Cluster, sc around the center of the St Cluster, St Cluster, *sc around the center of the next St Cluster, St Cluster; repeat from * around and join. | 32 St Clusters + 32 sc sts
Rnd 4:
Sl st to the middle of the St Cluster, *sc around the center of the St Cluster, St Cluster, sc in the next sc st, St Cluster, [sc around the center of the next St Cluster, St Cluster] 3 times; repeat from * around and join. | 40 St Clusters + 40 sc sts
Rnd 5:
Repeat Rnd 3.
Rnd 6:
Sl st to the middle of the St Cluster, *sc around the center of the St Cluster, St Cluster, sc in the next sc st, St Cluster, [sc around the center of the next St Cluster, St Cluster] 4 times; repeat from * around and join. | 48 St Clusters + 48 sc sts
Rnd 7:
Repeat Rnd 3.
Rnd 8:
Sl st to the middle of the St Cluster, *sc around the center of the St Cluster, St Cluster, sc in the next sc st, St Cluster, [sc around the center of the next St Cluster, St Cluster] 5 times; repeat from * around and join. | 56 St Clusters + 56 sc sts
Rnd 9:
Repeat Rnd 3.
Size XS Only:
Sl st to the middle of the St Cluster, *sc around the center of the St Cluster, St Cluster, sc in the next sc st, St Cluster, [sc around the center of the next St Cluster, St Cluster] 8 times; repeat from * around, work the remaining spaces in established stitch pattern without increasing and join. | 62 St Clusters + 62 sc sts
Then work 6 additional rnds repeating Rnd 3 and go to next section.
Rnd 10:
Sl st to the middle of the St Cluster, *sc around the center of the St Cluster, St Cluster, sc in the next sc st, St Cluster, [sc around the center of the next St Cluster, St Cluster] 6 times; repeat from * around and join. | 64 St Clusters + 64 sc sts
Rnd 11:
Repeat Rnd 3.
Size Small Only:
Sl st to the middle of the St Cluster, *sc around the center of the St Cluster, St Cluster, sc in the next sc st, St Cluster, [sc around the center of the next St Cluster, St Cluster] 15 times; repeat from * twice, work the remaining spaces in established stitch pattern without increasing and join. | 66 St Clusters + 66 sc sts
Then work 5 additional rnds repeating Rnd 3 and go to next section.
Rnd 12:
Sl st to the middle of the St Cluster, *sc around the center of the St Cluster, St Cluster, sc in the next sc st, St Cluster, [sc around the center of the next St Cluster, St Cluster] 7 times; repeat from * around and join. | 72 St Clusters + 72 sc sts
Rnd 13:
Repeat Rnd 3.
Size Medium Only:
Work 4 additional rnds repeating Rnd 3 and go to next section.
Size Large Only:
Sl st to the middle of the St Cluster, *sc around the center of the St Cluster, St Cluster, sc in the next sc st, St Cluster, [sc around the center of the next St Cluster, St Cluster] 11 times; repeat from * around, work the remaining spaces in established stitch pattern without increasing and join. | 78 St Clusters + 78 sc sts
Then work 4 additional rnds repeating Rnd 3 and go to next section.
Rnd 14:
Sl st to the middle of the St Cluster, *sc around the center of the St Cluster, St Cluster, sc in the next sc st, St Cluster, [sc around the center of the next St Cluster, St Cluster] 8 times; repeat from * around and join. | 80 St Clusters + 80 sc sts
Rnd 15:
Repeat Rnd 3.
Size 1X Only:
Sl st to the middle of the St Cluster, *sc around the center of the St Cluster, St Cluster, sc in the next sc st, St Cluster, [sc around the center of the next St Cluster, St Cluster] 39 times; repeat from * around, work the remaining spaces in established stitch pattern without increasing and join. | 82 St Clusters + 82 sc sts
Then work 2 additional rnds repeating Rnd 3 and go to next section.
Rnd 16:
Sl st to the middle of the St Cluster, *sc around the center of the St Cluster, St Cluster, sc in the next sc st, St Cluster, [sc around the center of the next St Cluster, St Cluster] 9 times; repeat from * around and join. | 88 St Clusters + 88 sc sts
Rnd 17:
Repeat Rnd 3.
Size 2X Only:
Work 2 additional rnds repeating Rnd 3 and go to next section.
Size 3X Only:
Sl st to the middle of the St Cluster, *sc around the center of the St Cluster, St Cluster, sc in the next sc st, St Cluster, [sc around the center of the next St Cluster, St Cluster] 21 times; repeat from * around, work the remaining spaces in established stitch pattern without increasing and join. | 92 St Clusters + 92 sc sts
Then work 1 additional rnd repeating Rnd 3 and goto next section.
Rnd 18:
Sl st to the middle of the St Cluster, *sc around the center of the St Cluster, St Cluster, sc in the next sc st, St Cluster, [sc around the center of the next St Cluster, St Cluster] 10 times; repeat from * around and join. | 96 St Clusters + 96 sc sts
Rnd 19:
Repeat Rnd 3.
Size 4X Only:
Work 1 additional rnd repeating Rnd 3 and go to next section.
Size 5X Only:
Sl st to the middle of the St Cluster, *sc around the center of the St Cluster, St Cluster, sc in the next sc st, St Cluster, [sc around the center of the next St Cluster, St Cluster] 15 times; repeat from * around, work the remaining spaces in established stitch pattern without increasing and join. | 102 St Clusters + 102 sc sts

How to Adjust Sizing For a Larger Bust
To adjust for a larger bust:
When you reach the point where you split for the sleeves and body, this is a great opportunity to modify the fit. To create more space in the front of the garment, shift the armholes slightly toward the back.
How to do it:
Work fewer stitches for the back before starting the first sleeve. This will move the sleeve placement back and add extra room in the front for the bust
Split For Sleeves & Body
Rnd 1:
Sl st to the middle of the St Cluster, *[sc around the center of the St Cluster, St Cluster] 16 (18, 20, 22, 24) (26, 28, 30, 32) times, skip 15 (15, 16, 17, 17) (18, 18, 18, 19) sc & St Clusters; repeat from * around and join. | 32 (36, 40, 44, 48) (52, 56, 60, 64) St Clusters + sc sts for body
Body
Rnd 1:
Sl st to the middle of the St Cluster, sc around the center of the St Cluster, St Cluster, *sc around the center of the next St Cluster, St Cluster; repeat from * around and join. | 32 (36, 40, 44, 48) (52, 56, 60, 64) St Clusters + sc sts for body
Repeat Rnd 1 for 20 rounds for 10 inches, 24 rounds for 12 inches, 28 rounds for 14 inches before bottom ribbing, or for desired length.
How to Adjust Length and Fit
- The body is worked in the round after the yoke, so you can simply add or subtract rounds to achieve your desired length. Try it on as you go to decide whether you want a cropped look, hip length, or longer. Just be sure to account for any additional yardage needed if you’re making it longer.
- The Circle Leaf Crochet Summer Top is designed with a relaxed, breezy fit—perfect for layering. For a more fitted look, select a size with 0–2″ of positive ease. For a looser, drapier fit, choose a size with 4–6″ of positive ease. To find your best fit, measure your bust and compare it to the finished bust measurements provided in the pattern. Don’t forget to try it on as you go, especially after the yoke, to customize the fit before moving on to the body.
Optional Ribbing
With a 3.5mm hook.
Setup Rnd 1:
Sl st to the middle of the St Cluster, *sc around the center of the St Cluster, St Cluster, ch 5; repeat from * around, join.
Setup Rnd 2:
Ch 1 (does not count as a st) sc in each st around, join.
Row 1:
Ch 6, sc in second chain from hook and across remaining chs, sl st 2 sts on the bottom edge (these do not count as sts), turn. | 5 sts
Row 2:
Skip the two sl st sts from the bottom edge, blo sc in each st across, turn.
Row 3:
Ch 1 (turning chain does not count as a stitch, blo sc in each st across, sl st 2 sts on the bottom edge, turn.
Repeat Rows 2-3 around the bottom edge. Join last row to first by slip stitching through the back loops of both rows.
Subscribe to my youtube channel
Finishing
Weave in all ends and block.
How to Block a Crochet Lace Top
Blocking is what takes a crochet lace top from “handmade” to “did you buy that?” — and for the Circle Leaf Stitch in particular, it really opens up the pattern and lets the openwork breathe. Don’t skip it.
For wet blocking: soak your finished top in cool water for about 20–30 minutes until it’s fully saturated, then gently squeeze out the water (don’t wring it). Lay it flat on a blocking mat and shape it to your finished measurements. Use rust-proof blocking pins to open up the lace sections and hold the shape while it dries. Full drying time is usually 24–48 hours, depending on your yarn and humidity.
For the sleeves specifically: if you want that flutter sleeve look, block them more aggressively than the body — pin them out wider and let them dry completely before unpinning. The sport-weight yarn responds really well to this, and you’ll notice a noticeable difference in how it drapes.
If you used Malabrigo Arroyo (superwash merino), you can also steam block it — hover a steam iron over the fabric without touching it, which is faster and works well for a light refresh after wearing. Cotton blends like the WeCrochet Comfy Sport respond better to wet blocking than steam.
Need more blocking details? I have a full guide — All About Blocking Your Crochet Projects — that walks through every method with photos.
More Free Summer Crochet Top Patterns
If you loved the lacy, lightweight feel of this top, here are a few more free summer top patterns you’ll want to bookmark:
Braided Wheat Easy Summer Top — a textured pullover that’s beginner-friendly and works up quickly in sport weight
Granny Summer Top or Dress — classic granny square construction with a modern wearable finish, available as a top or dress
Key Largo Top — another easy, free summer top with a relaxed, breezy silhouette
Hummingbird Cardi — if you want to grab an extra skein while you have your yarn out, this lightweight cardi is the perfect layering piece
Cheers, and happy crocheting!
Well, That Was Fun! What’s Next?